This content has been machine translated dynamically.
Dieser Inhalt ist eine maschinelle Übersetzung, die dynamisch erstellt wurde. (Haftungsausschluss)
Cet article a été traduit automatiquement de manière dynamique. (Clause de non responsabilité)
Este artículo lo ha traducido una máquina de forma dinámica. (Aviso legal)
此内容已经过机器动态翻译。 放弃
このコンテンツは動的に機械翻訳されています。免責事項
이 콘텐츠는 동적으로 기계 번역되었습니다. 책임 부인
Este texto foi traduzido automaticamente. (Aviso legal)
Questo contenuto è stato tradotto dinamicamente con traduzione automatica.(Esclusione di responsabilità))
This article has been machine translated.
Dieser Artikel wurde maschinell übersetzt. (Haftungsausschluss)
Ce article a été traduit automatiquement. (Clause de non responsabilité)
Este artículo ha sido traducido automáticamente. (Aviso legal)
この記事は機械翻訳されています.免責事項
이 기사는 기계 번역되었습니다.책임 부인
Este artigo foi traduzido automaticamente.(Aviso legal)
这篇文章已经过机器翻译.放弃
Questo articolo è stato tradotto automaticamente.(Esclusione di responsabilità))
Translation failed!
Multiple monitors
Up to eight monitors can be configured.
Defining multiple monitors
-
In Device configuration > Display, click Resolution/Layout to open the dialog of the same name.
The field Number of monitors specifies one monitor by default. In the field below, this monitor is represented by a blue monitor icon with the number 1. By default, the first monitor is defined as the primary monitor (see option in the lower section).
For a different setting, see the instructions below.
-
In the Number of monitors list, select how many monitors you want to connect to the devices.
Once you have defined more than one monitor, their possible positions (horizontal and vertical) are shown as gray monitor icons.
-
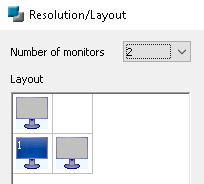
Double-click the gray monitor icon that shows the position of the second monitor.
The selected monitor icon is shown in blue with the number [2].
Note:
Alternatively, right-click a monitor position to assign a monitor to it.
-
If you have specified more than two monitors, double-click the desired gray monitor icons, one after the other.
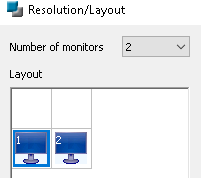
Each of the defined monitors is shown as a blue monitor icon with its number.
-
To automatically adjust the layout after one of the monitors is removed, select the option Automatic layout adjustment.
If the option is not active, the current layout is retained regardless of the actual situation.
Note:
A four-monitor configuration is supported on the following devices: Dell Z50QQ, Hewlett-Packard t620 Plus and Hewlett-Packard t730. A five-monitor configuration is supported on the following devices: Fujitsu FUTRO S940 and Fujitsu FUTRO S9010.
Defining positions of all monitors freely
To define the position of the first monitor, use a new layout.
-
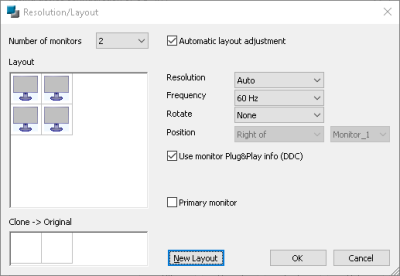
In the Resolution/Layout dialog, in the Number of monitors list, select how many monitors you want to connect to the devices.
The first monitor is shown as a blue monitor icon. For each additional monitor, their possible positions (horizontal and vertical) are shown as gray monitor icons.
-
Click New layout.
For the number of monitors selected, all possible positions are shown as gray monitor icons:
-
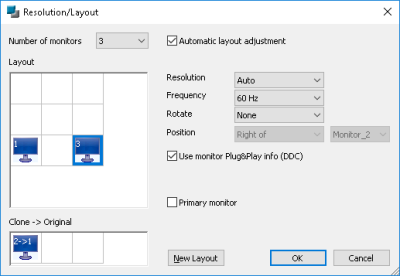
Double-click the desired monitor position for the first monitor. Then, double-click the desired monitor positions of the remaining monitors.
Cloning monitors (Clone mode)
If you have specified more than one monitor, by default the system configures the monitors as extended desktops (one continuous desktop over all monitors). Alternatively, for individual monitors, after having defined them, you can activate the Clone mode (same display on multiple monitors):
- Right-click the last defined blue monitor icon, and from the context menu, choose Clone of [x].
To deactivate the Clone mode, use the New Layout feature (see above).
Key combination for switching between clone mode and extended desktop
– from Scout [15 2101] und [eLux® RP 6 2101] –
- To allow users to quickly switch between the two modes, define the following Advanced file entry for the relevant devices:
| File | /setup/terminal.ini |
| Section | Hotkeys |
| Entry | CloneDisplays |
| Value | <Mod4>p |
| Value |
<Mod4> corresponds to the Windows logo key |
For further information, see Advanced file entries in the Scout guide.
Share
Share
This Preview product documentation is Citrix Confidential.
You agree to hold this documentation confidential pursuant to the terms of your Citrix Beta/Tech Preview Agreement.
The development, release and timing of any features or functionality described in the Preview documentation remains at our sole discretion and are subject to change without notice or consultation.
The documentation is for informational purposes only and is not a commitment, promise or legal obligation to deliver any material, code or functionality and should not be relied upon in making Citrix product purchase decisions.
If you do not agree, select I DO NOT AGREE to exit.