-
-
WebSocket communication between VDA and Delivery Controller™
-
-
Migrate workloads between resource locations using Image Portability Service
-
-
-
-
Multi-site management and user resource aggregation
-
This content has been machine translated dynamically.
Dieser Inhalt ist eine maschinelle Übersetzung, die dynamisch erstellt wurde. (Haftungsausschluss)
Cet article a été traduit automatiquement de manière dynamique. (Clause de non responsabilité)
Este artículo lo ha traducido una máquina de forma dinámica. (Aviso legal)
此内容已经过机器动态翻译。 放弃
このコンテンツは動的に機械翻訳されています。免責事項
이 콘텐츠는 동적으로 기계 번역되었습니다. 책임 부인
Este texto foi traduzido automaticamente. (Aviso legal)
Questo contenuto è stato tradotto dinamicamente con traduzione automatica.(Esclusione di responsabilità))
This article has been machine translated.
Dieser Artikel wurde maschinell übersetzt. (Haftungsausschluss)
Ce article a été traduit automatiquement. (Clause de non responsabilité)
Este artículo ha sido traducido automáticamente. (Aviso legal)
この記事は機械翻訳されています.免責事項
이 기사는 기계 번역되었습니다.책임 부인
Este artigo foi traduzido automaticamente.(Aviso legal)
这篇文章已经过机器翻译.放弃
Questo articolo è stato tradotto automaticamente.(Esclusione di responsabilità))
Translation failed!
Multi-site management and end-user resource aggregation
As a Cloud Administrator of multiple sites, you can designate one site as the primary and link other sites to it for centralized management. This feature helps improve operational efficiency across various aspects:
- Efficient site management. Administrators can manage multiple sites from a single interface, switching between them using the drop-down menu in the upper-right corner.
- Seamless navigation. Administrators can seamlessly switch between Studio and Monitor without needing to reselect the site. When a site is selected in Studio, it’s automatically selected in Monitor, streamlining your workflow.
- Simplified help desk operations. Administrators can view information for all sites in one Monitor console.
- Aggregated end-user resources. End users can sign in to a single Citrix Workspace URL (for example, primarysite.cloud.com) to access their apps and desktops from any linked site.
This article helps you understand, configure, and use centralized site management. It guides you through the following topics:
- Overview
- Cloud administrators: Set up centralized site management
- Administrators: Manage sites from a single interface
- Typical use cases
Note:
Centralized site management is currently not supported for Citrix Service Providers (CSPs) and their tenants.
Overview
The following diagram illustrates the hierarchical primary-secondary architecture in centralized site management.
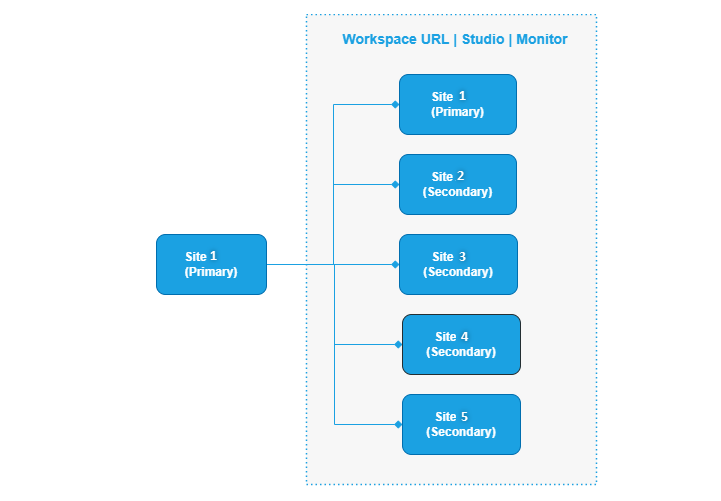
Primary and secondary sites definitions:
- Primary (also known as hub). The central site used to manage all linked sites.
- Secondary (also known as spoke). A site added to the primary site for centralized management.
Administrator roles and permissions
Access to the multi-site management feature varies based on the administrator role:
-
Only administrators with the Cloud Administrator role can set up multi-site management and end-user resource aggregation.
-
After setup:
-
In the Studio console: Multi-site management is available to administrators with Manage Console Access.
- If you’re a primary site administrator with Manage Console Access, you can view a secondary site in the site drop-down list after accessing the primary site. The list includes only secondary sites where you’re an administrator with Manage Console Access.
- Your permissions within each site are determined by your assigned roles and scopes.
For more information, see manage multiple sites from a single Studio UI.
-
In the Monitor console: Multi-site management is available only to administrators with the Help Desk Administrator or the Full Monitor Administrator role.
-
Limitations
- Limit to four secondary sites. For optimal performance in aggregating end-user resources through a single store URL, we recommend adding no more than four secondary sites. For example, exceeding this limit might lead to slow sign-ins in Monitor.
- Regional consistency. For aggregating end-user resources, all secondary sites must be in the same region as the primary site.
Cloud Administrators: Set up centralized site management
As a Cloud Administrator of multiple sites, you can set up centralized site management.
Preparation
Before you begin, you need to:
-
Designate a primary cloud account. Determine a cloud account (also called site) where you centrally manage sites in your organization.
-
Ensure you have the Cloud Administrator role. Ensure that you have the Cloud Administrator role for all sites you want to link for centralized management. For more information, see Add an administrator.
Set up centralized site management
To set up centralized site management, follow these steps:
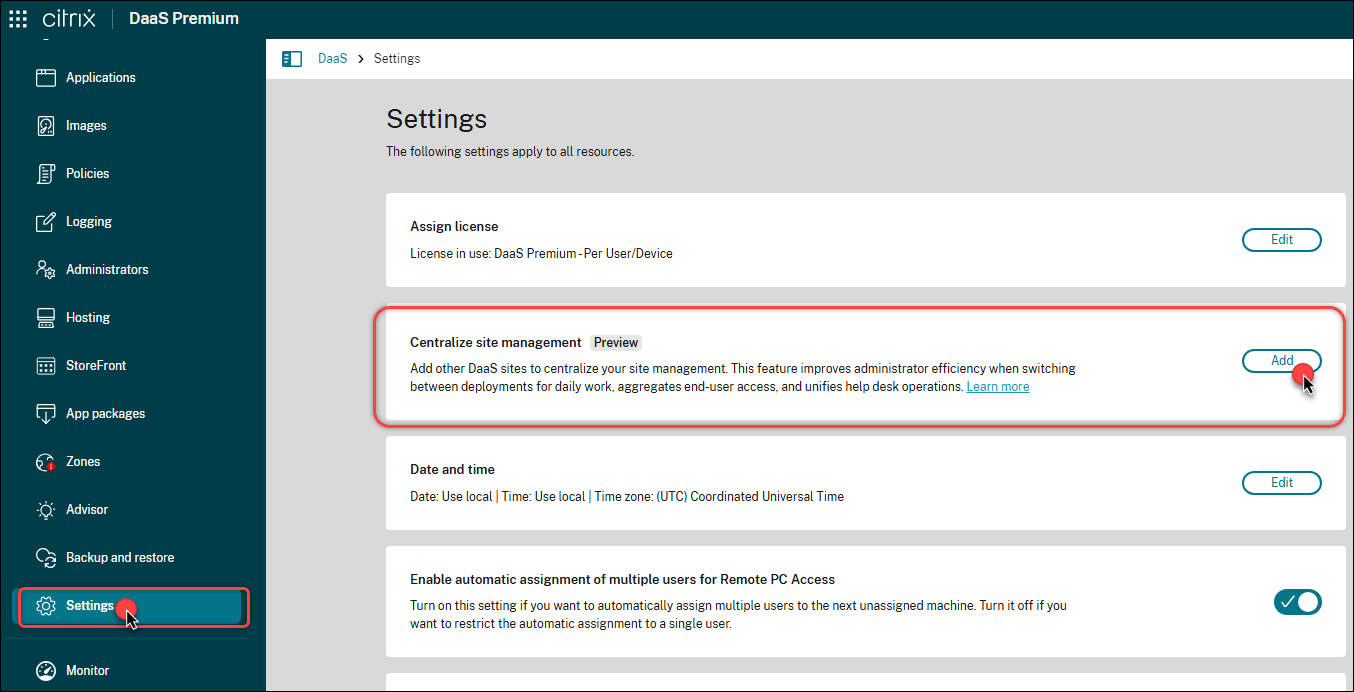
- Sign in to Citrix Cloud™, and then select the cloud account that you want to designate as the primary site.
- Access DaaS to open Studio.
- In the left pane, select Settings.
-
On the Site settings tab, click Add in the Centralize site management tile.
- On the Acknowledge page that appears, select the confirmation checkbox and click Confirm to confirm configuring this site as the primary.
-
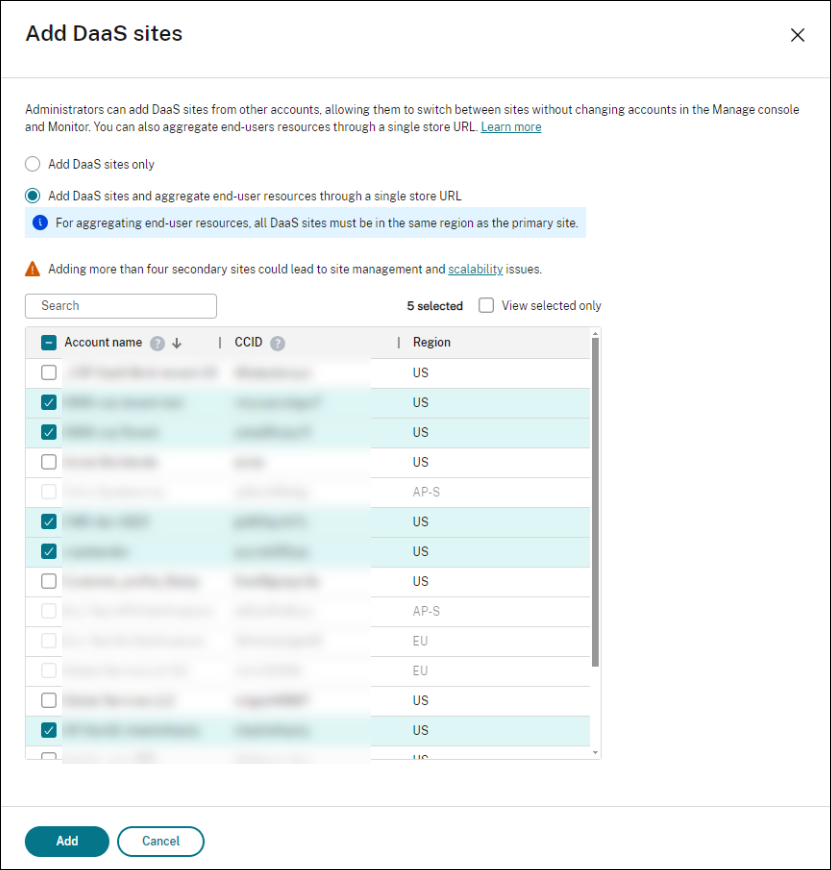
On the Add DaaS sites page that appears, complete the following settings:
-
Select how you want to apply the centralized management:
- Add DaaS sites only. Apply centralized management only to the Studio and Monitor consoles.
- Add DaaS sites and aggregate end-user resources through a single store URL. Apply centralized management to both the Studio and Monitor consoles and the store URL.
-
Select the cloud accounts that you want to add as secondary sites. Only cloud accounts for which you are a Cloud Administrator appear.
Note:
If you chose Add DaaS sites and aggregate end-user resources through a single store URL in the previous step:
- For optimal performance in aggregating end-user resources, we recommend adding no more than four secondary sites.
- Only those sites located in the same region as the primary site are available for selection as secondary sites.
-
Click Add.
-
-
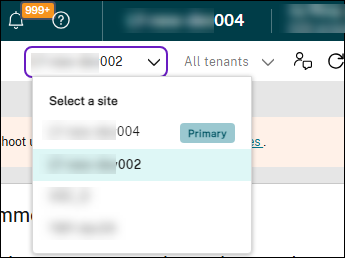
Refresh your browser. The site selection box appears at the top right corner of the console, where this site and its secondary sites appear.
Note
- After setup, multi-site management is available to administrators of the designated primary site, enabling them to manage secondary sites from a single Studio UI without switching accounts. For more information, see manage multiple sites from a single Studio UI.
- You can also enable multi-site management for other sites in the aggregation, designating that site as a primary site.
- Centralized site management isn’t supported for CSPs and their tenants, even though the Add or Manage button on the MANAGE > Settings > Centralize site management tile is enabled.
Add or remove a secondary site
As a Cloud Administrator of the primary site, you can add or remove a secondary site from the centralized site management. Detailed steps are as follows:
- Sign in to Citrix Cloud and select the account name of the primary site.
- Access DaaS to open Studio.
- In the left pane, select Settings.
- In the Centralize site management tile, click Manage.
- On the Manage DaaS sites page that appears, clear the checkbox next to the account you want to detach from the primary site or select the one you want to add to the primary site.
- Click Save.
Note:
When you switch to a secondary site through the primary site, the Manage button on the MANAGE > Settings > Centralize site management tile is disabled.
Administrators: Manage sites from a single interface
After setup, as an administrator of multiple sites, you can manage them from one Studio UI, eliminating the need to change accounts.
Considerations when switching between sites
-
Each site’s configuration is managed separately. Settings from one site don’t merge with another in the Manage menu.
-
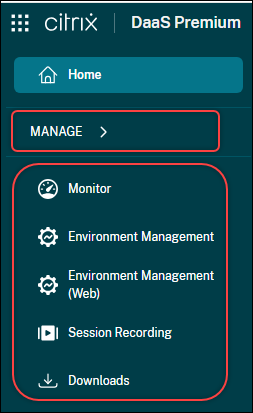
When you are on a secondary site from the primary site:
- Your access to menu items in the MANAGE menu depends on your permissions for the secondary site.
-
Your access to menu items other than MANAGE in the left pane depends on your permissions for the primary site.
Manage sites
To manage sites from a single interface, follow these steps:
- Sign in to Citrix Cloud and select the account name of the primary site.
- Access DaaS to open Studio.
- Select a site as needed from the site drop-down list in the upper-right corner. The drop-down list includes the primary site and any secondary sites where you have an administrator role with Manage Console Access.
- From the left pane, select a node under Manage and start your management. For example, select Machine Catalogs to start creating or managing catalogs for the selected site.
Administrators: Monitor sites from a single interface
After setup, as a Help Desk Administrator or Full Monitor Administrator of multiple sites, you can monitor them from one Monitor UI, eliminating the need to change accounts.
Typical use cases
Centralized site management helps organizations simplify administration and user access across multiple Citrix DaaS™ sites. This section outlines common use cases.
Efficient site administration
Multi-site management simplifies administration. For example, an organization with three DaaS sites can manage them centrally:
- Site A: Development
- Site B: User Acceptance Testing
- Site C: Production
Mergers and acquisitions
Acquiring a new company often results in a complex domain structure, such as multiple FQDN domains from different forests with the same name in a domain trust. A single site might cause resource enumeration or access issues. Multi-site management enables organizations to maintain separate deployments while managing them from a single interface.
End-User resource aggregation
With end-user resource aggregation enabled, users can access apps and desktops from multiple sites through the primary site’s Workspace URL. For example:
- Without aggregation: User 2 must use separate URLs for each site:
- Site 0 Workspace URL to access App 2
- Site 1 Workspace URL to access App 3
- Site 3 Workspace URL to access App 7
-
With aggregation: User 2 accesses all apps through the primary site’s Workspace URL.

Share
Share
This Preview product documentation is Citrix Confidential.
You agree to hold this documentation confidential pursuant to the terms of your Citrix Beta/Tech Preview Agreement.
The development, release and timing of any features or functionality described in the Preview documentation remains at our sole discretion and are subject to change without notice or consultation.
The documentation is for informational purposes only and is not a commitment, promise or legal obligation to deliver any material, code or functionality and should not be relied upon in making Citrix product purchase decisions.
If you do not agree, select I DO NOT AGREE to exit.