Adaptive access based on the user’s network location
The Citrix Workspace™ Adaptive Access feature uses advanced policy infrastructure to enable access to Citrix DaaS™ based on the user’s network location. The location is defined using the IP address range or subnet addresses.
Admins can define policies to either enumerate or not enumerate virtual apps and desktops based on the user’s network location. Admins can also control the user actions by enabling or disabling clipboard access, printers, client drive mapping and so on, based on the user’s network location. For example, admins can set up policies such that users accessing the resources from home have limited access to applications and users accessing the resources from branch offices have full access.
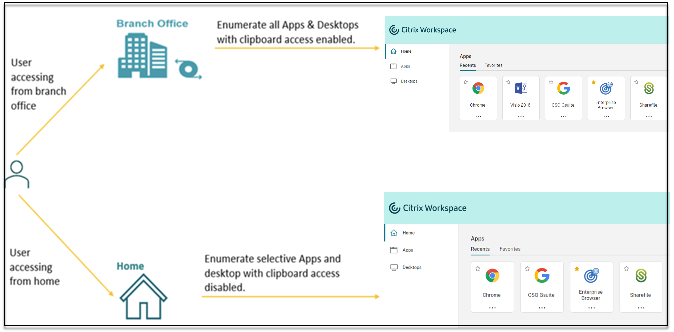
An admin can implement the following policies for accessing the applications:
- Enumerate a few sensitive applications only from corporate location or from their branch offices.
- Do not enumerate sensitive applications if the employees are accessing the workspace from an outside network.
- Disable printer access from the branch offices.
- Disable clipboard access and printer access when the users are outside the corporate network.
Entitlements
The Adaptive Access feature is available as part of Universal Hybrid Multi Cloud License (UHMC) and Platform License (CPL). For more information, see https://www.citrix.com/buy/licensing/product.html.
Prerequisites
-
Ensure that the Adaptive Access feature is enabled (Citrix Workspace > Access > Adaptive Access). For details, see Enable the Adaptive Access feature.
When adaptive access is enabled, the DaaS access policies are updated to use the option Connections through Citrix Gateway.
Note:
NetScaler® Gateway is required to add smart access tags in DaaS access policies. However, because DaaS consumes tags from Device Posture, Adaptive Access, and Adaptive Authentication services, it isn’t necessary to have a configured NetScaler Gateway in your setup.
-
Understanding of location tags. For details, see Network Location tags.
Points to note
The following points are only applicable if you want to restrict application enumeration based on the location. If you plan to use adaptive access to restrict user controls like disabling clipboard access, printer redirection, client drive mapping, based on the network location, you can ignore these guidelines.
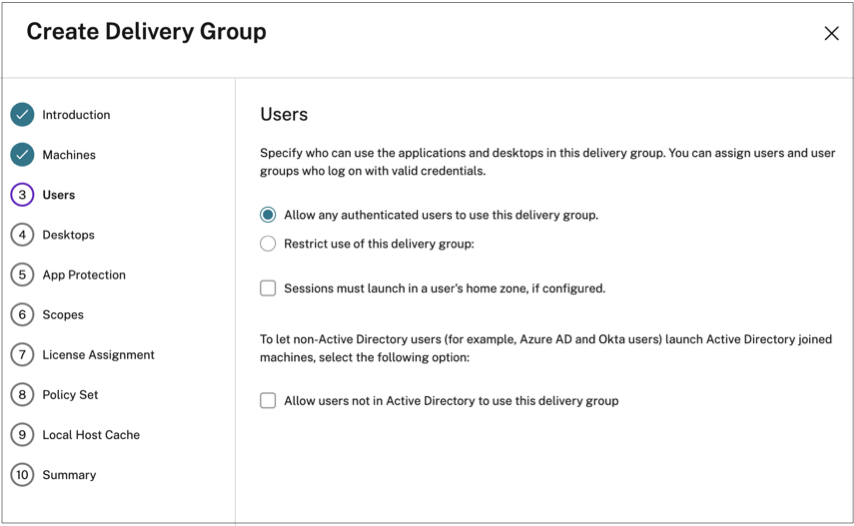
- If you plan to selectively enumerate Citrix DaaS based on network location, then user management must be performed for those delivery groups using Citrix Studio policies instead of workspace. When creating a Delivery group, in Users setting, either choose Restrict use of this Delivery Group users or Allow any authenticated users to use this Delivery Group. This enables you to configure adaptive access in the Access Policy tab under Delivery Group.
-
Changes to Direct Workload Connection when adaptive access is enabled.
- The Location tags field is visible in Citrix Cloud™ > Network Locations > Add a Network Location > Location tags.
- Existing Direct Workload Connection policies work as intended.
- New policies must be created in the Network Locations service (without defining tags) and also on the delivery group. In addition, the network connectivity type must be Internal.
- For new policies for Direct Workload Connection with tags, tags must be defined in the Network Locations service and also the same tags must be defined on the delivery group or access policy in DaaS Studio. In addition, the network connectivity type must be Internal. Location tags aren’t relevant for Direct Workload Connection.
-
The following is recommended testing your Citrix DaaS deployment.
- Identify a test delivery group or create a delivery group to implement this capability.
- Create a policy or identify a policy that can be used with a test delivery group.
Enable the Adaptive Access feature
- Log in to Citrix Cloud.
- Select Workspace Configuration from the hamburger menu.
- Adaptive Access toggle is turned off, by default. Turn the Adaptive Access toggle on.
- Click Yes, enable adaptive access on the confirmation message.
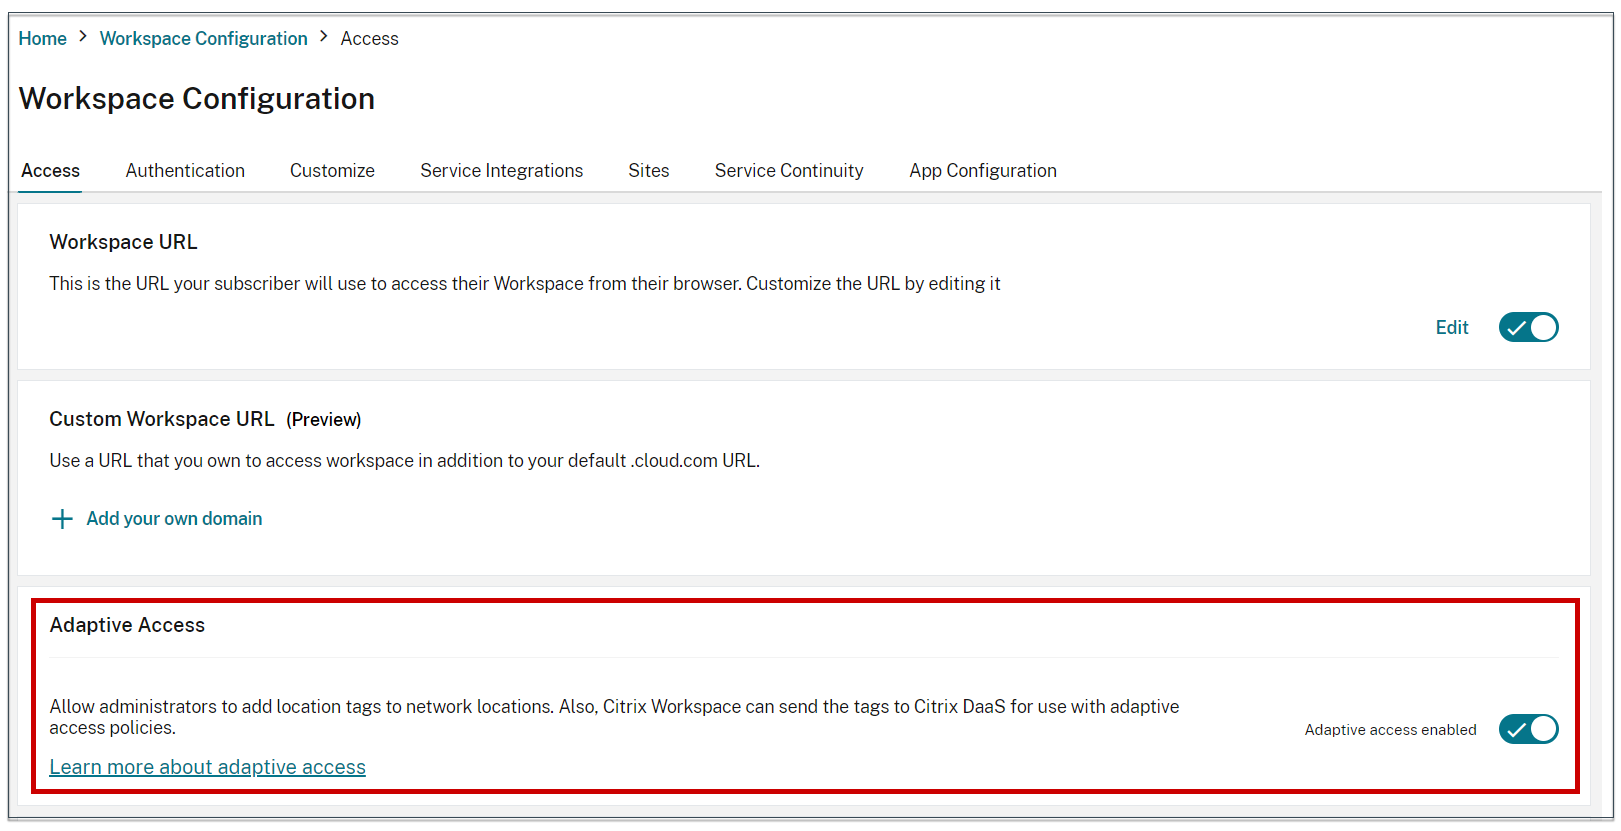
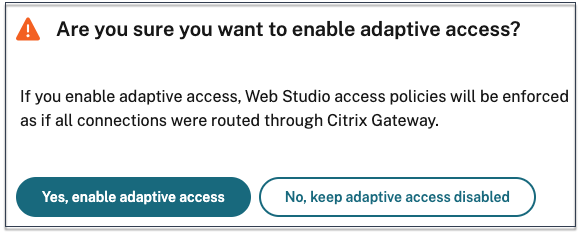
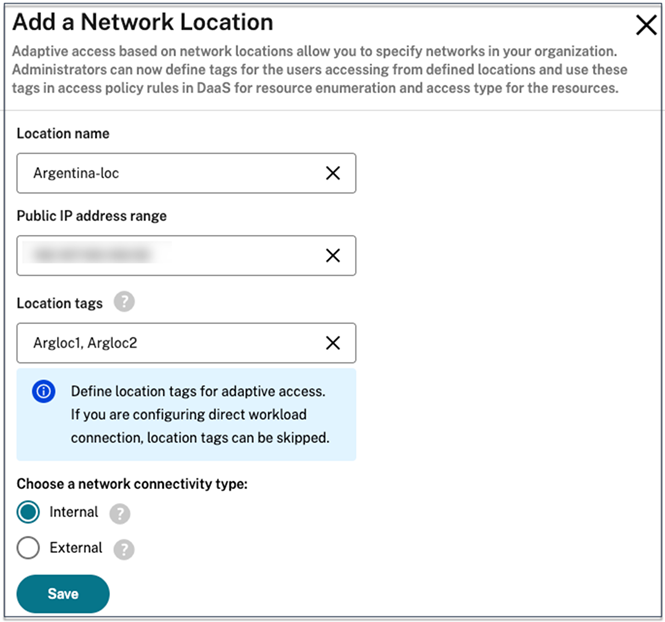
When adaptive access is enabled, you can define the location tags for adaptive access (Citrix Cloud > Network Locations > Add a Network Location > Location tags).
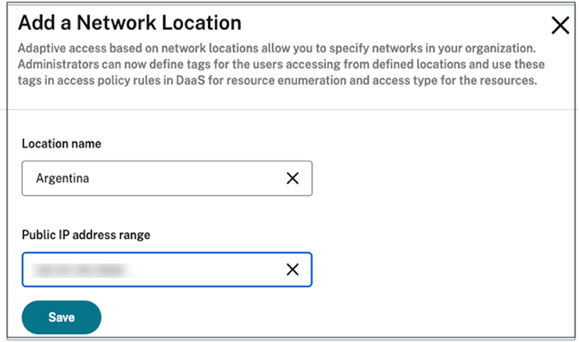
When Adaptive Access is disabled, you can’t add a network location. Location tags aren’t applicable in this case.
Important:
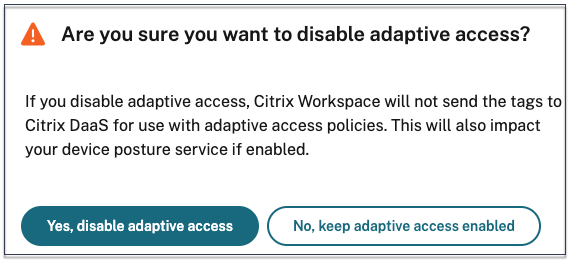
When you try to disable the Adaptive Access feature, the following message appears. Note that Workspace does not send the tags to the DaaS for adaptive access when the feature is disabled.
Configure adaptive access
Consider a scenario where an administrator needs to enforce access control based on the users’ network locations (for example office and home). Admin must also enforce smart controls such as clipboard restrictions for users working from home. To achieve this scenario with Adaptive access, admin must create 2 delivery groups based on the user’s network:
- Adaptive Access delivery group for BranchOffice with applications relevant to branch office users.
- WFH delivery group for WorkFromHome with applications relevant to home/remote users.
After the delivery groups are created, the following high-level steps are involved in configuring adaptive access based on network locations:
- Define tags and configure the network location policies.
- Use the defined tags in delivery groups for application enumeration and or Enforce smart controls on applications.
- Enforce smart controls on applications (optional).
Define network location tags for location-based access
The first step involves defining tags for users based on their locations; office or home.
- BRANCHOFFICE: This tag must be assigned to users connecting from the office network. These users have full access to all applications available to them.
- WORKFROMHOME: This tag must be assigned to users working remotely. These users have limited access to applications and certain features (like clipboard functionality).
For more information about tags, see Network Location tags.
Now that you have the delivery groups and respective tags created based on user location, you can proceed to network location policy configuration.
Configure the network location policies
Define network location policy rules for your user’s location by providing the public source IP address and location tag.
- Sign into Citrix Cloud.
- Select Network Locations from the hamburger menu. Ensure that the Adaptive Access toggle is enabled. Else the user interface for the Direct Workload Connection is displayed.
-
Click Add network location.
-
Location name: Enter an appropriate name for the policy.
Example: BRANCHOFFICE or WORKFROMHOME
-
Public IP address range: Define the public IP address range for your network.
Example: 192.0.2.10 - 192.0.2.30
-
Location Tags: Define tags for your location. This can be a name referring to your location. These tags are used to configure the adaptive access policies in Citrix Studio. For details, see Define tags in Citrix Studio.
Example: BRANCHOFFICE or WORKFROMHOME
-
Connectivity type: Define the application launch type.
Internal - Bypass gateway for application launch. External - Use Citrix Gateway service or traditional gateway for application launch.
-
- Click Save.

You can now use these tags on DaaS Studio to enable adaptive access.
Note:
- If network location tags are not assigned to the delivery groups, the users are granted unrestricted access to all applications in both Adaptive Access and WFH delivery groups. This might result in scenarios where users might inadvertently access certain applications that they are not authorized to. Assigning location tags to delivery groups ensures that access is controlled based on the users’ network location.
- While defining the location tags, ensure that you only enter the preferred tag name without the prefix “LOCATION_TAG”, for example BRANCHOFFICE. However, while defining tags in Citrix Studio, you must prefix the tag name with “LOCATION_TAG”. For example, “LOCATION_TAG_BRANCHOFFICE”.
Use the defined tags in delivery groups for application enumeration
- Sign into Citrix Cloud.
- On the Citrix DaaS tile, click Manage.
- Create a delivery group. For details, see Create delivery groups.
- Select the delivery group that you’ve created, and click Edit Delivery Group.
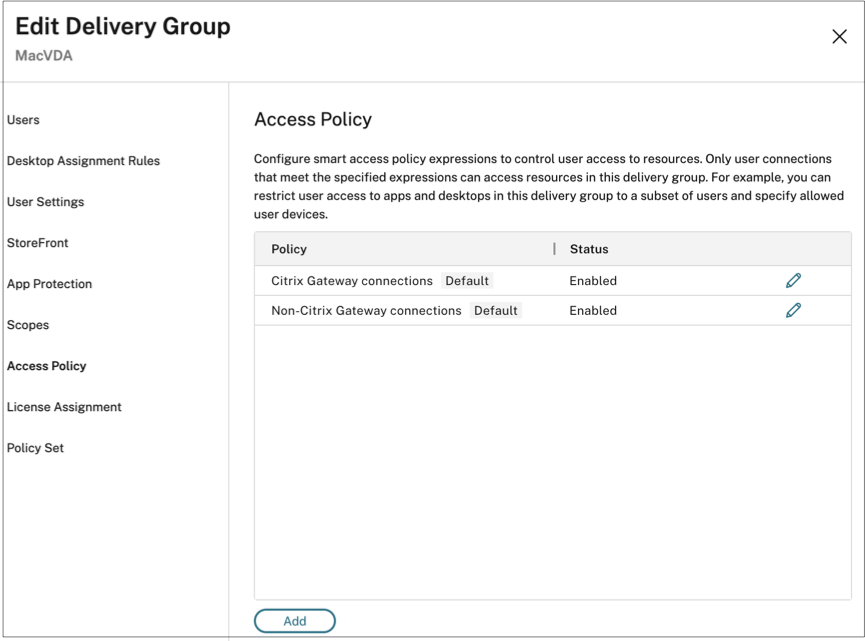
- Click Access Policy.
-
For customers using adaptive access within the Citrix Workspace platform, perform the following steps to restrict access for a delivery group to internal networks only:
- Right-click the delivery group and select Edit.
- Select the access policy in the left pane.
-
Click the edit icon to modify the default Citrix Gateway connections policy.
-
On the Edit policy page, select Connections meeting the following criteria, select Match any, and then add the criteria.
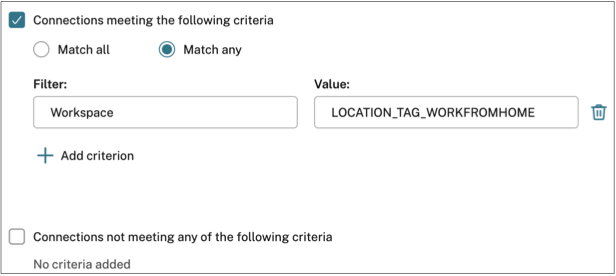
For WorkFromHome users, enter the following values in the respective delivery controller.
Filter: Workspace
Value: LOCATION_TAG_WORKFROMHOME
For BranchOffice users, enter the following values in the respective delivery controller.
Filter: Workspace
Value: LOCATION_TAG_BRANCHOFFICE
Note:
- Ensure that in the Value field, you enter the correct location tag name as you have defined while creating network location policies prefixed by “LOCATION_TAG”. For example, if you have defined the location tag as “BRANCHOFFICE”, then you must enter “LOCATION_TAG_BRANCHOFFICE” in the Value field. The network location tags in delivery groups must be entered in upper case irrespective of how it was defined in the network location policy. For details on configuring location tags, see Configure network location policies.
- The network location tags in delivery groups must be entered in upper case irrespective of how it was defined in the network location policy. For details on configuring location tags, see Configure the network location policies.
(Optional) Enforce smart controls on applications
In addition to restricting access using network location tags, admins can also enforce smart controls on applications. In this example, client clipboard redirection is disabled for users from the WorkFromHome location.
- Sign into Citrix DaaS.
- Navigate to Policies and click Create Policy.
- Select Client clipboard redirection, and then click Prohibit.
- Click Next.
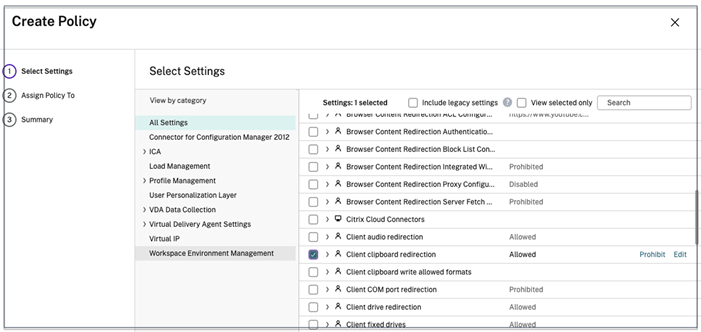
- On the Assign policy To page, select Access control.
-
Define the following values for the policy:
- Mode: Allow
- Connection type : With Citrix Gateway
- Gateway farm name: Workspace
- Access Condition: LOCATION_TAG_WORKFROMHOME (all in upper case)

- Click Next.
- Enter a name for the policy and add a policy description.
- Click Finish.
Users from the WORKFROMHOME location can’t perform clipboard access to their launched resources.
Network location tags
The Network Locations service provides the following tags.
-
Default tags: These tags are defined on the Network Locations service. The following default tags are available.
- LOCATION_internal: Tag sent by default when the network connectivity type is set as Internal while defining a network location.
- LOCATION_external: Tag sent by default when the network connectivity type is set as External while defining a network location.
- LOCATION_undefined: Tag sent for an IP address that is not defined in the policy but is coming through the Network Locations service. Launch for these users are the same as what is defined in the resource group.
- Custom tags: Admins can define custom tag names in the policies. Example: home, Office, BRANCH
Note:
When defining tags for the Network Location service, ensure the following:
The default tags always start with the prefix “LOCATION_
<tag name>. For example, LOCATION_INTERNAL.The custom tags always start with the prefix “LOCATION_TAG
<tag name>. For example, LOCATION_TAG_OFFICE.When defining tags in the delivery groups, tags must be entered in all upper case.
Default tags: LOCATION_INTERNAL, LOCATION_EXTERNAL, LOCATION_UNDEFINED
Custom tags: LOCATION_TAG_OFFICE, LOCATION_TAG_HOME
The following table summarizes the policies and tags for the earlier mentioned scenario.
| Location | Policy | Custom tag | Default tag | Tag to be used in DaaS delivery group | Tags to be used in the smart access policy |
|---|---|---|---|---|---|
| WFH | WFH | WORKFROMHOME | LOCATION_EXTERNAL | LOCATION_WORKFROMHOME and/or LOCATION_EXTERNAL | LOCATION_WORKFROMHOME and/or LOCATION_EXTERNAL |
| BranchOffice | BranchOffice | BRANCHOFFICE | LOCATION_EXTERNAL | LOCATION_BRANCHOFFICE and/or LOCATION_EXTERNAL | LOCATION_BRANCHOFFICE and/or LOCATION_EXTERNAL |
| Other | Not defined | Not defined | LOCATION_UNDEFINED | LOCATION_UNDEFINED | LOCATION_UNDEFINED |
Known issues
If you disable the Adaptive Access feature after it was enabled and the rules were set (tags and connectivity type), this does not remove the locations from the Network Locations page though the location tags and the connectivity type columns are hidden. But these locations are disabled in the back-end. This is a cosmetic issue.
Configure session recording policies based on tags
Session Recording allows organizations to record on-screen user activity in virtual sessions. You can specify tags including network location tags when creating a custom session recording policy, event detection policy, or event response policy. For an example, see Create a custom recording policy.