Support for Enterprise web apps
Web app delivery using the Secure Private Access service enables enterprise-specific applications to be delivered remotely as a web-based service. Commonly used web apps include SharePoint, Confluence, OneBug, and so on.
Web apps can be accessed using Citrix Workspace™ using the Secure Private Access service. The Secure Private Access service coupled with Citrix Workspace provides a unified user experience for the configured Web apps, SaaS apps, configured virtual apps, or any other workspace resources.
System requirements
Connector Appliance - Use the Connector Appliance with the Citrix Secure Private Access service to support VPN-less access to the Enterprise Web apps in the customers’ data center. For details, see Connector Appliance for Secure Private Access.
How it works
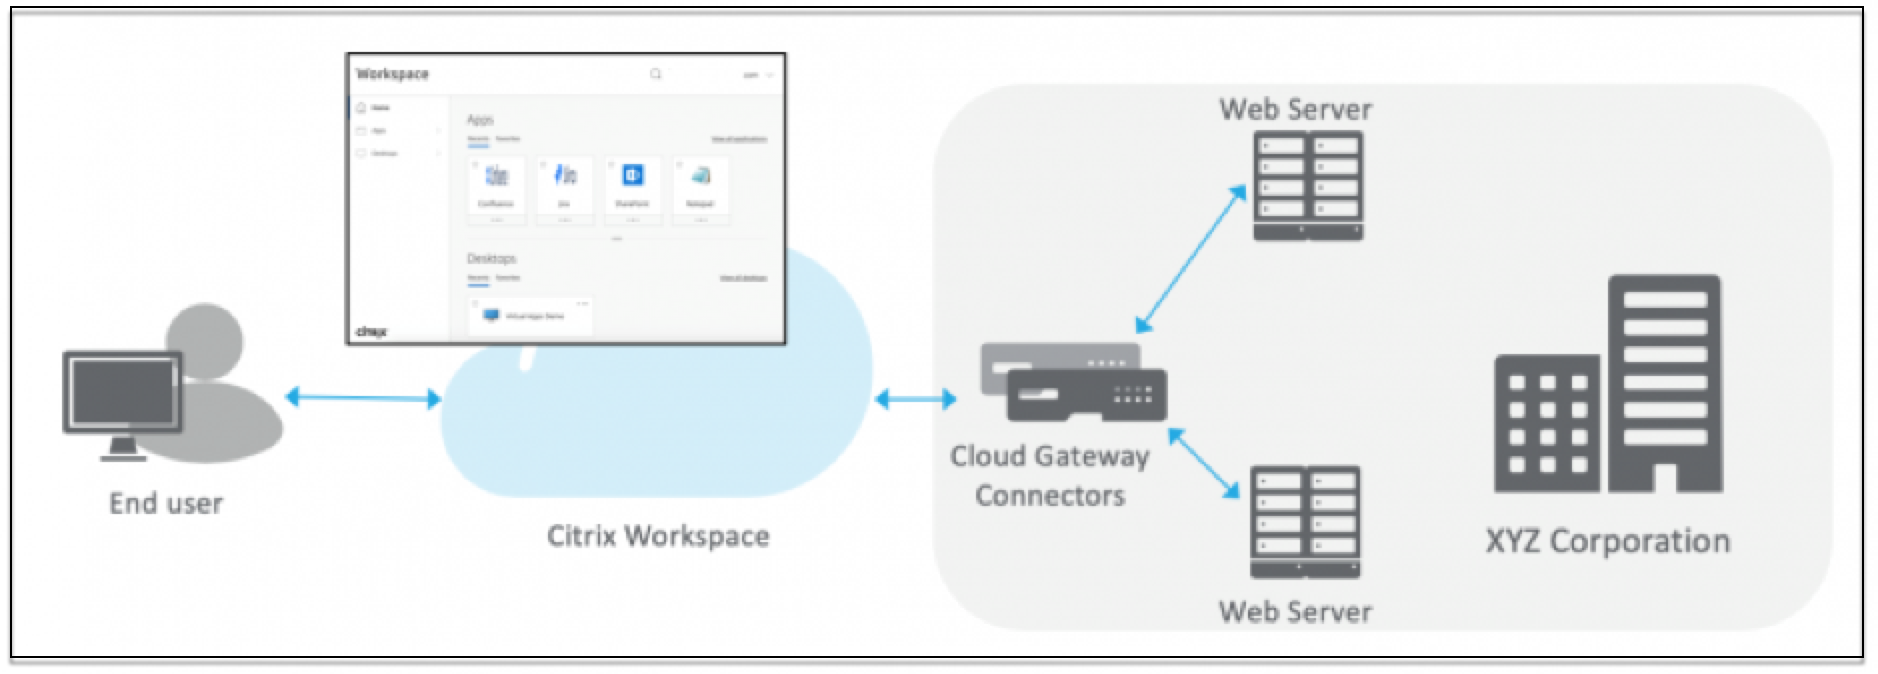
The Citrix Secure Private Access™ service securely connects to the on-premises data center using the connector, which is deployed on-premises. This connector acts as a bridge between Enterprise web apps deployed on-premises and the Citrix Secure Private Access service. These connectors can be deployed in an HA pair and require only an outbound connection.
A TLS connection between the Connector Appliance and the Citrix Secure Private Access service in the cloud secures the on-premises applications that are enumerated into the cloud service. Web applications are accessed and delivered through Workspace using a VPN-less connection.
The following figure illustrates accessing web applications using Citrix Workspace.

Configure a Web app
- Log in to Citrix Cloud and select Secure Private Access.
-
Click Applications > App Configuration and then click Add an app.
-
In Where is the application location?, select Inside my corporate network.
-
Select Inside my corporate network for applications hosted within your organization’s private network infrastructure, behind firewalls and accessible only through internal network connection.
-
Select Outside my corporate network (Google Connector): For applications hosted outside your organization’s private network infrastructure. Traffic routing occurs directly from users to the external application via the Google Cloud Connector.
-
-
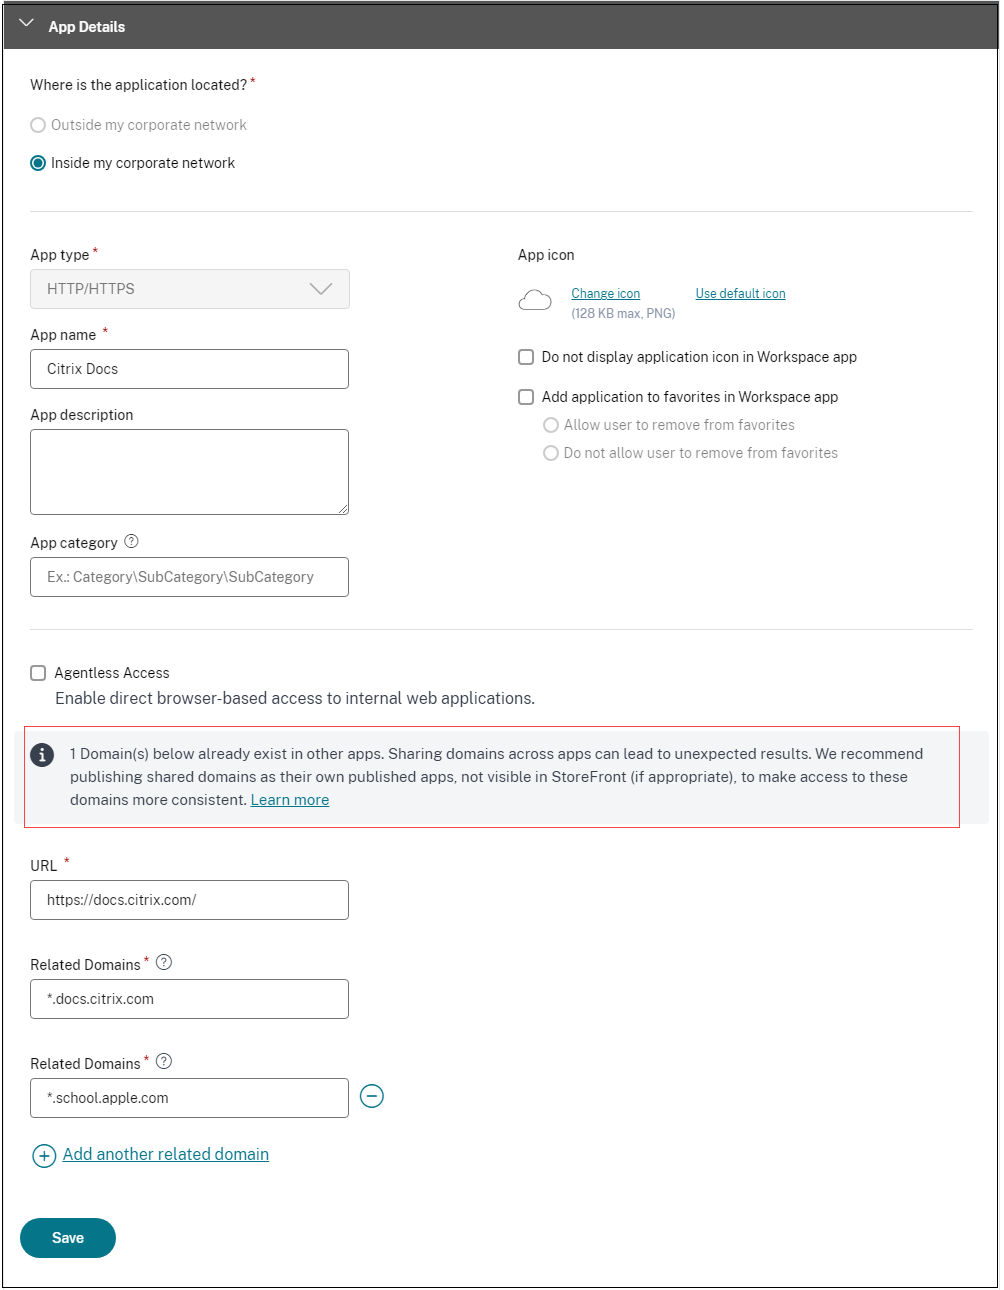
Enter the following details in the App Details section and click Next.

-
App type – Select the app type. You can select from HTTP/ HTTPS or UDP/TCP apps.
-
App name – Name of the application.
-
App description - A brief description of the app. This description is displayed to your users in the workspace.
-
App category - Add the category and the subcategory name (if applicable) under which the app that you’re publishing must appear in the Citrix Workspace UI. You can add a new category for each app or use existing categories from the Citrix Workspace UI. Once you specify a category for a web or a SaaS app, the app shows up in the Workspace UI under the specific category.
- The category/subcategories are admin configurable and admins can add a new category for every app.
- The App category field is applicable for HTTP/HTTPS apps and is hidden for TCP/UDP apps.
-
The category/subcategories names must be separated by a backslash. For example, Business And Productivity\Engineering. Also, this field is case sensitive. Admins must ensure that they define the correct category. If there’s a mismatch between the name in Citrix Workspace UI and the category name entered in the App category field, the category gets listed as a new category.
For example, if you enter the Business and Productivity category incorrectly as Business And productivity in the App category field, then a new category named Business and productivity gets listed in the Citrix Workspace UI in addition to the Business And Productivity category.
-
App icon – Click Change icon to change the app icon. The icon file size must be 128x128 pixels. If you do not change the icon, the default icon is displayed.
If you do not want to display the app icon, select Do not display application icon to users.
-
Select Agentless Access to enable users access the app directly from a client browser. For details, see Direct access to Enterprise web apps.
-
URL – URL with your customer ID. The URL must contain your customer ID (Citrix Cloud™ customer ID). To get your customer ID, see Sign up for Citrix Cloud. In case SSO fails or you do not want to use SSO, the user is redirected to this URL.
Customer domain name and Customer domain ID - Customer domain name and ID are used to create the app URL and other subsequent URLs in the SAML SSO page.
For example, if you’re adding a Salesforce app, your domain name is
salesforceformyorgand ID is 123754, then the app URL ishttps://salesforceformyorg.my.salesforce.com/?so=123754.Customer domain name and Customer ID fields are specific to certain apps.
-
Related Domains – The related domain is auto-populated based on the URL that you’ve provided. Related domain helps the service to identify the URL as part of the app and route traffic accordingly. You can add more than one related domain.
Note:
A warning message appears if duplicate related domains are added or if a related domain is also added as a URL for a different app. To avoid these issues, see Best Practices for Web and SaaS application configurations.
-
Maintain consistent connection - Select this checkbox to enable consistent connection to the same Connector Appliance. For details about consistent connections, see Maintain consistent connection.
Note:
When the Maintain consistent connection option is selected, the routing type for the application must be set to Internal via Connector in the App Connectivity section.
-
Click Add application to favorites Workspace app to add this app as a favorite app in Citrix Workspace app.
- Click Allow user to remove from favorites to allow app subscribers to remove the app from the favorites apps list in Citrix Workspace app. When you select this option, a yellow star icon appears at the top left-hand corner of the app in Citrix Workspace app.
-
Click Do not allow user to remove from favorites to prevent subscribers from removing the app from the favorites apps list in Citrix Workspace app. When you select this option, a star icon with a padlock appears at the top left-hand corner of the app in Citrix Workspace app.
If you remove the apps marked as favorites from the Secure Private Access service console, then these apps must be removed manually from the favorites list in Citrix Workspace. The apps aren’t auto deleted from the Workspace app if removed from the Secure Private Access service console.
Important:
- To enable zero-trust-based access to the apps, apps are denied access by default. Access to the apps is enabled only if an access policy is associated with the application.
- If multiple apps are configured with the same FQDN or some variation of the wildcard FQDN, this might result in a conflicting configuration.
- These issues can be resolved by following some of the best practices. For details, see Best practices for Web and SaaS application configurations.
-
-
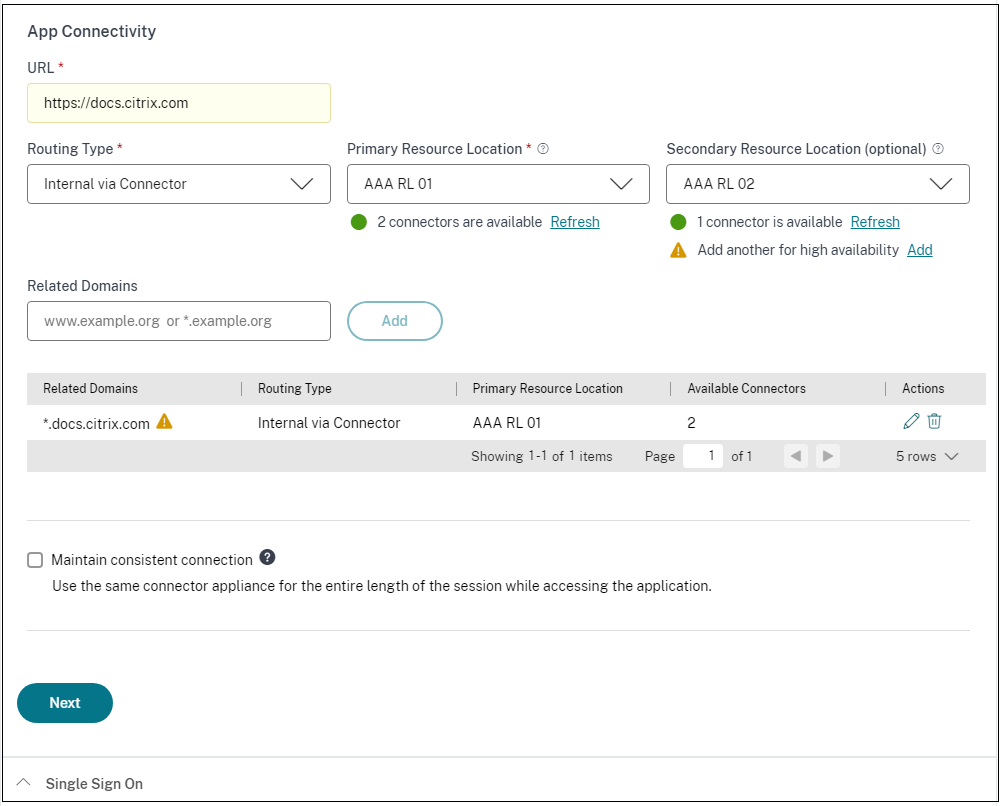
In the App Connectivity section, you define routing for the related domains of applications, if the domains must be routed externally or internally through Citrix Connector™ Appliance.

-
Routing Type - Select one of the following:
- Internal – bypass proxy - The domain traffic is routed through Citrix Cloud Connector™, bypassing the customer’s web proxy configured on the Connector Appliance.
- Internal via Connector - The apps can be external but the traffic must flow through the Connector Appliance to the outside network.
- External – The traffic flows directly to the internet.
-
Primary and secondary resource locations - Admins can ensure high availability of applications even during disruptions by configuring a secondary resource location or by using the First Available option.
- Primary Resource Location: Select the primary resource location where the application is hosted. Alternatively, admins can select the option First Available in Primary Resource Location.
- First available: The First Available option ensures that a working resource location is used. When First Available is selected, the system automatically routes traffic to the first available location. This ensures continuous application access without manual intervention. For instance, if ResourceLocation1 is unavailable but ResourceLocation2 is reachable, then ResourceLocation2 is selected by default to front-end the application.
- Secondary Resource Location - The Secondary Resource Location option becomes available only if a primary resource location is explicitly specified. If the primary resource location becomes unavailable, for reasons such as a Connector Appliance or data center failure, the application fails over to the specified secondary resource location. The secondary resource location can also act as a failover even when the application is hosted in another data center.
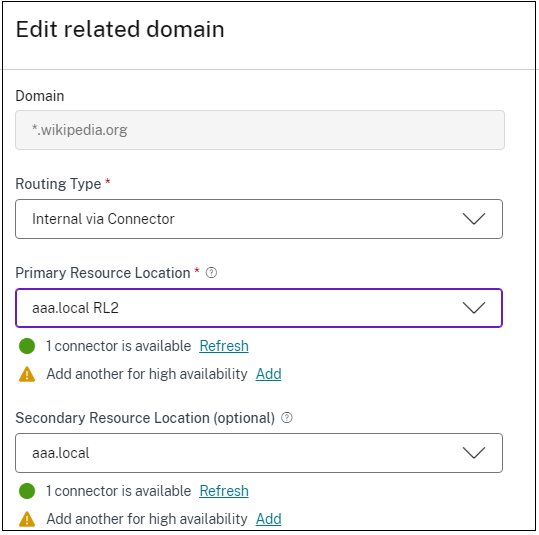
You can also set a primary and secondary resource location or select the First Available option for each of the related domains.
- Click the edit icon in the Actions column of the Related Domains table.
- Set the primary and secondary resource location or choose the First Available option.

Note:
Setting the backup resource location and using the First Available option feature is currently in Preview.
-
Maintain consistent connection - Select this checkbox to enable consistent connection to the same Connector Appliance. For details about consistent connections, see Maintain consistent connections.
Note:
When the Maintain consistent connection option is selected, the routing type for the application must be set to Internal via Connector in the App Connectivity section.
-
-
Click Save and then click Finish.
After you click Finish, the app is added to the Applications page. You can edit or delete an app from the Applications page after you’ve configured the application. To do so, click the ellipsis button on an app and select the actions accordingly.
- Edit Application
- Delete
Important:
- To grant access to the apps for the users, admins are required to create access policies. In access policies, admins add app subscribers and configure security controls. For details, see Create access policies.