在 Azure 中使用准备好的映像创建目录
-
创建准备好的映像,并使用这些准备好的映像通过以下方式创建 MCS 计算机目录:
- Studio
- PowerShell 命令
使用准备好的映像创建 MCS 计算机目录的关键步骤如下:
- 创建映像定义和初始映像版本。
- 使用映像版本作为准备好的映像来创建目录。
使用 Studio
创建映像定义和初始映像版本
要创建映像定义和初始映像版本,请执行以下操作:
- 在 Studio 中,转到“映像”节点,然后单击“创建映像定义”。在“简介”页面上,单击“下一步”。
- 在“映像定义”页面上,为映像定义指定“操作系统类型”和“会话类型”。
- 选择一个现有资源组或创建一个新资源组来保存映像资源。要启用映像共享,请在 Azure 计算库中选择“放置映像版本”,然后选择创建新库或使用现有库来保存其映像版本。
-
在“映像”页面上,选择“资源”(仅列出适用于所设置连接的资源)和要用作创建映像版本模板的主映像。您可以选中“使用计算机配置文件”复选框并选择一个计算机配置文件。
注意:
- 在选择映像之前,请验证主映像是否已安装 VDA 2311 或更高版本,并且 VDA 上已安装 MCSIO 驱动程序。
- 如果要使用机密 VM 类型准备好的映像创建 MCS 目录,请使用机密 VM 类型主映像和机密 VM 类型计算机配置文件创建准备好的映像。有关准备机密 VM 类型主映像和计算机配置文件的信息,请参阅 Azure 机密 VM。
- 在选择映像之前,请验证主映像是否已安装 VDA 2311 或更高版本,并且 VDA 上已安装 MCSIO 驱动程序。
-
在“存储和许可证类型”页面上,选择要在映像准备过程中使用的存储和许可证类型。
注意:
如果您在“映像”页面上选择了计算机配置文件,则计算机配置文件的许可证类型将根据配置文件设置预先选择。
- 在“计算机规范”页面上,选择计算机大小。如果您在“映像”页面上选择了计算机配置文件,则默认选择该计算机配置文件的计算机大小。
- 在“网卡”页面上,为准备映像选择或添加网卡。对于每个网卡,选择一个关联的虚拟网络。
- 在“磁盘设置”页面上,选择客户管理的加密密钥 (CMEK)。如果计算机配置文件没有 CMEK,但主映像有,则会预先选择主映像中的 CMEK。
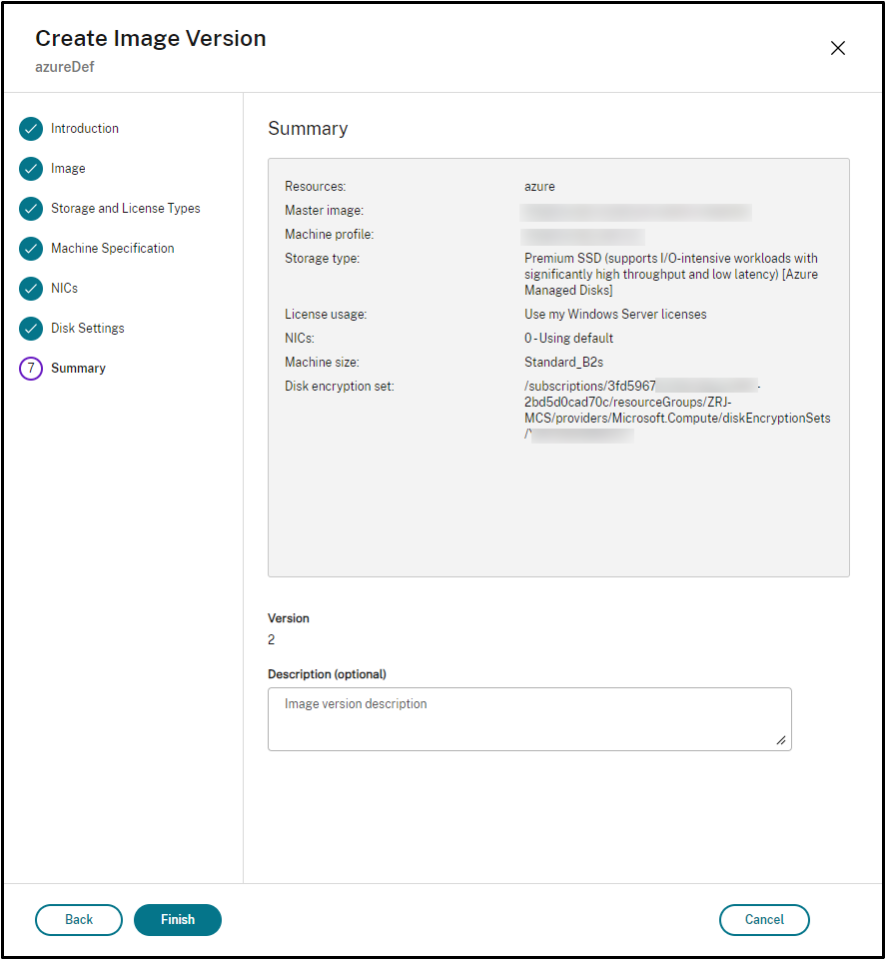
- 在“版本描述”页面上,输入所创建的初始映像版本的描述。
- 在“摘要”页面上,检查映像定义和所创建的初始映像版本的详细信息。输入映像定义的名称和描述。单击“完成”。
创建映像版本
映像版本允许管理特定映像的不同迭代或更新。此功能使您能够为不同目的维护映像的多个版本。
要从初始映像版本创建映像版本,请执行以下操作:
注意:
所有映像版本的托管单元必须相同。
- 转到“映像”节点,选择一个映像版本或映像定义,然后单击“创建映像版本”。
- 在“映像定义”页面上,您可以更改托管单元,并重新选择该映像版本的主映像和计算机配置文件。
- 如果您希望映像版本的配置与初始配置的映像版本不同,请在“创建映像版本”对话框的“存储和许可证类型”、“计算机规范”、“网卡”和“磁盘设置”页面上配置设置。
- 添加映像版本的描述。单击“完成”。
注意:
如果映像版本创建因任何原因失败,底部的“故障排除”选项卡会提供“重试”选项。
共享准备好的映像
要在 Azure 的不同托管单元之间共享准备好的映像,请按照以下步骤操作:
- 右键单击映像版本,然后选择“管理映像共享”。Azure 环境中的所有托管单元都会显示。创建映像版本的资源将禁用任何操作。
- 选择要共享映像的托管单元,然后单击“保存”。“共享状态”列显示“进行中”。
- 单击“资源”选项卡以获取有关共享状态的更多详细信息。
注意:
当映像版本共享状态为进行中时,“删除映像版本”或“管理映像共享”选项将被禁用。
从“映像”节点创建计算机目录
使用“映像”节点中的“创建目录”选项,利用映像版本创建目录。
或者,您可以在“计算机目录”节点中创建目录时选择版本,将其链接到目录创建工作流中的准备好的映像选项。请参阅从“计算机目录”节点创建计算机目录
要从“映像”节点创建 MCS 计算机目录,请执行以下操作:
- 选择一个映像版本,然后单击“创建目录”。在“简介”页面上单击“下一步”。
- 在“桌面体验”页面上,选择所需的桌面体验。
- 从“映像”页面到“磁盘设置”页面,设置会根据所选映像版本预先选择。
- 在“资源组”页面上,您可以选择创建新的资源组或使用现有资源组来放置此目录的资源。
- 完成后续页面上的设置。
- 在“摘要”页面上,检查计算机目录的详细信息。输入计算机目录的名称和描述。单击“完成”。
- 转到“计算机目录”节点以查看创建的计算机目录。
从“计算机目录”节点创建计算机目录
要从“计算机目录”节点创建 MCS 计算机目录,请执行以下操作:
-  1.  在左侧导航窗格中单击“计算机目录”。
-  1.  单击“创建计算机目录”。此时将显示“计算机目录设置”页面。在“简介”和“计算机类型”页面上单击“下一步”。
- 在“计算机管理”页面上,选择以下设置:
-
- 选择“已进行电源管理的计算机(例如,虚拟机或刀片式 PC)”。
- 选择“Citrix 预配技术”。然后,选择 Citrix Machine Creation Services™。
- 在“资源”字段中,列出了属于不同区域的资源。选择任何 Azure 网络资源,然后单击“下一步”。
- 选择“已进行电源管理的计算机(例如,虚拟机或刀片式 PC)”。
-
-
在“映像”页面上: 对于准备好的映像类型,请按照以下步骤操作:
- 选择“准备好的映像”。
- 在“准备好的映像”下,选择映像定义的映像版本。如果需要,为所选的准备好的映像版本添加备注。
- 单击映像版本名称。要查看有关所选映像版本的更多详细信息,请单击带下划线的版本号。
-
- 如果所选映像版本配置了计算机配置文件,请选择一个计算机配置文件。如果所选映像版本未配置计算机配置文件,则无法选择使用计算机配置文件。
-
- 配置后续页面上的设置。
- 在“磁盘设置”页面上,如果所选的准备好的映像使用磁盘加密集,则无法删除该加密集,但可以将密钥更改为另一个加密密钥。
- 在“资源组”页面上,您可以选择创建新的资源组或使用现有资源组来放置此目录的资源。
- 完成后续页面上的设置。
- 在“摘要”页面上,检查计算机目录的详细信息。输入计算机目录的名称和描述。单击“完成”。
使用 PowerShell
创建准备好的映像
创建准备好的映像版本规范的详细 PowerShell 命令如下:
-
使用
Test-ProvImageDefinitionNameAvailable命令检查可用的映像定义名称。例如,Test-ProvImageDefinitionNameAvailable -ImageDefinitionName <string[]> <!--NeedCopy-->-
- 使用
New-ProvImageDefinition命令创建映像定义。例如,
- 使用
New-ProvImageDefinition -ImageDefinitionName image1 -OsType Windows -VdaSessionSupport MultiSession <!--NeedCopy--> -
-
使用
Add-ProvImageDefinitionConnection命令在指定的托管连接中为映像定义创建新配置。Add-ProvImageDefinitionConnection的CustomProperties可以包含以下内容。如果您不使用这些参数,则会使用默认值。-
ResourceGroups:包含基本磁盘的资源组。 -
UseSharedImageGallery:基本磁盘类型的指示器。ACG(映像共享)使用true,快照使用false。 -
ImageGallery:当基本磁盘是 ACG 映像版本时的库名称。
例如,
-
在快照和客户提供的资源组的情况下:
$CustomerOwnRsourceGroupProperties = @" <CustomProperties xmlns="http:// schemas.citrix.com/2014/xd/machinecreation" xmlns:xsi="http://www.w3.org/2001/XMLSchema-instance"> <Property xsi:type="StringProperty" Name="ResourceGroups" Value="yangj_image" /> </CustomProperties> "@ <!--NeedCopy--> -
在 ACG 和客户提供的资源组以及映像库的情况下:
```
$CustomerOwnAllProperties = @”
-
- <Property xsi:type="StringProperty" Name="ImageGallery" Value="gallery" />
</CustomProperties>
“@
    <!--NeedCopy--> ````

-  In case of ACG and customer provided resource group only:

   ```

   $CustomerOwnResourceGroupProperties = @"
   <CustomProperties xmlns="http://schemas.citrix.com/2014/xd/machinecreation" xmlns:xsi="http://www.w3.org/2001/XMLSchema-instance">
   <Property xsi:type="StringProperty" Name="UseSharedImageGallery" Value="true" />
   <Property xsi:type="StringProperty" Name="ResourceGroups" Value="rg" />
   </CustomProperties>
   "@

   <!--NeedCopy--> ```

-  In case of ACG and resource group and image gallery managed by Citrix:

    ```

    $CustomerOwnResourceGroupNothingProperties = @"
    <CustomProperties xmlns="http://schemas.citrix.com/2014/xd/machinecreation" xmlns:xsi="http://www.w3.org/2001/XMLSchema-instance">
    <Property xsi:type="StringProperty" Name="UseSharedImageGallery" Value="true" />
    </CustomProperties>
    "@

    <!--NeedCopy--> ```

```

Add-ProvImageDefinitionConnection -ImageDefinitionName image1 -HypervisorConnectionName Azure28 [-CustomProperties $CustomProperties]

<!--NeedCopy--> ```
-
Create an image version using the
New-ProvImageVersioncommand. For example,New-ProvImageVersion -ImageDefinitionName image1 -Description "version 1" <!--NeedCopy--> -
Add a master image version spec to the image version using the
Add-ProvImageVersionSpeccommand. For example,Add-ProvImageVersionSpec -ImageDefinitionName image1 -ImageVersionNumber 1 -HostingUnitName azure -MasterImagePath "XDHyp:\HostingUnits\azure\image.folder\azureresourcegroup.resourcegroup\win2022-snapshot.snapshot" <!--NeedCopy-->Note:
You can add only one master image version spec to one image version for a hosting unit.
-
Create a prepared image version spec from the master image version spec using the
New-ProvImageVersionSpeccommand.The CustomProperties for
New-ProvImageVersionSpeccan include the following. If you do not use the parameters, then default values are used:-
PreparedImageStorageType: The storage type to use for the prepared image. Defaults toStandard_LRS, can also bePremium_LRSorStandard_ZRS.Standard_ZRSprovides zone redundancy for the image.
New-ProvImageVersionSpec -SourceImageVersionSpecUid c6e7384c-b2f8-46d6-9519-29a2c57ed3cb -NetworkMapping @{"0"="XDHyp:\HostingUnits\azure\virtualprivatecloud.folder\azureresourcegroup.resourcegroup\azure-vnet-eastus.virtualprivatecloud\dev.network"} -ServiceOffering"XDHyp:\HostingUnits\azure\serviceoffering.folder\Standard_B2ms.serviceoffering" -CustomProperties "<CustomProperties xmlns=`"http://schemas.citrix.com/2014/xd/machinecreation`" xmlns:xsi=`"http://www.w3.org/2001/XMLSchema-instance`"></CustomProperties>" -RunAsynchronously <!--NeedCopy--> -
-
You can also share a prepared image version spec with another hosting unit in all hosting connections by using the
Add-ProvImageVersionSpecHostingUnitcommand.The CustomProperties for
Add-ProvImageVersionSpecHostingUnitcan include the following. If you do not use the parameters, then values from the source prepared image spec are used:-
PreparedImageStorageType: The storage type to use for the prepared image.
Add-ProvImageVersionSpecHostingUnit -ImageVersionSpecUid xxxxxxx -HostingUnitName AzureWest

<!--NeedCopy-->
Note:
One hosting unit and preparation type can have only one prepared instance.
-
Example of the complete set of Powershell commands to create image definition, image version, and prepared image version spec:
New-ProvImageDefinition -ImageDefinitionName image1 -OsType Windows -VdaSessionSupport MultiSession

-  $ImageDefinitionCustomProperties = @" <CustomProperties xmlns="http://schemas.citrix.com/2014/xd/machinecreation" xmlns:xsi="http://www.w3.org/2001/XMLSchema-instance"> <Property xsi:type="StringProperty" Name="UseSharedImageGallery" Value="true" /> <Property xsi:type="StringProperty" Name="ResourceGroups" Value="rg" /> <Property xsi:type="StringProperty" Name="ImageGallery" Value="gallery" /> </CustomProperties> "@

Add-ProvImageDefinitionConnection -ImageDefinitionName image1 -HypervisorConnectionName Azure28 -CustomProperties $ImageDefinitionCustomProperties

$imageVersion = New-ProvImageVersion -ImageDefinitionName image1 -Description "version 1"

-  $SourceImageVersionSpec = Add-ProvImageVersionSpec -ImageVersionUid $imageVersion.ImageVersionUid `
-  -HostingUnitUid $hostingunit.HostingUnitUid `
-  -MasterImagePath "XDHyp:\HostingUnits\azure28\image.folder\abc.resourcegroup\def-snapshot.snapshot"

-  $ImageVersionSpecCustomProperties = @'

-  <CustomProperties xmlns="http://schemas.citrix.com/2014/xd/machinecreation" xmlns:xsi="http://www.w3.org/2001/XMLSchema-instance">

-  <Property xsi:type="StringProperty" Name="PreparedImageStorageType" Value="Premium_LRS" />

-  <Property xsi:type="StringProperty" Name="LicenseType" Value="Windows_Client" />

</CustomProperties>

'@

New-ProvImageVersionSpec -NetworkMapping @{"0" = "XDHyp:\HostingUnits\azure28\virtualprivatecloud.folder\East US.region\virtualprivatecloud.folder\studio-mcs-infrastructure.resourcegroup\studio-mcs-vnet-eastus.virtualprivatecloud\mcs-dev.network" } -CustomProperties $ImageVersionSpecCustomProperties -ServiceOffering "XDHyp:\HostingUnits\azure28\serviceoffering.folder\Standard_B2s.serviceoffering" -SourceImageVersionSpecUid $SourceImageVersionSpec.ImageVersionSpecUid

$TargetCustomProperties = @'

<CustomProperties xmlns="http://schemas.citrix.com/2014/xd/machinecreation" xmlns:xsi="http://www.w3.org/2001/XMLSchema-instance">

<Property xsi:type="StringProperty" Name="PreparedImageStorageType" Value="Standard_ZRS" />

</CustomProperties>

'@

Add-ProvImageVersionSpecHostingUnit -ImageVersionSpecUid xxxxxxx -HostingUnitName AzureWest –TargetCustomProperties $TargetCustomProperties

$PreparedImageVersionSpec = Get-ProvImageVersionSpec -ImageVersionUid $imageVersion.ImageVersionUid | Where SourceImageVersionSpecUid-eq $SourceImageVersionSpec.ImageVersionSpecUid

<!--NeedCopy-->
Note:
- All image version specs in an image definition must belong to the same hosting unit.
- An image version can have only one master image version spec and one prepared image version spec.
- All image version specs must either have a machine profile or none of the image version specs must have a machine profile.
Create a catalog using a prepared image version spec
Create an MCS machine catalog from the prepared image version spec using the New-ProvScheme command. For example,
New-ProvScheme -ProvisioningSchemeName <string> -ImageVersionSpecUid <Guid> -HostingUnitUid <Guid> -IdentityPoolUid <Guid> [-VMCpuCount <int>] [-VMMemoryMB <int>] [-UseWriteBackCache] [-NetworkMapping <Hashtable>] [-CleanOnBoot] [-Scope <string[]>] [-Metadata <Hashtable>] [-ServiceOffering <string>] [-SecurityGroup <string[]>] [-TenancyType <string>] [-MachineProfile <string>] [-CustomProperties <string>] [-ResetAdministratorPasswords] [-UseFullDiskCloneProvisioning] [-RunAsynchronously] [-PurgeJobOnSuccess] [-ProvisioningSchemeType <ProvisioningSchemeType>]
[-ImageAssignmentNote <string>]

<!--NeedCopy-->
Or,
-  New-ProvScheme -ProvisioningSchemeName <string> -ImageVersionSpecUid <Guid> -HostingUnitName <string> -IdentityPoolName <string> [-VMCpuCount <int>] [-VMMemoryMB <int>] [-UseWriteBackCache] [-NetworkMapping <Hashtable>] [-CleanOnBoot] [-Scope <string[]>] [-Metadata <Hashtable>] [-ServiceOffering <string>] [-SecurityGroup <string[]>] [-TenancyType <string>] [-MachineProfile <string>] [-CustomProperties <string>] [-ResetAdministratorPasswords] [-UseFullDiskCloneProvisioning] [-RunAsynchronously] [-PurgeJobOnSuccess] [-ProvisioningSchemeType <ProvisioningSchemeType>]
[-ImageAssignmentNote <string>]

<!--NeedCopy-->
If you want to use an ACG image version spec, then set UseSharedImageGallery as true. For example,
$provSchemeCustomProperties= @"
<CustomProperties xmlns="http://schemas.citrix.com/2014/xd/machinecreation" xmlns:xsi="http://www.w3.org/2001/XMLSchema-instance">
    <Property xsi:type="StringProperty" Name="UseSharedImageGallery" Value="true" />
    <Property xsi:type="StringProperty" Name="StorageAccountType" Value="StandardSSD_LRS" />
</CustomProperties>
"@
New-ProvScheme -ProvisioningSchemeName assignimage -ImageVersionSpecUid $PreparedImageVersionSpec.ImageVersionSpecUid `
    -HostingUnitUid $hostingunit.HostingUnitUid `
    -IdentityPoolUid $IdentityPool.IdentityPoolUid `
    -CleanOnBoot -Scope @() -SecurityGroup @() `
    -ServiceOffering "XDHyp:\HostingUnits\azure28\serviceoffering.folder\Standard_B2s.serviceoffering" `
    -NetworkMapping @{"0"="XDHyp:\HostingUnits\azure28\virtualprivatecloud.folder\East US.region\virtualprivatecloud.folder\studio-mcs-infrastructure.resourcegroup\studio-mcs-vnet-eastus.virtualprivatecloud\mcs-dev.network"} `
    -CustomProperties $provSchemeCustomProperties

<!--NeedCopy-->
Example of the complete set of Powershell commands to create a catalog:
$Catalog = New-BrokerCatalog  -AllocationType "Random"  -IsRemotePC $False  -MinimumFunctionalLevel "L7_20" -Name "azurecatalog" -PersistUserChanges "Discard" -ProvisioningType "MCS" -Scope @() -SessionSupport "MultiSession"

$IdentityPool = New-AcctIdentityPool  -AllowUnicode  -Domain "azure.local" -IdentityPoolName "azurecatalog" -IdentityType "ActiveDirectory"  -NamingScheme "azure##" -NamingSchemeType "Numeric" -Scope @()

$PreparedImageVersionSpec = Get-ProvImageVersionSpec -ImageDefinitionName image1 -ImageVersionNumber 1 -Filter "PreparationType -eq 'Mcs'"

$Task = New-ProvScheme -ProvisioningSchemeName azurecatalog -ImageVersionSpecUid $PreparedImageVersionSpec.ImageVersionSpecUid -HostingUnitName azure -IdentityPoolName azurecatalog -CleanOnBoot -Scope @() -SecurityGroup @() -ServiceOffering "XDHyp:\HostingUnits\azure\serviceoffering.folder\Standard_B2s.serviceoffering" -NetworkMapping @{"0"="XDHyp:\HostingUnits\azure\virtualprivatecloud.folder\azureresourcegroup.resourcegroup\azure-vnet-eastus.virtualprivatecloud\dev.network"} -CustomProperties "<CustomProperties xmlns=`"http://schemas.citrix.com/2014/xd/machinecreation`" xmlns:xsi=`"http://www.w3.org/2001/XMLSchema-instance`">    <Property xsi:type="StringProperty" Name="UseSharedImageGallery" Value="true" /><Property xsi:type=`"StringProperty`" Name=`"StorageAccountType`" Value=`"StandardSSD_LRS`" /></CustomProperties>" -RunAsynchronously

Get-ProvTask -TaskId $Task.TaskId
$ProvScheme = Get-ProvScheme -ProvisioningSchemeName azurecatalog

Set-BrokerCatalog -Name $Catalog.Name -ProvisioningSchemeId $ProvScheme.ProvisioningSchemeUid

<!--NeedCopy-->
Create Microsoft Entra joined and Microsoft Intune enrolled catalogs with prepared images
You can now use prepared images to create Microsoft Entra joined and Microsoft Intune enrolled catalogs. This feature is applicable to single and multi-session persistent and non-persistent type MCS catalogs. This implementation significantly reduces the storage and time costs, and simplifies the VM deployment and image update process.
Examples
-
To create a Microsoft Entra catalog using a prepared image.
New-ProvScheme -ProvisioningSchemeName <name> -ImageVersionSpecUid <preparedVersionSpecUid> -HostingUnitUid <hostingUnitUid> -IdentityPoolUid <IdentityPoolUid> [-CleanOnBoot] -NetworkMapping @{"0"="XDHyp:\HostingUnits\<hostingunitName>\<region>.region\virtualprivatecloud.folder\<resourcegroupName>.resourcegroup\<vnetName>.virtualprivatecloud\<sunNetName>.network"} -ServiceOffering <serviceofferingPath> [-MachineProfile <machineProfilePath>] [-CustomProperties <>] <!--NeedCopy--> -
To create a Microsoft Entra catalog enrolled in Microsoft Intune using a prepared image:
 New-ProvScheme -ProvisioningSchemeName <name> -ImageVersionSpecUid <preparedVersionSpecUid> -HostingUnitUid <hostingUnitUid> -IdentityPoolUid <IdentityPoolUid> [-CleanOnBoot] -NetworkMapping @{"0"="XDHyp:\HostingUnits\<hostingunitName>\<region>.region\virtualprivatecloud.folder\<resourcegroupName>.resourcegroup\<vnetName>.virtualprivatecloud\<sunNetName>.network"} -ServiceOffering <serviceofferingPath> [-MachineProfile <machineProfilePath>] [-CustomProperties <>]

  <!--NeedCopy-->
Share prepared images across Azure subscriptions or tenants
To share a prepared image across subscriptions or tenants on the Azure platform, follow this example:
- Service principal: SPN 1
- Subscription: Subscription 1
- Tenant: Tenant 1
You want to share this image with:
- Service principal: SPN 2
- Subscription: Subscription 2
- Tenant: Tenant 2 (can be the same as Tenant 1)
To successfully share and use the image, you must grant SPN 2 the following permissions in Subscription 1—at the gallery, resource group, or subscription scope:
Microsoft.Resources/subscriptions/readMicrosoft.Compute/galleries/images/read-
Microsoft.Compute/galleries/images/versions/readNote:
Any service principal that has any permission on a subscription or resource automatically inherits the
Microsoft.Resources/subscriptions/readpermission.
Alternatively, assign the Compute Gallery Image Reader built-in role to SPN 2.
For step-by-step guidance, see this Microsoft article.
Share encrypted prepared image across regions, subscriptions, and tenants
Azure Compute Gallery (ACG) images can be encrypted with a Disk Encryption Set (DES). With ACG sharing feature, you can share an encrypted prepared image across regions, subscriptions and tenants for Azure. The target resource needs to pick a DES in its region from the subscription where the prepared image belongs. You can thereafter create a machine catalog in the resource where the encrypted prepared image is shared.
The key steps to share an encrypted prepared image are:
- Create Disk Encryption Set (DES) in each region: See the microsoft documentation Use the Azure portal to enable server-side encryption with customer-managed keys for managed disks.
- Create an image definition for the Azure host connection and image versions in Azure Compute Gallery (ACG) and specify the DES to encrypt the prepared image : See Create an image definition and initial image version.
- Share the encrypted prepared image across regions, subscriptions, and tenants: You can use Studio or PowerShell commands.
You can now create a machine catalog in the resource where the encrypted prepared image is shared. For more information on creating the catalog, see Create a prepared image machine catalog in Azure.
Note:
- If the primary region is not encrypted, the shared regions also cannot have DES.
- If two host units target the same region, they have the same DES.
Share the encrypted image across regions, subscriptions, and tenants using Studio
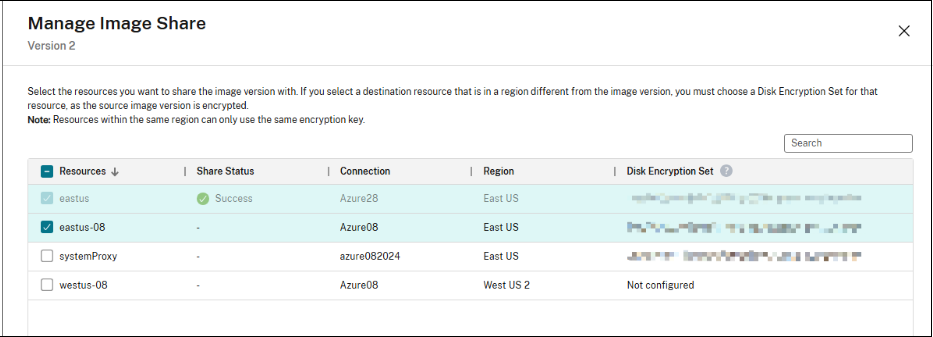
- Right-click an image version and select Manage Image Share. The resources with region and disk encryption set are listed.
-
Select the resources that you want to share with the image version. The resources where the image version is created from is disabled for any actions. Select a DES from the drop-down menu if DES is not configured for a resource.
Note:
Resources within the same region must use the same encryption key.
- Click Save.
-
Click the Resources tab for more details about the sharing status.
Note:
- When the status of the image version sharing is in progress, the option to Delete Image Version or Manage Image Share is disabled.
- When a resource is successfully shared, the DES is not editable.
Share the encrypted image across regions, subscriptions, and tenants using PowerShell
Use the command Add-ProvImageVersionSpecHostingUnit and add the parameter CustomProperties. In CustomProperties, configure the DES for the target resource. When sharing the prepared encrypted image, each resource picks a DES in its region from the subscription which the prepared image belongs to. For example,
$CustomProperties = "<CustomProperties xmlns=`"http://schemas.citrix.com/2014/xd/machinecreation`" xmlns:xsi=`"http://www.w3.org/2001/XMLSchema-instance`">"
 "<Property xsi:type=`"StringProperty`" Name=`"DiskEncryptionSetId`" Value=`"/subscriptions/xxxxxx-7152-46c4-b061-xxxxxx70c/resourceGroups/resourcegroup1/providers/Microsoft.Compute/diskEncryptionSets/desid1`" />"+
 "</CustomProperties>"
Add-ProvImageVersionSpecHostingUnit -ImageVersionSpecUid <Guid> -HostingUnitUid <Guid> -CustomProperties $CustomProperties

<!--NeedCopy-->