-
-
-
Security
-
Enable outbound SSH
-
-
-
This content has been machine translated dynamically.
Dieser Inhalt ist eine maschinelle Übersetzung, die dynamisch erstellt wurde. (Haftungsausschluss)
Cet article a été traduit automatiquement de manière dynamique. (Clause de non responsabilité)
Este artículo lo ha traducido una máquina de forma dinámica. (Aviso legal)
此内容已经过机器动态翻译。 放弃
このコンテンツは動的に機械翻訳されています。免責事項
이 콘텐츠는 동적으로 기계 번역되었습니다. 책임 부인
Este texto foi traduzido automaticamente. (Aviso legal)
Questo contenuto è stato tradotto dinamicamente con traduzione automatica.(Esclusione di responsabilità))
This article has been machine translated.
Dieser Artikel wurde maschinell übersetzt. (Haftungsausschluss)
Ce article a été traduit automatiquement. (Clause de non responsabilité)
Este artículo ha sido traducido automáticamente. (Aviso legal)
この記事は機械翻訳されています.免責事項
이 기사는 기계 번역되었습니다.책임 부인
Este artigo foi traduzido automaticamente.(Aviso legal)
这篇文章已经过机器翻译.放弃
Questo articolo è stato tradotto automaticamente.(Esclusione di responsabilità))
Translation failed!
Enable outbound SSH
By default the SecurSpaces proxy service blocks outbound SSH connections from workspaces. Until you enable one of the two options below, a developer who tries to reach an external host over SSH has the connection closed.
This page is for project owners and security officers. For the developer side — generating a key, registering it, and connecting — see Connect to external servers and services via SSH.
Choose an option
| Consideration | Personal SSH Identity | Connected SSH Services |
|---|---|---|
| Best for | Individual developers who each need their own key, for example to authenticate with Azure DevOps or GitHub | Teams where several people connect to the same SSH service |
| Who sets it up | You enable the toggle; each developer generates and registers their own key | You create the service resource and attach it to workspaces; developers connect with no further setup |
| Key ownership | Each user owns their key | The platform or an administrator holds the key |
| Registration effort | Each user registers their public key on every target service | Registered once, and everyone using the workspace connects |
| Scope | User level, across every workspace where the toggle is on | Resource level, attached per workspace or template |
| Best fit | Access to personal accounts and services | Shared infrastructure such as build servers, staging VMs, and cloud instances |
Option 1: Enable Personal SSH Identity
Requires the Security permission set to Manage, which project owners and security officers hold.
With Personal SSH Identity the platform generates and holds a key pair for each user. The private key is applied when the developer connects and is never exposed inside the workspace.
You can enable the setting on a single workspace, or on a template so that every workspace created from it inherits the setting.
On a workspace
- Go to the project’s Workspaces tab.
- Create or edit a workspace.
- In the left panel, select Security Settings.
- Switch Enable Personal SSH Identity on.
- Select Review and Launch, or Next, to save.
On a workspace template
- Go to the project’s Workspaces tab and select the Templates view.
- Create or edit a template.
- In Security Settings, switch Enable Personal SSH Identity on.
- Save the template.
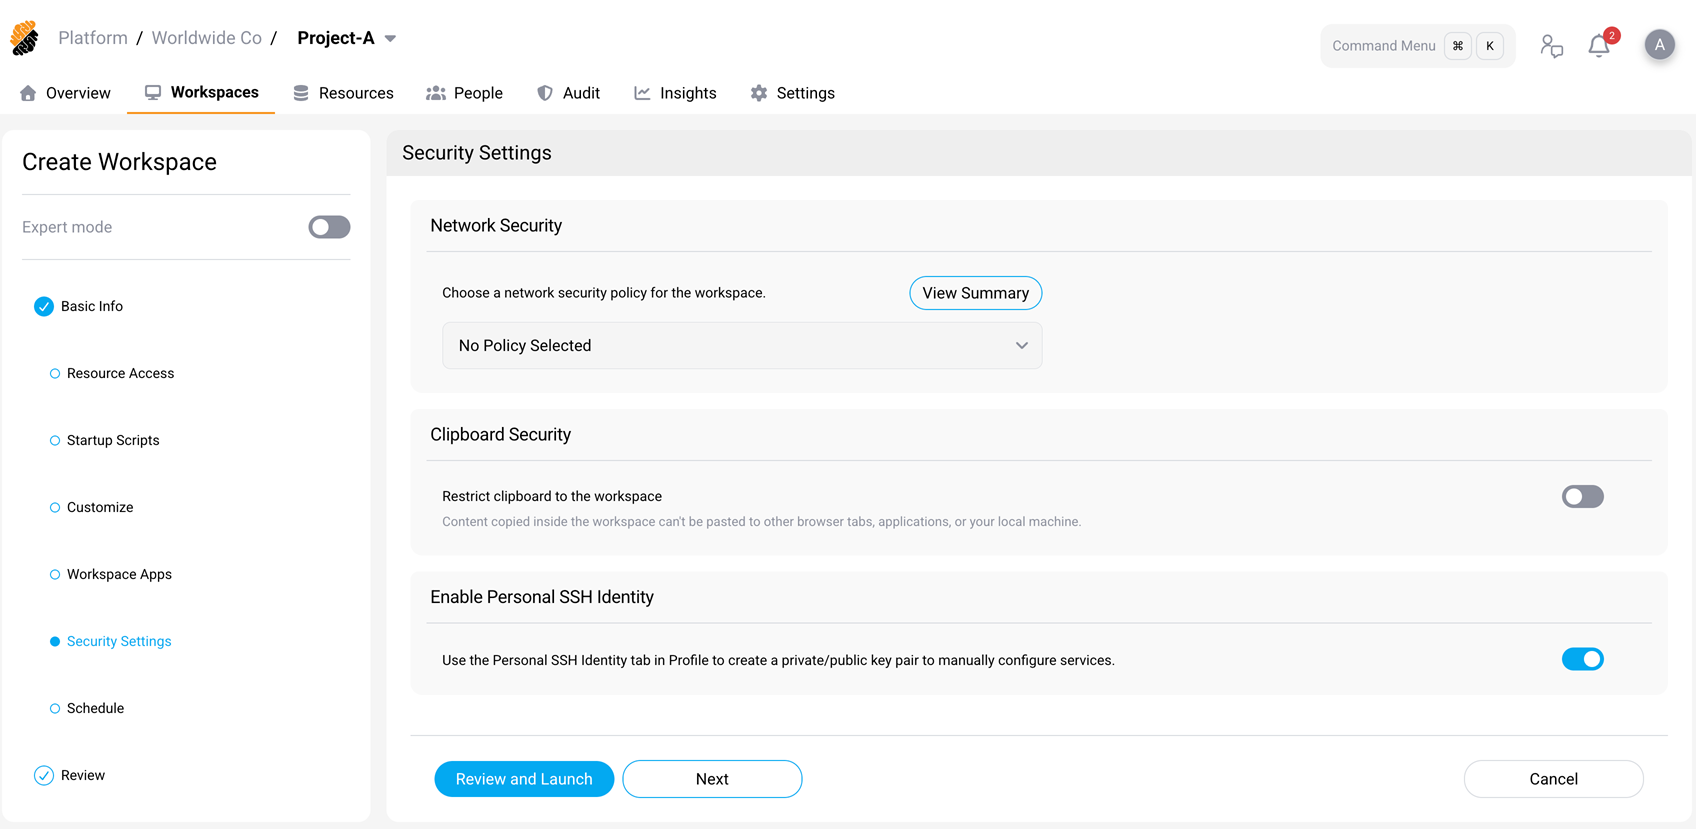
Outbound SSH is now allowed from that workspace. Each developer then generates their own key in their profile and registers the public key on the target service. See Personal SSH Identity.
Option 2: Attach a Connected SSH Service
Creating the service requires the Resources permission set to Manage.
A Connected SSH Service defines a target host once, with its credentials, and shares it across workspaces.
Developers connect with ssh <service-name> and never handle a key.
- Create the service as a project resource. For the form and its fields, see Connected SSH Services.
- Attach it to a workspace:
- Create or edit a workspace.
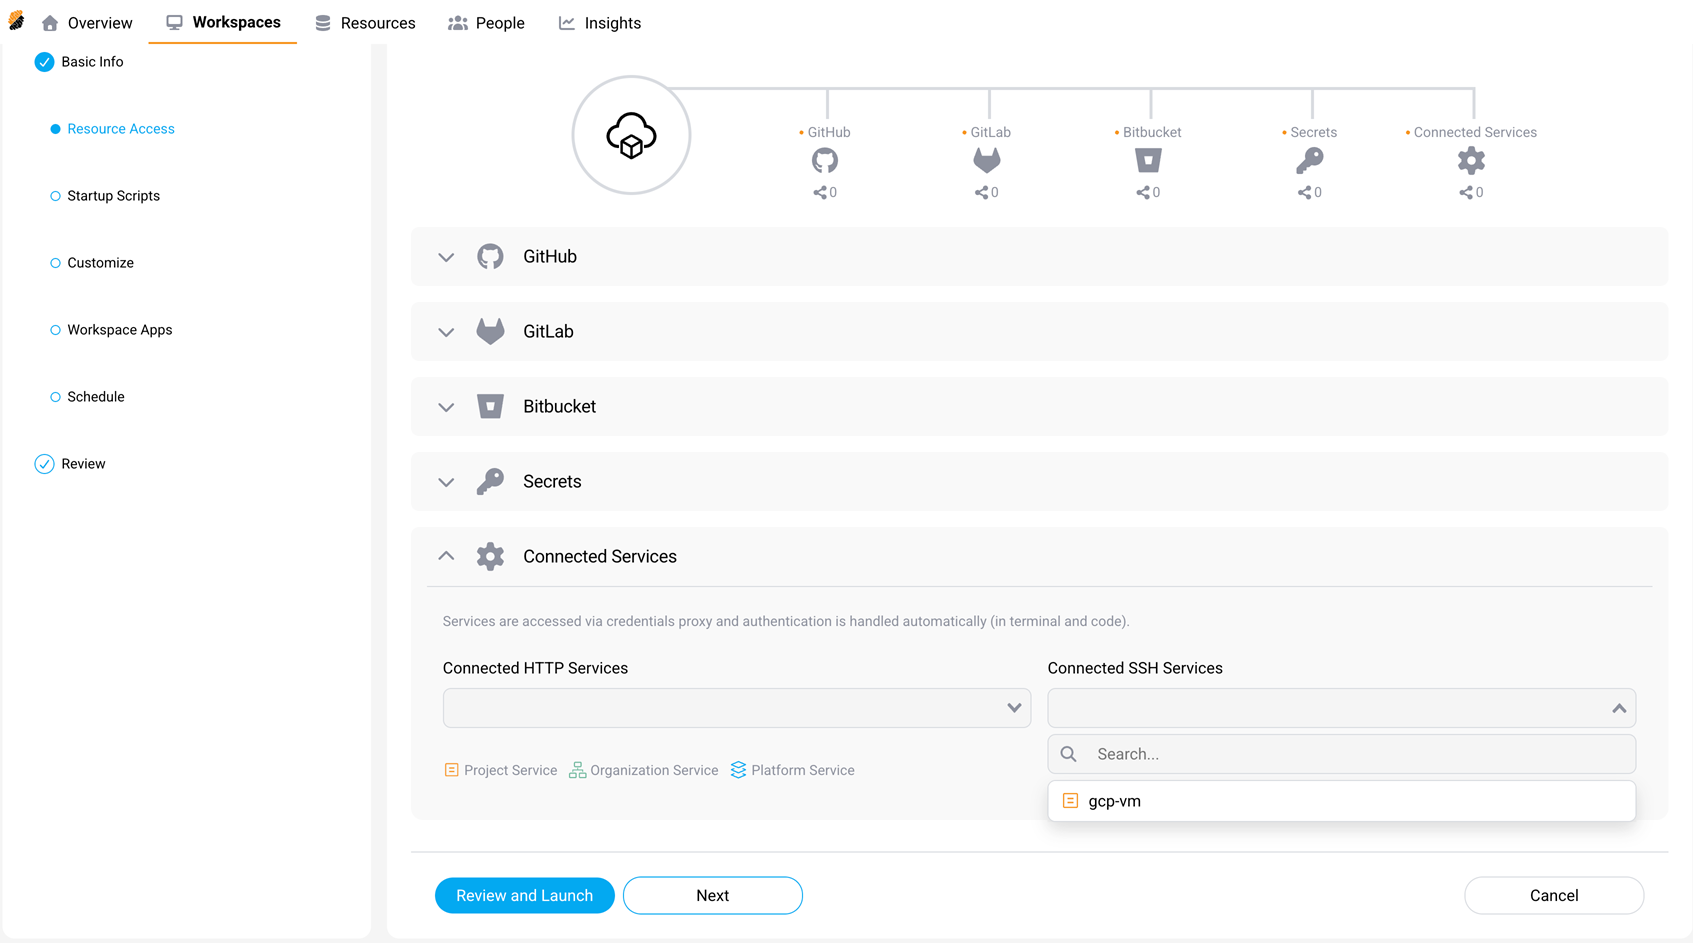
- In the left panel, select Resource Access.
- Under Connected Services, open the Connected SSH Services list.
- Select your service.
- Select Review and Launch, or Next, to save.
Related information
Share
Share
This Preview product documentation is Citrix Confidential.
You agree to hold this documentation confidential pursuant to the terms of your Citrix Beta/Tech Preview Agreement.
The development, release and timing of any features or functionality described in the Preview documentation remains at our sole discretion and are subject to change without notice or consultation.
The documentation is for informational purposes only and is not a commitment, promise or legal obligation to deliver any material, code or functionality and should not be relied upon in making Citrix product purchase decisions.
If you do not agree, select I DO NOT AGREE to exit.