Mount points
A Mount Point connects external file-based storage directly to a workspace file system. Unlike Data Buckets, which create point-in-time snapshots that are replicated to the cluster, Mount Points provide live access to the storage. Changes made inside the workspace are immediately visible to other workspaces sharing the same Mount Point, enabling real-time collaboration on shared files and datasets.
Mount Points are useful when teams need to:
- Share large datasets (for example, ML training data or model artifacts) without duplicating them across workspaces.
- Collaborate in real time on shared files without a manual snapshot-and-publish workflow.
- Access terabytes of data instantly, without waiting for replication.
Note
Mount Points are available only when a platform administrator has enabled the feature in System Configuration > Integrations > Mount Point Storage. See Enable Mount Points for details.
Note
Mount Points are not supported in multi-region configurations.
View Mount Points
Mount Points configured for the current project are displayed on the Resources > Mount Points page.
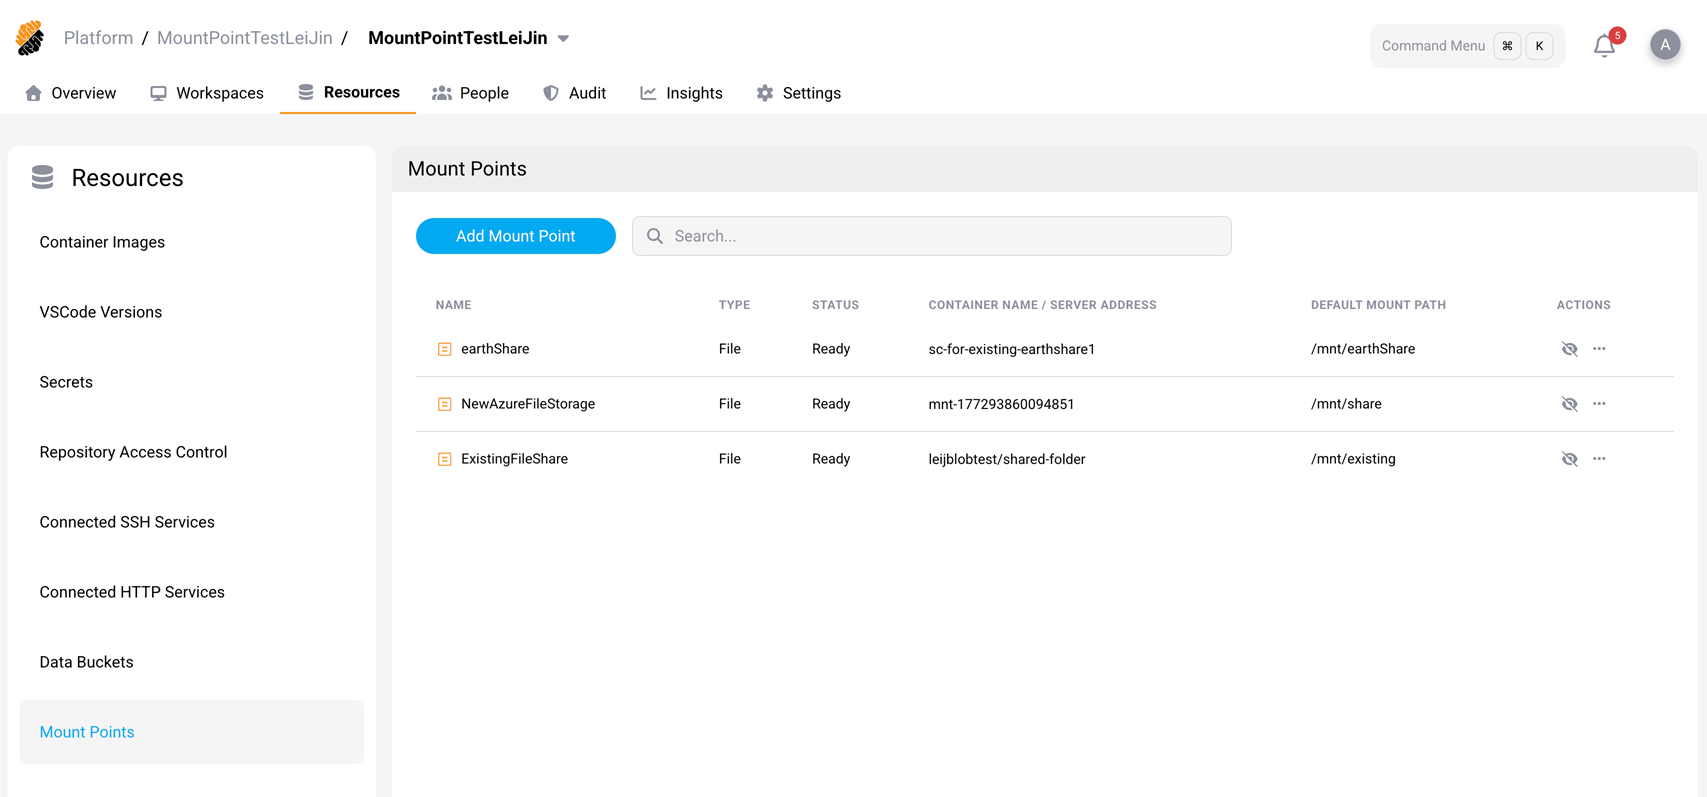
Each Mount Point displays the following information:
- Name — A descriptive label for the Mount Point.
- Type — The storage type. An Azure Mount Point reads File or Blob. An AWS Mount Point reads the backing service it uses, Amazon EFS or Amazon S3 Files.
- Status — The current state of the Mount Point. See Mount Point statuses.
- Storage Identifier — The storage behind the Mount Point. For Azure this is the storage account and file share, or the container or volume name. For AWS it is the name of the volume a platform administrator published, or the file system and access point identifiers.
-
Default Mount Path — The file system path where the share is mounted inside the workspace (for example,
/mnt/shared-data). - Actions — View details or manage the Mount Point.
Mount Point statuses
| Status | What it means |
|---|---|
| Creating | The Mount Point has been accepted and setup has started. |
| Provisioning | Storage is being provisioned and the platform is waiting for the volume to bind. |
| Ready | The volume is bound. The Mount Point can be attached to a workspace. |
| Updating | An edit is being applied. |
| Deleting | The Mount Point is being removed. |
| Error | Provisioning or attaching failed, or a timeout expired. Delete the Mount Point and create it again. |
A Mount Point can be edited only while it is Ready. In every other status the Edit action is unavailable, and an edit submitted against it is refused with a message that the Mount Point is not ready.
Note
For an AWS Mount Point, Ready means the volume is bound. It does not mean the volume has been mounted. See Troubleshoot AWS Mount Points.
Add a Mount Point
Requires the Resources permission set to Manage.
To add a Mount Point, select Add Mount Point on the Resources > Mount Points page.
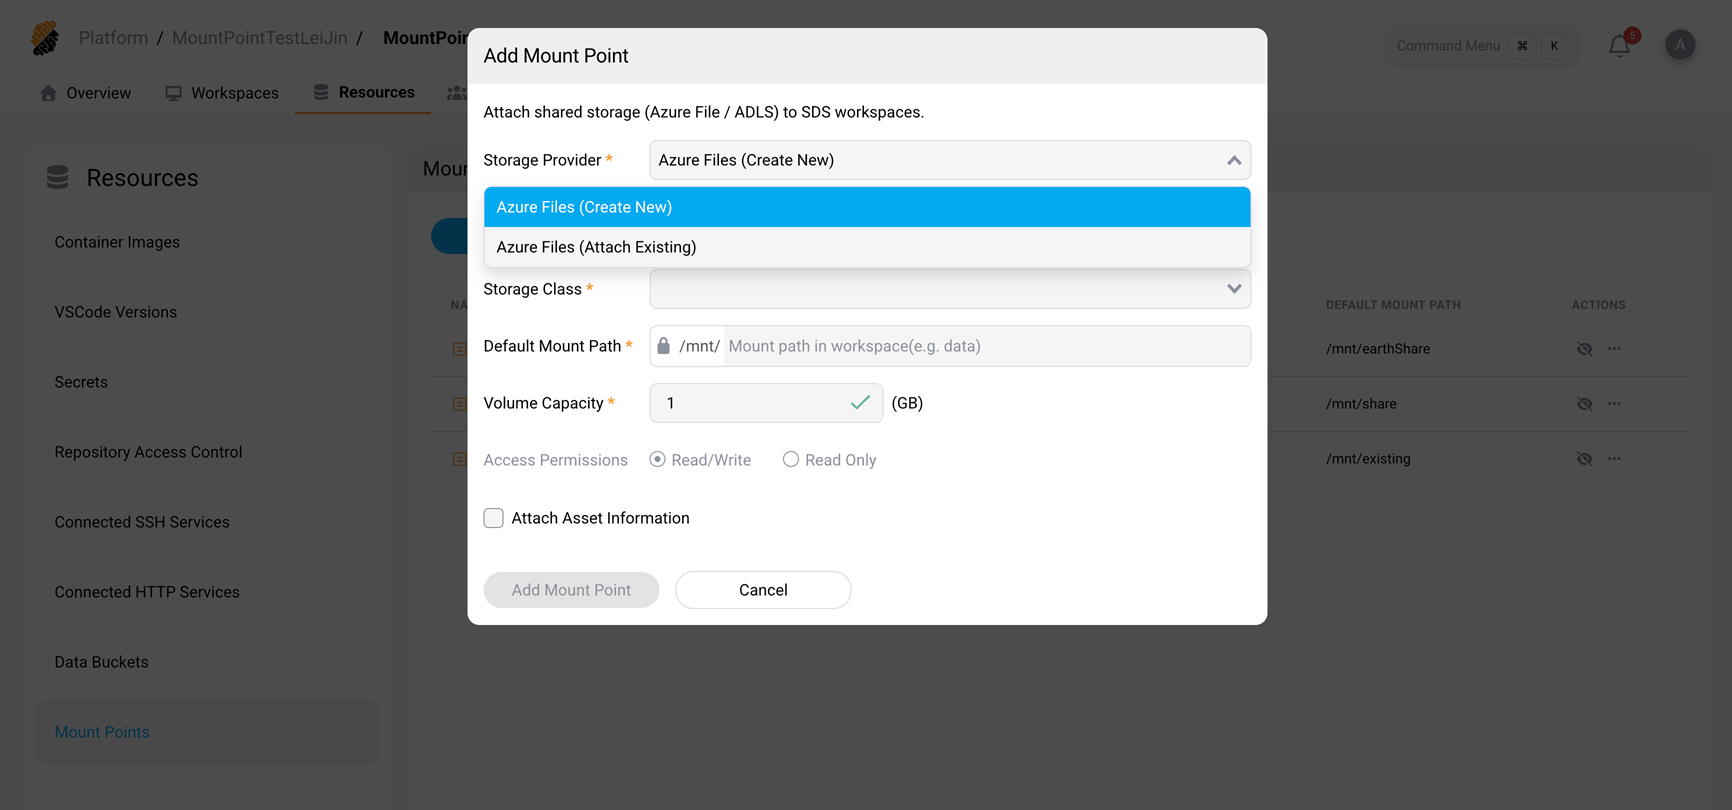
First, select a Storage Provider from the dropdown. The dropdown lists only the entries for the cloud your deployment runs in, so an AWS cluster offers the AWS entries and an Azure cluster offers the Azure entries.
- Azure Files (Create New) — Provisions a new Azure file share.
- Azure Files (Attach Existing) — Connects to an existing Azure file share.
- AWS Files (Create New) — Provisions new AWS-backed shared storage from an eligible storage class.
- AWS Files (Attach Existing) — Connects to existing Amazon Elastic File System (EFS) or Amazon S3 Files storage prepared by your infrastructure team.
Azure Files (Create New)
Provide the following information:
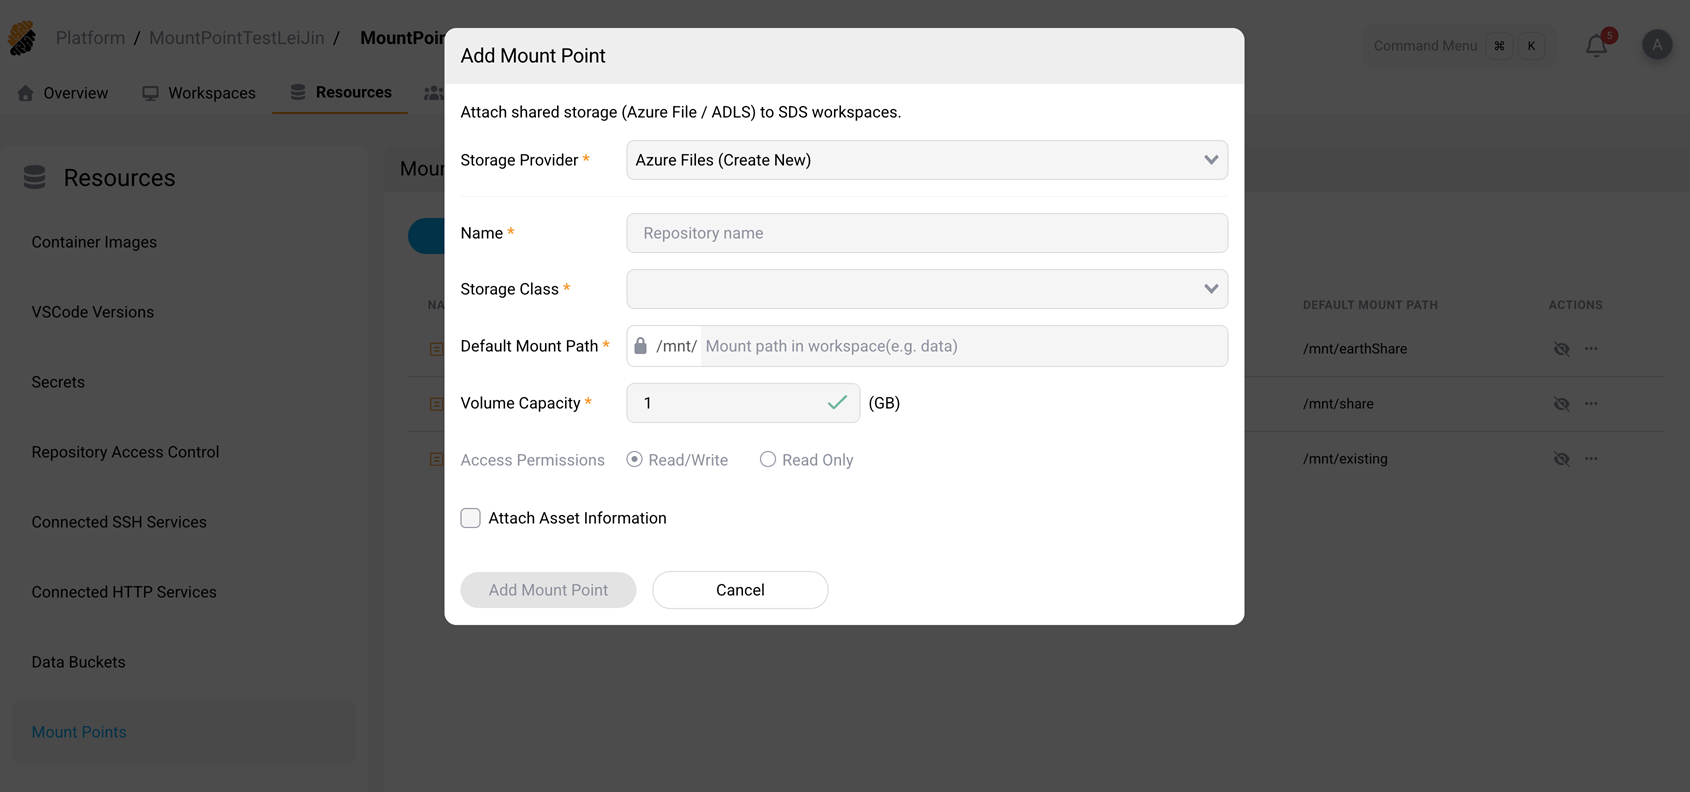
- Name — A descriptive name to identify the Mount Point.
- Storage Class — Select a storage class from the available options.
-
Default Mount Path — The path where the share is mounted inside the workspace file system. The path is prefixed with
/mnt/(for example, enteringdataresults in/mnt/data). - Volume Capacity — The size of the file share in GB.
- Access Permissions — Fixed at Read/Write for a newly provisioned share. The control is shown but cannot be changed. Choose read-only access per workspace when you attach the Mount Point.
- Attach Asset Information (optional) — Add metadata to classify the Mount Point.
Azure Files (Attach Existing)
When attaching an existing Azure file share, provide a Name and select a Connection Method. The two methods are offered as a pair of options, and each one asks for a different set of fields.
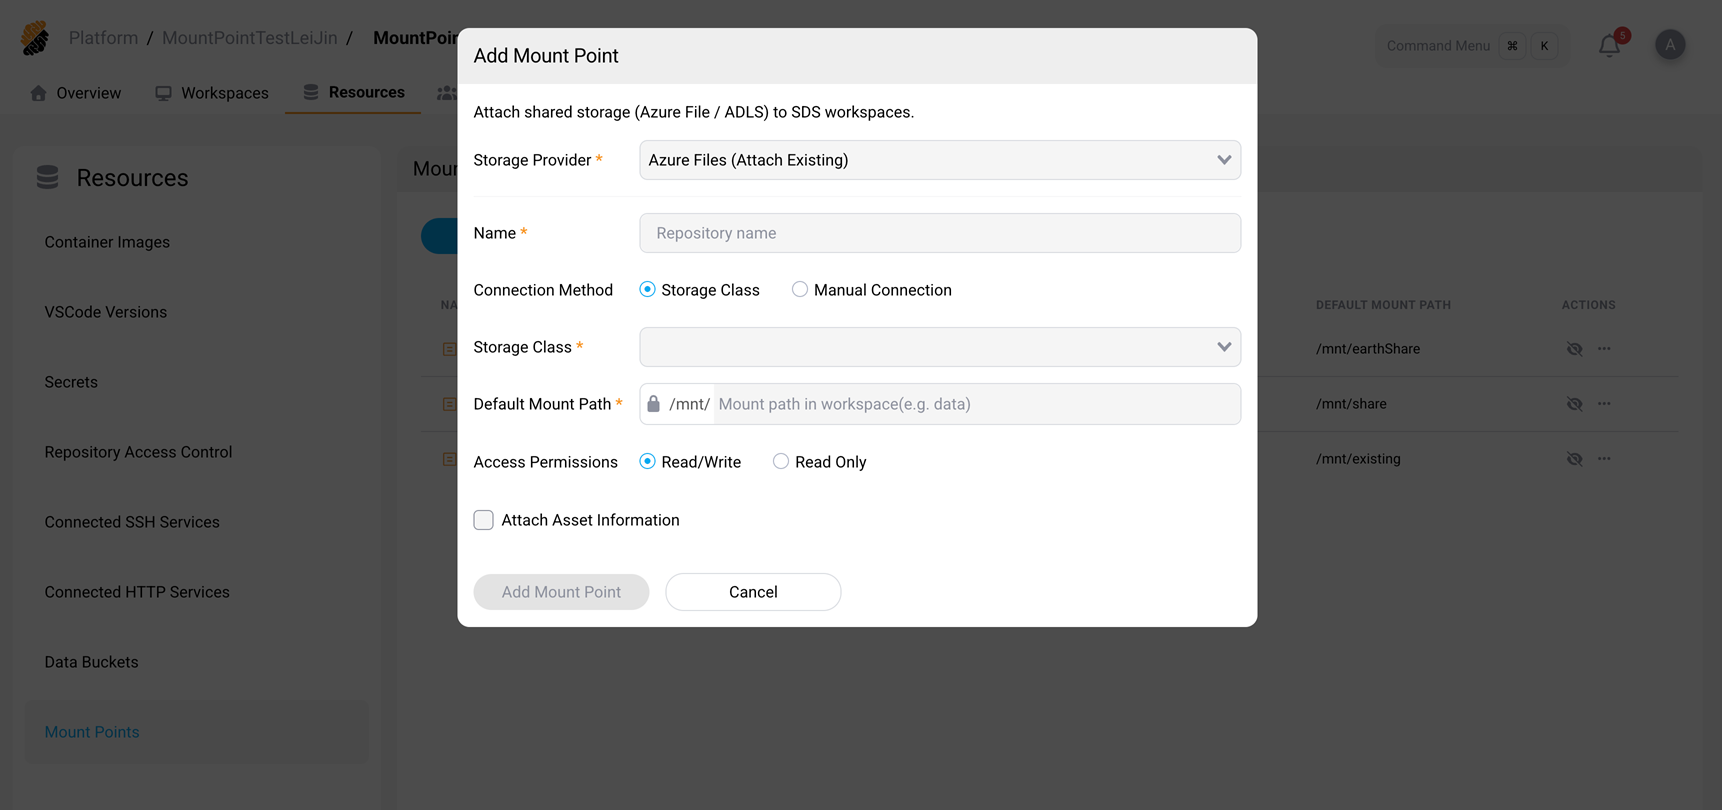
- Storage Class — Select an eligible Azure file storage class. Use this method when a platform administrator has already prepared a storage class for the share.
-
Manual Connection — Enter the storage details directly. All three fields are required:
- Storage Account — The name of the Azure storage account that holds the share.
- Access Key — The storage account access key.
- File Share Name — The name of the file share to mount.
Then configure the Default Mount Path, and select Read/Write or Read Only under Access Permissions. The connection method and its fields are fixed once the Mount Point is created.
AWS Files (Create New)
When creating a new AWS-backed Mount Point, select a storage class that represents either Amazon EFS or Amazon S3 Files. The storage class determines the backing service and must be configured by an administrator before project owners can use it.
Provide the following information:
- Name — A descriptive name to identify the Mount Point.
- Storage Class — Select an eligible Amazon EFS or Amazon S3 Files storage class.
-
Default Mount Path — The path where the storage is mounted inside the workspace file system. The path
is prefixed with
/mnt/. - Access Permissions — Fixed at Read/Write for a newly provisioned Mount Point. The control is shown but cannot be changed, and it cannot be changed later by editing the Mount Point. Choose read-only access per workspace when you attach the Mount Point, if users should not modify the shared data from that workspace.
- Attach Asset Information (optional) — Add metadata to classify the Mount Point.
There is no size to set. Amazon EFS and Amazon S3 Files are elastic, so an AWS Mount Point has no provisioned capacity and no per-Mount-Point size quota. See Mount point limits and behavior.
Note
A new AWS Mount Point shows Creating, and then Provisioning, for up to three minutes while AWS creates the access point and the volume binds. That wait is normal and does not mean the Mount Point has failed. For what Ready does and does not guarantee, see Troubleshoot AWS Mount Points.
AWS Files (Attach Existing)
Use attach existing when an infrastructure team has already created the storage that the project should use. There are two ways to identify that storage, and which of them you see depends on how the platform is configured.
Select an existing volume. Every deployment offers this method, and unless a platform administrator has enabled the second one, it is the only method available. The form shows a Volume list containing the volumes a platform administrator has published to your project, to your organization, or to the whole deployment. Provide the following information:
- Name — A descriptive name to identify the Mount Point.
- Volume — Select a published volume by name.
- Default Mount Path — The path where the storage is mounted inside the workspace file system.
- Access Permissions — Select Read/Write or Read Only.
If the volume you expect is not listed, ask your platform administrator to check it. A volume is offered only to the scope its label names, and a volume that a deleted Mount Point released must be reset before it can be attached again. See Author a PersistentVolume for Attach Existing.
Enter file system details. A platform administrator can additionally allow the platform to build the volume from AWS coordinates that you type. This method is turned off by default. Where it is enabled, an Attach Method choice appears above the form, offering Select an existing volume and Enter file system details. Where it is not enabled, there is no choice to make and only the volume list is shown. Choosing Enter file system details asks for:
- Name — A descriptive name to identify the Mount Point.
- Storage backend — Select Amazon EFS or Amazon S3 Files.
-
File System ID — The AWS file system identifier, which starts with
fs-. -
Access Point ID — The access point identifier, which starts with
fsap-. This field is required for both Amazon EFS and Amazon S3 Files. - Subpath (optional) — Mount a specific directory within the backing storage.
- Default Mount Path — The path where the storage is mounted inside the workspace file system.
- Access Permissions — Select Read/Write or Read Only.
Administrators and security officers see one further control on this form: a Mount the entire file system (no access point) checkbox. Selecting it hides the Access Point ID field and mounts the root of the file system, so a workspace sees every project’s data on that file system and there is no per-project isolation. It is refused on a file system that already backs Mount Points the platform created. In that case, clear the checkbox and name a specific access point instead. Project owners do not see this checkbox.
Important
Amazon EFS and Amazon S3 Files are both mounted over NFS, and both need the
tlsmount option for that traffic to be encrypted. A storage class or volume that does not carry it is not offered, and an attach to one is refused rather than mounted unencrypted. If a storage class, volume, or access point you expect is not available, ask your platform administrator to review the AWS Mount Point storage configuration.
AWS storage classes and existing file systems are prepared by your platform administrator outside of the platform. If the AWS options are missing, or an existing file system you expect is not offered, see Prepare AWS storage for Mount Points.
Note
Deleting a Mount Point is blocked while a live workspace, a workspace template, or a deleted workspace that can still be restored uses it. Detach it from each of those first.
Editing is not affected by usage. A Mount Point can be edited whenever it is Ready, however many workspaces use it, and cannot be edited in any other status. An errored or still-provisioning Mount Point has to be deleted and created again rather than corrected.
Attach a Mount Point to a workspace
You can attach one or more Mount Points to a workspace during workspace creation or when creating a workspace template.
Mount Points appear in the Resource Access step alongside other resource types such as GitHub, GitLab, Secrets, and Connected Services.
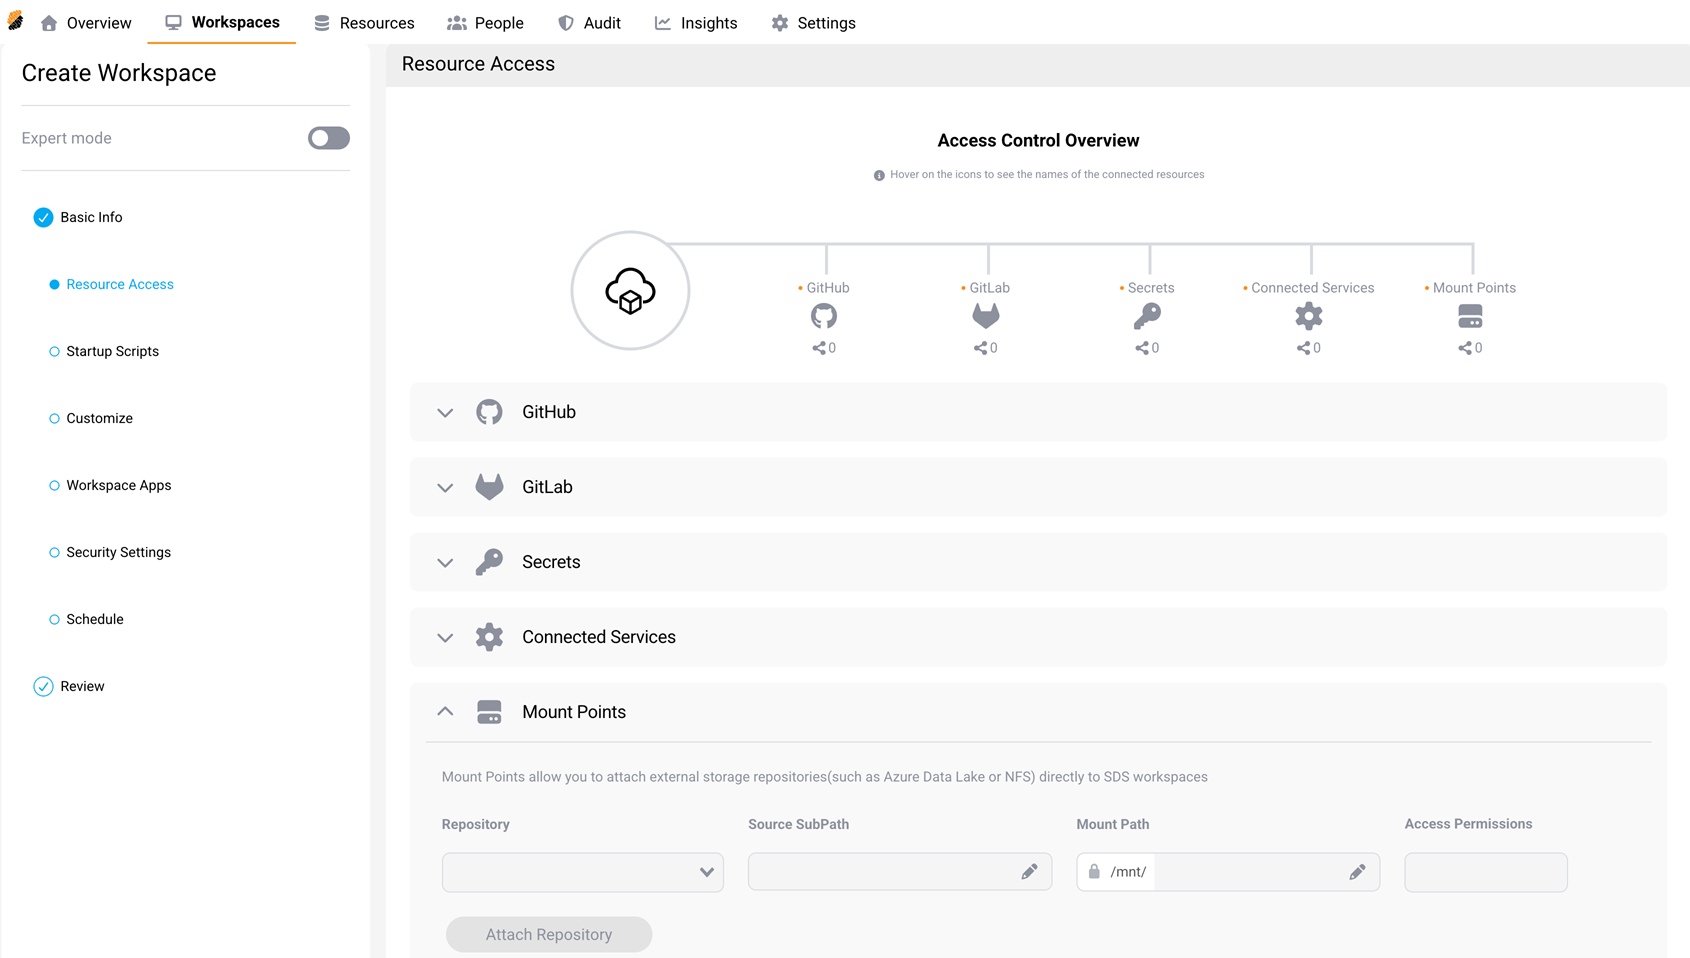
When attaching a Mount Point:
- Expand the Mount Points section in the Resource Access step.
- Select a Mount Point from the Repository dropdown.
- Optionally, specify a Source SubPath to mount a specific subdirectory of the file share.
- Review or customize the Mount Path — the location in the workspace file system where the share is accessible. The path is prefixed with
/mnt/. - Select Read/Write or Read Only under Access Permissions. This is where you choose how the Mount Point behaves in this workspace. The dropdown starts on the Mount Point’s own setting, which is Read/Write for every Mount Point created with Create New, and it is the only place to make an attach read-only.
- Select Attach Repository to add the Mount Point to the workspace.
Attached Mount Points are listed under Configured Repositories below the attachment form.
Important
Each Mount Point in a workspace must use a unique mount path. If a path conflict is detected, the system displays an error and prevents the workspace from being created until the conflict is resolved.
Note
Mount Points can only be added in the primary region. If the workspace is configured for a non-primary region, the Mount Points section is disabled.
Mount Points in workspace templates
When you create or update a workspace template, you can pre-configure Mount Points in the same way as during workspace creation. Workspaces created from the template automatically inherit the configured Mount Points and their mount paths.
Developers creating a workspace from a template can still customize the mount path for each attached Mount Point before launching the workspace.
Note
The template editor is not covered by the primary-region restriction. It lets you attach a Mount Point whatever region the template targets, so a template can be saved carrying storage that workspaces outside the primary region cannot use. Do not treat this as a supported way to use Mount Points in a secondary region. See Mount point limits and behavior.