-
-
-
Configuration
-
-
-
This content has been machine translated dynamically.
Dieser Inhalt ist eine maschinelle Übersetzung, die dynamisch erstellt wurde. (Haftungsausschluss)
Cet article a été traduit automatiquement de manière dynamique. (Clause de non responsabilité)
Este artículo lo ha traducido una máquina de forma dinámica. (Aviso legal)
此内容已经过机器动态翻译。 放弃
このコンテンツは動的に機械翻訳されています。免責事項
이 콘텐츠는 동적으로 기계 번역되었습니다. 책임 부인
Este texto foi traduzido automaticamente. (Aviso legal)
Questo contenuto è stato tradotto dinamicamente con traduzione automatica.(Esclusione di responsabilità))
This article has been machine translated.
Dieser Artikel wurde maschinell übersetzt. (Haftungsausschluss)
Ce article a été traduit automatiquement. (Clause de non responsabilité)
Este artículo ha sido traducido automáticamente. (Aviso legal)
この記事は機械翻訳されています.免責事項
이 기사는 기계 번역되었습니다.책임 부인
Este artigo foi traduzido automaticamente.(Aviso legal)
这篇文章已经过机器翻译.放弃
Questo articolo è stato tradotto automaticamente.(Esclusione di responsabilità))
Translation failed!
Configuration
The Configuration Page is used to create and edit custom shell scripts and configuration files, configure your IDE and define personal workspace startup scripts. You can also configure additional settings (e.g. theme) by clicking on the profile picture on the top right of the screen.
Manage Configuration Files
Use the Configuration Files section to personalize your development environment. You can specify your preferred default shell and create custom configuration scripts (such as .bashrc or .zshrc) that automatically apply to your workspaces.
This ensures that every new workspace you create includes your preferred aliases, environment variables, and tool settings without requiring manual setup each time.
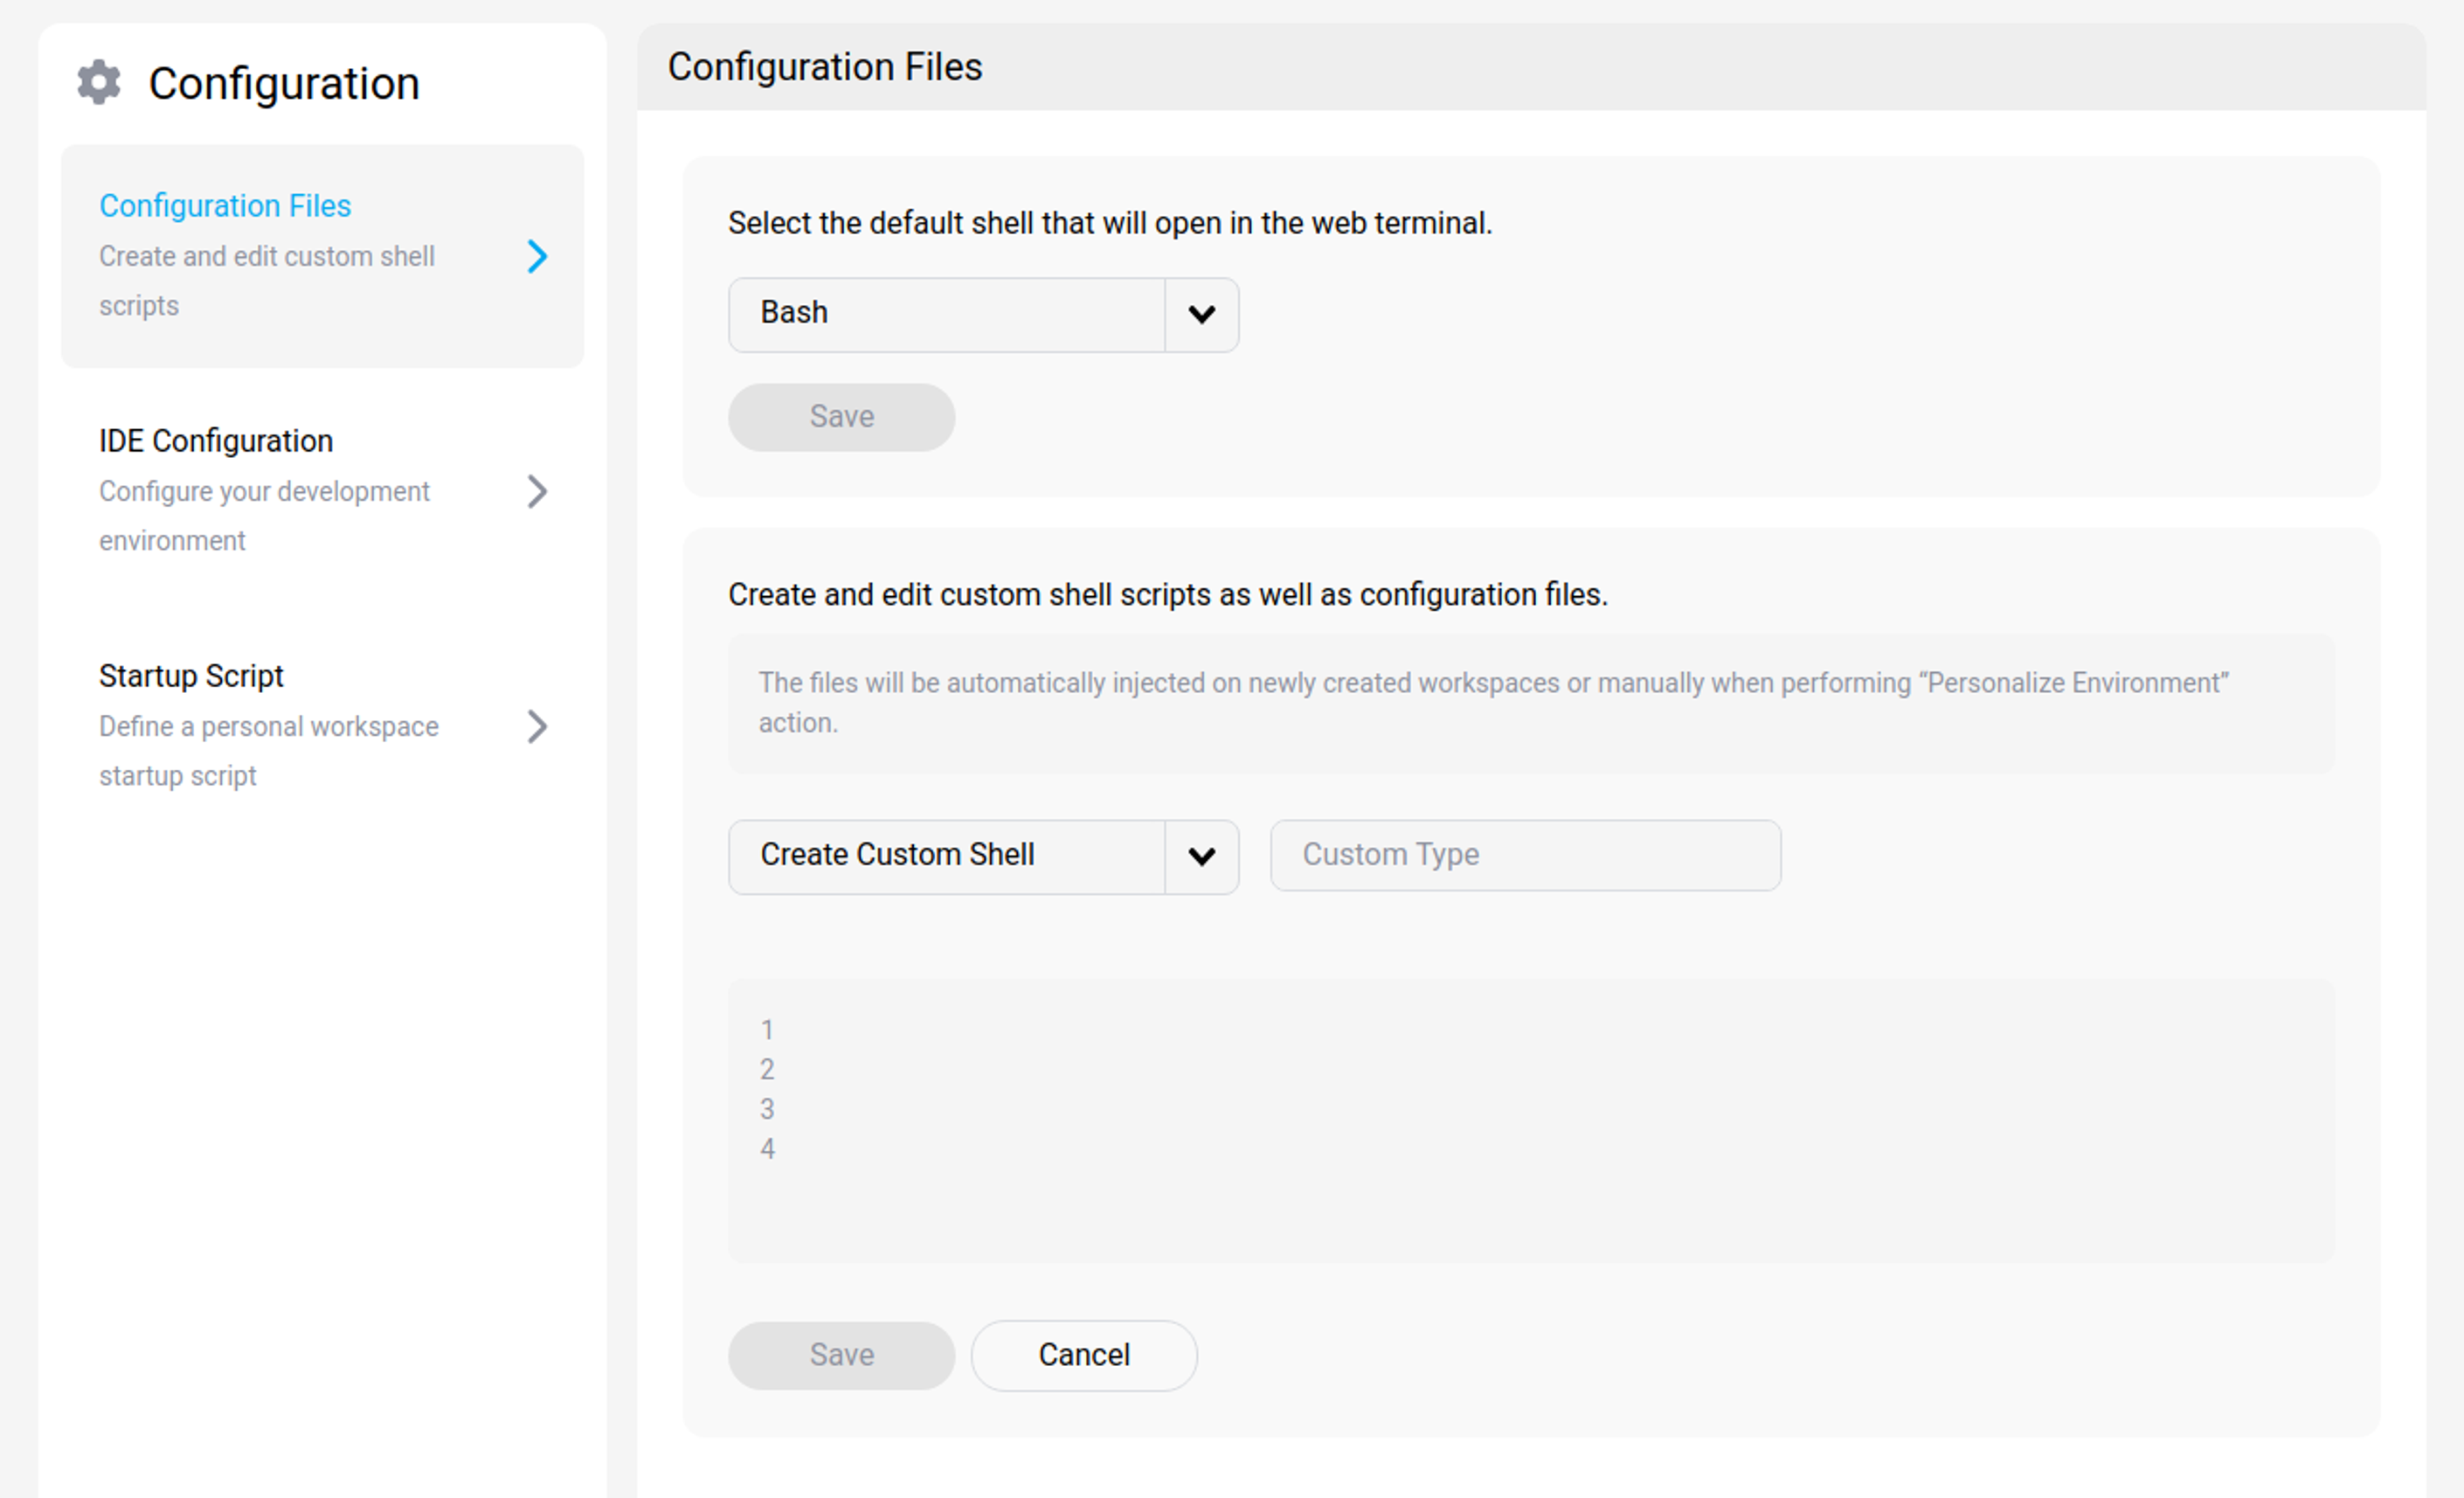
Set the default shell
You can define which shell launches automatically when you open a web terminal in your workspace.
- Go to Configuration > Configuration Files.
- Under Select the default shell that will open in the web terminal, select the dropdown menu.
- Choose your preferred shell (for example, Bash).
- Select Save.
Create and edit custom configuration files
You can create custom shell scripts and configuration files to persist your environment settings. These files are automatically injected into:
- Newly created workspaces: The files are applied during the workspace creation process.
- Existing workspaces: You can manually apply updates by selecting the Personalize Environment action within a workspace.
To create a new configuration file
- Go to the Configuration Files section.
- In the Create and edit custom shell scripts area, select theCreate Custom Shell dropdown menu.
- Select the type of file you want to configure (e.g. Bash Shell or Zsh Shell).
- If you select Custom Type, enter the specific filename in the adjacent field.
- Enter your script or configuration code in the editor pane.
- Select Save.
Sample configurations
You can copy and paste the following examples into your .bashrc file to improve productivity and safety.
Improve directory navigation
Use these aliases to list files with more detail (including hidden files and file sizes) and to navigate folders quickly.
# List all files including hidden ones
alias ll='ls -alF'
alias la='ls -A'

# Go back one or two directories
alias ..='cd ..'
alias ...='cd ../..'
<!--NeedCopy-->
Prevent accidental deletions
Add safety prompts to critical commands to ensure you confirm before deleting or overwriting files.
# Ask for confirmation before executing
alias rm='rm -i'
alias cp='cp -i'
alias mv='mv -i'
<!--NeedCopy-->
Configure Git shortcuts
Reduce repetitive typing for common Git operations.
# Check status
alias gs='git status'

# Add all changes
alias ga='git add .'

# Commit with a message
alias gc='git commit -m'

# Push changes
alias gp='git push'
<!--NeedCopy-->
Dot files
Use dot files to apply your personal shell, editor, and tool configuration to Citrix SecurSpaces™
workspaces. You connect a Git repository once, and SecurSpaces clones it to ~/.dotfiles in each selected
workspace.
Dot files is a per-user setting. It uses your connected Git integration and affects only workspaces that you own.
Before you begin
Before you configure dot files, make sure that:
- Your dot files repository is available through GitHub, GitLab, Bitbucket, Azure DevOps, or Azure DevOps with Entra ID.
- You connected the matching Git provider in Profile > Integration.
- Your repository includes one of the supported install scripts.
SecurSpaces looks for the first install script that exists in this order:
install.shinstallbootstrap.shbootstrapsetup.shsetupscript/bootstrapscript/setup
If the file is executable, SecurSpaces runs it directly. Otherwise, SecurSpaces runs it with bash.
Configure dot files
- Go to Profile > Configuration > Dot Files.
- Select the Code repository integration that can access your dot files repository.
- Enter the Dot-files repository URL, or select Browse repositories and choose the repository.
- Select the Install-script timeout. The timeout can be from 1 to 10 minutes.
- Under Apply dot files to, select one of the following options:
- All my workspaces — Apply dot files to every workspace you own.
- Only selected workspaces — Apply dot files only to the workspaces you select.
- Select Save Changes.
Expected result: The next time an included workspace starts or resumes, SecurSpaces clones the repository
to ~/.dotfiles and runs the install script.
Apply dot files to an existing workspace
To reapply dot files without waiting for a workspace restart:
- Open the workspace actions menu.
- Select Personalize Environment.
Expected result: SecurSpaces runs the dot files install script again. Use this action after changing your Dot files repository or after updating the dot files configuration.
Review dot files output
Dot files output appears in the workspace startup logs under Applying dot files. The log shows clone output, script output, and the script exit code.
Dot files does not block workspace startup. If the repository cannot be cloned, no install script is found, the script exits with an error, or the timeout expires, SecurSpaces records the result in the logs and continues starting the workspace.
Change or remove dot files
You can update or remove your dot files configuration at any time:
- To use a different repository, update the Dot files repository URL and select Save Changes.
- To stop applying dot files, select Remove dot files configuration.
- To limit where dot files run, choose Only selected workspaces and select the workspaces to include.
Removing the configuration stops future dot files runs. It does not delete an existing ~/.dotfiles directory
from any workspace.
IDE Configuration
IDE configuration files can be managed from the profile settings. A configuration must be initially imported from a running workspace. Then, it can be applied to new or existing workspaces manually or automatically.
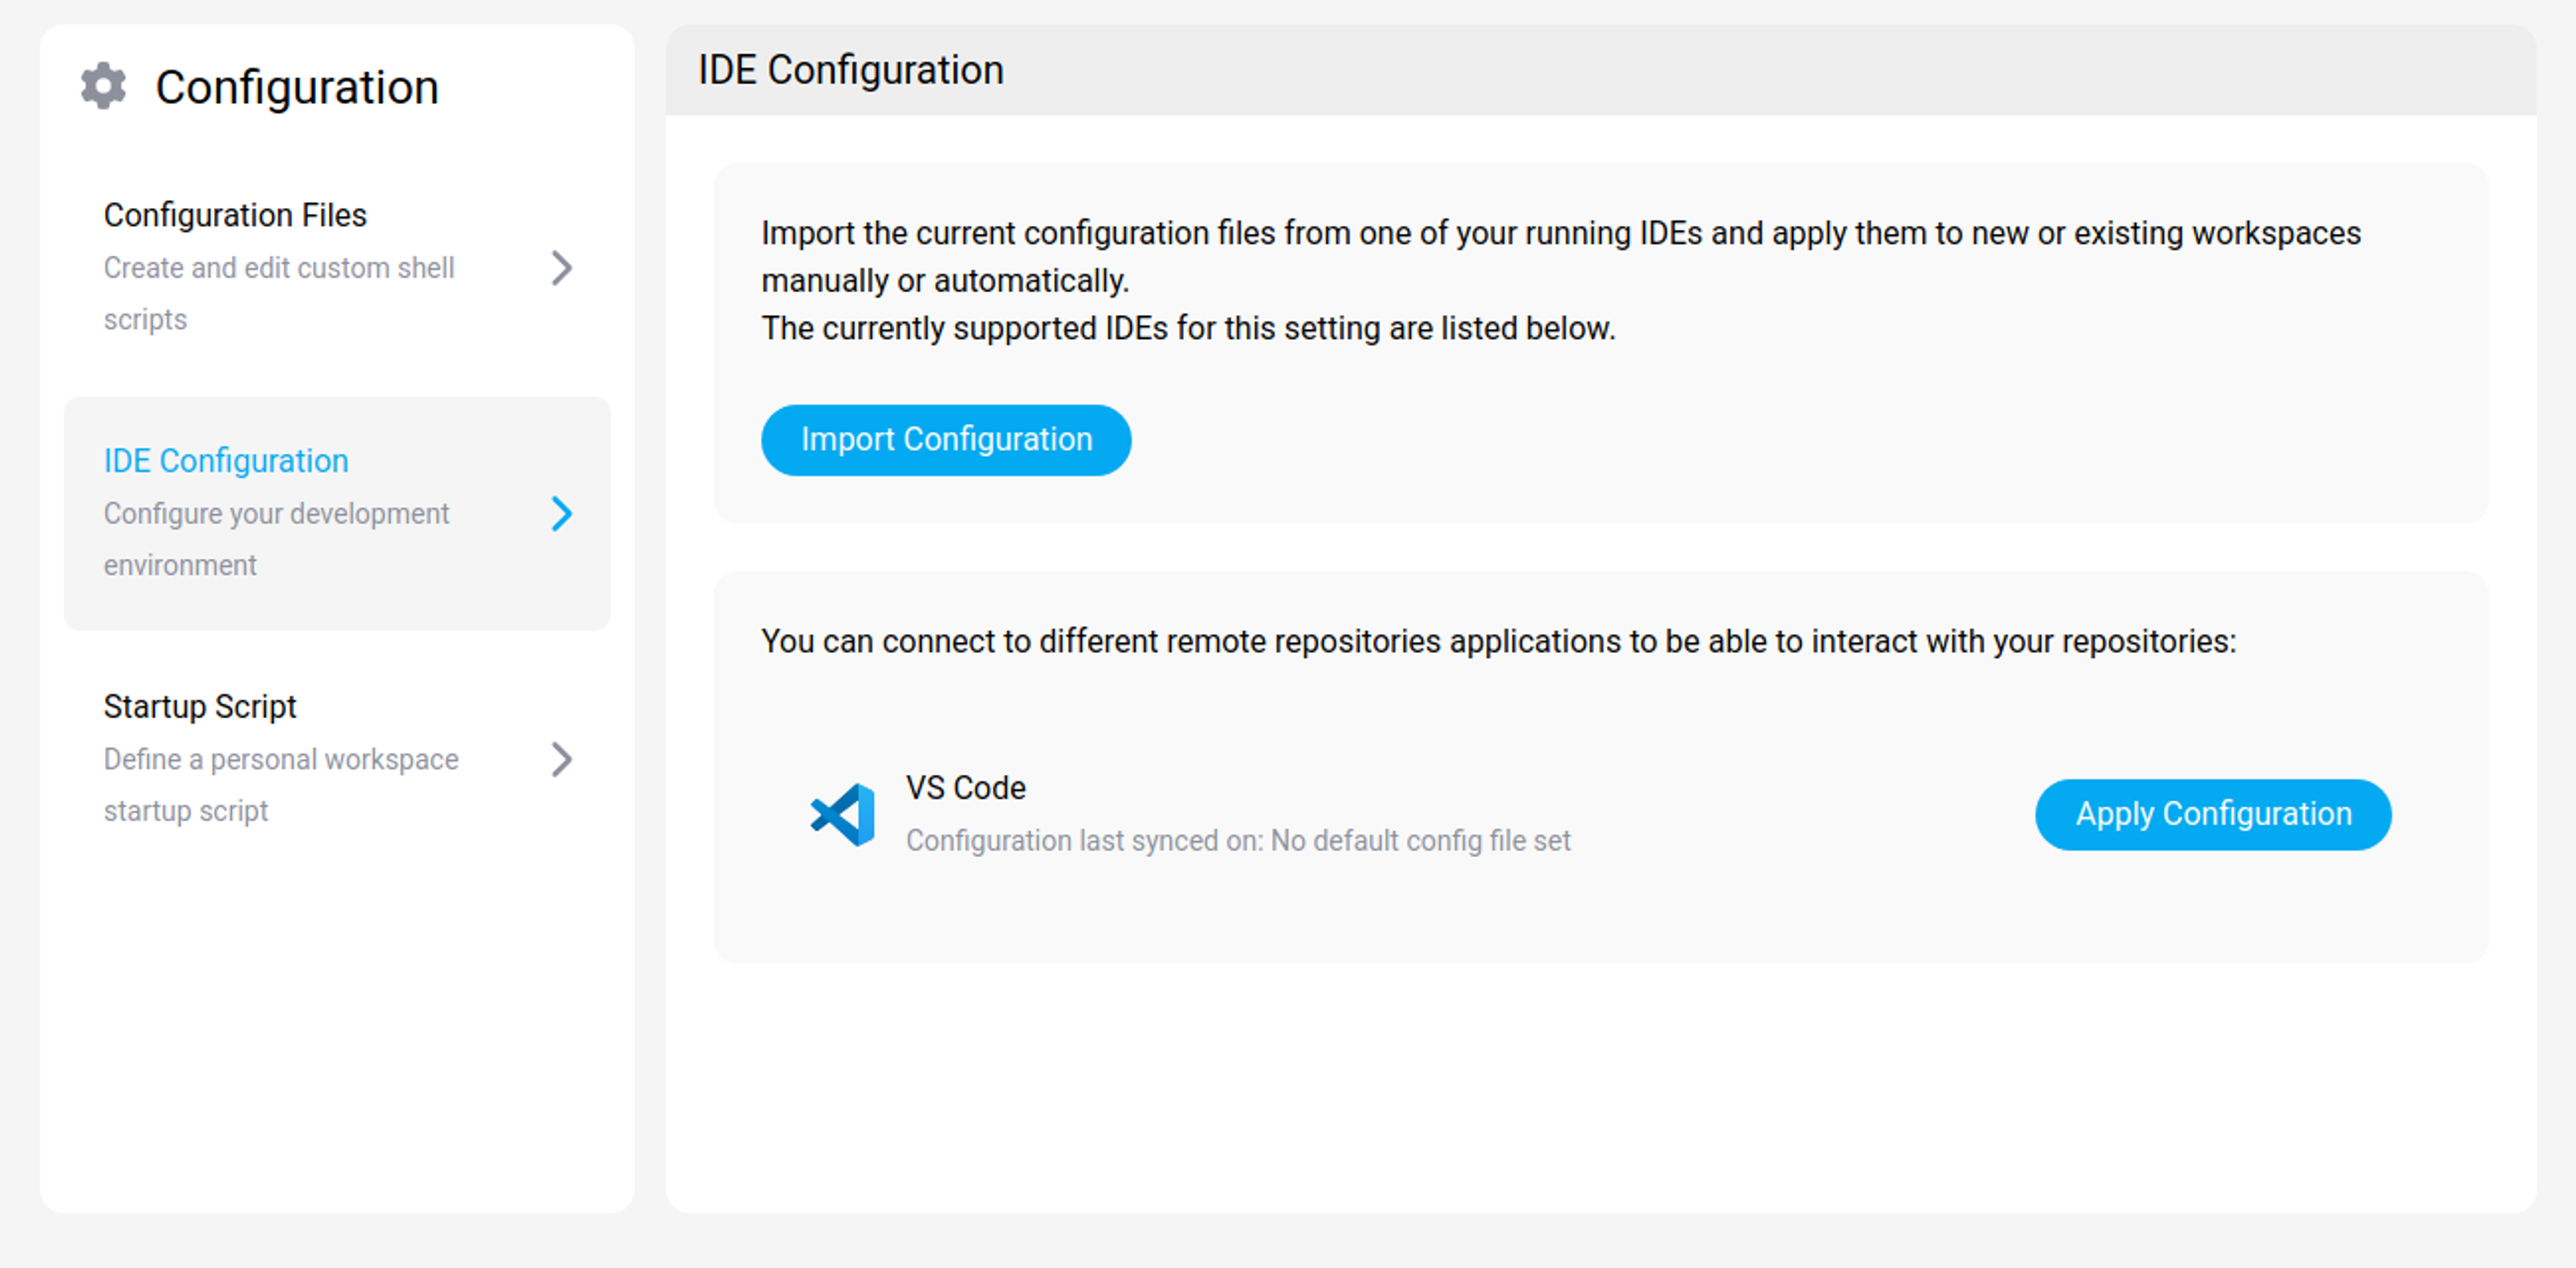
Currently supported IDEs are:
- VSCode,
- any IDEs from Jetbrains.
Startup Script
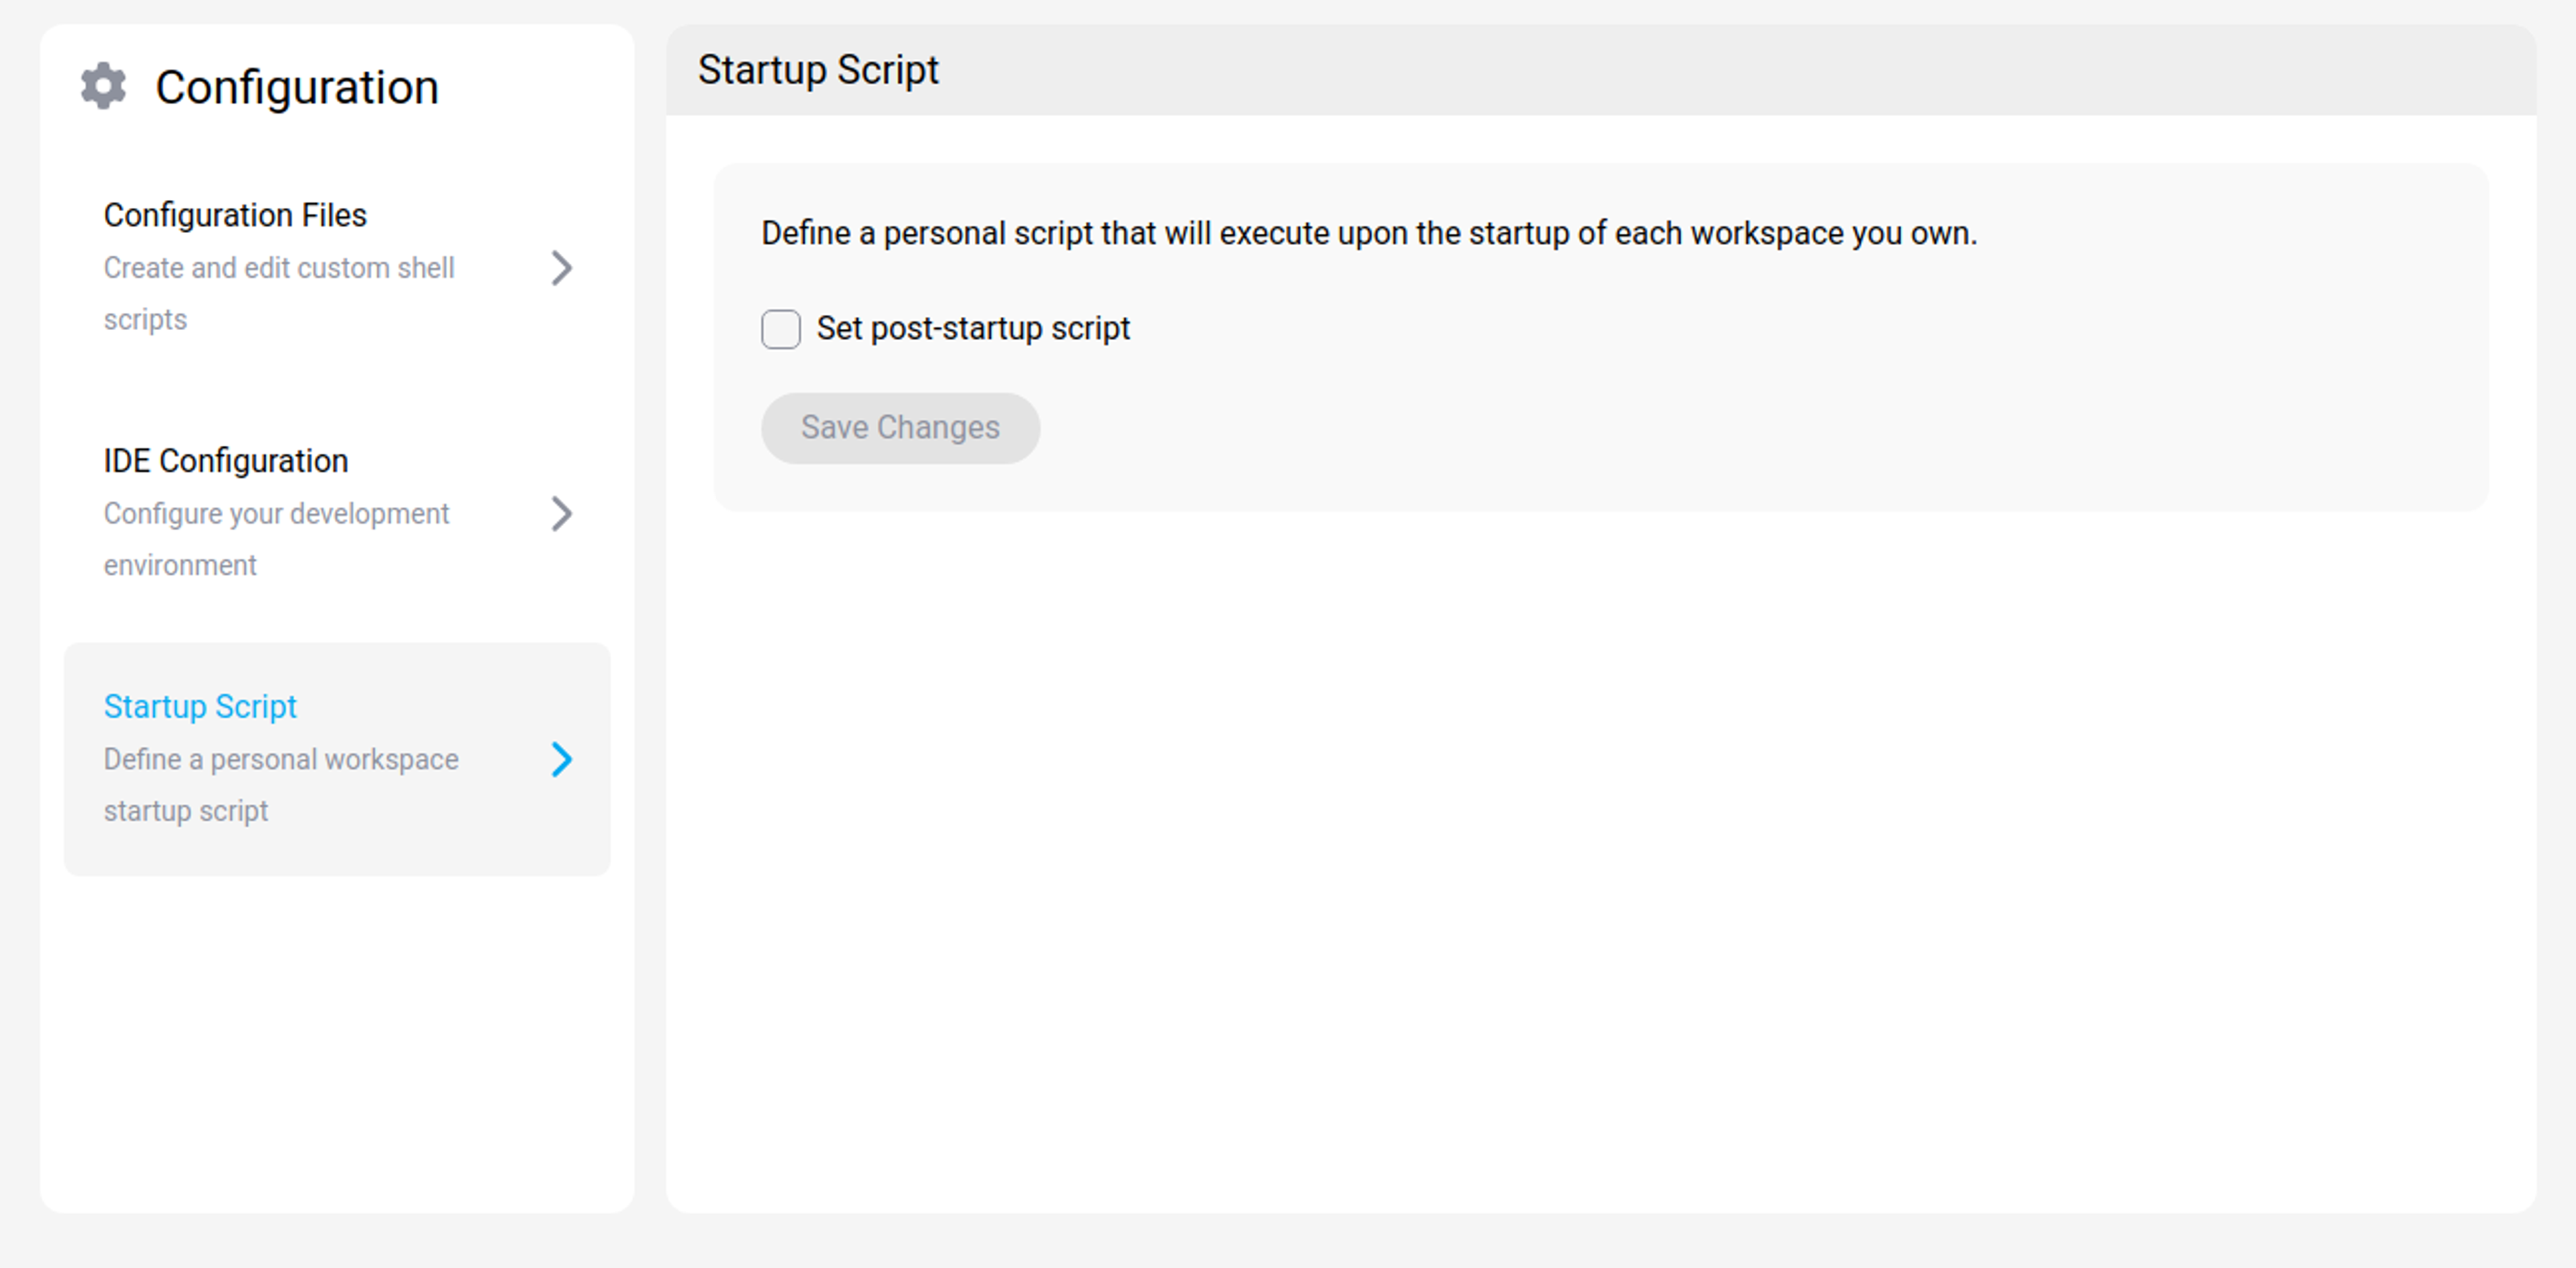
You can define a personal script that will be executed upon each startup of the workspaces that you own. For scripts set on an individual workspace, see Startup Scripts.
Tip:
Note that if you defined a startup script for a given workspace, then it will override this one
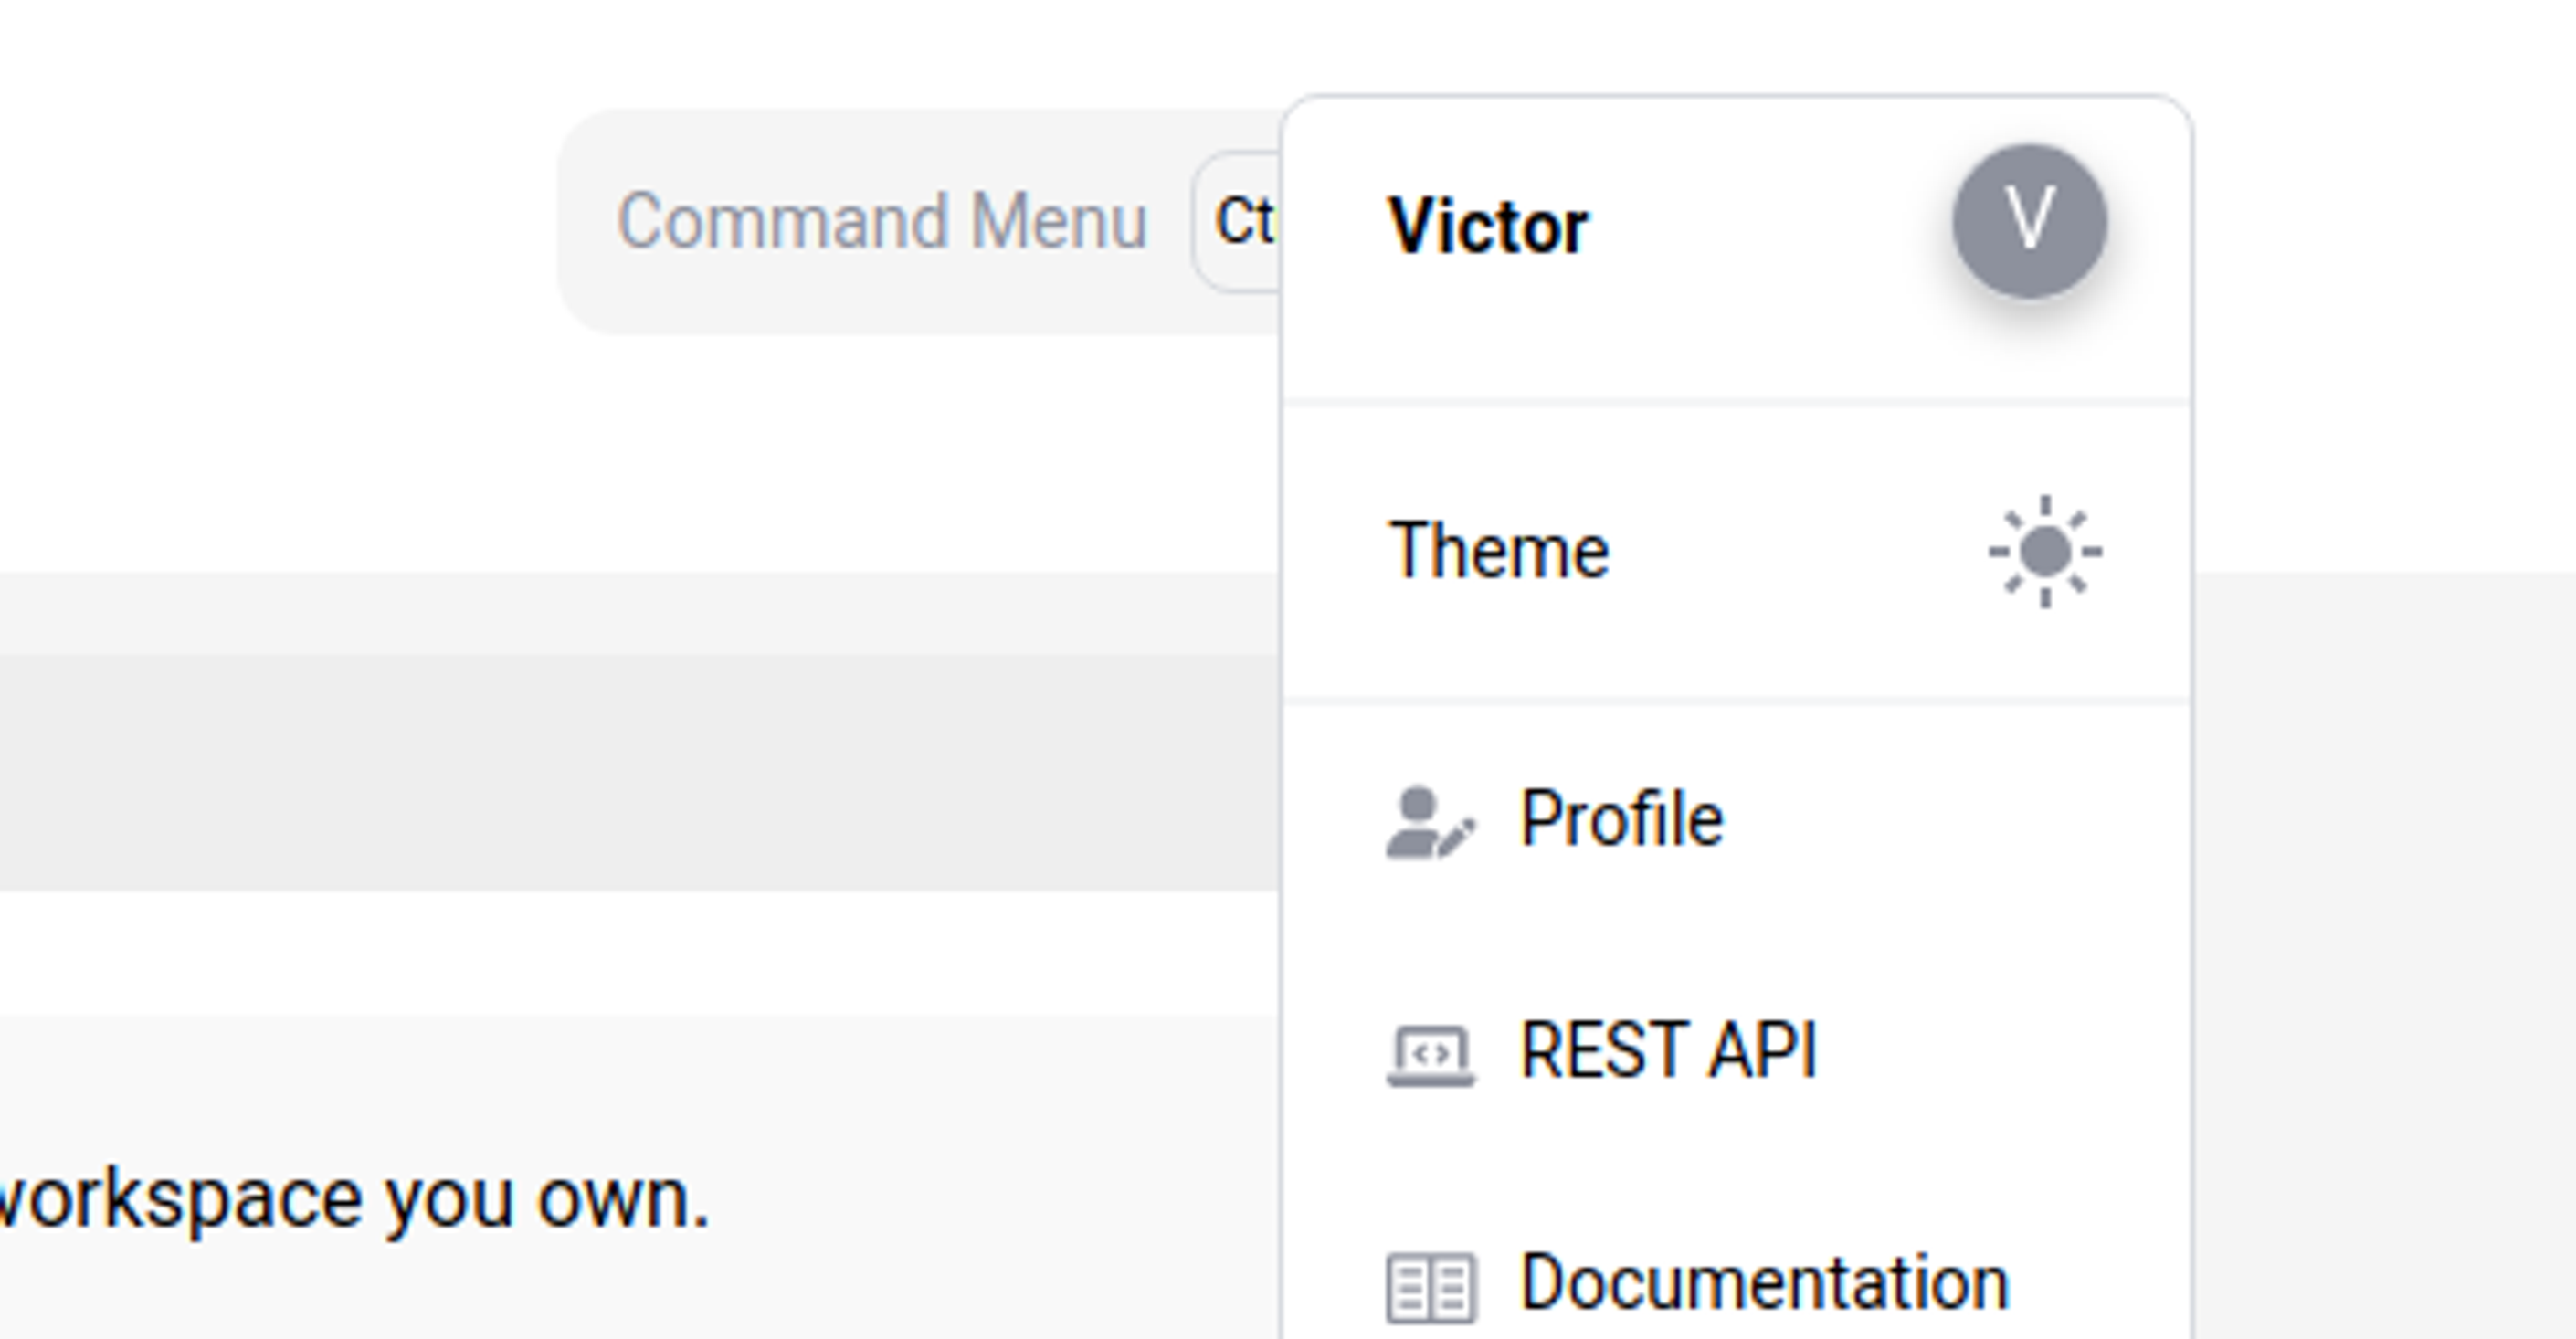
Theme
Two color themes for dashboards are available in the Profile Menu. You can switch between a light and dark theme for the User Interface (UI) display.
Language
A language for the UI can be selected from the footer. Supported languages for the platform UI are:
- English,
- French.
Related information
Share
Share
This Preview product documentation is Citrix Confidential.
You agree to hold this documentation confidential pursuant to the terms of your Citrix Beta/Tech Preview Agreement.
The development, release and timing of any features or functionality described in the Preview documentation remains at our sole discretion and are subject to change without notice or consultation.
The documentation is for informational purposes only and is not a commitment, promise or legal obligation to deliver any material, code or functionality and should not be relied upon in making Citrix product purchase decisions.
If you do not agree, select I DO NOT AGREE to exit.