This content has been machine translated dynamically.
Dieser Inhalt ist eine maschinelle Übersetzung, die dynamisch erstellt wurde. (Haftungsausschluss)
Cet article a été traduit automatiquement de manière dynamique. (Clause de non responsabilité)
Este artículo lo ha traducido una máquina de forma dinámica. (Aviso legal)
此内容已经过机器动态翻译。 放弃
このコンテンツは動的に機械翻訳されています。免責事項
이 콘텐츠는 동적으로 기계 번역되었습니다. 책임 부인
Este texto foi traduzido automaticamente. (Aviso legal)
Questo contenuto è stato tradotto dinamicamente con traduzione automatica.(Esclusione di responsabilità))
This article has been machine translated.
Dieser Artikel wurde maschinell übersetzt. (Haftungsausschluss)
Ce article a été traduit automatiquement. (Clause de non responsabilité)
Este artículo ha sido traducido automáticamente. (Aviso legal)
この記事は機械翻訳されています.免責事項
이 기사는 기계 번역되었습니다.책임 부인
Este artigo foi traduzido automaticamente.(Aviso legal)
这篇文章已经过机器翻译.放弃
Questo articolo è stato tradotto automaticamente.(Esclusione di responsabilità))
Translation failed!
Hello World workspace
Developer
The Hello World workspace is a self-contained training environment that lets you explore Citrix SecurSpaces™ hands-on. It includes a fullstack demo application — no Git credentials or internet access required.
Use this workspace to follow along with the quick start guides, run your first onboarding session, or validate that SecurSpaces is working correctly in your environment.
Before you start
The Hello World container image does not ship with SecurSpaces, so it has to be added to a project before anyone can create a workspace from it. A developer cannot do this themselves.
For project owners: set up a dedicated Hello World playground project that every new developer can join. Add the image to that project’s container resources once — either directly from Docker Hub (
strongnetwork/workspace-demo-multi-project) or from a company-approved registry — and configure the five database secrets in Step 1 as project secrets. New developers can then start this guide without having to ask for anything. If your organization screens container images before use, involve your platform administrator early: this image is reviewed like any other, so allow time for it.
If you’re a developer and the Hello World image isn’t available when you create a workspace, ask your project owner or platform administrator to set this up.
What’s inside
| Component | Details |
|---|---|
| Application | “ACME Project” — a user management app (search, add, view, delete users) |
| Frontend | Next.js + React + TypeScript + Bootstrap |
| Backend | Next.js API Routes (REST endpoints) |
| Database | PostgreSQL 15 (runs in a Docker container inside the workspace) |
| Tooling | Node.js LTS, Yarn, Docker, ESLint, TypeScript |
| VS Code extensions | GitHub Copilot Chat (pre-installed). Language and tooling extensions (ESLint, Prettier, Docker, PostgreSQL Explorer) are not pre-installed — add them as needed. |
Everything is pre-built and ready to run. The workspace functions without internet access or external accounts.
Step 1: Create a workspace
Confirm the Hello World image is available in your project. If it isn’t, see Before you start.
Create the workspace:
- From the SecurSpaces overview page, select Create workspace.
- Under Basic Info, select the Hello World container image and tag from the project’s available images.
- Under Workspace specifications, select a template with at least:
- CPU: 2 cores
- RAM: 8 GB
-
Navigate to the Resource Access Control step and under Secrets, add the following as environment variables:
Name Value DB_HOSTlocalhostDB_PORT5432DB_NAMEproject_acmeDB_USERacme_userDB_PASSWORDacme_password - Select Launch.
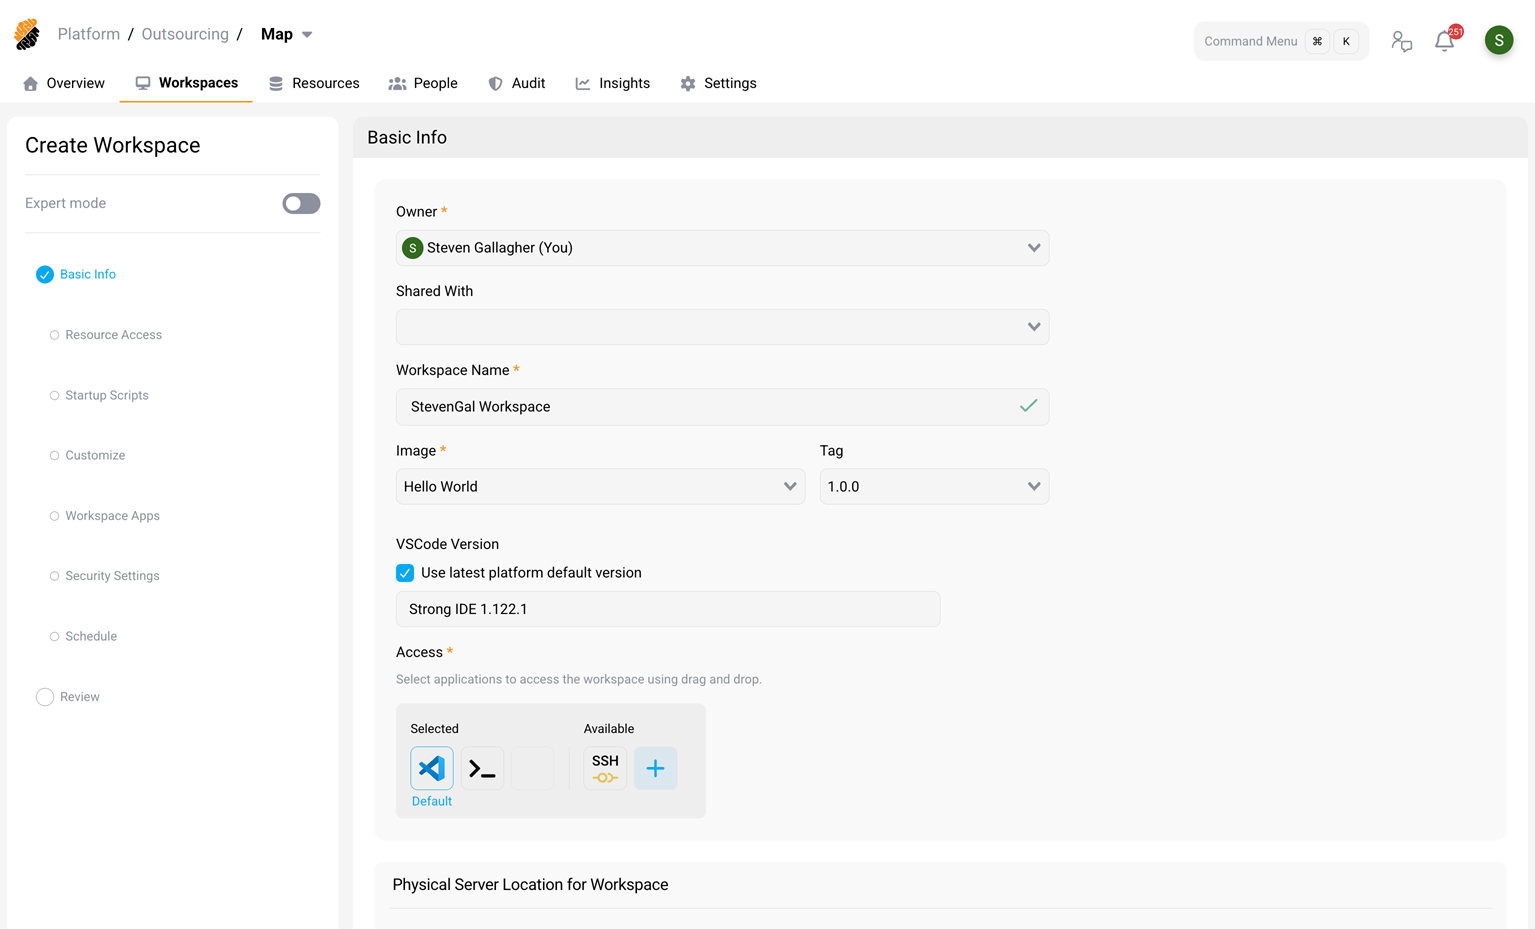
Your workspace starts in under 30 seconds. Docker is provided automatically by the platform (through Docker-in-Docker), so no additional setup is required.
Step 2: Understand how secrets are configured
The Hello World app connects to PostgreSQL using the environment variables you added in Step 1. These are injected into your workspace automatically — no .env file needed.
Open a terminal and verify:
echo $DB_USER    # acme_user
echo $DB_HOST    # localhost
<!--NeedCopy-->
The app reads these through process.env in its database connection code (src/lib/db.ts). DB_PORT is optional — it defaults to 5432 if omitted. As an alternative to the individual DB_* variables, you can supply a single DATABASE_URL connection string; if set, it takes precedence.
Personal vs. project secrets
| Type | Set by | Where it applies | Use case |
|---|---|---|---|
| Personal secret | You, in Profile > Security | Every workspace you own, by default | Your own API keys, tokens, service credentials |
| Project secret | Project owner, in project resources | The project, then attached to workspaces | Shared database credentials, team API keys, service URLs |
Neither type is all-or-nothing. You choose which workspaces a secret reaches, though the two work differently:
- Personal secrets inject into every workspace you own by default. To narrow that, switch the secret to Custom List and select the workspaces it applies to. A workspace you don’t select doesn’t receive the secret — useful when a credential belongs in your own project but not in a workspace you share with others.
- Project secrets are made available to the project, then attached to individual workspaces when the workspace is created or through the workspace template. A project secret reaches only the workspaces it’s attached to.
Both types can be injected as an environment variable or as a file. File secrets appear in the
/secrets folder; environment secrets show up in env output.
Three things worth knowing:
- Changes need a restart. Adding, editing, or retargeting a secret takes effect when the affected workspaces reboot, not immediately.
- Names become environment variable names, so they can’t contain spaces, hyphens, or special characters, and names reserved by Linux are rejected.
- Personal secrets win on a name clash. If a workspace secret has the same name as one of your personal secrets, the value comes from your personal secret.
In this exercise, you added the secrets directly to the workspace. In a real project, your project owner would typically configure shared secrets at the project level so they’re available to everyone automatically. You’d only add personal secrets (like your own API keys) through Profile > Security > Personal secrets.
Step 3: Start the application
Open the Cloud IDE (VS Code for Web) and open a terminal. Start the PostgreSQL database, then the dev server:
cd /home/developer/demo-nodejs-postgresql-main
docker-compose up -d    # start PostgreSQL (first run initializes the database)
yarn dev
<!--NeedCopy-->
VS Code detects the open port (3000) and shows a notification: “A workspace application is available at the port 3000”. Select Preview to open the app in VS Code’s built-in browser.
You should see the ACME Project interface. Try adding a user and searching — this exercises the full stack (React to API to PostgreSQL).
You’re ready
Your Hello World workspace is running and ready for development work. You’ve experienced:
- Creating a workspace from a container image
- Configuring secrets as environment variables
- Running a fullstack application with a database
What to do next
| Goal | Guide |
|---|---|
| Learn the everyday Node.js development loop in SecurSpaces | Tutorial: Develop, debug, and share a Node.js app — continues in this workspace |
| Set up your real project environment | Set up your account and Create and connect to your workspace |
| Understand SecurSpaces concepts and terminology | What is SecurSpaces? |
Get help
- Ask your project owner about which template to use for your actual project.
- Browse the SecurSpaces docs for detailed guides.
Share
Share
This Preview product documentation is Citrix Confidential.
You agree to hold this documentation confidential pursuant to the terms of your Citrix Beta/Tech Preview Agreement.
The development, release and timing of any features or functionality described in the Preview documentation remains at our sole discretion and are subject to change without notice or consultation.
The documentation is for informational purposes only and is not a commitment, promise or legal obligation to deliver any material, code or functionality and should not be relied upon in making Citrix product purchase decisions.
If you do not agree, select I DO NOT AGREE to exit.