Connect over SSH
An SSH-based connection lets you work in a Citrix SecurSpaces™ workspace from a locally installed IDE such as VS Code, Cursor, Windsurf, Kiro, or JetBrains. Your IDE runs on your machine while the code, tools, and compute stay in the cloud workspace.
SecurSpaces provides dedicated extensions for these IDEs that simplify workspace power management and one-click SSH connections. For IDEs without a SecurSpaces extension, you can connect manually using a standard SSH key pair.
Supported IDEs
VS Code Desktop, Cursor, Windsurf and Kiro connect in one click using the SecurSpaces extension. JetBrains Gateway connects through its own SSH configuration, and any other SSH-capable editor connects with a manual key pair. For the full list and the connection method for each, see Supported IDEs.
Prerequisites
Before you can connect to a workspace via SSH, verify the following:
- Remote Development Over SSH is enabled. A platform administrator, organization owner, or project owner must enable this setting under Workspace Settings > Security Settings > Remote Development Over SSH. This setting is available at the platform, organization, and project levels.
- SSH is enabled on the workspace. When creating or editing a workspace, go to Basic Info > Access and drag the SSH icon to Selected. Workspaces without SSH enabled display a “No SSH access” label and cannot accept SSH connections.
Connect using VS Code, Cursor, Windsurf, or Kiro
SecurSpaces provides the Citrix Secure Developer Spaces - Remote SSH extension for VS Code-based IDEs (VS Code, Cursor, Windsurf, and Kiro). Selecting any of these IDEs in the Connect Via SSH dialog uses the IDE’s custom URI scheme to launch the application, install the SecurSpaces extension if needed, and automatically establish the SSH connection.
The fastest way to get started is to initiate the connection from the SecurSpaces console:
- In the SecurSpaces console, navigate to the project Workspaces or Overview page.
- Locate a workspace with the SSH icon visible in the Access column and select it.
-
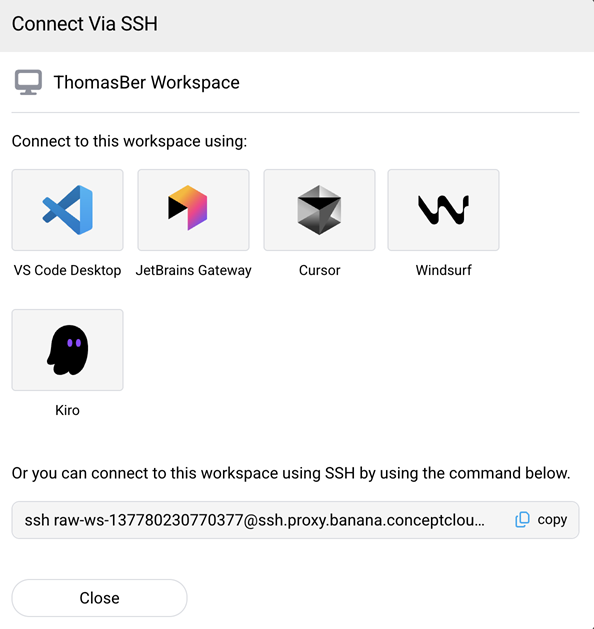
In the Connect Via SSH dialog, select your IDE (for example, VS Code Desktop).
-
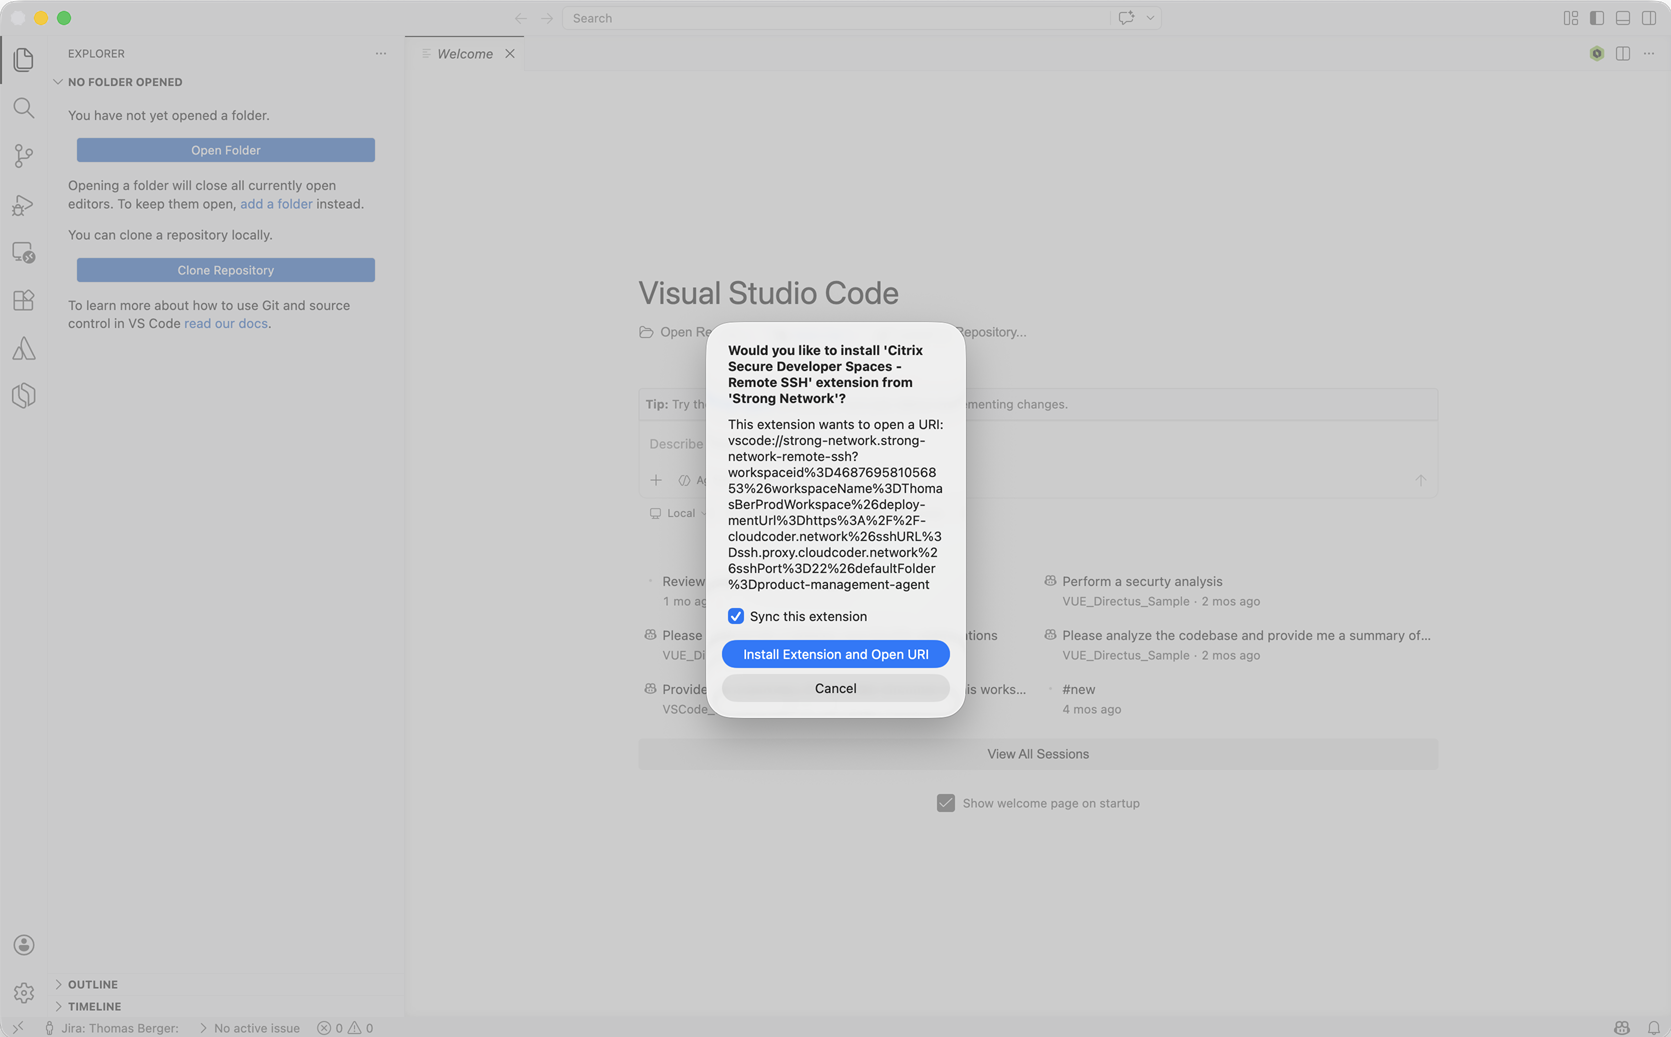
Your local IDE opens. If this is your first connection, you are prompted to install the Citrix Secure Developer Spaces - Remote SSH extension. Select Install Extension and Open URI.
- The extension connects to the workspace automatically.
Install the extension manually
If you prefer to set up the extension before initiating a connection from the console:
- Install the Citrix Secure Developer Spaces - Remote SSH extension from the VS Code Marketplace.
- Open the extension sidebar. Before you sign in, it shows an Environment URL field.
- Enter the URL of your SecurSpaces environment and select Connect. You are redirected to your browser to sign in.
- After you sign in, the sidebar lists the workspaces available to you, grouped by project.
What the extension installs
You install one extension, Citrix Secure Developer Spaces - Remote SSH. It has two parts:
- The part that runs on your local machine provides the sidebar, sign-in, the workspace list, SSH connections, and the status bar. Your access token stays on your machine and is never placed on the workspace.
- A companion component packaged inside it runs in the workspace. It reports activity so that a workspace you are actively using is not paused by idle detection, and it responds to the network measurements described in Monitor connection quality.
The companion component is installed into the workspace for you when you connect. There is nothing to set up. If you used an earlier version of the SecurSpaces extension, you might be prompted to remove the previous remote extension and restart your IDE.
Manage workspaces from the extension
The extension sidebar is the SecurSpaces entry point inside your IDE. Select the SecurSpaces icon in the activity bar to open it. Workspaces are grouped by project, and the workspace you are connected to is highlighted and sorted to the top.
Each workspace row shows its current state, and workspaces without SSH enabled are labeled. You can act on a workspace from its row controls or by right-clicking the row. Right-clicking a running workspace offers Connect in current window, Connect in new window, Edit workspace, and Delete workspace. A paused workspace offers Edit workspace and Delete workspace.
For the full list of states, row controls, and context menu actions, see Extension sidebar.
Starting or pausing a workspace shows progress until the new state settles.
Pausing the workspace you are currently connected to closes the remote connection and returns you to a local window.
Warning
Deleting a workspace permanently removes it and all of its data, and cannot be undone. Pause a running workspace before you delete it.
Open repositories, mount points, and apps
Expand a workspace to see what it contains. The connected workspace expands automatically the first time you connect to it.
- Repositories — the code repositories cloned into the workspace. Select one to open that folder in your IDE, or right-click it and select Open in Terminal to open a terminal at that location.
- Mount points — the shared storage attached to the workspace. Read-only mount points are labeled. Select one to open the folder, or right-click it and select Open in Terminal.
- Apps — the workspace apps that are running, such as Jupyter Lab or a preview app. Select an app to open it in your default browser, or right-click it and select Copy URL.
Apps can only be opened while the workspace is running.
Open the SecurSpaces console from your IDE
Some actions open the SecurSpaces console in your browser rather than being performed in the IDE. The console applies your permissions to these actions.
- Open SDS Console — opens your SecurSpaces environment.
- Add workspace — the + button in a project header starts the create-workspace flow.
- Edit Profile Settings — opens your profile.
- Troubleshoot Connection — opens the profile page used to diagnose connection problems.
These commands are also available from the Command Palette under Citrix SDS.
Monitor connection quality
While you are connected to a workspace, the status bar shows the connection state, the workspace name, and the round-trip time of the connection. The color changes as latency increases, so a slow connection is visible without opening anything.
Hover over the status bar for more detail, including an estimated bandwidth. Select it to Remeasure Network Now or to Disable Network Monitor. Both actions are also available from the Command Palette, along with Enable Network Monitor to turn monitoring back on.
Disabling the monitor stops the measurements and hides the status bar. The choice persists across restarts.
Each IDE window runs its own monitor for the workspace that window is connected to.
Note
These measurements describe the responsiveness of the connection your IDE uses, which includes SSH and protocol overhead. They are a guide to how the connection feels rather than a raw network benchmark.
If some actions are missing
The extension is updated more often than the platform it connects to. When your SecurSpaces platform is older than the extension, actions that depend on newer platform features are hidden rather than shown and failing.
If the extension hides anything, the bottom of the sidebar reads More actions appear here after your SDS administrator updates the platform. Repositories, mount points, and apps, along with the console actions listed earlier, are the features affected. Ask your platform administrator to upgrade SecurSpaces.
Connect using JetBrains Gateway
JetBrains Gateway enables SSH connections from JetBrains IDEs (IntelliJ IDEA, PyCharm, GoLand, and others).
Install JetBrains Gateway
Download and install JetBrains Gateway.
Create an SSH connection
-
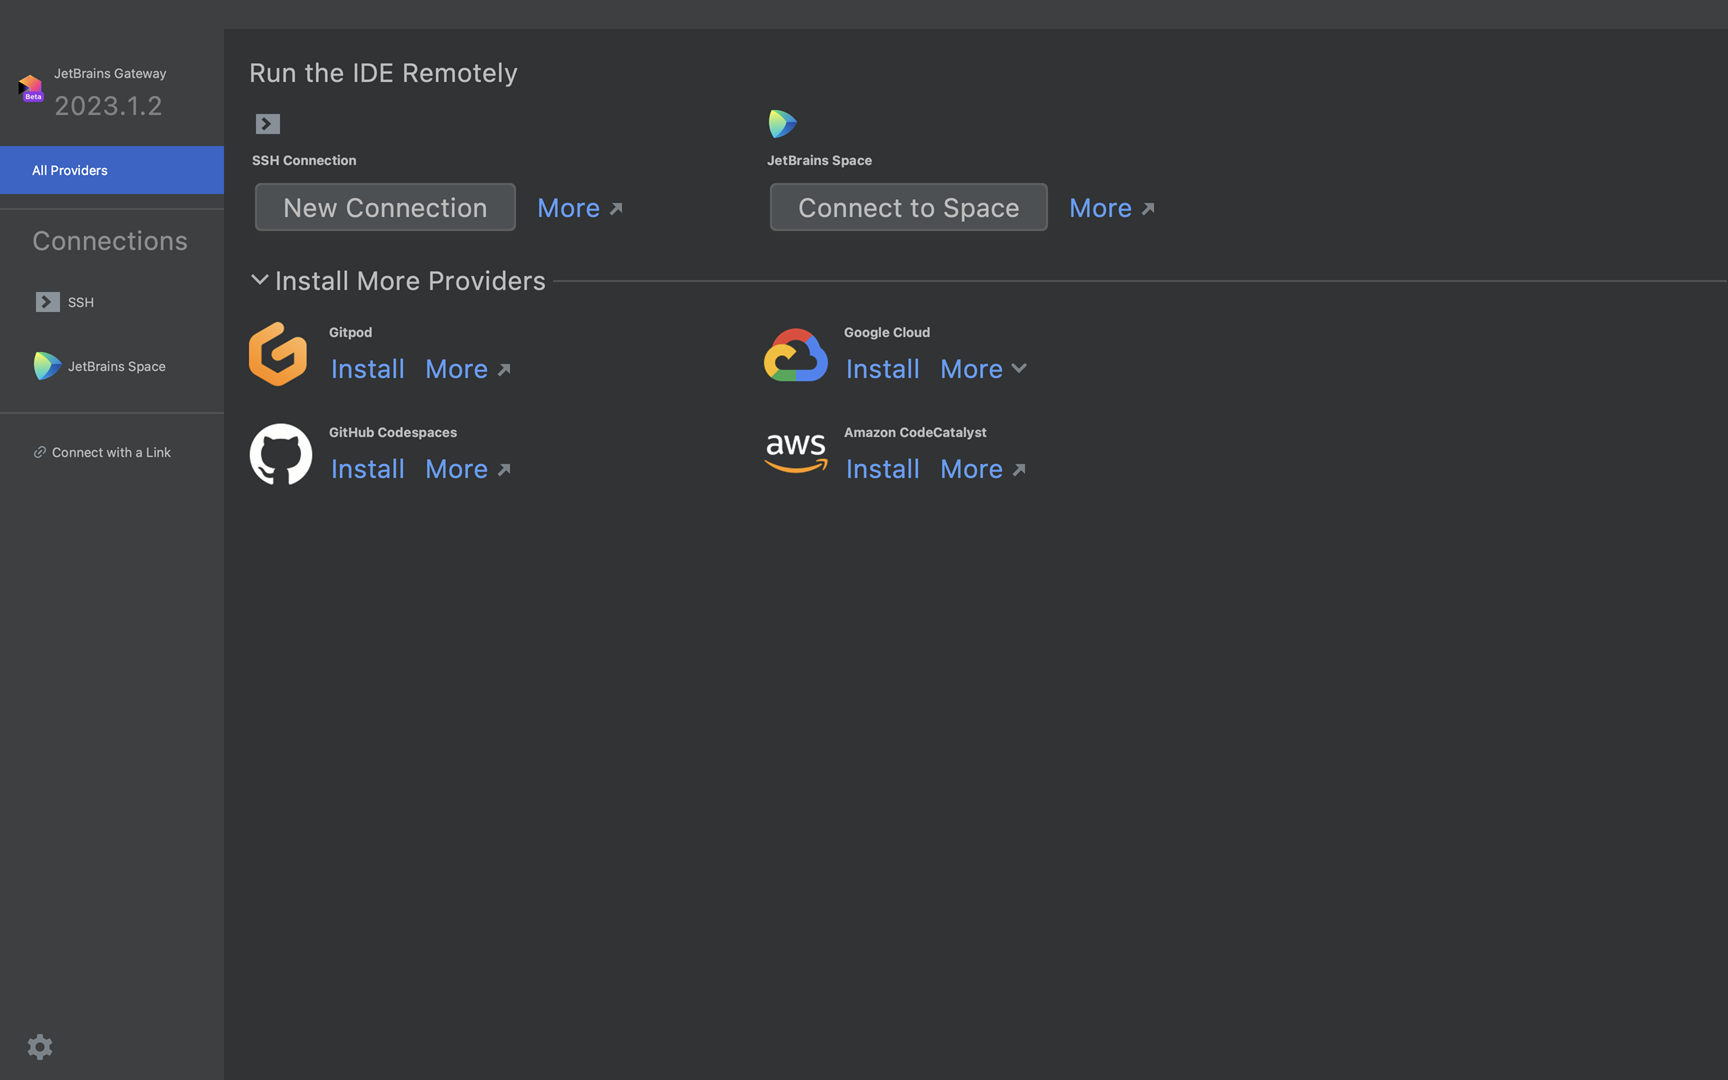
In JetBrains Gateway, select New Connection under SSH Connection.
- Click the settings icon next to Connection, then click + to add a new SSH configuration.
- In the SecurSpaces console, select the SSH icon on your workspace, then select JetBrains Gateway in the dialog. The SSH command is displayed at the bottom of the dialog.
- Enter the connection details from the SSH command:
-
Host — The part after
@(for example,ssh.proxy.cloudcoder.network). -
Username — The part before
@(for example,raw-ws-468769581056853). - Authentication type — Select Key Pair and provide the path to your private key.
Tip:
Disregard the
sshprefix and the@character when splitting the command into Host and Username. -
Host — The part after
-
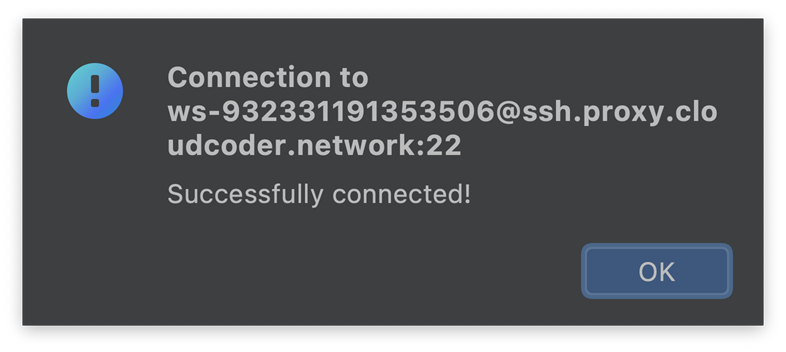
Click Test Connection to verify the configuration, then click OK.
- Select your new configuration as the Connection and click Check Connection and Continue.
-
Choose the JetBrains IDE you want to use and the project folder to open, then click Download IDE and Connect.
Tip:
The IDE is downloaded to your workspace, not to your local machine.
- After the IDE installation completes, you are connected to your workspace.
Manual SSH connection
If your IDE lacks a dedicated SecurSpaces extension or a JetBrains Gateway integration, you can connect using a standard SSH key pair. This approach works with any terminal or SSH-capable editor.
Generate an SSH key pair
On UNIX and UNIX-like systems, run ssh-keygen in your terminal:
ssh-keygen
<!--NeedCopy-->
- Press Enter to accept the default path and file name, or specify a custom location.
- Enter a passphrase when prompted (recommended for additional security), or press Enter to skip.
- The command generates a key pair: a private key (for example,
id_rsa) and a public key (for example,id_rsa.pub).
Upload your public key
Upload the public key to the SSH Keys section in your Profile > Security page.
Supported key types: ssh-rsa, ecdsa-sha2-nistp256, ecdsa-sha2-nistp384, ecdsa-sha2-nistp521, ssh-ed25519, sk-ecdsa-sha2-nistp256@openssh.com, sk-ssh-ed25519@openssh.com.
Authorize your workspace
After uploading your key, authorize the workspace(s) that should accept connections using this key.
Connect from a terminal
- In the SecurSpaces console, select the SSH icon on your workspace to open the Connect Via SSH dialog.
- Copy the SSH command displayed at the bottom of the dialog.
-
Run the command in your terminal:
ssh raw-ws-468769581056853@ssh.proxy.cloudcoder.network
<!--NeedCopy-->
You are now connected to your workspace via SSH.
Key expiry and renewal
A public key you register for SSH access does not last indefinitely. It is valid for a fixed period — 7 days by default — after which the platform stops accepting it. A platform administrator sets the period, so your deployment might use a different one.
What you have to do about it depends entirely on how you connect:
| How you connect | What happens when the key expires |
|---|---|
| The SecurSpaces extension for VS Code, Cursor, Windsurf, or Kiro | Nothing. The extension renews the key for you. |
| JetBrains Gateway with the SecurSpaces plugin | Nothing. The plugin renews the key for you. |
Any other SSH client — plain ssh, a terminal emulator, or an IDE’s own generic remote-SSH support |
You renew it yourself. The connection stops working until you do. |
This is why a setup that worked last week can start refusing connections without anything having changed. The key expired, and nothing renewed it, because the client you use has no way to.
Renew a key manually
- Go to Profile > Security > Remote Access Over SSH.
- Upload your public key again, and authorize the workspaces that should accept it.
You can keep using the same key pair; it is the registration that expires, not the key itself. See Security.
Note:
If you connect from a script, a scheduled job, or anything else unattended, plan for this. There is no automatic renewal outside the SecurSpaces IDE integrations, so an unattended connection will fail every time the key expires until someone re-registers it.
Keeping a session alive
An SSH session that connects normally and then drops after a period of inactivity has usually been closed by something between you and the workspace, not by the workspace itself. Idle TCP connections are commonly reaped by corporate proxies, VPNs, load balancers, and NAT gateways.
Sending traffic periodically keeps the connection from looking idle. In ~/.ssh/config on your local
machine:
Host *
    ServerAliveInterval 60
    ServerAliveCountMax 3
<!--NeedCopy-->
That asks for a keepalive every 60 seconds and gives up after three unanswered ones. VS Code Remote-SSH,
JetBrains Gateway, and plain ssh all read this file, so it applies to every client at once.
For work that must outlive the connection entirely, run it under a terminal multiplexer such as tmux or
screen, or with nohup. The process then survives the disconnection and you reattach to it afterwards.
Note:
A session that ends while you are away might also be the workspace pausing rather than the connection dropping. Idle detection stops workspaces on a schedule. See Workspace lifecycle.
Recovering a corrupted terminal
After an interrupted session, the terminal can show stray characters, sequences such as ^[[<35;80;24M, a
missing or duplicated prompt, or no response to typing.
This happens when a full-screen program was running at the moment the connection dropped. Programs such as
tmux, vim, less, top, and interactive CLI tools put the terminal into a special mode — often enabling
mouse reporting — and restore it when they exit cleanly. A dropped connection gives them no chance to, so the
terminal is left in that mode and mouse movement or scrolling arrives as text.
To restore it:
reset
<!--NeedCopy-->
If reset is unavailable or the terminal does not respond, stty sane followed by Ctrl+L usually works.
To reduce how often this happens:
- Add the keepalive above, so sessions drop less often in the first place.
- Turn off mouse reporting in tools that enable it. In
tmux, remove or commentset -g mouse onin~/.tmux.conf. - Detach from a multiplexer session with its own key binding rather than closing the terminal window.