Sign in to workspaces with SAML using custom domains
If you’ve configured a custom domain in Citrix Workspace (for example, https://workspaces.yourdomain.com), additional configuration in Citrix Cloud and your SAML provider might be required, depending on the SAML sign-in scenarios that you want to support in Citrix Cloud.
You might need a pair of SAML applications for this configuration. Citrix Cloud requires different SAML service provider (SP) endpoints, depending on whether the SAML application uses the cloud.com or workspaces.yourdomain.com URLs to perform the sign-in operation.
For more information about configuring custom domains in Citrix Workspace, see Configure a custom domain in the Citrix Workspace product documentation.
Considerations for deploying one or two SAML applications
To determine whether you need to deploy a single or dual SAML application solution, identify which combination of SAML sign-in scenarios you need your SAML provider to support.
The following sign-in scenarios share the same SAML application (SAML App 1) by default:
- SAML authentication for Citrix Workspace where the Workspace sign-in URL for your region (cloud.com, citrixcloud.jp, cloud.us) is configured in your SAML provider as the SP Entity ID.
- SAML authentication for Citrix Cloud using your unique sign-in URL (for example,
https://citrix.cloud.com/go/mycompany). In this scenario, administrators are authenticated to Citrix Cloud using SAML, based on their Active Directory (AD) group membership.
Adding SAML authentication for users through a custom domain (for example, https://workspaces.mycompany.com) that you configure in Workspace Configuration requires a second SAML application (SAML App 2).
Note:
Adding a custom URL and configuring SAML will take up to 24 hours for provisioning in Citrix Cloud.
The following table lists the supported combinations of SAML sign-in scenarios and the required SAML apps.
| Sign in to Workspace with Workspace URL | Sign in to Workspace with custom domain URL | Sign in to Citrix Cloud using SAML sign-in URL | SAML App 1 required? | SAML App 2 required? |
|---|---|---|---|---|
| Yes | No | No | Yes - Use cloud.com SAML endpoints | No |
| No | Yes | No | Yes - Use custom domain SAML endpoints | No |
| No | No | Yes | Yes - Use cloud.com SAML endpoints | No |
| Yes | No | Yes | Yes - Use cloud.com SAML endpoints | No |
| No | No | Yes | Yes - Use the cloud.com SAML endpoints | Yes - Use custom domain SAML endpoints |
| Yes | Yes | Yes | Yes - Use cloud.com SAML endpoints | Yes - Use custom domain SAML endpoints |
Single SAML application configuration
- In Citrix Cloud, go to Workspace Configuration > Access and configure a custom domain. For more information, see Configure a custom domain.
- In your SAML provider’s management console, configure a single SAML application using the custom domain as the SP endpoints.
- Download the SAML signing certificate for the SAML application. In a later step, you upload this certificate to Citrix Cloud.
-
For the Entity ID, ensure
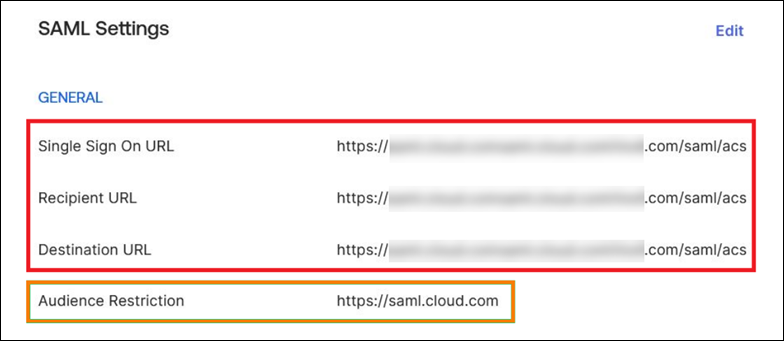
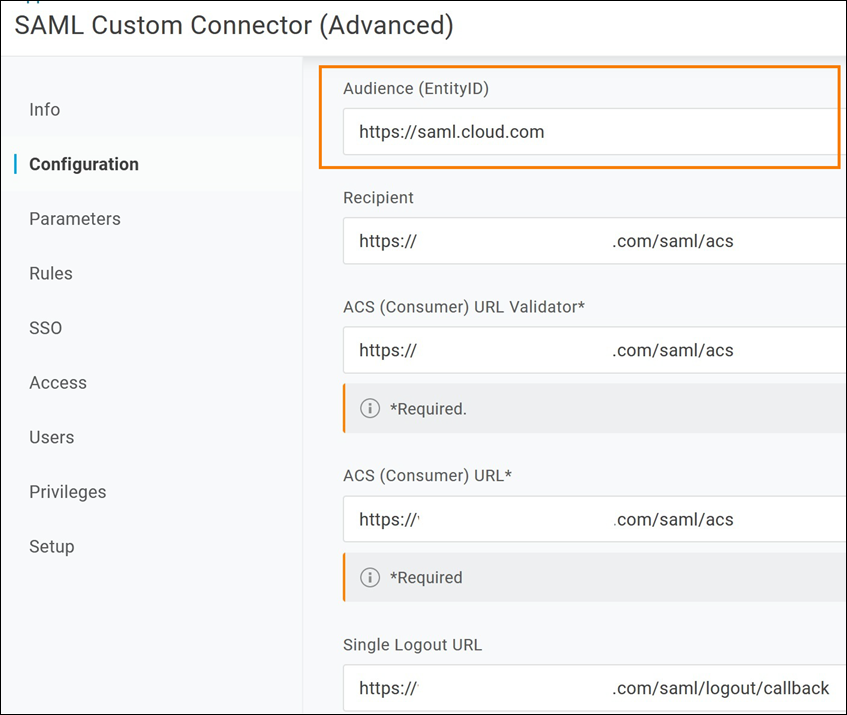
https://saml.cloud.comis entered. Depending on your SAML provider, this setting might be labeled Audience instead. For all other endpoints, replacehttps://saml.cloud.comwith the Workspace custom domain that you configured in Step 1.The following example illustrates the endpoint configuration for Okta, where Audience Restriction contains the Entity ID value:
The following example illustrates the endpoint configuration for OneLogin, where Audience contains the Entity ID value:
- In Citrix Cloud, go to Identity and Access Management > Authentication and configure the SAML connection.
- Go to Workspace Configuration > Authentication and select SAML 2.0.
- Go to Workspace Configuration > Custom Workspace URL > Edit and select Use only the custom domain.
- Select Save to save your changes.
- To test the configuration, sign in to Citrix Workspace using your custom Workspace URL (
https://workspaces.mycompany.com).
Dual SAML application configuration
- In Citrix Cloud, go to Workspace Configuration > Access and configure a custom domain. For more information, see Configure a custom domain.
- In your SAML provider’s management console, configure two SAML applications. Configure these applications identically, including identical signing settings for SSO and SLO requests, binding type, and logout settings. If the configurations in these SAML applications don’t match, you might experience differences in sign-in and logout behavior when switching between your Workspace URL and your Workspace custom domain.
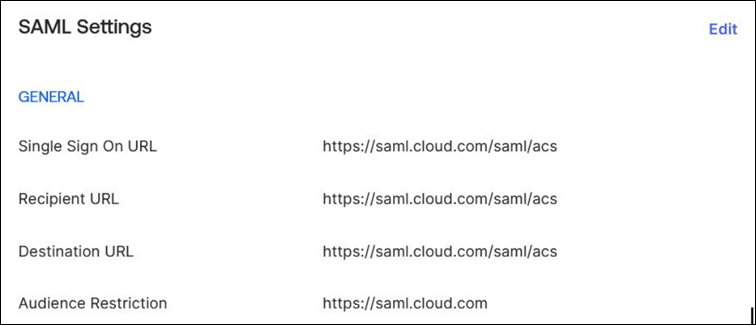
- In the first SAML application, configure the following SP endpoints:
- Entity ID:
https://saml.cloud.com - Assertion Consumer Service:
https://saml.cloud.com/saml/acs - Logout:
https://saml.cloud.com/saml/logout/callback
The following example shows this endpoint configuration in the Okta management console:
- Entity ID:
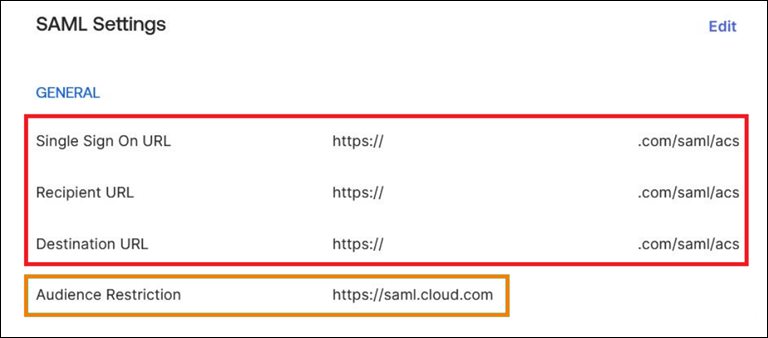
- In the second SAML application, configure the following SP endpoints. Use your Workspace custom domain only for the Assertion Consumer Service and Logout endpoints.
- Entity ID:
https://saml.cloud.com - Assertion Consumer Service:
https://workspaces.mycompany.com/saml/acs - Logout:
https://workspaces.mycompany.com/saml/logout/callback
The following example shows this endpoint configuration in the Okta console. Note that Audience Restriction contains the Entity ID value.
- Entity ID:
- Download the SAML signing certificates for both SAML applications. You upload these to Citrix Cloud in a later step.
- In the Citrix Cloud management console, configure a SAML connection:
- From the Citrix Cloud menu, select Identity and Access Management.
- On the Authentication tab, locate SAML 2.0, click the ellipsis button, and select Connect.
- On the Configure SAML page, enter the details of the first SAML application that you created in Step 2.
- Configure Citrix Workspace™ to use the new SAML connection:
- From the Citrix Cloud menu, select Workspace Configuration.
- On the Authentication tab, select SAML 2.0.
- On the Access tab, in Custom Workspace URL, select Edit.
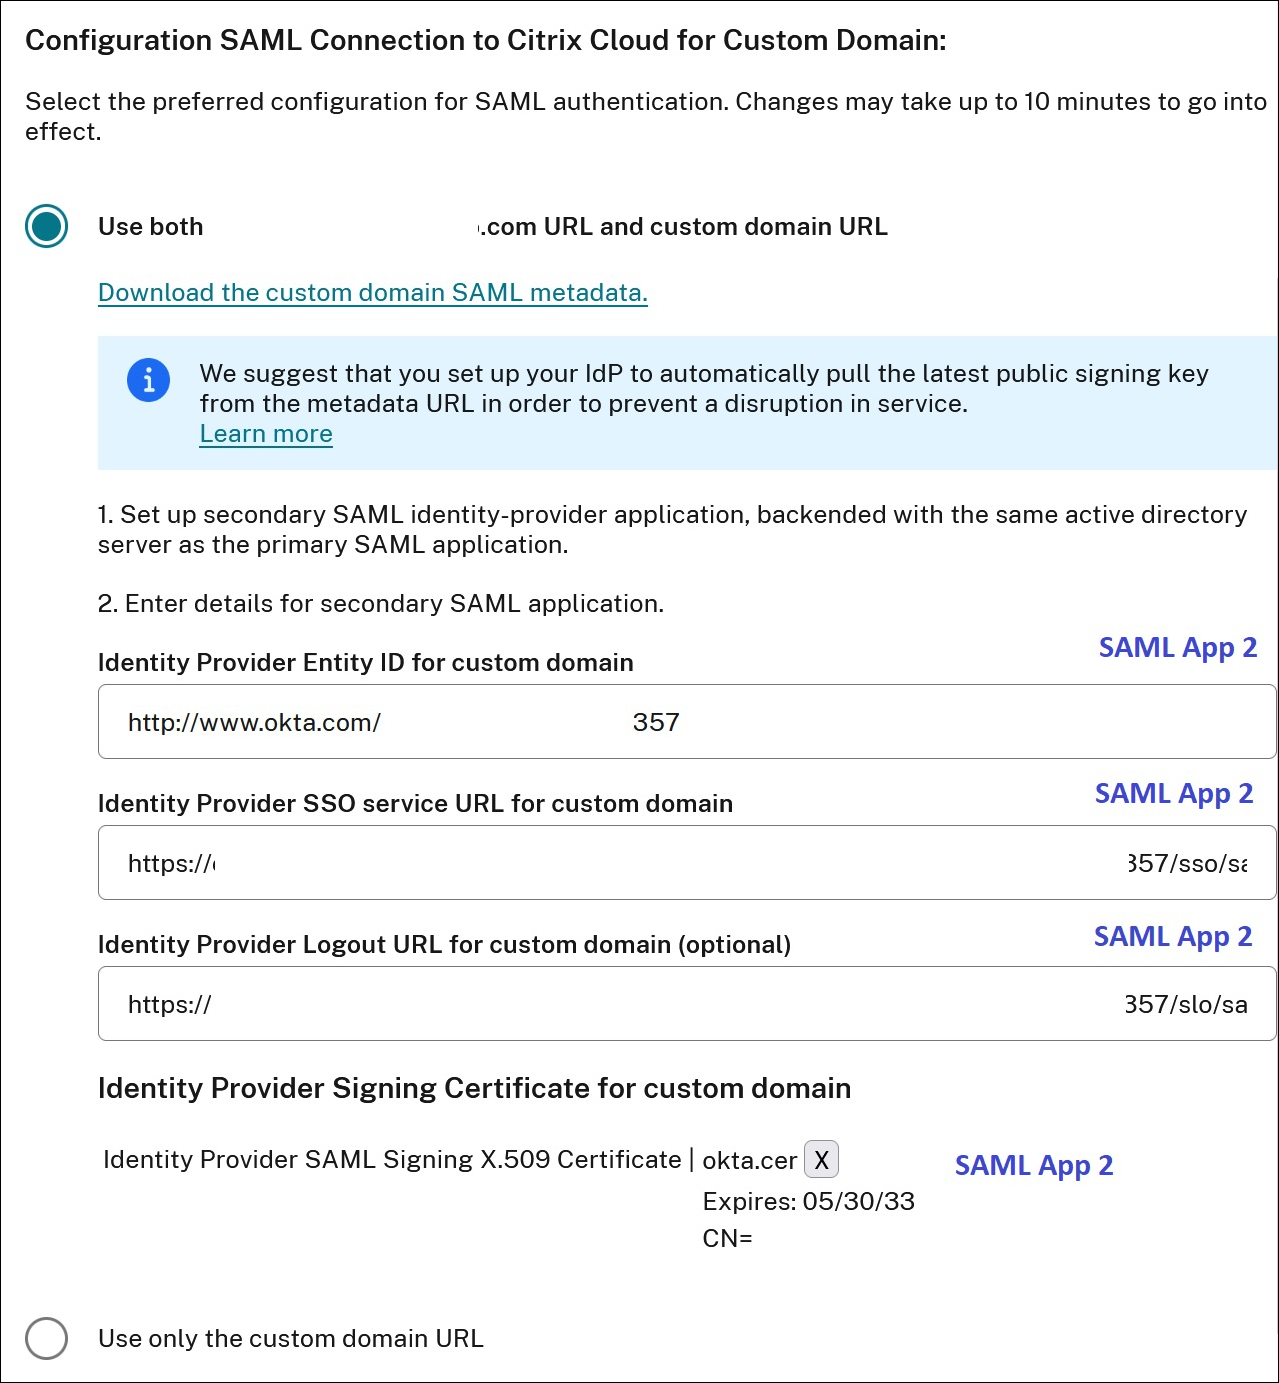
- On the Configure for SAML page, select Use both customer.cloud.com URL and custom domain URL.
- Enter the following information:
- In Identity Provider Entity ID for custom domain, enter the Entity ID from the second SAML application that you created in Step 2.
- In SSO service URL for custom domain, enter the SSO URL from the second SAML application.
- In Logout URL for custom domain, enter the SLO URL from the second SAML application.
- In Identity Provider Signing Certificate for custom domain, upload the SAML signing certificate from the second SAML application.
- Select Save to save your changes.
View the SAML connection details
After configuration, go to Identity and Access Management > Authentication. In SAML 2.0, select Select SAML Provider > View from the ellipsis menu. The SAML Configuration page displays pairs of SAML endpoints configured for Entity ID, SSO URL, and Logout URL.
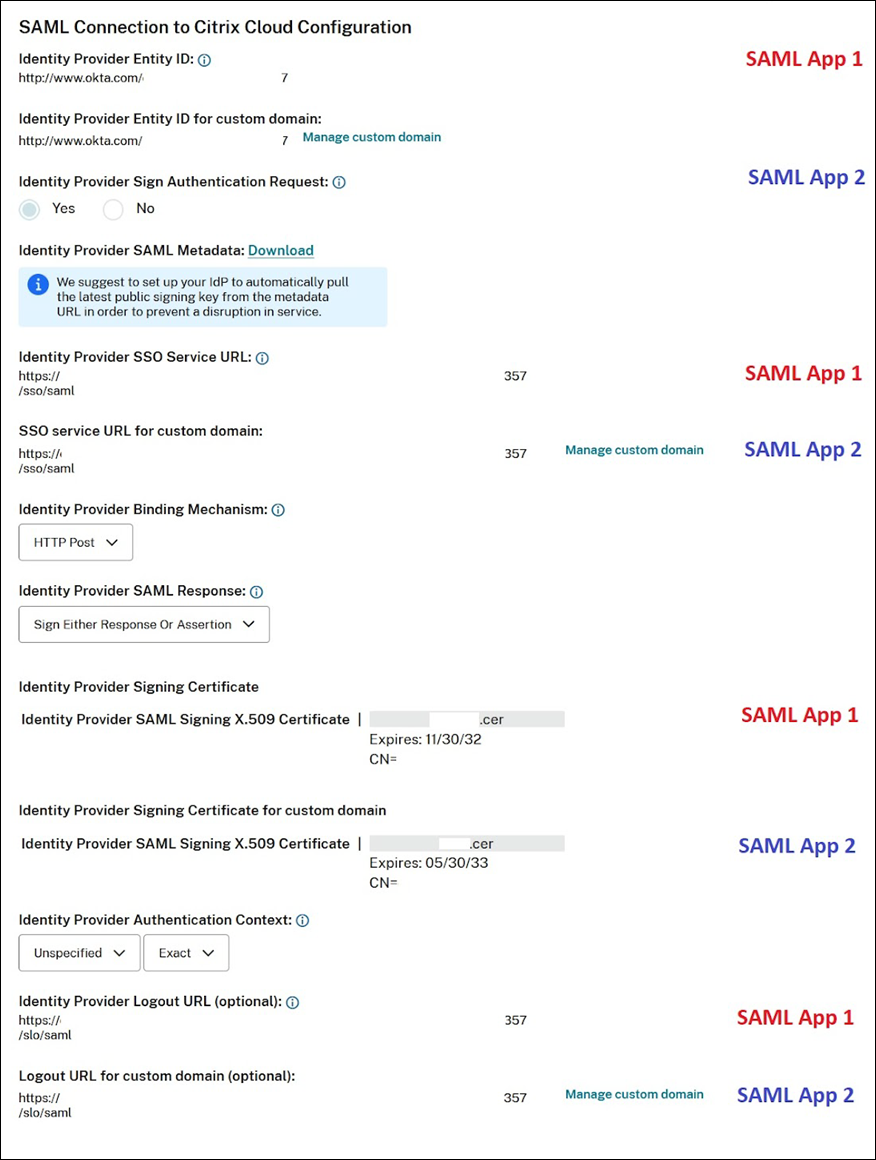
All other SAML configuration settings apply to both the first and second SAML applications that you created.
Verify sign-ins to Citrix Workspace
To verify the sign-in and logout behavior you configured, perform the following tests:
- Sign in to Citrix Workspace using your Workspace URL (
https://mycompany.cloud.com) and your SAML provider. - Sign in to Citrix Workspace using your Workspace custom domain (
https://workspace.mycompany.com) and your SAML provider. - Sign in to Citrix Cloud using your unique sign-in URL (
https://citrix.cloud.com/go/mycompany) and your SAML provider.