管理交付组
注意:
从版本 2511 开始,Citrix Web Studio(基于 Web)是 Citrix Virtual Apps and Desktops™ 的唯一管理控制台。Citrix Studio(基于 MMC)已从安装程序中删除。本文仅适用于 Web Studio。有关 Citrix Studio 的信息,请参阅 Citrix Virtual Apps and Desktops 7 2212 或更早版本中的等效文章。
简介
- 本文介绍了通过管理控制台管理交付组的步骤。除了更改创建组时指定的设置外,您还可以配置创建交付组时不可用的其他设置。
过程类别包括:常规、用户、计算机和会话。有些任务跨越多个类别。例如,“阻止用户连接到计算机”在计算机类别中描述,但它也影响用户。如果您在一个类别中找不到某个任务,请检查相关类别。
-
其他文章也包含相关信息:
- 应用程序 包含有关管理交付组中应用程序的信息。
-
管理交付组需要交付组管理员内置角色权限。有关详细信息,请参阅 委派管理。
-
常规
- 查看组详细信息
- 更改首选属性
- 更改交付类型
- 更改 StoreFront™ 地址
- 更改功能级别
- 管理 Remote PC Access 交付组
- 使用文件夹组织交付组
- 管理 App Protection
- 更改交付组的暂停功能
查看组详细信息
- 使用搜索功能查找特定的交付组。有关说明,请参阅 搜索实例。
- 根据需要从搜索结果中选择一个组。
- 有关组列的说明,请参阅下表。
- 单击底部详细信息窗格中的选项卡,以获取有关此组的更多信息。
| 列 | 说明 |
|---|---|
| 交付组 | 组名称和会话类型。会话类型包括单会话操作系统和多会话操作系统。 |
| 交付 | 从此组交付的资源类型。可能的值包括应用程序、桌面以及应用程序和桌面。如果交付组由专用计算机组成,则显示“静态计算机分配”。 |
| 正在使用的会话 | 已设置的计算机数量和处于断开连接状态的计算机数量。 |
| 已分配计数 | 目录中分配给交付组的计算机数量。 |
| 文件夹 | 组在 Delivery Groups(交付组)树中的位置。它显示组所在文件夹的名称(包括尾随反斜杠),如果组位于根级别,则显示“-”。 |
更改首选属性
首选属性控制用户如何从交付组访问和启动资源。要更改交付组的首选属性,请执行以下步骤:
- 在 Studio 中,选择左侧窗格中的 Delivery Groups(交付组)。
- 选择一个组,然后在操作栏中选择 Edit(编辑)。
- 在 Preferences(首选项)页面上,更改下表中的任何设置。
- 选择 Apply(应用)以应用所做的任何更改并保持窗口打开。或者,选择 OK(确定)以应用更改并关闭窗口。
| 设置 | 说明 |
|---|---|
| 说明 | Citrix Workspace™(或 StoreFront)使用的文本以及用户看到的文本。 |
| 启用交付组 | 交付组是否已启用。 |
| 时区
|
此交付组中计算机所在的时区。此设置会自动显示为新创建的交付组在 Settings > Date and Time(设置 > 日期和时间)中设置的时区。如果需要,您可以为交付组选择不同的时区。下拉菜单列出了站点支持的时区。
注意: 更改交付组上的时区可能会重新启动该交付组中的计算机。为避免这种情况,请确保在非生产时间更改时区设置。 |
| 启用 Secure ICA® | 使用 SecureICA 保护交付组中计算机的通信,SecureICA 会加密 ICA 协议。默认级别为 128 位。可以使用 SDK 更改级别。Citrix® 建议在遍历公共网络时使用更多加密方法,例如 TLS 加密。此外,SecureICA 不检查数据完整性。 |
| 每个用户的最大桌面数 | 用户可以拥有的桌面数量。 |
在将仅应用程序或桌面和应用程序类型更改为仅桌面类型之前,请从组中删除所有应用程序。
- 选择左侧窗格中的 Delivery Groups(交付组)。
- 选择一个组,然后单击操作栏中的 Edit(编辑)。
- 在 Delivery Type(交付类型)页面上,选择所需的交付类型。
- 单击 Apply(应用)以应用所做的任何更改并保持窗口打开。或者,单击 Save(保存)以应用更改并关闭窗口。
更改 StoreFront 地址
- 选择左侧窗格中的 Delivery Groups(交付组)。
- 选择一个组,然后单击操作栏中的 Edit(编辑)。
- 在 StoreFront 页面上,选择或添加 StoreFront URL。这些 URL 由安装在交付组中每台计算机上的 Citrix Workspace™ 应用程序使用。
- 单击 Apply(应用)以应用所做的任何更改并保持窗口打开。或者,单击 Save(保存)以应用更改并关闭窗口。
您还可以通过选择左侧窗格中的 StoreFront 来指定 StoreFront 服务器地址。
更改功能级别
在升级交付组中计算机上的 VDA 以及包含交付组中使用的计算机的计算机目录后,更改交付组的功能级别。
开始之前:
- 如果您使用 Citrix Provisioning™(以前称为 Provisioning Services),请在 Citrix Provisioning 控制台中升级 VDA 版本。
- 启动包含已升级 VDA 的计算机,以便它们可以向 Delivery Controller 注册。此过程会告知控制台交付组中需要升级的内容。
- 如果您必须继续使用较早的 VDA 版本,则无法使用较新的产品功能。有关详细信息,请参阅升级文档。
要更改交付组的功能级别:
- 在左侧窗格中选择交付组。
- 选择一个组,然后在操作栏中单击更改功能级别。仅当检测到已升级的 VDA 时,才会显示更改功能级别操作。
- 单击更改。
显示内容会指示您哪些计算机(如果有)无法更改为该功能级别以及原因。然后,您可以取消更改操作,解决计算机问题,然后再次执行更改操作。
更改完成后,您可以将计算机还原到其以前的状态。选择交付组,然后在操作栏中选择撤消功能级别更改。
管理 Remote PC Access 交付组
如果 Remote PC Access 计算机目录中的计算机未分配,则该计算机将临时分配给与该目录关联的交付组。此临时分配使计算机以后可以分配给用户。
交付组到计算机目录的关联具有优先级值。优先级决定了计算机在向系统注册时或用户需要计算机分配时所分配的交付组。值越低,优先级越高。如果 Remote PC Access 计算机目录具有多个交付组分配,则软件会选择优先级最高的匹配项。使用 PowerShell SDK 设置此优先级值。
首次创建时,Remote PC Access 计算机目录与交付组关联。以后添加到目录的计算机帐户或组织单位可以添加到交付组。此关联可以关闭或打开。
要添加或删除 Remote PC Access 计算机目录与交付组的关联:
- 在左侧窗格中选择交付组。
- 选择一个 Remote PC Access 组。
- 在详细信息部分中,单击计算机目录选项卡,然后选择一个 Remote PC Access 目录。
- 要添加或恢复关联,请单击添加桌面。要删除关联,请单击删除关联。
使用文件夹组织交付组
-  您可以创建文件夹来组织交付组,以便于访问。

-  > **提示:** > > 您可以通过单击操作栏右上角的**文件夹**图标,为“交付组”节点设置首选默认视图(文件夹视图或列表视图)。
所需角色
默认情况下,您需要具有以下内置角色才能创建和管理交付组文件夹:云管理员、完全管理员或交付组管理员。如有必要,您可以自定义用于创建和管理交付组文件夹的角色。有关详细信息,请参阅所需权限。
创建交付组文件夹
开始之前,请规划如何组织交付组。请考虑以下事项:
- 您可以将文件夹嵌套多达五层(不包括默认根文件夹)。
- 一个文件夹可以包含交付组和子文件夹。
-
Web Studio 中的所有节点(例如计算机目录、交付组、应用程序和应用程序组)在后端共享相同的文件夹树。为避免在重命名或移动文件夹时出现名称冲突,请在不同节点之间为第一级文件夹使用唯一的名称。
-
如果您使用
New-BrokerAdminFolderSDK cmdlet 创建文件夹并希望它显示在交付组节点下,则必须使用Set-BrokerAdminFolderMetadatacmdlet 添加ContainsDeliveryGroups元数据。
示例:
Set-BrokerAdminFolderMetadata -AdminFolderId {adminFolderUid} -Name ContainsDeliveryGroups -Value true <!--NeedCopy--> -
要创建交付组文件夹,请按照以下步骤操作:
- 在左侧窗格中选择交付组。
- 在文件夹层次结构中,选择一个文件夹,然后在操作栏中选择创建文件夹。
- 输入新文件夹的名称,然后单击完成。
提示:
如果您在意外位置创建了文件夹,可以将其拖动到正确位置。
移动交付组
- 您可以在文件夹之间移动交付组。详细步骤如下:
-
在左侧窗格中选择交付组。
-
按文件夹查看组。您也可以打开文件夹层次结构上方的查看所有以一次性查看所有组。
-
右键单击一个组,然后选择移动交付组。
-
选择要将组移动到的文件夹,然后单击完成。
-
提示:
-
-
您可以将组拖动到文件夹。
管理交付组文件夹
您可以删除、重命名和移动交付组文件夹。
-  请注意,只有当文件夹及其子文件夹不包含任何交付组时,才能删除该文件夹。

-  要管理文件夹,请执行以下步骤:
-
在左侧窗格中选择交付组。
-
在文件夹层次结构中,选择一个文件夹,然后根据需要选择操作栏中的一个操作:
- 要重命名文件夹,请选择重命名文件夹。
- 要删除文件夹,请选择删除文件夹。
- 要移动文件夹,请选择移动文件夹。
-
按照屏幕上的说明完成剩余步骤。
下表列出了对交付组文件夹执行操作所需的权限。
- |**操作**|**所需权限**| | – | – |
-
创建交付组文件夹 创建交付组文件夹 删除交付组文件夹 删除交付组文件夹 移动交付组文件夹 移动交付组文件夹 重命名交付组文件夹 编辑交付组文件夹 将交付组移动到文件夹 编辑交付组文件夹和编辑交付组属性
管理应用程序保护
以下信息是对应用程序保护的补充。请注意以下详细信息:
-
您必须拥有有效的应用程序保护授权。要购买应用程序保护功能,请联系您的 Citrix 销售代表。
-
应用程序保护需要 XML 信任。要启用 XML 信任,请转到设置 > 启用 XML 信任。
-
关于防屏幕捕获:
- 在 Windows 和 macOS 上,只有受保护内容的窗口为空白。当受保护的窗口未最小化时,应用程序保护处于活动状态。
- 在 Linux 上,整个捕获为空白。无论受保护的窗口是否最小化,应用程序保护都处于活动状态。
要为交付组选择应用程序保护方法,请执行以下步骤:
-
在左侧窗格中选择交付组。
-
选择一个组,然后在操作栏中选择编辑。
-
- 在应用程序保护页面上,您可以看到以下选项:
-
选项 说明 -
不应用 选择此选项以不应用该设置。 -
应用到此交付组 选择防键盘记录和/或防屏幕捕获选项。将鼠标悬停在每个设置上可阅读工具提示中的详细信息。 -
上下文应用 要应用此设置,请在访问策略设置页面中配置访问策略。 -
^^ - 在左侧窗格中单击访问策略,然后单击添加。
-
^^
^^ 1. 在添加策略页面上,执行以下操作:
- i. 输入策略名称并根据需要配置设置。
- ii. 在筛选器和值字段中,输入详细信息,然后单击完成。新策略将列在应用程序保护页面中。为此策略启用所需设置。
- iii. 单击保存。
- i. 输入策略名称并根据需要配置设置。
- 在交付组页面上,选择交付组,然后单击底部的详细信息选项卡。将显示已应用的新应用程序保护设置。
将交付组的挂起功能设置为必需或可选:
-
必需 - 交付组只能包含那些支持挂起的 VM。
-
可选 - 交付组可以包含支持挂起或不支持挂起的 VM。
开始之前
仅当交付组中存在的所有 VM 都可挂起时,才能将交付组的挂起功能更改为“必需”。
要更改交付组的挂起功能:
- 在 Web Studio 中,转至左侧窗格中的“交付组”。
- 选择一个组,然后在操作栏中单击“更改挂起功能”。
- 单击“是”以确认您的操作。
用户
- 本节涵盖以下主题:
在交付组中添加或删除用户
有关用户的详细信息,请参阅用户。
- 在左侧窗格中选择“交付组”。
-
选择一个组,然后在操作栏中单击“编辑”。 - 1. 在“用户”页面上:
- 要添加用户,请单击“**添加**”,然后指定要添加的用户。 - 要删除用户,请选择一个或多个用户,然后单击“**删除**”。 - 选中或清除此复选框以允许未经身份验证的用户访问。 - 单击“应用”以应用所做的任何更改并保持窗口打开。或者,单击“保存”以应用更改并关闭窗口。
导入或导出用户列表
对于包含物理单会话操作系统计算机的交付组,您可以在创建交付组后从 .csv 文件导入用户信息。您还可以将用户信息导出到 .csv 文件。.csv 文件可以包含来自以前产品版本的数据。
CSV 文件中的第一行必须包含两个列标题,以逗号分隔。请确保第一个标题是 Machine Account,第二个标题是 User Names。(您可以包含其他标题,但不支持这些标题。)文件中的后续行包含逗号分隔的数据。Machine Account 条目可以是计算机 SID、FQDN 或域和计算机名称对。
-
要导入或导出用户信息:
-
- 在左侧窗格中选择“交付组”。
-
- 选择一个组,然后在操作栏中单击“编辑”。
- 在“计算机分配”页面上,选择“导入”列表或“导出”列表,然后浏览到文件位置。
- 单击“应用”以应用所做的任何更改并保持窗口打开。或者,单击“保存”以应用更改并关闭窗口。
限制访问交付组中的桌面和应用程序
您可以通过执行以下任务来管理用户对交付组中资源的访问:
限制特定用户访问桌面
满足以下两个条件的用户可以访问交付组中的桌面:
- 有权访问此交付组中的资源(应用程序和桌面)。
-
默认情况下,访问权限由部署的用户访问列表决定,该列表未通过 Studio 配置。您可以从默认用户范围添加或删除用户。请参阅在交付组中添加或删除用户。
-
有权访问此组中的桌面。
-
有关详细信息,请参阅步骤 8. 桌面(或桌面分配规则)。
-
要限制特定用户访问桌面,请参阅在创建和编辑交付组时限制桌面使用。
-
限制特定用户访问应用程序
满足所有以下条件的用户可以访问交付组中的应用程序:
-
有权访问此交付组中的资源(应用程序和桌面)。
默认情况下,访问权限由部署的用户访问列表决定,该列表未通过 Studio 配置。您可以从默认用户范围中添加或删除用户。请参阅在交付组中添加或删除用户。
-
有权访问此组中的应用程序。
默认情况下,应用程序授权策略规则包括所有人。有关详细信息,请参阅 PowerShell SDK
BrokerAppEntitlementPolicyRulecmdlet。如果需要,您可以使用本节中介绍的步骤限制用户访问交付组中的应用程序。 -
有权访问包含此应用程序的应用程序组。
- 若要在交付组级别限制特定用户访问应用程序,请按照以下步骤操作:
- 在 Studio 中,选择左侧窗格中的交付组。
- 选择一个交付组,然后在操作栏中选择编辑。
-
若要限制应用程序访问,请按照以下步骤操作:
-
在左侧窗格中,单击应用程序分配规则。
-
若要允许特定用户访问应用程序,请选择限制应用程序使用,然后单击允许列表区域中的添加,并指定要包括的用户或用户组。
-
若要阻止特定用户访问应用程序,请单击阻止列表区域中的添加,并指定要排除的用户或用户组。
-
注意:
- 如果您选择限制应用程序使用但将允许列表和阻止列表都留空,则此组中的任何用户都无法使用应用程序。
- 如果您选择限制应用程序使用并使允许列表为空,则阻止列表中的用户除外,所有用户都可以使用应用程序。
限制对交付组中资源的访问
您对限制用户访问交付组中资源所做的任何更改都将覆盖以前的设置,无论您使用何种方法。您可以:
-
使用委派管理范围限制管理员访问: 您可以创建并分配一个允许管理员访问所有应用程序的范围,以及另一个仅提供对某些应用程序访问权限的范围。有关详细信息,请参阅委派管理。
- 通过智能访问策略表达式限制用户访问: 您可以配置访问策略规则来控制用户对特定交付组的访问。示例包括:
- 限制对部分用户的访问,并指定允许的用户设备。
- 限制通过 Workspace(而非 StoreFront)连接的用户访问。
- 限制通过特定 Workspace URL 连接的用户访问。
本节将指导您如何通过访问策略规则限制用户访问交付组:
-  [关于访问策略规则](#about-access-policy-rules)
-  [添加访问策略规则](#add-access-policy-rules-using-web-studio)
-  [使用 Web Studio 管理访问策略规则](#manage-access-policy-rules-using-web-studio)
关于访问策略规则
-
您可以为交付组配置多个访问策略规则。交付组中的应用程序和桌面会显示在用户的 StoreFront 或 Workspace 中,前提是用户的连接与您为交付组定义的任何访问策略规则匹配,无论顺序如何。
-
每个规则都可以单独启用或禁用。禁用规则在评估访问策略时将被忽略。
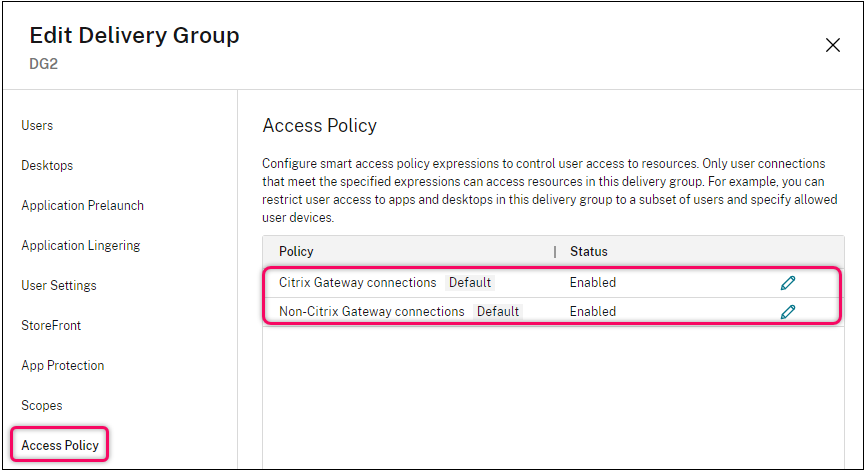
在 Web Studio 中,访问策略列表包括以下默认 SmartAccess 策略规则。您可以根据需要添加更多规则。
- Citrix Gateway 连接。 此策略仅允许通过 Citrix Gateway 建立的用户连接访问交付组中的资源。通过 Workspace 建立的用户连接(当启用设备状态或网络位置功能时)也被视为通过 Citrix Gateway 建立的连接。
-
非 Citrix Gateway 连接。 此策略仅允许非通过 Citrix Gateway 建立的用户连接访问交付组中的资源。
-
注意:
-
- 为防止默认规则覆盖新配置的规则,您必须禁用默认规则或对其进行优化以排除新策略中使用的筛选器。- 默认策略无法删除,但可以禁用。要禁用策略,请单击编辑图标,然后将策略状态更改为已禁用。
- 策略列表还显示使用 PowerShell 命令添加的规则。这些策略可以删除,但无法在 Web Studio 中编辑。
-
使用 Web Studio 添加访问策略规则
访问策略规则包含一组筛选器。有关筛选器的详细信息,请参阅本文。添加访问策略规则时,您可以根据需要向规则添加多个条件筛选器。
要使用 Web Studio 为交付组添加策略,请按照以下步骤操作:
- 在控制台中,选择左侧窗格中的“交付组”。
- 选择一个组,然后单击操作栏中的“编辑”。
-
- 在“访问策略”页面上,单击“添加”。此时将显示“添加策略”页面。
-
在“策略名称”字段中,键入策略的描述性名称。该名称在您的部署中必须是唯一的。
-
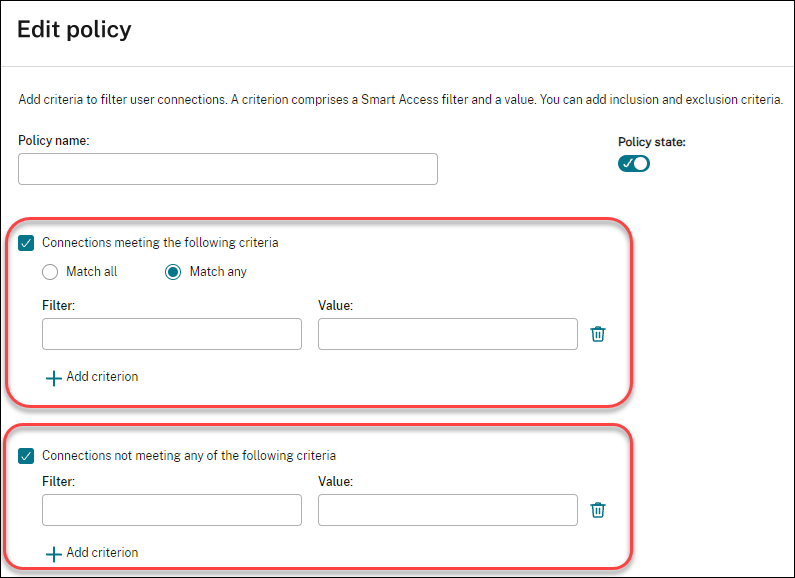
要定义允许的用户连接条件,请执行以下步骤:
- 选择“符合以下条件的连接”。
-
- 单击“添加条件”。
-
- 在“筛选器”字段中,键入要使用的筛选器的名称。在“值”字段中,键入筛选器的所需值。例如,要仅允许通过 Workspace(而不是 StoreFront)连接的用户访问此交付组中的资源,请在“筛选器”中键入
Citrix-Via-Workspace,在“值”中键入True。
- 在“筛选器”字段中,键入要使用的筛选器的名称。在“值”字段中,键入筛选器的所需值。例如,要仅允许通过 Workspace(而不是 StoreFront)连接的用户访问此交付组中的资源,请在“筛选器”中键入
-
- 要添加更多条件,请重复步骤 b-c。
-
选择条件之间的关系:
- 匹配任意。仅当传入用户连接符合任何已配置的筛选器条件时才允许访问。
- 匹配所有。仅当传入用户连接符合所有已配置的筛选器条件时才允许访问。
-
要定义禁止的用户连接条件,请执行以下步骤:
- 选择“不符合以下任何条件的连接”。
-
- 单击“添加条件”。
-
- 在“筛选器”字段中,键入要使用的筛选器的名称。在“值”字段中,键入筛选器的所需值。例如,要禁止通过
example.cloud.comWorkspace URL 连接的用户访问此交付组中的资源,请在“筛选器”中键入Citrix.Workspace.UsingDomain,在“值”中键入example.cloud.com。
- 在“筛选器”字段中,键入要使用的筛选器的名称。在“值”字段中,键入筛选器的所需值。例如,要禁止通过
-
- 要添加更多条件,请重复步骤 b-c。
-
-
注意:
符合任何已配置条件的用户连接都将被禁止访问此交付组中的资源。
- 选择“不符合以下任何条件的连接”。
-
单击“完成”。
新策略将显示在策略列表中。
-
审查并优化默认策略规则,以避免与此新策略涵盖的连接发生意外重叠。要优化现有策略,请使用以下方法:
- 禁用默认策略规则。
- 配置默认策略规则,以排除您添加到新策略的包含条件中的 SmartAccess 筛选器。有关详细信息,请参阅使用 Web Studio 管理策略规则和使用 PowerShell 添加和管理访问策略规则。
重要提示:
如关于访问策略规则中所述,当用户的连接与交付组中的一个或多个策略规则匹配时,用户将获得对其资源的访问权限。因此,创建规则后,您必须仔细审查并优化现有规则,以避免与新规则涵盖的连接发生任何意外重叠。
使用 Web Studio 管理访问策略规则
-
您可以使用包含和排除条件来优化默认策略。例如,要将访问限制为这些连接的子集,请执行以下步骤:
-
- 编辑默认策略。
- 选择“符合以下任何条件的连接”。
- 添加、编辑或删除 SmartAccess 策略表达式,以用于允许的用户访问方案。
有关详细信息,请参阅 Citrix Gateway 文档。
使用 PowerShell 添加和管理访问策略规则
-
您可以使用以下 PowerShell cmdlet 添加和管理交付组的访问策略规则:
- New-BrokerAccessPolicyRule
- Get-BrokerAccessPolicyRule
- Set-BrokerAccessPolicyRule
- Rename-BrokerAccessPolicyRule
- Remove-BrokerAccessPolicyRule
有关详细信息,请参阅 Citrix 开发人员文档中的相关文章。
配置访问策略的用户范围
默认情况下,交付组中的所有访问策略都适用于同一组用户。您可以使用 Studio、PowerShell 或 Rest API 配置访问策略以应用于特定用户。
要使用 Studio 将访问策略应用于指定用户,请执行以下步骤:
- 在 Studio 中,选择左侧窗格中的“交付组”。
- 选择一个组,然后选择操作栏中的“编辑交付组”。
- 在“用户”页面上,选择“使用上下文访问”。
- 选择要配置的访问策略,然后单击“用户访问范围”。此时将显示“用户访问范围”页面。
- 要定义此策略适用于哪些经过身份验证的用户:
- 要将此策略应用于任何经过身份验证的用户,请选择“允许任何经过身份验证的用户使用资源”。
-
要将此策略应用于特定用户,请保持选中“限制资源使用”。然后,使用允许列表和阻止列表为此策略添加或删除用户。
-
- 要将此访问策略应用于不提供凭据的用户,请选择“授予未经身份验证(匿名)用户访问权限;无需凭据”。
计算机
管理计算机的用户分配
在交付组中管理计算机的用户分配。为交付组配置桌面分配规则后,计算机将在首次启动桌面时随机分配给用户,并保持分配给这些用户,除非其用户分配被修改。如果要手动将未分配的计算机分配给特定用户,或者更改计算机的现有用户分配,请按照本主题中描述的步骤进行更改。使用这些步骤,您还可以修改 Citrix Workspace App 中为分配给用户的计算机显示的名称。
详细步骤如下:
- 在 Studio 中,从左侧窗格中选择交付组。
- 选择一个组,然后在操作栏中选择编辑。
-
在左侧窗格中,选择计算机分配。组中每台计算机的以下详细信息将显示:
- **计算机名称:**显示计算机的名称。 - **显示名称:**显示计算机在 Citrix Workspace App 中的显示名称。 - **用户:**显示分配给此计算机的用户。如果配置了桌面分配规则,计算机将在首次启动桌面时随机分配给用户,并保持分配给这些用户,除非其用户分配被修改。-
- 找到一台计算机,然后为其分配用户或更改其用户分配:
- 单击浏览以浏览用户。
- 在用户列中,输入以分号分隔的用户名列表。
- 单击从 CSV 文件导入以使用 CSV 文件导入设置详细信息。
- 单击更改以更新计算机的桌面图标。指定的图标仅在计算机级别覆盖默认图标集。
-
-
(可选)如果计算机已分配给用户,请根据需要修改其显示名称。
注意:
- > - > “显示名称”字段仅在计算机分配给用户时启用: - >- 如果计算机根据桌面分配规则分配给用户,则此字段显示在该规则中配置的显示名称。
- 如果计算机是手动分配给用户的,并且该字段留空,则交付组的已发布名称(如果已指定)将用作计算机的显示名称。如果未指定已发布名称,则使用交付组的名称。请注意,您只能通过 PowerShell 为交付组指定已发布名称。
- 选择应用以应用更改并保持窗口打开。或者,选择确定以应用更改并关闭窗口。
更改计算机对用户的分配
您可以更改使用 MCS 预配的单会话操作系统计算机的分配。您无法更改多会话操作系统计算机或使用 Citrix Provisioning 预配的计算机的分配。
- 在左侧窗格中选择交付组。
- 选择一个组,然后在操作栏中单击编辑。
- 在桌面或桌面分配规则页面(页面标题取决于交付组使用的计算机目录类型)上,指定新用户。
- 单击应用以应用所做的任何更改并保持窗口打开。或者,单击保存以应用更改并关闭窗口。
- 在 Studio 中,从左侧窗格中选择交付组。
-
在组列表中,包含由 MCS 或 Citrix Provisioning 预配的单会话池式计算机的组会显示警告图标。
-
- 根据需要选择一个组,然后在操作栏中选择编辑。
- 在本地主机缓存页面上,选择保持资源可用。
- 选择应用以应用所做的任何更改并保持窗口打开。或者,选择确定以应用更改并关闭窗口。
- 或者,您可以使用 PowerShell 命令覆盖默认行为。有关详细信息,请参阅应用程序和桌面支持。
重要提示:
启用对电源管理的单会话池式计算机的访问可能会导致来自先前用户会话的数据和更改出现在后续会话中。
更改每个用户的最大计算机数
-
- 在左侧窗格中选择交付组。
- 选择一个组,然后在操作栏中单击编辑。
- 在桌面分配规则页面上,设置每个用户的最大桌面数。
- 单击应用以应用所做的任何更改并保持窗口打开。或者,单击保存以应用更改并关闭窗口。
更新交付组中的计算机
-
- 在左侧窗格中选择交付组。
- 选择一个组,然后在操作栏中单击查看计算机。
- 选择一台计算机,然后在操作栏中单击更新计算机。
- 要选择其他映像,请选择映像,然后选择一个快照。
要应用更改并通知计算机用户,请选择向最终用户推出通知。然后指定:
- 何时更新主映像:立即或在下次重新启动时
- 重新启动分发时间(开始更新组中所有计算机的总时间)
- 是否通知用户重新启动
- 用户收到的消息
添加、更改或删除桌面的标记限制
- 添加、更改和删除标记限制可能会对启动时考虑的桌面产生意想不到的影响。请查看标记中的注意事项和警告。
- 在左侧窗格中选择交付组。
-
- 选择一个组,然后在操作栏中单击编辑。
-
- 在桌面页面上,选择桌面并单击编辑。
-
- 要添加标记限制,请选择将启动限制到具有此标记的计算机,然后选择该标记。
-
要更改或删除标记限制,请执行以下任一操作:
- 选择其他标记。
- 通过清除将启动限制到具有此标记的计算机来删除标记限制。
-
单击应用以应用所做的任何更改并保持窗口打开。或者,单击保存以应用更改并关闭窗口。
从交付组中删除计算机
删除计算机会将其从交付组中删除。它不会将其从交付组使用的计算机目录中删除。因此,该计算机可用于分配给另一个交付组。
计算机必须先关机才能删除。要在删除计算机时暂时阻止用户连接到该计算机,请在关机前将计算机置于维护模式。
计算机可能包含个人数据,因此在将计算机分配给其他用户之前请谨慎操作。请考虑重新映像计算机。
- 在左侧窗格中选择交付组。
- 选择一个组,然后在操作栏中单击查看计算机。
-
- 确保计算机已关机。
-
- 选择计算机,然后在操作栏中单击从交付组中删除。
您还可以通过计算机使用的连接从交付组中删除计算机。
阻止用户连接到交付组中的计算机(维护模式)
当您需要暂时停止与计算机建立新连接时,可以为交付组中的一台或所有计算机启用维护模式。您可以在应用修补程序或使用管理工具之前执行此操作。
- 当多会话 OS 计算机处于维护模式时,用户可以连接到现有会话,但无法启动新会话。
-
当单会话 OS 计算机(或使用远程电脑访问的电脑)处于维护模式时,用户无法连接或重新连接。当前连接将保持连接状态,直到用户断开连接或注销。
- 要启用或禁用维护模式:
- 在左侧窗格中选择交付组。
- 选择一个组。
-
- 要为交付组中的所有计算机启用维护模式,请在操作栏中单击启用维护模式。
- 要为一台计算机启用维护模式,请在操作栏中单击查看计算机。选择一台计算机,然后在操作栏中单击启用维护模式。
-
- 要为交付组中的一台或所有计算机禁用维护模式,请按照前面的说明操作,但在操作栏中单击禁用维护模式。
-
Windows 远程桌面连接 (RDC) 设置也会影响多会话 OS 计算机是否处于维护模式。在以下任何情况下,维护模式都处于启用状态:
- 维护模式已设置为启用,如前所述。
- RDC 设置为不允许连接到此计算机。
- RDC 未设置为不允许连接到此计算机。远程主机配置用户登录模式设置为允许重新连接,但阻止新登录或允许重新连接,但阻止新登录直到服务器重新启动。
-
您还可以为以下各项启用或禁用维护模式:
- 连接,这会影响使用该连接的计算机。
- 计算机目录,这会影响该目录中的计算机。
关闭并重新启动交付组中的计算机
远程电脑访问计算机不支持此过程。
- 在左侧窗格中选择交付组。
- 选择一个组,然后在操作栏中单击查看计算机。
-
选择计算机,然后在操作栏中单击以下条目之一:
- 强制关机: 强制关闭计算机电源并刷新计算机列表。
- 重新启动: 请求操作系统关机,然后再次启动计算机。如果操作系统无法遵守,计算机将保持其当前状态。
- 强制重新启动: 强制关闭操作系统,然后重新启动计算机。
- 挂起: 暂停计算机而不关机,并刷新计算机列表。
- 关机: 请求操作系统关机。
- 对于非强制操作,如果计算机在 10 分钟内未关机,则会断电。如果 Windows 在关机期间尝试安装更新,则存在更新完成前计算机断电的风险。
Citrix 建议您阻止单会话 OS 计算机用户在会话中选择“关机”。有关详细信息,请参阅 Microsoft 策略文档。
您还可以通过连接关闭并重新启动计算机。
- ### 创建和管理交付组中计算机的重新启动计划
注意:
- 当重新启动计划应用于启用了 Autoscale™ 的交付组时,其计算机仅关机并留待 Autoscale 启动它们。
- 当重新启动计划应用于随机单会话计算机时,这些计算机将关机而不是重新启动,以节省成本。我们建议您使用 Autoscale 启动计算机。
- 更改交付组上的时区可能会重新启动该交付组中的计算机。为避免这种情况,请务必在非生产时间更改时区设置。
重新启动计划指定了交付组中的计算机定期重新启动的时间。您可以为一个交付组创建一个或多个计划。计划可以影响以下任一情况:
- 组中的所有计算机。
- 组中的一台或多台(但不是所有)计算机。这些计算机通过您应用于计算机的标记进行标识。这称为标记限制,因为标记将操作限制为仅具有该标记的项目。
例如,假设您的所有计算机都在一个交付组中。您希望每周重新启动每台计算机一次,并希望每天重新启动会计团队使用的计算机。为此,请为所有计算机设置一个计划,并为会计部门中的计算机设置另一个计划。
计划包括重新启动开始的日期和时间以及持续时间。
-
您可以启用或禁用计划。禁用计划在测试期间、特殊时间间隔期间或在需要之前准备计划时会很有用。
-
您不能使用计划通过管理控制台进行自动启动或关机,只能用于重新启动。
-
计划重叠
-
多个计划可以重叠。在上面的示例中,两个计划都影响会计计算机。这些计算机可能会在周日重新启动两次。计划代码旨在避免比预期更频繁地重新启动同一台计算机,但这无法保证。
- 如果计划在开始时间和持续时间上精确重合,则计算机更有可能只重新启动一次。
- 计划在开始时间和持续时间上的差异越大,发生多次重新启动的可能性就越大。
-
受计划影响的计算机数量也会影响重叠的可能性。在此示例中,影响所有计算机的每周计划可能会比会计计算机的每日计划更快地启动重新启动,具体取决于为每个计划指定的持续时间。
-
有关重新启动计划的深入了解,请参阅 重新启动计划内部结构。
-
查看重新启动计划
- 在左侧窗格中选择 交付组。
- 选择一个组,然后在操作栏中单击 编辑。
-
- 选择 重新启动计划 页面。
-
重新启动计划 页面包含每个已配置计划的以下信息:
- 计划名称
- 使用的标记限制(如果有)
- 计算机重新启动的频率
- 计算机用户是否收到通知
- 计划是否已启用
-
添加(应用)标记
配置使用标记限制的重新启动计划时,请确保已将标记添加到计划影响的计算机。在上面的示例中,会计团队使用的每台计算机都应用了一个标记。有关详细信息,请参阅标记。
尽管您可以将多个标记应用于一台计算机,但重新启动计划只能指定一个标记。
-  1.  在左侧窗格中选择 **交付组**。
-  1.  选择包含由计划控制的计算机的组。
- 单击 查看计算机,然后选择要添加标记的计算机。
- 在操作栏中单击 管理标记。
- 如果标记存在,请启用标记名称旁边的复选框。如果标记不存在,请单击 创建,然后指定标记的名称。创建标记后,启用新创建的标记名称旁边的复选框。
- 在 管理标记 对话框中单击 保存。
创建重新启动计划
注意:
重新启动计划可以应用于所有电源管理和非电源管理的多会话计算机。
- 1. 在左侧窗格中选择 **交付组**。 - 1. 选择一个组,然后在操作栏中单击 **编辑**。
- 在 重新启动计划 页面上,单击 添加。
-
在 添加重新启动计划 页面上:
- 要启用计划,请选择 是。要禁用计划,请选择 否。
- 键入计划名称和描述。
- 对于 限制为标记,应用标记限制。
- 对于 包括维护模式中的计算机,选择是否在此计划中包括处于维护模式的计算机。要改用 PowerShell,请参阅维护模式中计算机的计划重新启动。
- 对于 重新启动频率,选择重新启动发生的频率:每日、每周、每月或一次。如果选择 每周 或 每月,则可以指定一个或多个特定日期。
- 对于 每隔,指定您希望计划运行的频率。
- 对于 开始日期,指定计划首次发生的开始日期。
-
对于 开始重新启动时间,以 24 小时制格式指定开始重新启动的时间。
- 对于 重新启动持续时间:
- 要强制重新启动具有无响应会话的计算机,请选择 强制重新启动,然后选择以下选项之一:
- 立即重新启动所有计算机
- 在一段时间内重新启动所有计算机,并按 小时 或 分钟 指定时间。
-
要在重新启动前等待所有会话耗尽,请选择 正常重新启动。
启动配置为使用正常重新启动的重新启动计划时:
- 属于交付组的所有空闲计算机将立即重新启动。
- 属于具有一个或多个活动会话的交付组的每台计算机将在所有会话注销后重新启动。
注意:
正常重新启动计划只能重新启动电源管理的计算机。
- 在 向用户发送通知 中,确定是否在重新启动开始前在适用的计算机上显示通知消息。默认情况下,不显示任何消息。
- 如果选择在重新启动开始前 15 分钟显示消息,则可以选择在初始消息后每五分钟重复一次消息。默认情况下,消息不会重复。
-
输入通知标题和文本。没有默认文本。
如果希望消息包含重新启动倒计时,请包含变量 %m%。除非您选择同时重新启动所有计算机,否则消息将在重新启动前的适当时间显示在每台计算机上。
- 单击完成以应用更改并关闭添加重新启动计划窗口。
- 单击应用以应用所做的更改并保持窗口打开。或者,单击保存以应用更改并关闭窗口。
排空后重新启动
使用 PowerShell 创建或更新计算机重新启动计划(New-BrokerRebootSchedulev2 或 Set-BrokerRebootSchedulev2)时,可以使用另一个重新启动持续时间值。
使用 -UseNaturalReboot <Boolean> 参数启用排空后重新启动功能时,所有计算机将在排空所有会话后重新启动。当达到重新启动时间时,计算机将进入排空状态,并在所有会话注销后重新启动。
此功能支持包含单会话或多会话计算机的交付组。您可以将此选项用于电源管理的计算机以及未进行电源管理的计算机。
- 在本地环境中,此功能仅在使用 PowerShell 时受支持。Web Studio 中不提供此功能。
编辑、删除、启用或禁用重新启动计划
- 在左侧窗格中选择交付组。
- 选择一个组,然后在操作栏中单击编辑。
- 在重新启动计划页面上,选中相应计划的复选框。
- 要编辑计划,请单击编辑。使用创建重新启动计划中的指导更新计划配置。
- 要启用或禁用计划,请单击编辑。选中或清除启用重新启动计划复选框。
- 要删除计划,请单击删除。确认删除。删除计划不会影响应用于受影响计算机中的任何标记。
由于数据库中断而延迟的计划重新启动
注意:
此功能仅在 PowerShell 中可用。
如果在交付组中计算机 (VDA) 的计划重新启动开始之前发生站点数据库中断,则重新启动将在中断结束时开始。这可能会导致意外结果。
例如,假设您已将交付组的重新启动计划在非生产时间(从 03:00 开始)进行。在计划重新启动开始前一小时(02:00)发生站点数据库中断。中断持续六小时(直到 08:00)。当 Delivery Controller 和站点数据库之间的连接恢复时,重新启动计划开始。VDA 重新启动现在比其原始计划晚五小时开始,导致 VDA 在生产时间重新启动。
为避免这种情况,您可以对 New-BrokerRebootScheduleV2 和 Set-BrokerRebootScheduleV2 cmdlet 使用 MaxOvertimeStartMins 参数。该值指定重新启动计划可以开始的超出计划开始时间的最大分钟数。
-
如果在此时间内(计划时间 +
MaxOvertimeStartMins)恢复数据库连接,则 VDA 重新启动开始。 -
如果在此时间内未恢复数据库连接,则 VDA 重新启动不会开始。
-
如果省略此参数或其值为零,则无论中断持续时间如何,计划重新启动都会在数据库连接恢复时开始。
有关详细信息,请参阅 cmdlet 帮助。此功能仅在 PowerShell 中可用。在 Web Studio 中配置重新启动计划时,无法设置此值。
维护模式下计算机的计划重新启动
注意:
此功能仅在 PowerShell 中可用。Citrix Virtual Apps™ and Desktops 7 2006 及更高版本支持
IgnoreMaintenanceMode选项。
要指示重新启动计划是否影响处于维护模式的计算机,请将 IgnoreMaintenanceMode 选项与 BrokerRebootScheduleV2 cmdlet 结合使用。
例如,以下 cmdlet 创建一个计划,该计划重新启动处于维护模式的计算机(以及未处于维护模式的计算机)。
```powershell
Set-BrokerAdminFolderMetadata -AdminFolderId {adminFolderUid} -Name ContainsDeliveryGroups -Value true
<!--NeedCopy--> ```
以下 cmdlet 修改现有重新启动计划。
```
C:\PS> New-BrokerCatalogRebootSchedule -Name BankTellers -CatalogName BankTellers  -StartDate "2022-02-03" -StartTime "02:00" -Enabled $true -RebootDuration 120
<!--NeedCopy--> ```
有关详细信息,请参阅 cmdlet 帮助。此功能仅在 PowerShell 中可用。
启用一次性重新启动计划
如果要使用 PowerShell 启用一次性重新启动计划,请使用以下 BrokerCatalogRebootSchedule PowerShell 命令来创建、修改和删除重新启动计划:
- Get-BrokerCatalogRebootSchedule
- New-BrokerCatalogRebootSchedule
- Set-BrokerCatalogRebootSchedule
- Remove-BrokerCatalogRebootSchedule
- Rename-BrokerCatalogRebootSchedule
限制:
- 如果目录重启计划关联的目录未配置时区,则该计划会被创建但不会启动。
- 创建目录重启计划后,该重启计划仅在属于交付组的目录虚拟机上运行。
示例:
-
要创建名为 BankTellers 的目录中虚拟机的重启计划,使其在 2022 年 2 月 3 日凌晨 2 点到凌晨 4 点之间开始。
C:\PS> New-BrokerCatalogRebootSchedule -Name BankTellers -CatalogName BankTellers -StartDate "2022-02-03" -StartTime "02:00" -Enabled $true -RebootDuration 120 <!--NeedCopy--> -
要创建 UID 为 17 的目录中虚拟机的重启计划,使其在 2022 年 2 月 3 日凌晨 1 点到凌晨 5 点之间开始。在重启前十分钟,每个虚拟机都将在所有用户会话中显示一个消息框,标题为 WARNING: Reboot pending,消息为 Save your work。
C:\PS> New-BrokerCatalogRebootSchedule -Name 'Update reboot' -CatalogUid 17 -StartDate "2022-02-03" -StartTime "01:00" -Enabled $true -RebootDuration 240 -WarningTitle "WARNING: Reboot pending" -WarningMessage "Save your work" -WarningDuration 10 <!--NeedCopy--> -
要将名为 Old Name 的目录重启计划重命名为 New Name。
C:\PS> Rename-BrokerCatalogRebootSchedule -Name "Old Name" -NewName "New Name" <!--NeedCopy--> -
要显示所有 UID 为 1 的目录重启计划,然后将 UID 为 1 的目录重启计划重命名为 New Name。
C:\PS> Get-BrokerCatalogRebootSchedule -Uid 1 | Rename-BrokerCatalogRebootSchedule -NewName "New Name" -PassThru <!--NeedCopy--> -
要将名为 Accounting 的目录重启计划设置为在每个虚拟机重启前十分钟显示一条消息,标题为 WARNING: Reboot pending,消息为 Save your work。此消息将显示在该虚拟机上的每个用户会话中。
``` C:\PS> Set-BrokerCatalogRebootSchedule -Name Accounting -WarningMessage “Save your work” -WarningDuration 10 -WarningTitle “WARNING: Reboot pending”
-
To display all restart schedules that are disabled, and then enable all disabled restart schedules.
C:\PS> Get-BrokerCatalogRebootSchedule -Enabled $false | Set-BrokerCatalogRebootSchedule -Enabled $true -
To set the catalog restart schedule with UID 17 to display the message Rebooting in %m% minutes fifteen, ten, and five minutes before the restart of each VM.
C:\PS> Set-BrokerCatalogRebootSchedule 17 -WarningMessage "Rebooting in %m% minutes." -WarningDuration 15 -WarningRepeatInterval 5 -
To configure the time zone for the catalog named MyCatalog.
C:\PS> Set-BrokerCatalog -Name "MyCatalog" -TimeZone <TimeZone>
Power manage machines in a delivery group
You can power manage only virtual single-session OS machines, not physical machines (including Remote PC Access machines). Single-session OS machines with GPU capabilities cannot be suspended, so power-off operations fail. For multi-session OS machines, you can create a restart schedule.
In delivery groups containing pooled machines, virtual single-session OS machines can be in one of the following states:
- Randomly allocated and in use
- Unallocated and unconnected
In delivery groups containing static machines, virtual single-session OS machines can be:
- Permanently allocated and in use
- Permanently allocated and unconnected (but ready)
- Unallocated and unconnected
During normal use, static delivery groups typically contain both permanently allocated and unallocated machines. Initially, all machines are unallocated, except for manually allocated ones when the delivery group was created. As users connect, machines become permanently allocated. You can fully power manage the unallocated machines in those delivery groups, but only partially manage the permanently allocated machines.
-
Pools and buffers: For pooled delivery groups and static delivery groups with unallocated machines, a pool (in this instance) is a set of unallocated or temporarily allocated machines that are kept in a powered-on state, ready for users to connect. A user gets a machine immediately after logon. The pool size (the number of machines kept powered-on) is configurable by time of day. For static delivery groups, use the SDK to configure the pool.
A buffer is an extra standby set of unallocated machines that are turned on when the number of machines in the pool falls below a threshold. The threshold is a percentage of the delivery group size. For large delivery groups, a significant number of machines might be turned on when the threshold is exceeded. So, plan delivery group sizes carefully or use the SDK to adjust the default buffer size.
-
Power state timers: You can use power state timers to suspend machines after users have disconnected for a specified amount of time. For example, machines suspend automatically outside of office hours if users are disconnected for at least 10 minutes.
You can configure timers for weekdays and weekends, and for peak and nonpeak intervals.
-
Partial power management of permanently allocated machines: For permanently allocated machines, you can set power state timers, but not pools or buffers. The machines are turned on at the start of each peak period, and turned off at the start of each off-peak period. You do not have the fine control that you have with unallocated machines over the number of machines that become available to compensate for machines that are consumed.
Power manage virtual single-session OS machines
- Select Delivery Groups in the left pane.
- Select a group and then click Edit Delivery Group in the action bar.
- On the Power Management page, select Weekdays in Power manage machines. By default, weekdays are Monday to Friday.
- For random Delivery groups, in Machines to be powered on, click Edit and then specify the pool size during weekdays. Then, select the number of machines to power on.
- In Peak hours, set the peak and off-peak hours for each day.
- Set the power state timers for peak and non-peak hours during weekdays: In During peak hours > When disconnected, specify the delay (in minutes) before suspending any disconnected machine in the delivery group, and then select Suspend. In During off-peak hours > When disconnected, specify the delay before turning off any logged-off machine in the delivery group, and then select Shutdown. This timer is not available for delivery groups with random machines.
- Select Weekend in Power manage machines, and then configure the peak hours and power state timers for weekends.
- Click Apply to apply any changes you made and keep the window open. Or, click Save to apply changes and close the window.
Use the SDK to:
- Shut down, rather than suspend, machines in response to power state timers, or if you want the timers to be based on logoffs, rather than disconnections.
- Change the default weekday and weekend definitions.
- Disable power management. See CTX217289.
Power manage VDI machines transitioning to a different time period with disconnected sessions
Important:
This enhancement applies only to VDI machines with disconnected sessions. It does not apply to VDI machines with logged off sessions.
In earlier releases, a VDI machine transitioning to a time period where an action (disconnect action=”Suspend” or “Shutdown”) was required remained powered on. This scenario occurred if the machine disconnected during a time period (peak or off-peak times) where no action (disconnect action=”Nothing”) was required.
Starting with Citrix Virtual Apps and Desktops 7 1909, the machine is suspended or powered off when the specified disconnection time elapses, depending on the disconnect action configured for the destination time period.
For example, you configure the following power policies for a VDI delivery group:
- Set
PeakDisconnectActionto “Nothing” - Set
OffPeakDisconnectActionto “Shutdown” - Set
OffPeakDisconnectTimeoutto “10”
For more information about the disconnect action in the power policy, see https://developer-docs.citrix.com/projects/delivery-controller-sdk/en/latest/Broker/about_Broker_PowerManagement/#power-policy and https://developer-docs.citrix.com/projects/delivery-controller-sdk/en/latest/Broker/Get-BrokerDesktopGroup/.
In earlier releases, a VDI machine with a session disconnected during peak times remained powered on when it transitioned from peak to off-peak. Starting with Citrix Virtual Apps and Desktops 7 1909, the OffPeakDisconnectAction and the OffPeakDisconnectTimeout policy actions are applied to the VDI machine on period transition. As a result, the machine is powered off 10 minutes after it transitions to off-peak.
If you want to revert to the previous behavior (that is, take no action on machines that transition from peak to off-peak or off-peak to peak with disconnected sessions), do one of the following:
- Set the
LegacyPeakTransitionDisconnectedBehaviourregistry value to1, the equivalent of true which enables the previous behavior. By default, the value is0, or false, which triggers disconnect power policy actions on period transition.- Path:
HKEY_LOCAL_MACHINE\SOFTWARE\Citrix\DesktopServer - Name:
LegacyPeakTransitionDisconnectedBehaviour - Type:
REG_DWORD - Data:
0x00000001 (1)
- Path:
- Configure the setting by using the
Set-BrokerServiceConfigurationDataPowerShell command. For example:PS C:\> Set-BrokerServiceConfigurationData HostingManagement.LegacyPeakTransitionDisconnectedBehaviour -SettingValue $true
A machine must meet the following criteria before power policy actions can be applied to it on period transition:
- Have a disconnected session.
- Have no pending power actions.
- Belong to a VDI (single session) delivery group that transitions to a different time period.
- Have a session that disconnects during a certain time period (peak or off-peak times) and transitions to a period where a power action is assigned.
Change the percentage of VDAs in a powered state for catalogs
- Adjust the peak hours for the delivery group from the Power management section for the delivery group.
- Make a note of the Desktop Group name.
-
With administrator privileges, start PowerShell and run the following commands. Replace “Desktop Group Name” with the name of your desktop group that has a changed percentage of the VDAs running.
asnp Citrix*# Set-BrokerDesktopGroup "Desktop Group Name" -PeakBufferSizePercent 100A value of 100 means that 100% of the VDAs are in the ready state.
-
Verify the solution by running:
#Get-BrokerDesktopGroup "Desktop Group Name"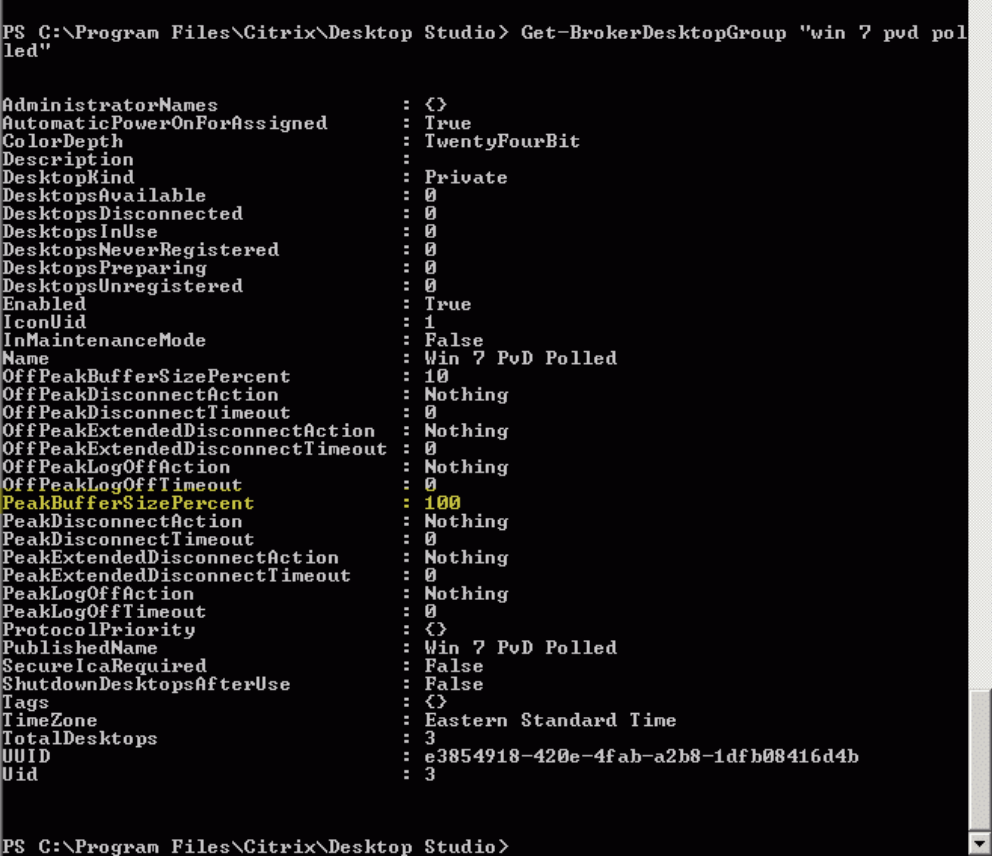
It can take up to an hour for changes to take effect.
To shut down the VDAs after the user logs off, enter:
# Set-BrokerDesktopGroup "Desktop Group Name" -ShutDownDesktopsAfterUse $True
To restart VDAs during peak hours, so that they’re ready for users after they log off, enter:
# Set-BrokerDesktopGroup "Desktop Group Name" -AutomaticPowerOnForAssignedDuringPeak $True
Sessions
- Log off or disconnect a session, or send a message to users
- Configure session prelaunch and session linger
- Control session reconnection when disconnected from machine in maintenance mode
- Configure session roaming
Log off or disconnect a session
- Select Delivery Groups in the left pane.
- Select a delivery group and then select View Machines in the action bar.
- In the middle pane, select the machine, select View Sessions in the action bar, and then select a session.
- Alternatively, in the middle pane, select the Session tab and then select a session.
- To log off from a session, select Log off in the action bar. The session closes and the user is logged out. The machine becomes available to other users unless it is allocated to a specific user.
- To disconnect a session, select Disconnect in the action bar. Applications continue to run in the session and the machine remains allocated to that user. The user can reconnect to the same machine.
You can configure power state timers for single-session OS machines to automatically handle unused sessions. For details, see Power managed machines.
Send a message to a delivery group
- Select Delivery Groups in the left pane.
- Select a delivery group and then select View Machines in the action bar.
- In the middle pane, select a machine to which you want to send a message.
- In the action bar, select View Sessions.
- In the middle pane, select all sessions and then select Send Message in the action bar.
- Type your message and click OK. You can specify the level of severity if needed. Options include Critical, Question, Warning, and Information.
Alternatively, you can send a message using Citrix Director. For more information, see Send messages to users.
Configure session prelaunch and session linger in a delivery group
These features are supported only on multi-session OS machines.
The session prelaunch and session linger features help specified users access applications quickly, by starting sessions before they are requested (session prelaunch) and keeping application sessions active after a user closes all applications (session linger).
By default, session prelaunch and session linger are not used. A session starts (launches) when a user starts an application, and remains active until the last open application in the session closes.
Considerations:
- The delivery group must support applications, and the machines must be running a VDA for multi-session OS, minimum version 7.6.
- These features are supported only when using Citrix Workspace app for Windows, and also require extra Citrix Workspace app configuration. For instructions, search for session prelaunch in the product documentation for your Citrix Workspace app for Windows version.
- Citrix Workspace app for HTML5 is not supported.
- When using session prelaunch, if a user’s machine is put into suspend or hibernate mode, prelaunch does not work (regardless of session prelaunch settings). Users can lock their machines/sessions. However, if a user logs off from Citrix Workspace app, the session is ended and prelaunch no longer applies.
- When using session prelaunch, physical client machines cannot use the suspend or hibernate power management functions. Client machine users can lock their sessions but must not log off.
- Prelaunched and lingering sessions consume a concurrent license, but only when connected. If using a user/device license, the license lasts 90 days. Unused prelaunched and lingering sessions disconnect after 15 minutes by default. This value can be configured in PowerShell (
New/Set-BrokerSessionPreLaunchcmdlet). - Careful planning and monitoring of your users’ activity patterns are essential to tailoring these features to complement each other. Optimal configuration balances the benefits of earlier application availability for users against the cost of keeping licenses in use and resources allocated.
- You can also configure session prelaunch for a scheduled time of day in Citrix Workspace app.
How long unused prelaunched and lingering sessions remain active
There are several ways to specify how long an unused session remains active if the user does not start an application: a configured timeout and server load thresholds. You can configure all of them. The event that occurs first causes the unused session to end.
-
Timeout: A configured timeout specifies the number of minutes, hours, or days an unused prelaunched or lingering session remains active. If you configure too short a timeout, prelaunched sessions end before they provide the user benefit of quicker application access. If you configure too long a timeout, incoming user connections might be denied because the server doesn’t have enough resources.
You can enable this timeout from the SDK only (
New/Set-BrokerSessionPreLaunchcmdlet), not from the management console. If you disable the timeout, it does not appear in the console display for that delivery group or in the Edit Delivery Group pages. -
Thresholds: Automatically ending prelaunched and lingering sessions based on server load ensures that sessions remain open as long as possible, assuming that server resources are available. Unused prelaunched and lingering sessions do not cause denied connections because they are ended automatically when resources are needed for new user sessions.
You can configure two thresholds: the average percentage load of all servers in the delivery group, and the maximum percentage load of a single server in the group. When a threshold is exceeded, the sessions that have been in the prelaunch or lingering state for the longest time are ended. Sessions are ended one-by-one at minute intervals until the load falls below the threshold. While the threshold is exceeded, no new prelaunch sessions are started.
Servers with VDAs that have not registered with a Controller and servers in maintenance mode are considered fully loaded. An unplanned outage causes prelaunch and lingering sessions to end automatically to free capacity.
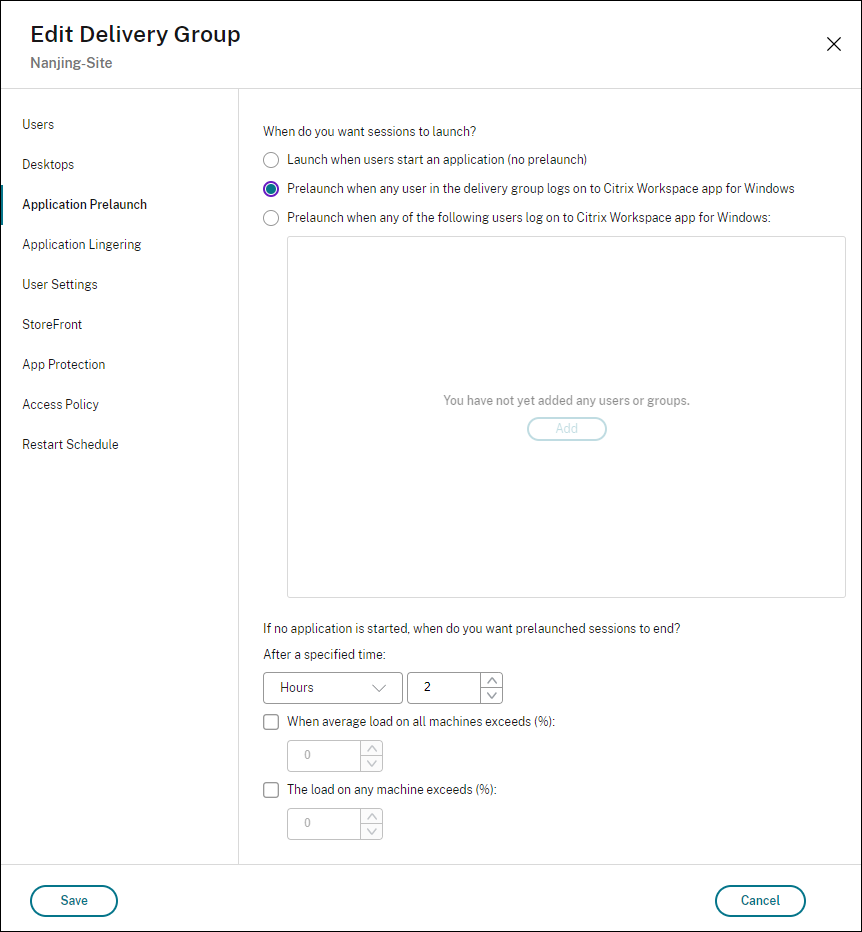
To enable session prelaunch
- Select a group and then click Edit Delivery Group in the action bar.
-
On the Application Prelaunch page, enable session prelaunch by choosing when sessions launch:
- When a user starts an application. This is the default setting. Session prelaunch is disabled.
- When any user in the delivery group logs on to Citrix Workspace app for Windows.
- When anyone in a list of users and user groups logs on to Citrix Workspace app for Windows. Be sure to also specify users or user groups if you choose this option.
-
A prelaunched session is replaced with a regular session when the user starts an application. If the user does not start an application (the prelaunched session is unused), the following settings affect how long that session remains active.
- When a specified time interval elapses. You can change the time interval (1–99 days, 1–2376 hours, or 1–142,560 minutes)
- When the average load on all machines in the delivery group exceeds a specified percentage (1–99%)
- When the load on any machine in the delivery group exceeds a specified percentage (1–99%)
Recap: A prelaunched session remains active until one of the following events occurs: a user starts an application, the specified time elapses, or a specified load threshold is exceeded.
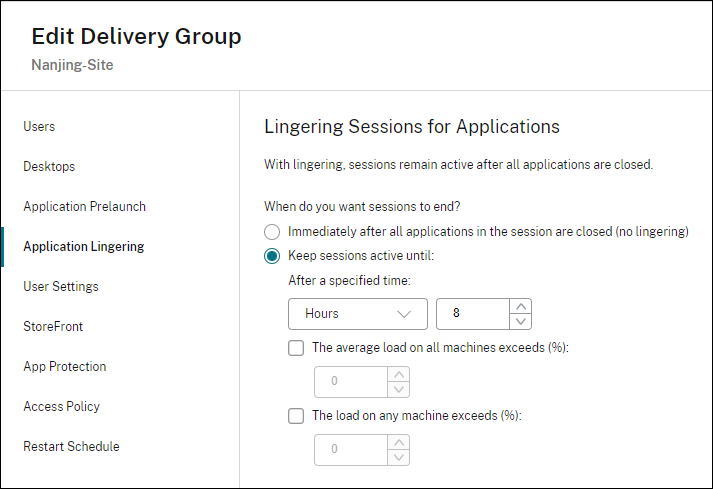
To enable session linger
- Select Delivery Groups in the left pane.
- Select a group and then click Edit Delivery Group in the action bar.
-
On the Application Lingering page, enable session linger by selecting Keep sessions active until.
-
Several settings affect how long a lingering session remains active if the user does not start another application.
- When a specified time interval elapses. You can change the time interval: 1–99 days, 1–2376 hours, or 1–142,560 minutes.
- When the average load on all machines in the delivery group exceeds a specified percentage: 1–99%.
- When the load on any machine in the delivery group exceeds a specified percentage: 1–99%.
Recap: A lingering session remains active until one of the following events occurs: a user starts an application, the specified time elapses, or a specified load threshold is exceeded.
Control session reconnection when disconnected from machine in maintenance mode
NOTE:
This feature is available only in PowerShell.
You can control whether sessions that are disconnected on machines in maintenance mode are allowed to reconnect to machines in the delivery group.
Before version 2106, reconnection was not allowed for single-session pooled desktop sessions that had disconnected from machines in maintenance mode. As of version 2106, you can configure a delivery group to allow or prohibit reconnections (regardless of session type) after disconnection from a machine in maintenance mode.
When creating or editing a delivery group (New-BrokerDesktopGroup, Set-BrokerDesktopGroup), use the -AllowReconnectInMaintenanceMode <boolean> parameter to allow or prohibit reconnections for machines that were disconnected from a machine in maintenance mode.
- When set to true, sessions can reconnect to machines in the group.
- When set to false, sessions cannot reconnect to machines in the group.
Default values:
- Single-session: Disabled
- Multi-session: Enabled
Configure session roaming
By default, session roaming is enabled for delivery groups. Sessions roam between client devices with the user. When the user launches a session and then moves to another device, the same session is used and applications are simultaneously available on both devices. You can view the applications on multiple devices. The applications follow, regardless of the device or whether current sessions exist. Often, printers and other resources assigned to the application also follow. Alternatively, you can use PowerShell. For more information, see Session roaming.
Configure session roaming for applications
To configure session roaming for applications, follow these steps:
-
In the console, select Delivery Groups in the left pane.
-
Select a group and then select Edit Delivery Group in the action bar.
-
On the Users page, enable session roaming by selecting the Sessions roam with users as they move between devices checkbox.
- When enabled, if a user launches an application session and then moves to another device, the same session is used and available on both devices. When disabled, the session no longer roams between devices.
-
Select OK to apply changes and close the window.
Configure session roaming for desktops
To configure session roaming for a desktop, follow these steps:
-
In the console, select Delivery Groups in the left pane.
-
Select a group and then select Edit in the action bar.
-
On the Desktops page, select the desktop and select Edit.
-
Enable session roaming by selecting the Session roaming checkbox.
- When enabled, if the user launches the desktop and then moves to another device, the same session is used, and applications are available on both devices. When disabled, the session no longer roams between devices.
Select OK to apply changes and close the window.
Applications
View and add applications to a delivery group.
- In the console, select Delivery Groups in the left pane.
- Select a group. If this group contains applications, View Applications appears in the action bar.
- Select View Applications. You are directed to the Applications node where all applications available in this group appear.
- To add more applications to this group, go to the Delivery Groups node, select the group, and select Add Applications in the action bar.
Seamless log in from Citrix Secure Access™ Client on VDA
You can seamlessly log in to Citrix Workspace using Single Sign-On (SSO) from the Citrix Secure Access (CSA) client present on the VDA to Citrix Secure Private Access. This feature is applicable to both single and multi-session VDAs.
The steps to achieve this are as follows:
-
Edit an existing delivery group to enable SPA SSO. For example,
Set-BrokerDesktopGroup -Name <String> -SpaSsoEnabled 1 -
Check the status of SPA SSO of a delivery group using the Get -BrokerDesktopGroup PowerShell command. For example:
Get-BrokerDesktopGroup -Name <String> -property 'SpaSsoEnabled' - 在 SPA 中,创建应用程序和策略。请参阅配置 TCP/UDP 应用程序和配置应用程序的访问策略。
- 通过 RDP 连接到单会话或多会话 VDA 并安装最新的 CSA 代理。
- 打开 Citrix Workspace 并登录到单会话或多会话 VDA。
故障排除
-
未向交付控制器注册的 VDA 在启动代理会话时不予考虑。这会导致原本可用的资源利用率不足。VDA 未注册的原因有多种,其中许多原因管理员都可以进行故障排除。详细信息显示在目录创建向导中以及将目录添加到交付组后提供故障排除信息。
创建交付组后,交付组的详细信息窗格会显示可以注册但未注册的计算机数量。例如,一台或多台计算机已开机且未处于维护模式,但当前未向控制器注册。查看“未注册但应已注册”的计算机时,请检查详细信息窗格中的故障排除选项卡,以了解可能的原因和建议的纠正措施。
有关功能级别消息的信息,请参阅VDA 版本和功能级别。
有关 VDA 注册故障排除的信息,请参阅 CTX136668。
- 在交付组的显示中,详细信息窗格中的已安装的 VDA 版本可能与计算机上安装的实际版本不同。计算机的 Windows 程序和功能显示实际的 VDA 版本。
- 对于状态为电源状态未知的计算机,请参阅 CTX131267 以获取指导。 ```