Session experience
DPI matching
The DPI matching feature ensures that the virtual session gets rendered according to the DPI of the device. Previously, even on high-DPI mobile phones and tablets, the DPI of the device wasn’t considered for session display. Starting with the 24.1.0 release, a new display setting helps to achieve DPI matching.
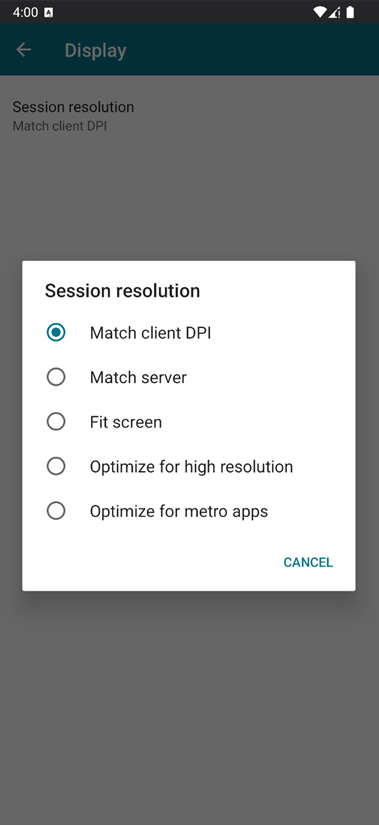
On your device, go to Citrix Workspace app for Android Settings > General > Display > Session Resolution > and select the Match client DPI option.
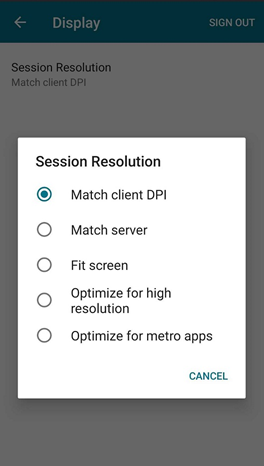
In other words, the Citrix Workspace app attempts to match the display resolution and DPI scale settings of the Android device to the Citrix session automatically. This feature enhances the user experience by displaying the sessions according to the DPI of the phone or tablet. The session icons, text, and image clarity are now sharper and more comfortable to read.
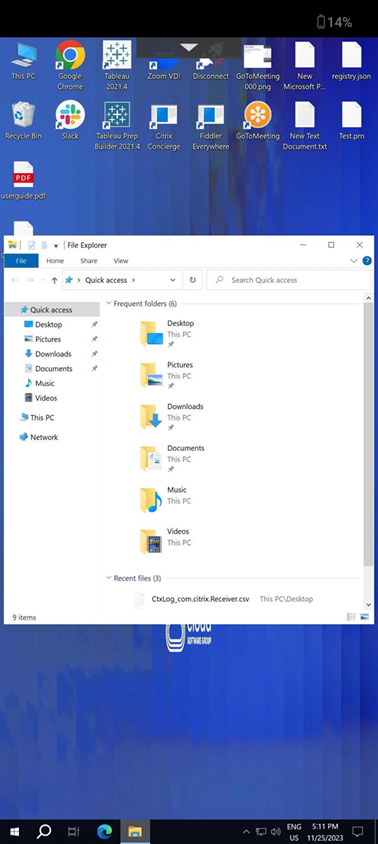
For example, when you select the Match client DPI option, the session icons, text, and images are clear.
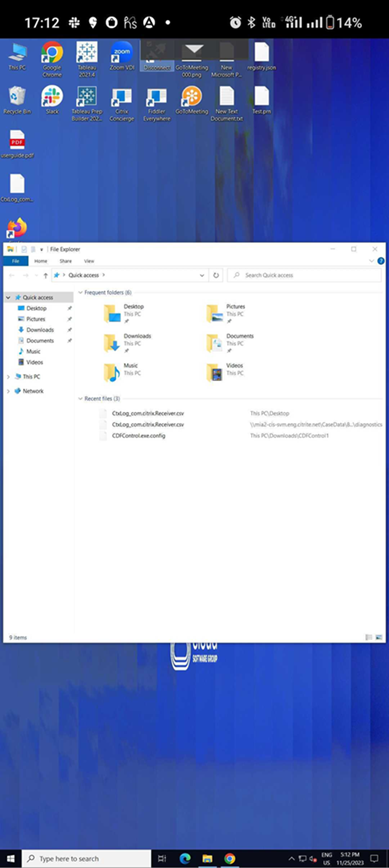
On the contrary, when you select the Fit screen option, the session icons, text, and images are smaller in size.
Note:
When you connect an external monitor, the session continues to render with the primary device’s DPI because of Android’s limitation.
Enlightened Data Transport (EDT)
In earlier releases, session launches were unsuccessful when Enlightened Data Transport (EDT) connections can’t be established between Citrix Gateway and the VDA. Starting with the 21.5.0 release, unsuccessful EDT connections fall back to TCP.
EDT stack parameters enabled by default
Starting with the 21.7.0 release, the EDT stack parameters are enabled by default. As a result, we’ve removed the EDT Stack Parameters option from Settings > Advanced.
To date, the option to disable EDT stack parameters was available to users. With this option available, not all clients were following custom EDT Maximum Segment Size (MSS) requirements consistently. As a result, fragmentation occurred with degradation in HDX™ performance and issues in establishing sessions for these clients. With EDT stack parameters newly enabled by default, the overall user experience and satisfaction is now enhanced.
Parallel connection
Starting with the 21.7.0 release, we’ve are introducing the EDT and TCP parallel connection feature. The feature results in decreased connection times.
Earlier, when establishing a connection, the Citrix Workspace app tried to connect using EDT. Unsuccessful EDT connection attempts fall back to TCP causing the following issues that are now addressed:
- Increased connection time in fallback scenarios.
- Session reliability and Auto client reconnect tended to favor TCP.
- Required a connection break to try TCP again.
MTU Discovery capabilities added to EDT
We’ve added Maximum Transmission Unit Discovery capabilities to Enlightened Data Transport (EDT). As a result, you can now enjoy a consistently stable HDX experience, delivered by EDT.
Earlier, EDT failed in several scenarios such as VPN, Wi-Fi, 4G or 3G connections, and on Microsoft Azure, caused by packet loss because of packet size.
When you tried to launch a session, packet fragmentation caused sessions to drop. As a workaround, it was necessary to adjust the EDT MSS (Maximum Segment Size) in the StoreFront file, which meant extra configuration. The addition of MTU Discovery capabilities added to EDT resolves and addresses these issues.
MTU Discovery capabilities added to EDT work in sessions hosted on 1912 VDA and later.
Auto-launch of ICA® file
You can launch your published apps and desktops by tapping the resource. This feature requires StoreFront (on-premises) Version 1912 or later.
Enhanced session launch
Published apps and desktops are launched in separate windows. This enhancement helps you to use and interact with the store enumeration window without having to disconnect or log off from the session.
Limitations:
- After changing any user settings, you must relaunch the session for the changes to take effect.
- Apps and desktop are named ‘Workspace’ in the taskbar - not after the session.
Battery status indicator
The battery status of the device is now displayed in the notification area of a Citrix Desktop session.
Note:
Battery status indicator isn’t displayed for server VDA.
USB device redirection
Starting with Version 20.9.0, the USB redirection feature is fully functional and ready for general availability. By default, the USB redirection feature is disabled.
This feature allows the redirection of arbitrary USB devices from client machines to Citrix Virtual Apps and Desktops and Citrix DaaS. It allows you to interact with a wide selection of generic USB devices in a session, as if they were physically plugged into it.
As a prerequisite to manage this feature using the Citrix Global App Config Service, set the USB redirection feature to Enabled on the Delivery Controller. For more information on how to configure USB redirection on the Delivery Controller, see the Generic USB devices section in the Citrix Virtual Apps and Desktops documentation.
The Citrix Global App Configuration service gives Citrix administrators the ability to deliver Citrix Workspace service URLs and Citrix Workspace app settings through a centrally managed service.
The USB redirection feature is integrated with and configurable through the Citrix Global App Config Service. You can manage the feature using the Citrix Global App Config Service for non-domain joined networks.
For information on configuring the feature using this method, see Global App Configuration service in the developer’s documentation.
Note:
This feature is ready for general availability starting with Version 20.9.0. In Versions 20.8.1 and earlier, it’s available on-demand only.
The USB redirection policy must be set to Allowed on the Delivery Controller. For information about configuring USB redirection in Citrix Studio, see Configure generic USB redirection in the Citrix Virtual Apps and Desktops documentation.
For printers and scanners:
Install the vendor-specific drivers on the device. When the installation is complete, the vendor software might ask you to reconnect the USB device. Reconnect the USB device to redirect it.
Configuring USB redirection on mobile phones, tablets, and Samsung DeX
- Add a USB redirection policy-enabled store and launch a session.
-
Tap the session toolbar icon as displayed in the dialog below:
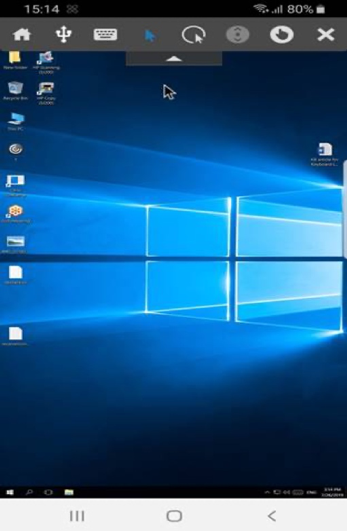
- Tap the USB Icon in the session toolbar.
-
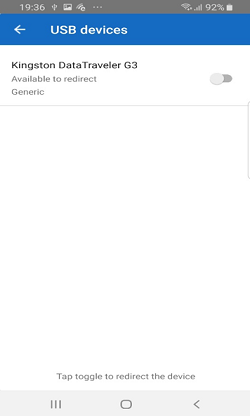
Connected USB devices are listed in the USB devices window as follows:
-
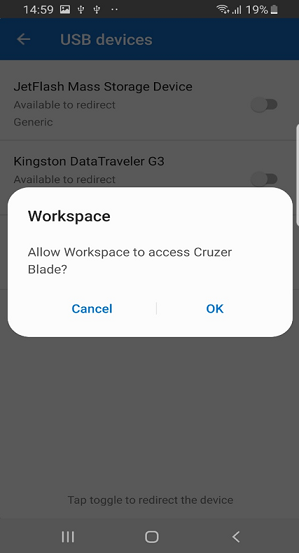
To redirect a particular USB device, tap the Toggle option against the device.
A Workspace permission dialog appears.
-
Tap OK to grant permission for the Citrix Workspace app to redirect the device.
Note:
This step is mandatory to redirect the USB device.
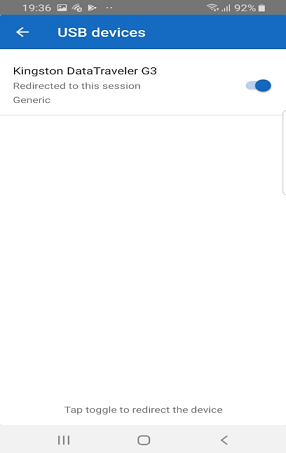
The USB device is redirected and the status is displayed as follows:
Note:
- If a pen drive is redirected, it appears as listed in a session.
- If a printer or scanner is redirected, it’s displayed in the Devices section in the control panel.
Tested USB devices
| Device | Manufacturer | Model |
|---|---|---|
| Printer | HP | LaserJet P2014 |
| Scanner | HP | Scanjet G3010 |
| Scanner | Canon | CanoScan LiDE 700 F |
| Space Navigator | 3Dconnexion | |
| Printer | Brother | QL-580N |
| Scanner | HP | Scanjet 200 |
Known issues:
- Only one USB device is supported at a time.
- Audio and video USB devices aren’t currently supported.
Auto-redirection of USB devices
Citrix Workspace app lets you redirect USB devices automatically when you connect them. When you connect a USB device, a prompt appears, asking you for permission. After you grant the permission, the USB device is redirected automatically.
Note:
This feature is available on-demand only and supports only if the USB device redirection feature is enabled.
Enhancements to audio redirection
Previously, audio redirection in a desktop session required multiple levels of microphone settings, and the steps to set the permissions weren’t intuitive. Now, microphone permission settings are simplified and are user friendly. You can also enable the permissions while you are in a session.
By default, the audio toggle under Citrix Workspace app > Settings > Audio is enabled. The session can now detect the speaker that is already connected. Administrators can enable or disable audio redirection using the Global App Configuration service.
Note:
By default, the microphone permission is disabled on both the Citrix Workspace app setting and on the store setting page.
You might come across one of the following scenarios when either the Citrix Workspace app or the store disables the microphone:
- When both Citrix Workspace app and Store settings disable the microphone permission, the Allow Workspace to record audio pop-up message appears as you start the desktop session and use the microphone. Tap While using the app.
- When Citrix Workspace app enables, but Store settings disable the microphone permission, the Allow access to microphone pop-up message appears as you start the desktop session and use the microphone. Tap Allow.
Keyboard layout synchronization
Citrix Workspace app allows you to enable the keyboard layout synchronization under Settings > General > Keyboard > Keyboard Layout Sync.
The Keyboard Layout Sync option allows automatic keyboard layout synchronization between the VDA and the client device.
On a fresh install and by default, the client-side IME is automatically enabled for Japanese, Chinese, and Korean languages and the Keyboard Layout Sync option is set to Off.
To enable dynamic keyboard layout synchronization, set the Keyboard Layout Sync option to On.
When the Keyboard Layout Sync option is disabled, both the VDA-side (remote) IME and the client-side IME take effect depending on your device’s current input method. For example, if the client-side IME is in English and the VDA-side IME is in Japanese, the VDA-side IME (remote) takes effect.
When the Keyboard Layout Sync option is enabled, the client-side IME takes precedence. If you change the input language at the client-side IME, the VDA-side IME changes accordingly. For example, if you change the client-side IME to Japanese, the VDA-side IME automatically changes to Japanese. At the same time, Japanese IME on your client device is used during the session.
Prerequisites:
- For Linux VDA, enable Client keyboard layout sync and IME improvement policies.
- For Windows VDA, enable Unicode Keyboard Layout Mapping, Client Keyboard Layout Sync, and IME Improvement policies.
- The VDA must be version 7.16 or later.
Feature Limitations:
- This feature works only on soft keyboards on the devices, not on external keyboards.
- Keyboard layout synchronization does not support Gboard (the Google Keyboard).
- The keyboard layout can only be synced from the client to the server. When changing the server-side keyboard layout, the client keyboard layout can’t be changed.
- When you change the client keyboard layout to a non-compatible layout, the layout might be synced on the VDA side, but functionality can’t be confirmed.
Keyboard layout support for Windows VDA and Linux VDA
| Keyboard layout on Android | Keyboard Language | Keyboard Layout on Windows | Keyboard Layout on Linux |
|---|---|---|---|
| Belarusian(Belarus) | Belarusian(Belarus) | Belarusian(Belarus) Keyboard | by |
| Bulgarian | Bulgarian | Bulgarian (Typewriter) keyboard | bg |
| Chinese (Simplified) | Chinese (Simplified, China) | Citrix IME - Chinese (Simplified, China) | zh |
| Chinese (Traditional) | Chinese (Traditional, Taiwan) | Citrix IME - Chinese (Traditional, Taiwan) | tw |
| Croatian | Croatian (Croatia) | Croatian keyboard | hr |
| Czech | Czech | Czech keyboard | cz |
| Danish | Danish | Danish keyboard | df |
| Dutch | Dutch (Netherlands) | United States-International keyboard | us |
| Dutch(Belgium) | Dutch | Belgian (Period) Keyboard | be |
| English (Australia) | English (Australia) | US keyboard | us |
| English (Canada) | English (Canada) | US keyboard | us |
| English (UK) | English (United Kingdom) | United Kingdom keyboard | gb |
| English(US) | English (United States) | US keyboard | us |
| Estonian | Estonian | Estonian keyboard | ee |
| Finnish | Finnish | Finnish keyboard | fi |
| French (Canada) | French (Canada) | French Keyboard | fr |
| French (Switzerland) | French (France) | Swiss French Keyboard | ch |
| French(French) | French (France) | French Keyboard | fr |
| German (Austria) | German (Austria) | German keyboard | at |
| German (Switzerland) | German (Switzerland) | Swiss German keyboard | ch |
| German(Germany) | German (Germany) | German keyboard | at |
| Greek | Greek | Greek keyboard | gr |
| Hungarian | Hungarian | Hungarian keyboard | hu |
| Icelandic | Icelandic | Icelandic keyboard | is |
| Irish | Irish | ie | |
| Italian | Italian (Italy) | Italian keyboard | it |
| Japanese | Japanese | Citrix IME - Japanese | jp |
| Korean | Korean | Citrix IME - Korean | kr |
| Latvian | Latvian | Latvian keyboard | lv |
| Norwegian | Norwegian (Bokmål) | Norwegian keyboard | no |
| Polish | Polish | Polish (Programmers) keyboard | pl |
| Portuguese (Brazil) | Portuguese (Brazil) | Portuguese (Brazil ABNT) keyboard | br |
| Portuguese (Portugal) | Portuguese (Portugal) | Portuguese keyboard | pt |
| Romanian | Romanian (Romania) | Romanian (legacy) keyboard | ro |
| Russian(Russia) | Russian | Russian keyboard | ru |
| Slovak | Slovak | Slovak keyboard | sk |
| Slovenian | Slovenian | Slovenian keyboard | si |
| Spanish (Mexico) | Spanish (Mexico) | Latin American keyboard | latam |
| Spanish (Spain) | Spanish (Spain) | Spanish keyboard | es |
| Swedish(Sweden) | Swedish (Sweden) | Swedish keyboard | se |
| Turkish | Turkish | Turkish F keyboard | tr |
| Ukrainian | Ukrainian | Ukrainian keyboard | ua |
Enhanced keyboard and IME diagnostics tool
Starting with version 24.11.0, Citrix Workspace app for Android supports a new self-service command line tool hosted in Windows Virtual Delivery Agent (VDA) to diagnose keyboard and Input Method Editor (IME) related issues. This tool meets various user requirements, provides platform versatility, and caters to personalized needs. The keyboard and IME functions depend on different configurations and capabilities in VDA and Citrix Workspace apps. Incorrect settings in the VDA or client-side might result in unexpected input behavior. With this tool, you can easily identify issues that were previously difficult to find. They are:
- Client keyboard layout and VDA keyboard layout inconsistency: The tool checks if the client keyboard layout matches the VDA keyboard layout.
- Predictive text setting for CJK client IME input check: The tool checks the client keyboard’s predictive text setting to suggest best practices.
- Keyboard input mode selection: The tool checks the VDA policy and the selected keyboard input mode to confirm if keyboard functions work well.
Prerequisites
- Citrix Workspace app for Android 24.11.0 or later.
- Windows VDA 2411 or later.
This command line tool is hosted in Windows VDA as CtxKbImeDiagnostics.exe.
The command line interfaces are as follows:
| Interface | Description | Note |
|---|---|---|
CtxKbimeDiagnostics |
Shows diagnostic results for the current user’s ICA sessions. | If the user has admin privileges, it shows the diagnostic for all active ICA sessions. If the user has no admin privileges, it shows the diagnostics for the current user’s ICA sessions. |
CtxKbimeDiagnostics [-v] |
Shows setting information and diagnostic results for current user’s ICA sessions. | If the user has admin privileges, it shows the diagnostics for all active ICA sessions. |
CtxKbimeDiagnostics [-v] [-s Session_Id] |
Shows setting information and diagnostic results for the current session. | |
CtxKbimeDiagnostics [-s Session_Id] |
Specific to a session and shows the respective diagnostic result for this session. | If the user has admin privileges, they can query other ICA sessions. If the user has no admin privileges, the user can only query their own ICA sessions. |
CtxKbimeDiagnostics [-s Session_Id] [-v] |
Specific to a session and shows all setting information and diagnostic results for this session. | If the user has admin privileges, they can query other ICA sessions. If the user has no admin privileges, the user can only query their own ICA sessions. |
CtxKbimeDiagnostics [-h] |
Shows supported args/parameters and examples. | “Help” interface. |
CtxKbimeDiagnostics [-V] |
Shows the current tool version. | |
Service continuity
Service continuity removes or minimizes the dependency on the availability of components that are involved in the connection process. Users can launch their virtual apps and desktops regardless of the health status of the cloud services.
For more information, see the Service continuity section in the Citrix Workspace documentation.
App switch
This feature enables an end user to switch between many published apps that are in the same session. When you tap the Switch icon, you can scroll to select an app and the app that is in focus is highlighted. You can view the app title, preview image, and window title.
When you open or close an app, the app count updates accordingly. If some apps are opened in another session, the app count includes all the opened ones.
![]()
Support for full-screen display
Starting with the 23.8.0 version, the H264 codec supports improved video rendering in full screen mode. If you’re a frequent consumer of videos or heavily depend on video content, this feature is recommended for you. It’s designed to improve your video experience for performance, video quality, and resource utilization.
Configuration
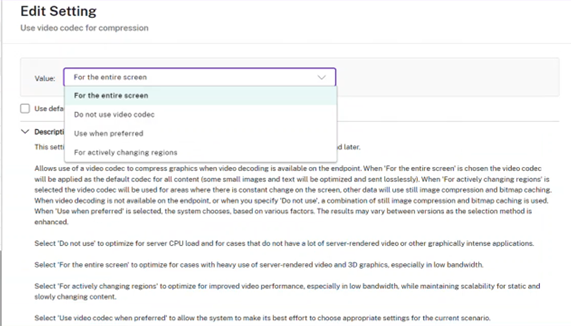
On the DDC machine set the policy Use video codec for compression to For the entire screen to improve video compression up to 60FPS.
Addition of Ctrl+Alt+Del shortcut in session toolbar
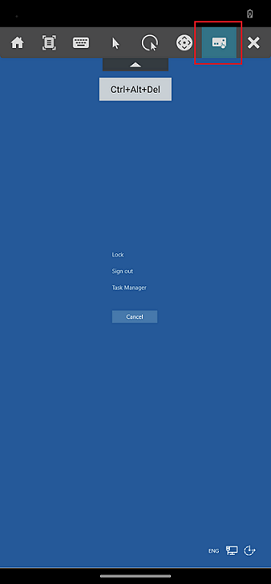
Starting from the 23.9.5 version, the session toolbar has an option to do the Ctrl+Alt+Del function with the tap of a button. This option facilitates users to sign out, switch users, lock the device, or access the Task Manager.
Support for full-screen mode for app sessions
Previously, when you started an app session, you could view it in windowed mode.
Starting from the 23.9.5 version, Citrix Workspace app for Android introduces a new option to view the app session in full-screen mode. This feature is helpful when you:
- start a session in full immersion mode with touch devices
- try to duplicate the screen and cast it
- view the Citrix Workspace app on a smaller screen.
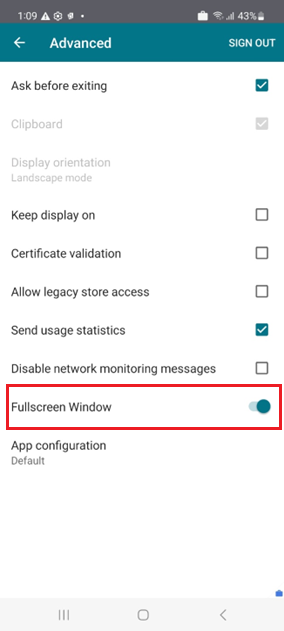
To enable the option, go to Citrix Workspace app for Android Settings > Advance > Fullscreen Window and toggle on. The following screenshot displays the option:
Accessibility and TalkBack
Citrix Workspace app provides an enhanced user experience with the TalkBack feature. The TalkBack feature helps end users who have difficulty seeing the screen. The narrator reads the screen elements aloud when using the UI.
To use the Android talkback feature, end users must enable it from Android Settings > Accessibility > Talkback.
For more information, see Accessibility and TalkBack in the help documentation.
Known issues in the feature
-
When you attach an external keyboard to your device:
- To use the CapsLock key as the narrator key, the action might not work as expected. As a workaround, press the Insert key. [HDX-55347]
- To use the key combination Win+Ctrl+Enter to enable the narrator, the action doesn’t take effect inside the virtual desktop session. As a workaround, use the Win key or the Start menu and enter the word Narrator. [HDX-55380]
Improved error messages
Previously, error messages had insufficient actionable descriptions.
Starting with the 23.12.0 release, error messages include a clear and user-friendly title, a specific description for each error, and error codes where possible. Error codes help administrators to troubleshoot the issue. The improved messages to end users provide enough details to troubleshoot problems. If there are any unresolved issues, we suggest users reach out to their IT administrator for further assistance.
For example, when the user is unable to sign in, the following error message appears:

Soft keyboard support for barcode scanner
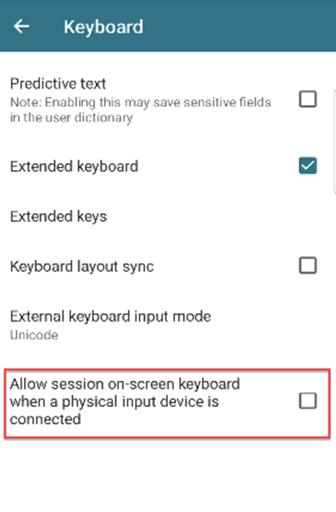
Previously, when barcode scanners (for example, Zebra scanners) were detected in a session, the soft keyboard didn’t appear. The issue was because it was identified as an external keyboard.
Starting with the 24.2.0 version, the soft keyboard appears when barcode scanners are connected as a physical input device. A new keyboard setting is added to support this feature. End users can go to Citrix Workspace app Setting > Keyboard > and select Allow session on-screen keyboard when a physical input device is connected option.
Managing predictive text
The predictive text helps in a better typing experience by suggesting words that you can type next. When you enable this feature during an app or desktop session, it’s possible for passwords to show up on the prediction ribbon. To control this behavior this feature is disabled by default.
Notes:
- On your device’s default keyboard settings, if the Predictive text option is disabled, you can’t use this feature even when you enable it through Citrix Workspace app for Android.
- In a session, when the CJK input layout is set as a default on the GBoard keyboard, the English layout appears instead of the CJK layout. To view the CJK keyboard layout, go to app Settings > Keyboard and enable the Predictive text option. [CVADHELP-23667]
Document scanner
If you’re signed into Citrix Workspace app, you can use the document scanner feature to scan many documents and transfer those scanned documents to the virtual desktop session.
Note:
- This feature is enabled by default.
Prerequisites
- Client drive mapping (CDM) must be enabled for the store.
- Document scanner requires read and write access on your device. To enable access, follow these steps:
- From your profile, tap application Settings > Store settings.
- Tap your current store.
- Tap Device Storage and then select Full access.
For more information about how to use this feature, see Document scanner in the help documentation.
Enhancement to support desktop-like experience in a single session on Samsung DeX
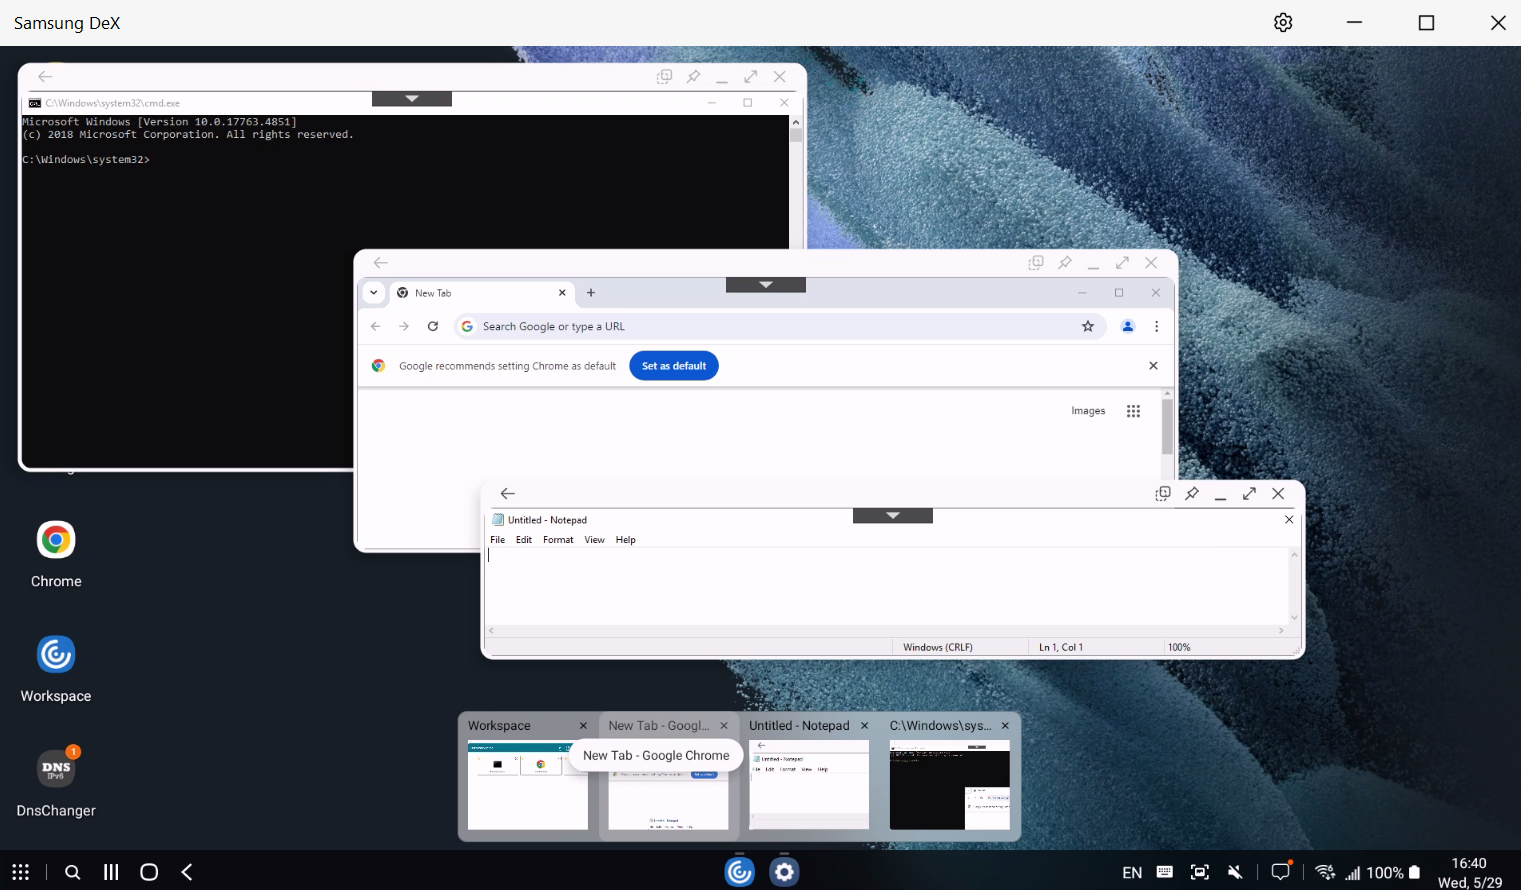
Previously, Citrix Workspace app supported seamless multi-tasking and provided users with a desktop-like experience. It allows you to open multiple apps within the same session to run simultaneously. These apps opened in separate windows.
Starting from the 24.7.0 release, end users can open a separate window for session-sharing apps. This feature supports more than one local window, thus facilitating multi-tasking. Each window has a name for each virtual app. Users can open multiple virtual apps and native DeX apps on the DeX screen only. Active virtual apps and native DeX apps show up as active apps in the bottom taskbar with respective app names, on the DeX Screen only.
Note:
The first app you start might take a minute to sign in to the session and load your user profile.
Users can do the following:
- Click the pin button on the upper-right of the window to pin the app window. The pinned window always stays on top.
- Access the session toolbar button on all the app windows.
- Minimize, maximize, move, and close the app window.
- Switch apps and multi-task using mouse clicks, double-clicks, drag, and keyboard strokes.
Feature limitations
- Server-oriented window size change isn’t supported. In other words, if the size of the server-side window is set or limited, any requests to change the size from the client side aren’t successful. This setting results in a discrepancy between the local and remote window graphics.
- The client-side window has a minimum window size. For instance, the minimum size of a window on a 1920x1080 resolution DeX screen is 220x220 with the title bar, and the available rectangle size is 220x189.
- Certain menu options might extend and appear out of the parent app boundary. The extended menu options might appear in the other app windows.
- The preview image of an app in the taskbar might overlap and cover another app’s preview.
Enhanced EDT congestion control
The Enhanced EDT congestion control feature optimally utilizes the available network bandwidth, resulting in improved throughput and reduced latencies for internet traffic. This allows users with poor network connections to experience seamless sessions on their mobile devices. Overall, this feature enhances the user experience and usability of Citrix Workspace app for Android.
Note:
- By default, this feature is enabled. However, to use this feature, ensure you enable the Citrix Workspace app > Settings > Advanced > EDT option.
- This feature is supported on both cloud and on-premises stores.
For more information about configurations, see Enhanced EDT congestion control in the Citrix Virtual Apps and Desktops documentation.
Enforcing Citrix access using Citrix Workspace™ app
Starting with version 24.12.0, admins can mandate users on Android devices to access Citrix Workspace exclusively through the native app. When this feature is enabled, users attempting to access the store URL and third-party browsers are automatically redirected to the Citrix Workspace app. This ensures they can take advantage of all the native app’s capabilities and enjoy a seamless user experience. Additionally, this feature gives admins greater control over the user environment and enhances security by keeping the authentication process within the native app, eliminating the need to download ICA files.
Admins can enable this feature using their Citrix Cloud account. For more information, see Mandate end users to authenticate and access apps and desktops through native app.
Improved in-session toolbar
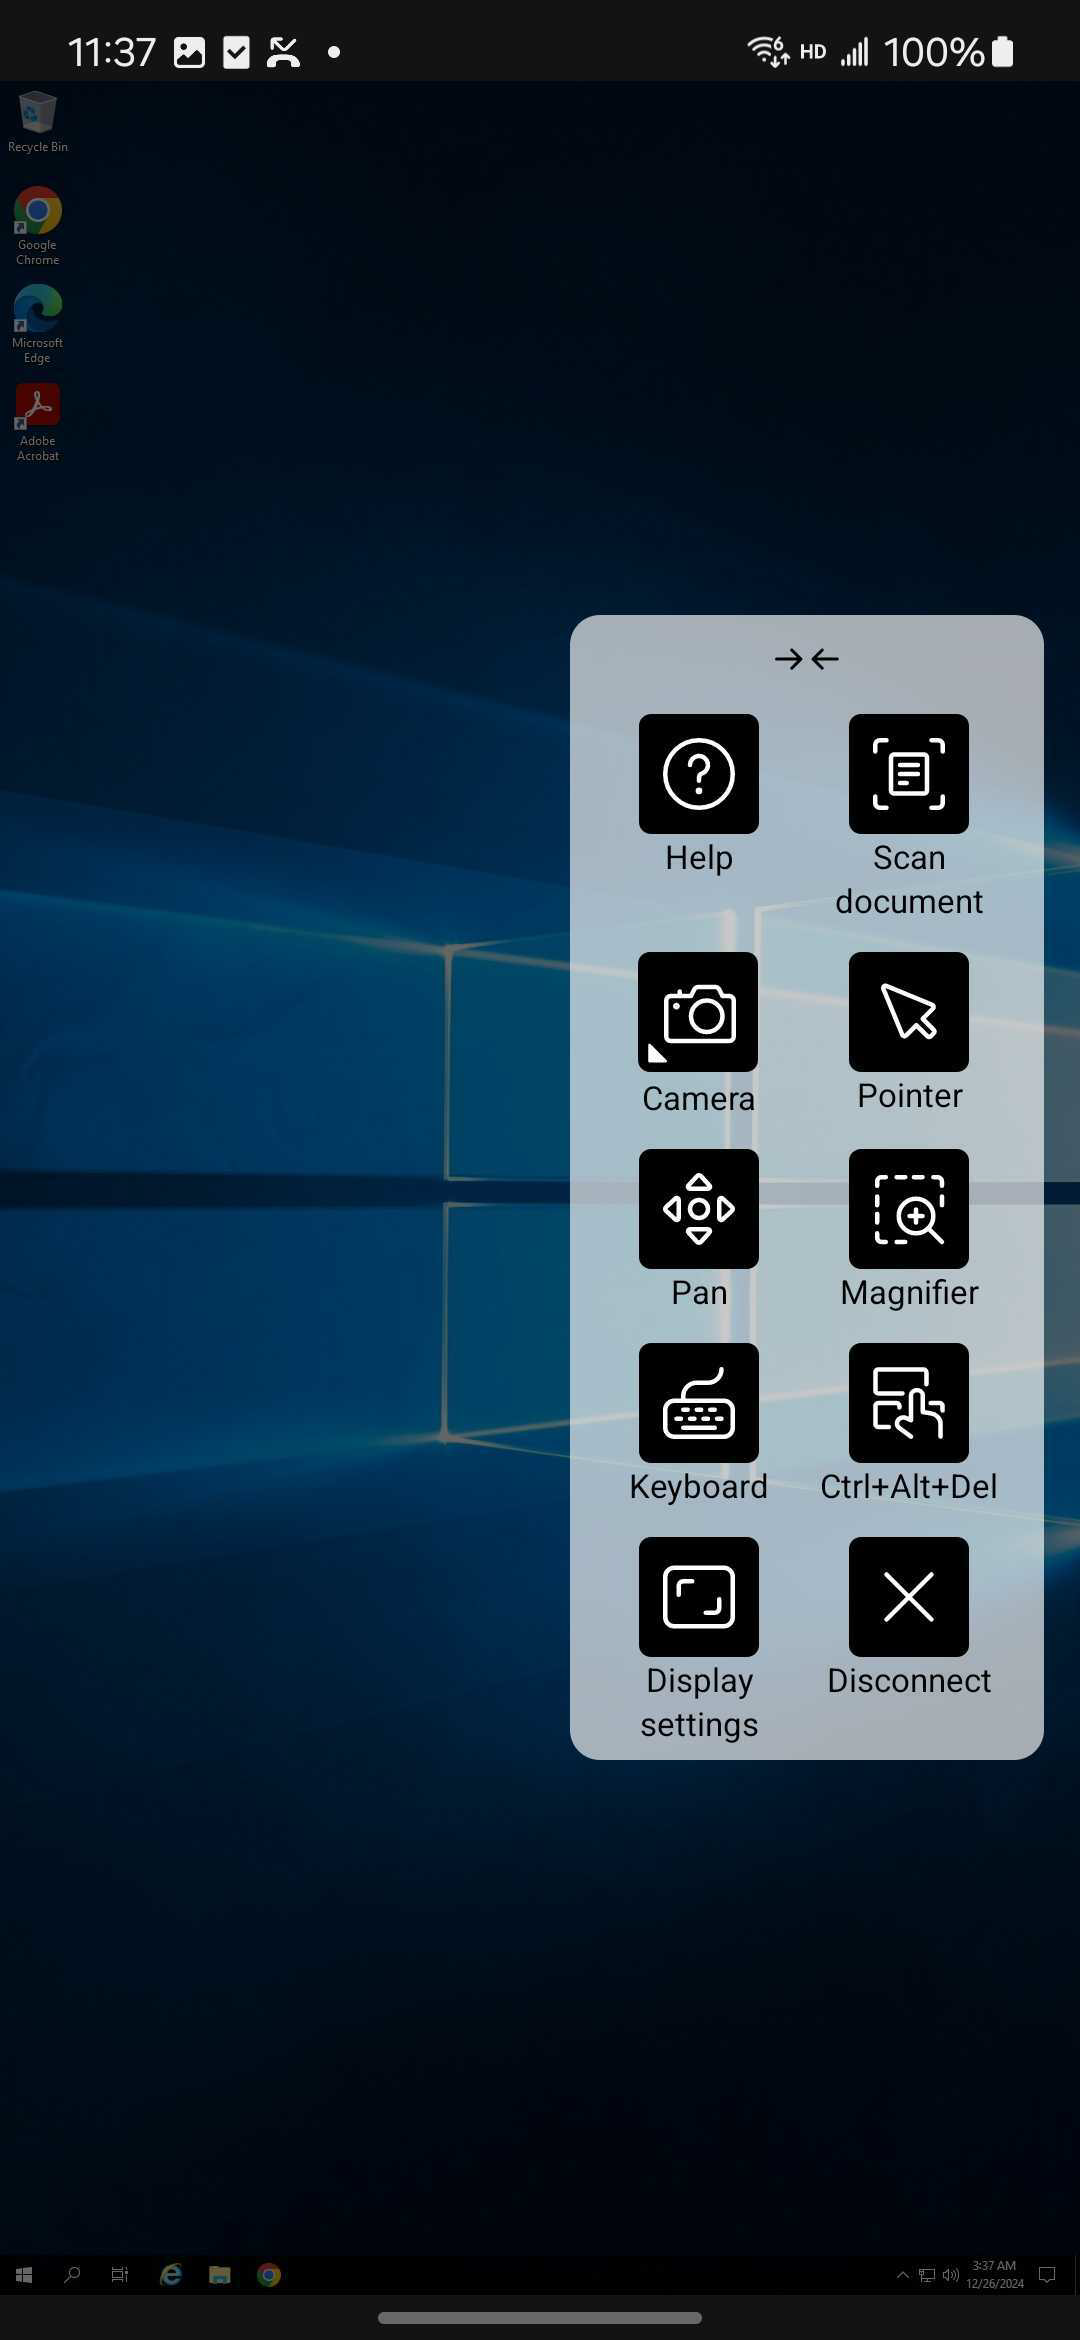
Starting with the 24.12.0 version, an enhanced toolbar UI appears when you start a desktop session. The look and feel of the in-session toolbar UI is changed. The toolbar UI is designed to improve the end user experience by organizing the options in a user-friendly manner.

Note:
This feature is disabled by default. To enable the feature, follow the configuration steps.
Benefits
This enhanced toolbar includes:
- Admin Control: Admins can customize the toolbar, choosing what options are shown to the end user.
- Enhanced look and feel: The toolbar has been revamped with a new user interface and skinning options.
- Switchable layout: The toolbar can switch between a single and dual-column layout.
- Customizable toolbar: Admins can push the old or new toolbar to users.
- Drag functionality: In landscape mode, the toolbar notch can only be moved along the top edge of the screen. In portrait mode, the notch can be dragged horizontally from left to right, right to left, and vertically along the screen’s edge.
- Quick access icons: New icons are introduced to quickly access frequently used features.
- Gesture guide: This guide provides guidance on using single-click, right-click, drag, zoom, toggle pointer, and keyboard.
- Toolbar guide: Includes options for devices, keyboard, pointer, magnifier, mouse, display, camera, switch, and more.
Configuration
You can configure the new toolbar UI as follows:
Global App Configuration service
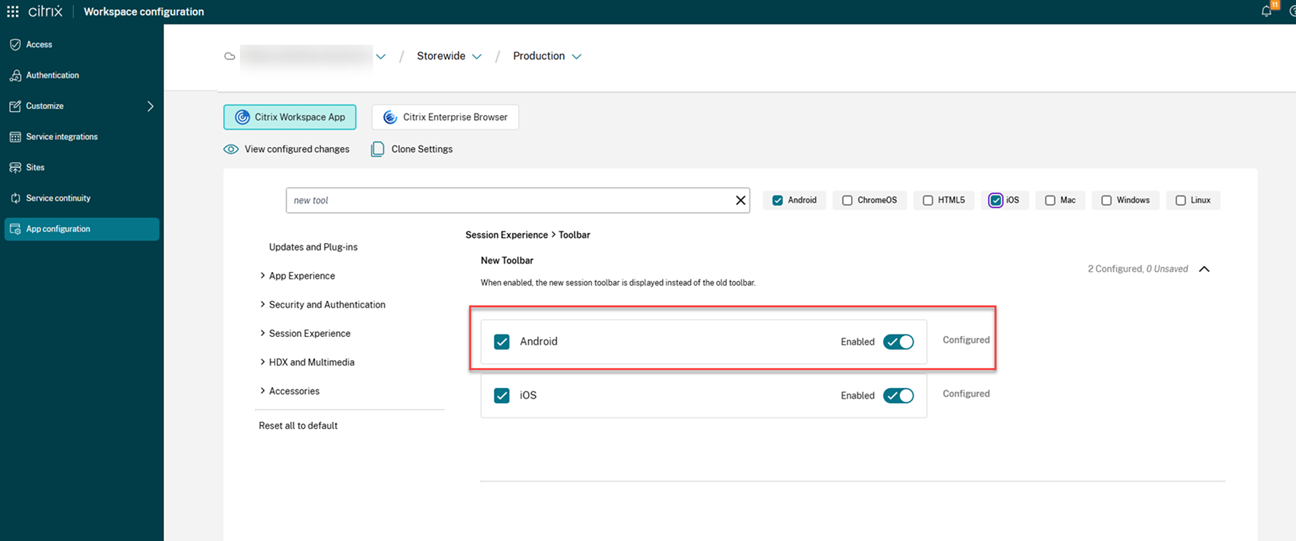
On the cloud setup, administrators can enable or disable the improved toolbar feature by navigating to Workspace Configuration > App Configuration > Session Experience > Toolbar > New Toolbar. To enable the feature, select the checkbox and the respective toggle button.
Icons and Actions
Note:
The icons are visible to the end users only if their organization’s admin has enabled the specific feature.
| Icon/Action | Description |
|---|---|
| Toolbar notch | When you start an app or a desktop session, the toolbar notch appears at the top of the screen. When you click the notch, the toolbar appears in the unpinned state. Drag and reposition the toolbar notch onto any side of the screen. After you release the mouse, the notch will automatically align itself with the nearest edge. |
| Help | Guides on using toolbar features, gestures, and menu options for navigating and interacting with the session. |
| Scan Document | Opens the camera app for scanning documents. |
| Devices
|
Click to open the USB Devices dialog box. Click Add to view the USB devices connected to the local device. The dialog box lists the devices that can be redirected to the session. To redirect the USB devices, select an appropriate device and click Connect. |
| Note: You can view the Devices icon only if your IT administrator provides access to connect USB devices through policy settings. | |
| Camera | You can select the type of camera to use: front, rear, or external. |
| Pointer | Displays a Windows-like mouse pointer inside the session window. |
| Pan
|
Tap to switch between the following actions |
| Pan: Tap to move around the screen easily. | |
| Scroll: Tap to scroll the page. | |
| Multi-touch: Tap to pinch and zoom, scroll, and use multi-finger gestures in the session. | |
| Magnifier | Displays a window-like mouse pointer along with a magnifying lens. User can move the magnifier window over the screen to see the magnified view. |
| Keyboard | Displays the Android system soft keyboard along with an extended keyboard accessory with control keys. |
| Ctrl+Alt+Del | You can perform the Ctrl+Alt+Del function with the click of a button. This option helps users to sign out, switch users, lock the system, or access the Task Manager. |
| Display Settings | Opens the Citrix Workspace app display settings. |
| Switch | Switch apps is used to switch between multiple virtual apps that are opened at a time in a single VDA. |
| Variable Menu Options | Scan - displays a full-screen camera to scan documents. |
| Disconnect
|
The disconnect action keeps the virtual desktop running. Log out to save energy. |
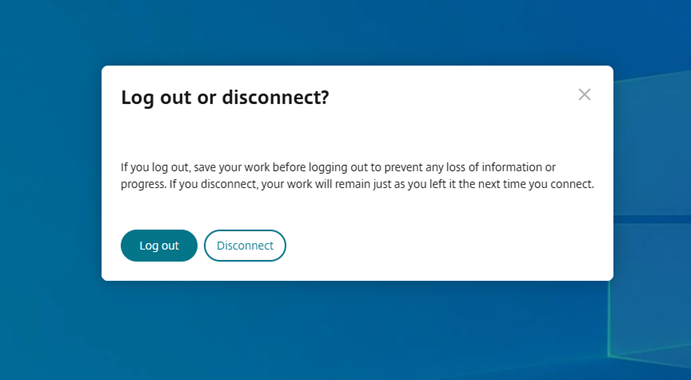
| Note: When admin configures both the Log out and Disconnect options, the following message appears | |
 |
|
| Log out to save energy: the logout action shuts down the virtual machine and conserves energy. End users must make sure to save their work before logging out. | |
| Disconnect: closes the virtual desktop session window. However, the virtual session remains active until the next sign-in. End users can resume their work easily. The Sustainability leaf icon appears only when the sustainability feature is enabled. |
Webcam selection
Starting with version 24.12.0, external webcam selection is now available in the new toolbar. Users can use the camera icon given in the toolbar.
Connection strength indicator
Starting with 2501 version, Citrix Workspace app for Android supports the Connection Strength Indicator (CSI) on the new in-session toolbar. This feature displays a network strength icon that alerts you of network issues. By clicking the icon, you can view real-time connection statistics for the client, gateway, and VDA, and copy diagnostic information to share with IT for advanced troubleshooting.
![]()
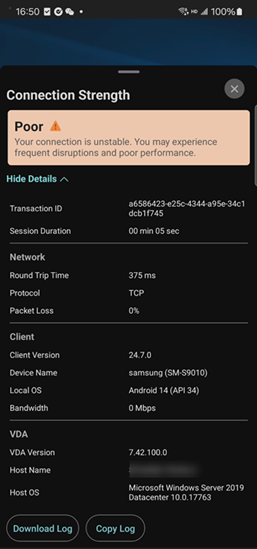
Note:
This feature is enabled by default. You can see the Connection Strength icon on the new toolbar when you open the session. You can disable the feature through the Global App Configuration service as follows:
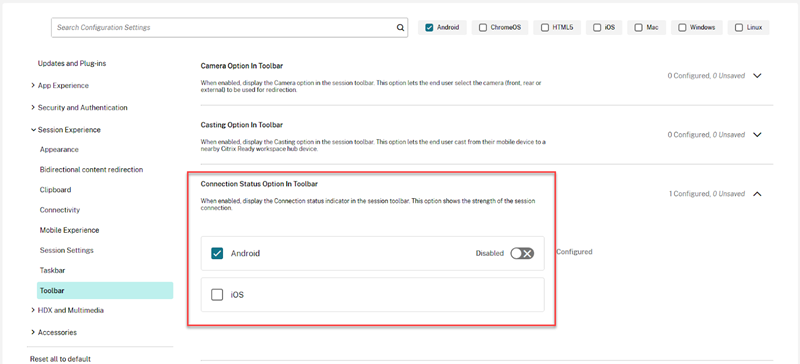
Prerequisites
To use this feature, you must enable the Improved in-session toolbar feature. By default, the new toolbar feature is disabled. Administrators must enable the new toolbar feature through Global App Configuration service. This feature is available only in the VDA version 2407 or later.
For more information, see Improved in-session toolbar feature.
Sustainability initiative from Citrix Workspace app
Previously, virtual desktops were left in a disconnected state when users closed them by tapping the home button. This consumed unnecessary energy and power resources.
We have introduced a sustainability initiative that encourages users to conserve energy that might be used due to running unused virtual desktops. Also, admins can customize the sustainability message dialog box contents.
When this feature is enabled, a prompt is displayed to sign out from the desktop session when a user closes a virtual desktop. This feature might help conserve energy if there are Windows OS policies that are used to shut down VMs when no users are logged in.
Notes:
- This feature is disabled by default.
- This feature is available on both cloud and on-premises store.
To enable this feature, do the following:
- Navigate to Citrix Studio.
- Click Delivery Groups from the left navigation pane.
- Select the required VDA from the Delivery Group section.
- Click the Edit icon. The Edit Delivery Group page appears.
- Click Desktops from the left navigation pane.
- Select the required VDA where you must add the keywords.
- Click Edit. The Edit Desktop page appears.
- Set the
ICA-LogOffOnClosekeyword totruein the Description field. - Click OK. The following dialog box appears when you close the virtual desktop.
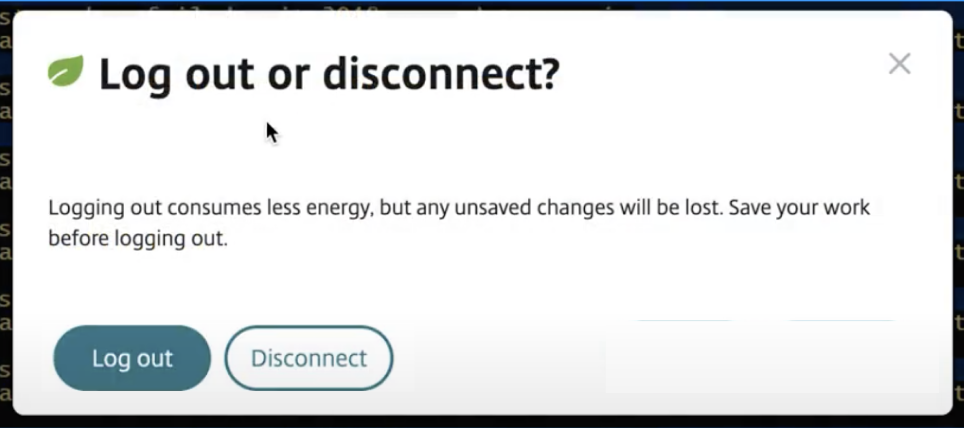
End users can exit from the session in two ways:
Sign out to save energy - This sustainability action shuts down the virtual machine and conserves energy. End users must make sure to save their work before signing out.
Disconnect to close the virtual desktop session window. However, the virtual session remains active until the next sign-in. End users can resume their work easily.
Customizing the text in the Save Energy screen
Admins can customize the disconnect and log out dialog box contents in the Saved energy screen.
Configure
Admins can customize the sustainability dialog box contents using the following keywords in DDC for both on-premises and cloud setup:
Note:
The maximum number of characters allowed in the Description field is 200.
| Keyword | Description |
|---|---|
| ICA-LogOffOnClose | Keyword for enabling/disabling Sustainability. The default value is false. |
| ICA-Icon | Keyword for enabling/disabling Sustainability leaf Icon. Even if this setting is empty, the ICA-LogOffOnClose setting applies. |
| ICA-PromptMessage | Keyword for customizing the prompt message that appears in the dialog box. If you haven’t given a customized message, then the default message applies. |
| ICA-Title | The keyword for customizing the title that appears in the dialog box. If you haven’t given a customized message, then the default message applies. |
Notes:
- The disconnect and log out dialog boxes appear according to the parsed key.
- If you choose not to use the sustainability feature, then the admin can configure the key LogOffOnClose to false. However, the user sees the default dialog box, and can choose to click the “Don’t ask me again” checkbox. When the user clicks this option, the session disconnects, but the dialog box doesn’t appear in subsequent sessions.
Customization:
To customize the text in the Save Energy screen, do the following:
- Follow steps 1–8 from the preceding section.
- Set the
ICA-PromptMessagekeyword to the required text in the Description field. - Set the
ICA-Titlekeyword to the required text in the Description field. -
Set the
ICA-Iconkeyword to true or false.Example:
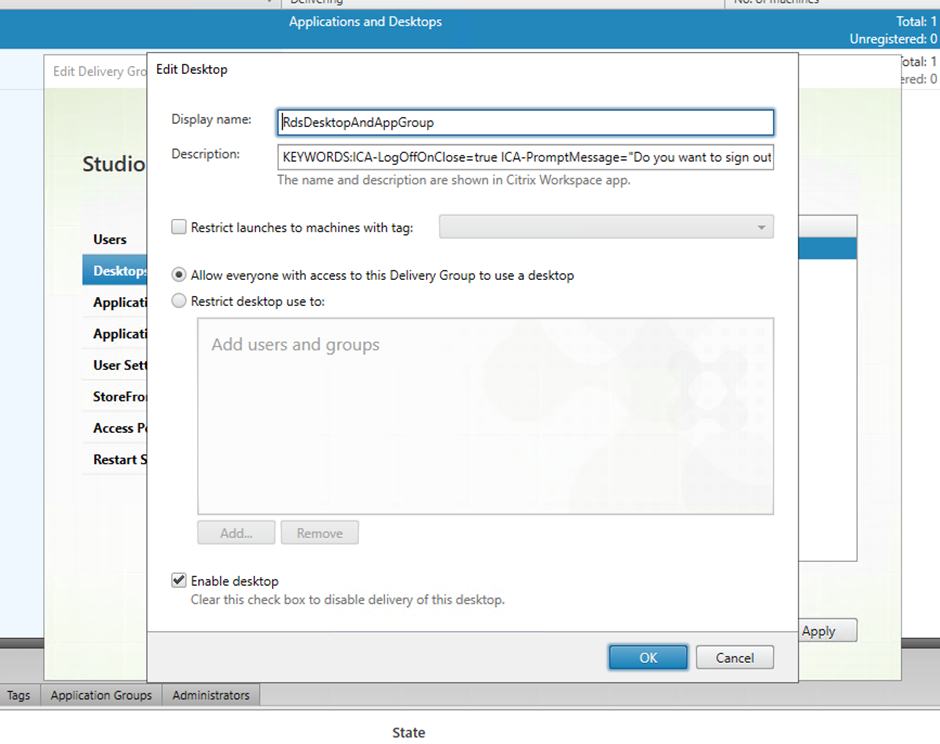
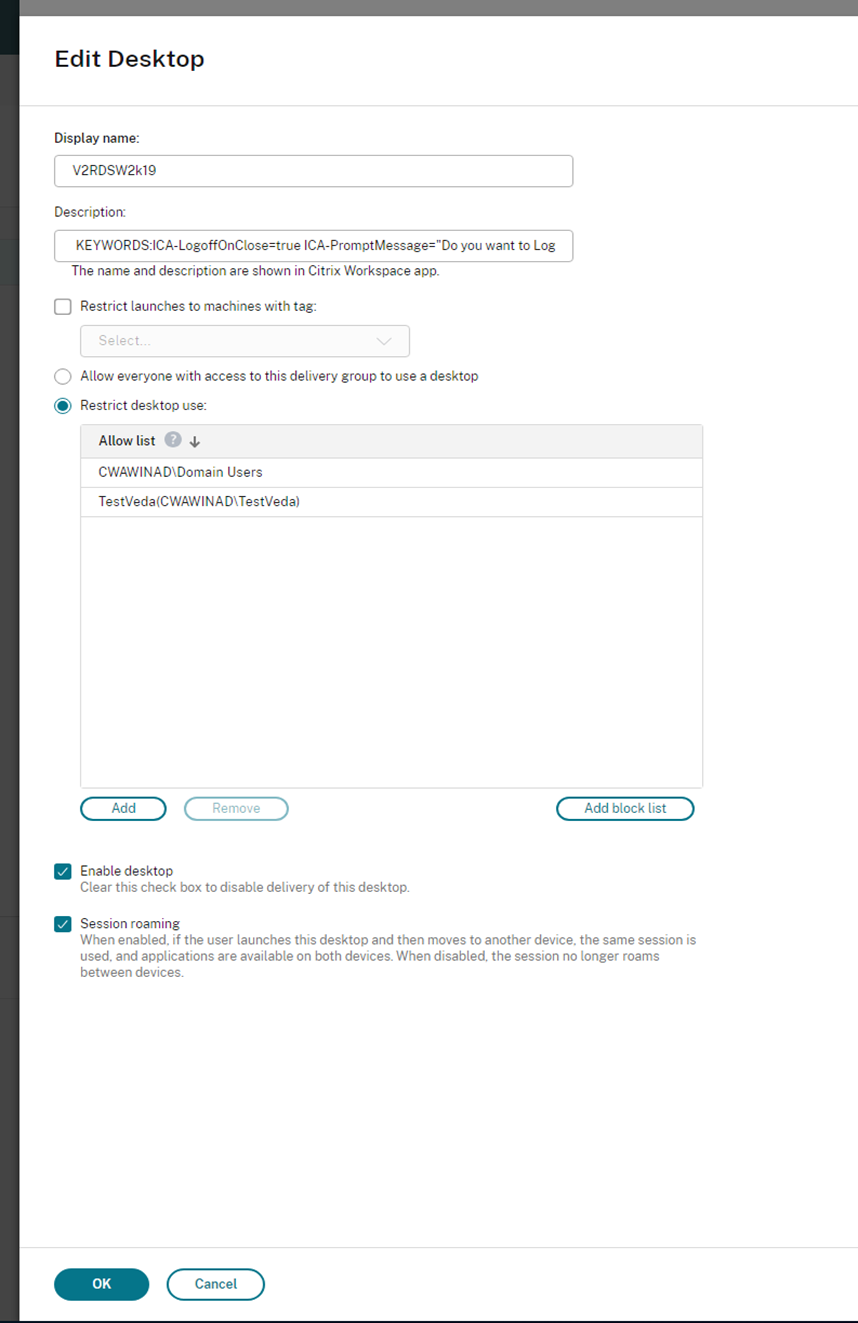
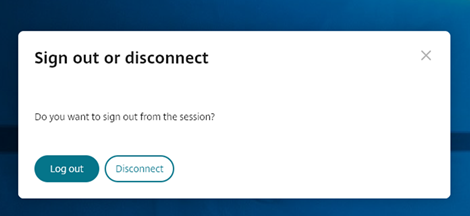
KEYWORDS:ICA-LogOffOnClose=true ICA-PromptMessage="Do you want to sign out from the session?" ICA-Title="Sign out or disconnect" ICA-Icon=true
<!--NeedCopy-->
The following screenshot displays how to edit desktop group dialogs:
For on-premises setups
For cloud setups
The keywords are assigned by default for new desktop machines assigned to the group. For existing desktop machines, you must run the following PowerShell commands for changes to apply:
$dg = Get-BrokerDesktopGroup -Name '<group name>' -Property 'Name','Uid'

$apr = @( Get-BrokerAssignmentPolicyRule -DesktopGroupUid $dg.Uid -Property 'Description' )

Get-BrokerMachine -DesktopGroupUid $dg.Uid -IsAssigned $true | Set-BrokerMachine -Description $apr[0].Description
<!--NeedCopy-->
With this PowerShell script, it’s possible to have multiple assignment policy rules for a single Delivery Group. Using Citrix Studio also, you can configure multiple Assignment policy rules, each with a unique description value, and a possible set of different keywords.
-
Click OK. The following dialog box appears when you close the virtual desktop:
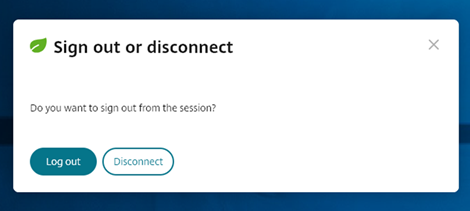
When ICA-Icon=false – Leaf icon will not be shown
Support for multi-site store failover based on geo-location
Starting with version 24.5.0, the multi-store failover handling feature improves multi-store failover handling by running store address checks asynchronously and removing outdated store entries when a new failover store address is detected. When a failover occurs due to an outage, the Global Server Load Balancer (GSLB) redirects the client to a new site.
This feature ensures that, when launching a previously added store, the Gateway detector checks if the store address has changed based on the user’s geo-location. If a new address is found, the client automatically removes the old store entry and adds the new one. This process runs in the background, allowing for a seamless transition to the new store without manual intervention. Note that this feature applies only to on-premises stores.
Prerequisite
The user must log in to the store.
Limitation
If the log-in session cookie expires, the multi-store failover does not happen automatically because the API for fetching the URL fails. In this case, the login page is prompted.
Enhanced mouse pointer mode
Starting with the version 25.5.0, Citrix Workspace app for Android introduces enhancements to mouse pointer mode, providing a smoother and more consistent experience. The mouse pointer now moves more naturally by responding to swipe velocity.
Default display settings
Previously, the default display setting was Fit screen.
Starting with version 25.5.0, Citrix Workspace app for Android unifies session resolution settings across mobile platforms. By default, sessions use Match client DPI mode, which matches the client’s DPI for a sharper, more consistent experience across devices.
Use cases
For new installations, enabling the feature flag sets the default display setting to Match client DPI. New users get the best display experience immediately.
For existing users, enabling or disabling the feature flag after installation does not change the display setting. Users must update the setting manually by going to Settings > Display:
Shortcuts for virtualized apps and desktops on home screen
Starting with version 25.5.0, users can launch Citrix-delivered virtual apps and desktops directly from their Android home screen. This feature streamlines access and delivers a native-like app experience.

Enhanced virtual desktop screen resizing experience
Starting with the 25.5.0 version, Citrix Workspace app for Android ensures a smooth transition and prevents gray screens and flickers when resizing or stretching your virtual desktop screen. This feature is enabled by default.
Auto-launch desktops and apps
Starting with version 2507, Citrix Workspace app for Android automatically launches designated desktop or applications upon user login based on administrator preferences.
How to configure
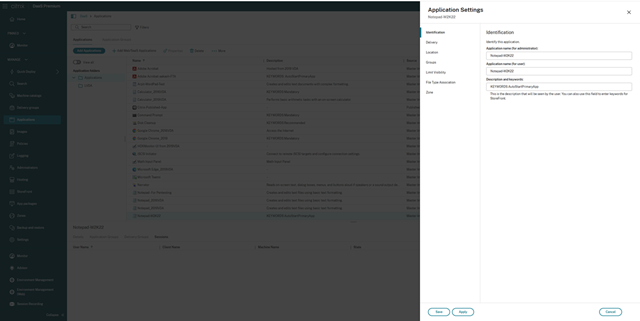
To ensure a core application launch automatically in Citrix Workspace, administrators must append the string KEYWORDS:AutoStartPrimaryApp to the application description. After it is configured, these applications start automatically for all users.
The following are the steps for administrators:
- Open the management console.
- Start Citrix Studio (or your organization’s Citrix management portal) and sign in with an account that has the rights to edit published applications.
- Locate the application
- Navigate to apps (or the equivalent section) and find the app you want to auto-start (for example, Notepad).
- Edit app properties
- Select the app and choose Edit or Properties. Find the Description field.
- Append the auto-start keyword.
- At the end of the description text, append a single space followed by the exact keyword:
KEYWORDS:AutoStartPrimaryApp - Save the changes.
- Click OK or Save or Update to persist the edited application description.
Session Launch Experience Improvement
Previously, the launch progress dialog box wasn’t intuitive to the users. The notification message was static. A gray screen appeared prior to the desktop image rendering, which resulted in a flicker and glitch-like effect.
Starting with version 25.7.0, Citrix Workspace app for Android ensures an enhanced desktop launch experience. Now, you experience a seamless, flicker-free transition to your desktop without intermediate screens. Users can view meaningful notifications about the launch progress. This feature is enabled by default.
The improved app and desktop launch experience is more informative, modern, and provides a user-friendly experience on Citrix Workspace app for Android. This new improved launch experience helps to keep the users engaged with timely and relevant information about the launch status.
Enhanced Connection Strength Indicator
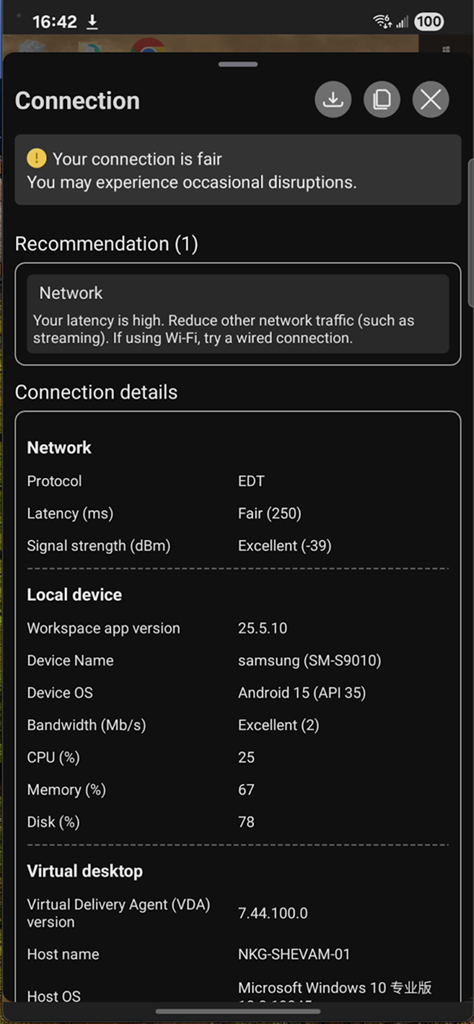
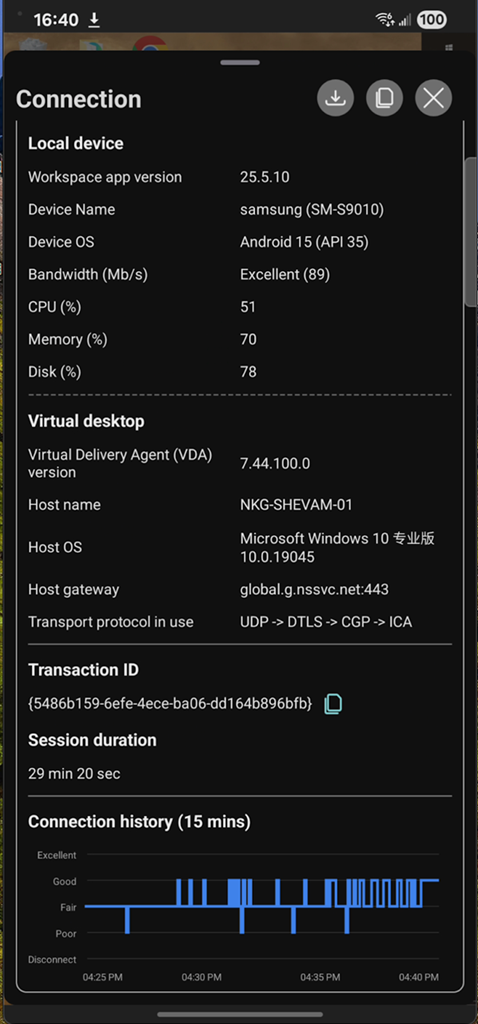
Starting with 25.7.0 version, Citrix Workspace app for Android supports more features to the existing feature Connection Strength Indicator (CSI) on the new in-session toolbar.
The following are the enhancements:
- Brand-new UI: A redesigned user interface for improved clarity and user experience.
-
Additional Connection Details:
- Signal Strength: Displays and records the Wi-Fi signal strength.
- Bandwidth: Displays and records the bandwidth data.
- CPU: Displays and records the current device CPU usage status.
- Memory: Displays and records the current device memory usage status.
- Disk: Displays and records the current device disk usage status.
- Scored Metrics and Recommendations: Scores are calculated for latency, signal strength, and bandwidth. If a score is Fair or Poor, a recommendation is added to the layout to help address the issue.
- Connection History: Records the last 15 minutes of connection history and displays it in a chart at the bottom of the layout. It is a composite score calculated based on bandwidth, signal strength, and latency. This historical data is also included in the logs when copied or downloaded.
- Download details: It records all connection items (that is, latency, bandwidth and signal strength) along with local device stats (that is, CPU usage, memory usage and disk usage in percentage). It also includes the status of the connection history. The timeline of the stored data is last 15 minutes.
Visibility in to real-time progress during resource launches
Starting with version 25.9.0, Citrix Workspace app for Android provides granular progress status during the launch of apps and desktop. This feature provides real-time feedback during the launch of the virtual desktop or application with a progress tracking system. This functionality allows users to monitor the status of the launch in real-time, helping to manage expectations and reduce uncertainty.
Benefits
- Displays clear and dynamic progress updates during resource launch.
- Helps users understand whether a launch is in progress or encountering delays.
- Enhances transparency and confidence in the connection process.
- Improves the overall usability and responsiveness of the Citrix Workspace experience on Android devices.
In this article
- DPI matching
- Enlightened Data Transport (EDT)
- Auto-launch of ICA® file
- Enhanced session launch
- Battery status indicator
- USB device redirection
- Auto-redirection of USB devices
- Enhancements to audio redirection
- Keyboard layout synchronization
- Enhanced keyboard and IME diagnostics tool
- Service continuity
- App switch
- Support for full-screen display
- Addition of Ctrl+Alt+Del shortcut in session toolbar
- Support for full-screen mode for app sessions
- Accessibility and TalkBack
- Improved error messages
- Soft keyboard support for barcode scanner
- Managing predictive text
- Document scanner
- Enhancement to support desktop-like experience in a single session on Samsung DeX
- Enhanced EDT congestion control
- Enforcing Citrix access using Citrix Workspace™ app
- Improved in-session toolbar
- Connection strength indicator
- Sustainability initiative from Citrix Workspace app
- Customizing the text in the Save Energy screen
- Support for multi-site store failover based on geo-location
- Auto-launch desktops and apps
- Visibility in to real-time progress during resource launches