-
-
Cloud Connector Standalone Citrix Secure Ticketing Authority (STA) service
-
-
-
-
-
This content has been machine translated dynamically.
Dieser Inhalt ist eine maschinelle Übersetzung, die dynamisch erstellt wurde. (Haftungsausschluss)
Cet article a été traduit automatiquement de manière dynamique. (Clause de non responsabilité)
Este artículo lo ha traducido una máquina de forma dinámica. (Aviso legal)
此内容已经过机器动态翻译。 放弃
このコンテンツは動的に機械翻訳されています。免責事項
이 콘텐츠는 동적으로 기계 번역되었습니다. 책임 부인
Este texto foi traduzido automaticamente. (Aviso legal)
Questo contenuto è stato tradotto dinamicamente con traduzione automatica.(Esclusione di responsabilità))
This article has been machine translated.
Dieser Artikel wurde maschinell übersetzt. (Haftungsausschluss)
Ce article a été traduit automatiquement. (Clause de non responsabilité)
Este artículo ha sido traducido automáticamente. (Aviso legal)
この記事は機械翻訳されています.免責事項
이 기사는 기계 번역되었습니다.책임 부인
Este artigo foi traduzido automaticamente.(Aviso legal)
这篇文章已经过机器翻译.放弃
Questo articolo è stato tradotto automaticamente.(Esclusione di responsabilità))
Translation failed!
License Activation Service
The License Activation Service (LAS) is a new cloud-based licensing solution that provides an alternative to the traditional Citrix® legacy licensing. LAS introduces new modules for activation, ensuring a seamless and modern approach to license management.
The LAS simplifies the Citrix Licensing experience. There are no longer license access codes or files to generate, download, or install on the license server. You only need to upgrade your license server and register with Citrix Cloud. Once the compatible products are pointed to the license server, they can be activated automatically.
After activation, the License Server regularly communicates with the License Activation Service to keep its activation up to date. The LAS is built with cloud technology, which improves performance and ensures that there is no downtime. If, for any reason, the License Server or LAS is unreachable, the system enters license caching mode, which is designed to protect the system from being unlicensed and avoid an outage. For more information, see License caching mode.
For more details on LAS, see the Licensing documentation License Activation Service.
Prerequisites
- Install or update the License Server to version 11.17.2 build 53100 or later.
- Reliable and continuous internet connection for the License Server.
Considerations
- All Delivery Controllers must be compatible with LAS before the Web Studio prompts for activation. A single site can use either legacy licenses or LAS.
- You can have multiple License Servers registered with the same Citrix Cloud ID (CCID) or OrgID. However, a site can be configured to point to only one license server.
Limitations
- If a License Server is registered with Citrix Cloud for LAS, you might see alerts in the Director or Citrix License Manager indicating a failure to upload compliance data. To resolve this issue, download the certificates for Baltimore CyberTrust Root from https://www.digicert.com/kb/digicert-root-certificates.htm/ and then install them in the Trusted Root Certification Authority store on the License Server.
- Migrating to LAS sets the Product Edition to Premium and the License Model to Concurrent but this might change in the future. Do not modify the license configuration using PowerShell as this might impact registration and session launch.
- You can migrate your Citrix Virtual Apps and Desktops™ site from the existing legacy license to LAS using only Web Studio.
Key steps
- Install or upgrade the License Server to version 11.17.2 build 53100 or later and configure LAS as per the instructions mentioned in How to Configure License Server for License Activation Service.
-
Install Citrix Virtual Apps™ and Desktops version 2411 or later. Install the core components, such as Citrix Delivery Controller, Citrix Studio, Web Studio, and Citrix Director.
Note:
All Delivery Controllers in the Citrix Virtual Apps and Desktops site must be compatible with LAS.
-
After you install the required components, use Citrix Site Manager to create a site. For information on creating a site, see Create a site. If the License Server is configured to use LAS, the Metainstaller displays the entitlements. The entitlements are provided along with their corresponding license expiration dates.
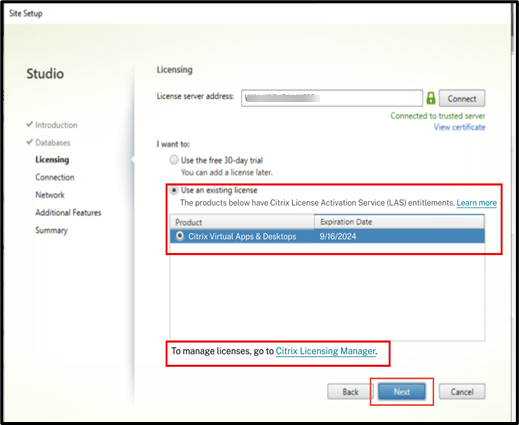
Note:
If the License Server is not upgraded to the latest License Server version, you get an error message.
- Check licensing details.
- Migrate legacy licensing to LAS.
Check licensing details
After creating the site, check the licensing details using Web Studio.
- On Web Studio, select the Licensing node.
-
On the Licensing Overview page, check if the Citrix Virtual Apps and Desktops site has the appropriate license or if the license has expired while using LAS features.
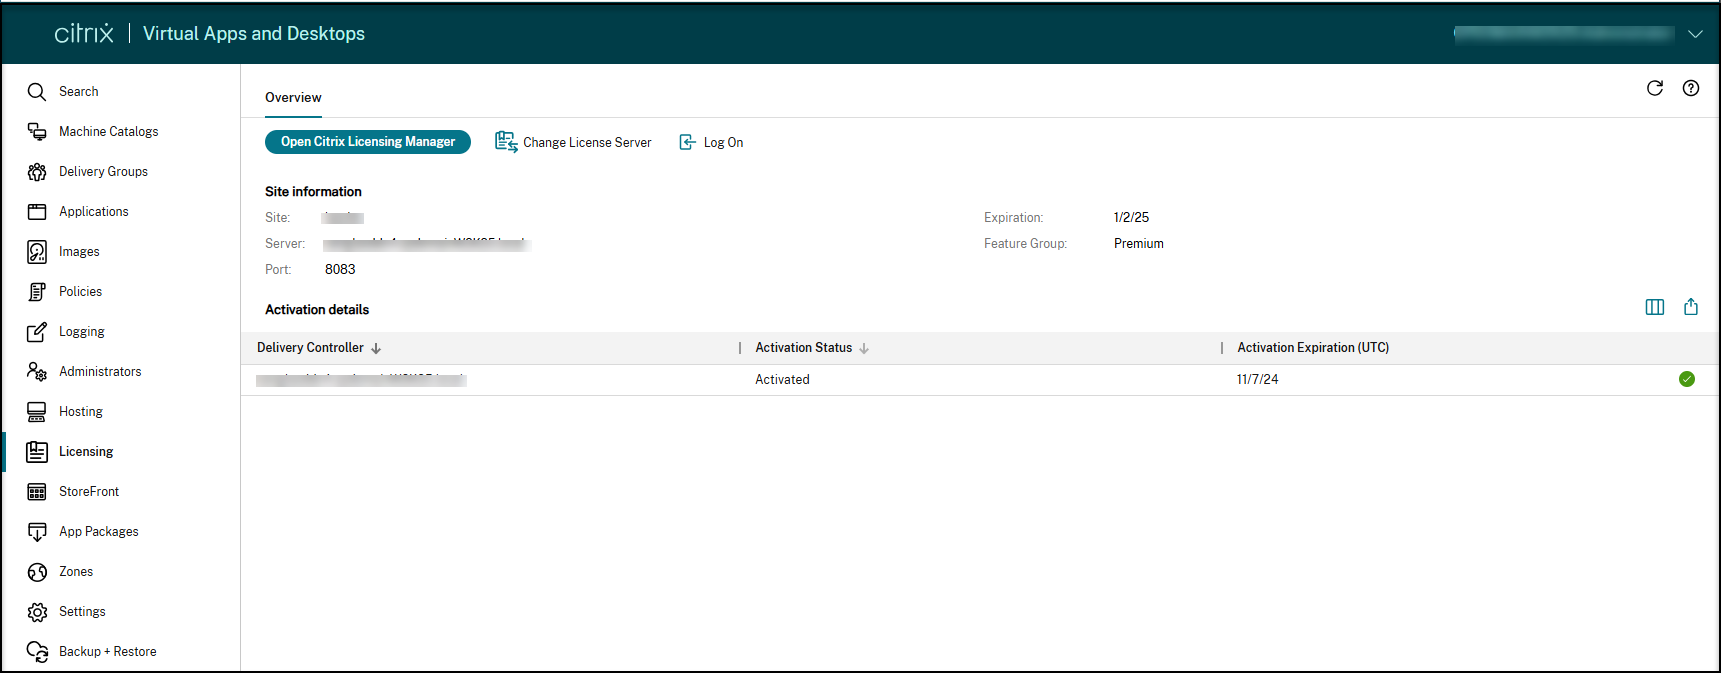
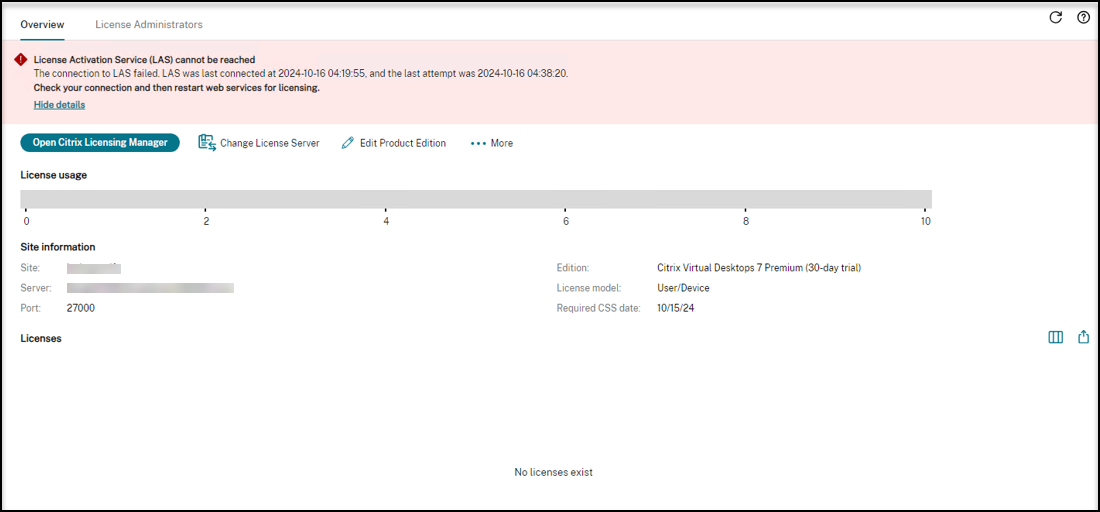
If the LAS is not reachable, you might see an error message:
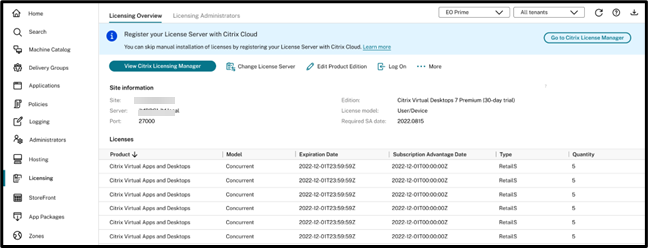
If your License Server is still using an old legacy license and the Citrix Virtual Apps and Desktops site is LAS-aware, then the Web Studio prompts you to register your License Server with Citrix Cloud.
Migrate legacy licensing to LAS
If you have already registered your License Server with Citrix Cloud and have the necessary entitlement, you must follow the specific sequence below to migrate your existing Citrix Virtual Apps and Desktops site from legacy licensing to LAS without impacting user sessions.
- Upgrade License Server: Upgrade the License Server to the minimum supported version.
- Upgrade Delivery Controllers: Upgrade all the Delivery Controllers in the site to a LAS-supported version.
-
Remove Delivery Group License Assignments:
- Before clicking Migrate to LAS, manually remove any license assignments set below the Site level (that is, remove the license assignment in the delivery group level).
- Confirm Allocations: Verify that the LAS allocations are accurate.
-
Click Migrate to LAS:
-
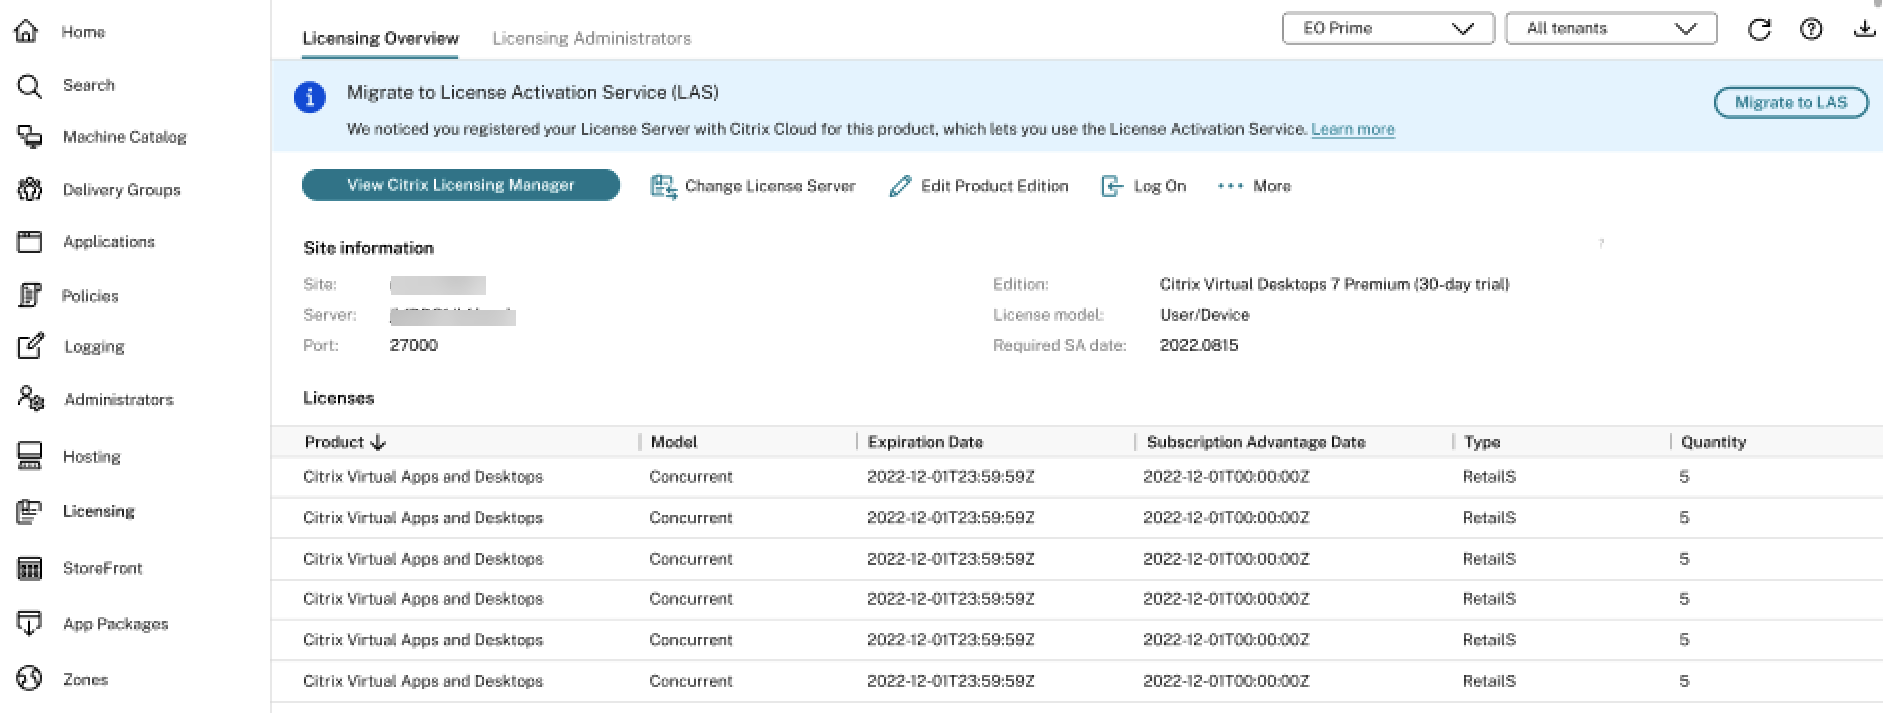
Once the previous steps are complete, click Migrate to LAS.
-
The License Edition of the Citrix Virtual Apps and Desktops site is set to Citrix Virtual Apps and Desktops Premium and the License Model is configured to Concurrent once you migrate to LAS.
-
Roll back from LAS to legacy licensing
Do the following to roll back from LAS to legacy licensing:
-
Run the following PowerShell command.
Set-ConfigSite -UseLicenseActivationService $false <!--NeedCopy--> -
Configure the legacy licenses in Web Studio.
Note:
These steps are provided for temporary troubleshooting only. Legacy license files are approaching End of Life (EOL) and will not function beyond April 15, 2026. To ensure uninterrupted service, we recommend migrating to the License Activation Service (LAS). For details, see the announcement.
Important considerations for upgrade
When you upgrade from any earlier Citrix Virtual Apps and Desktops version to 2411 and later, upgrade the License Server to the latest version (version 11.2.17 build 53100 or later).
-
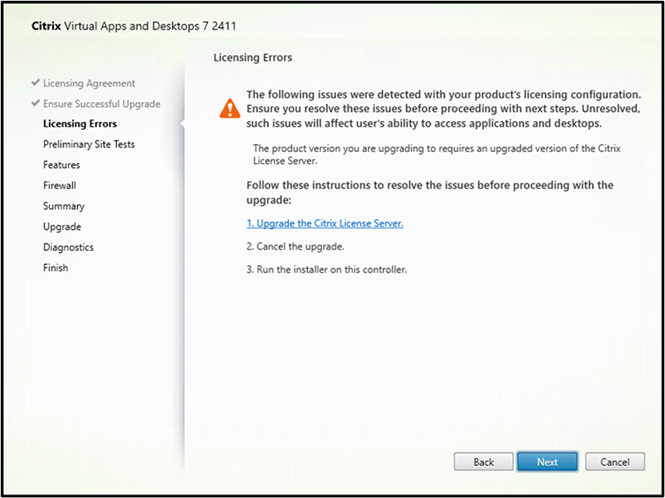
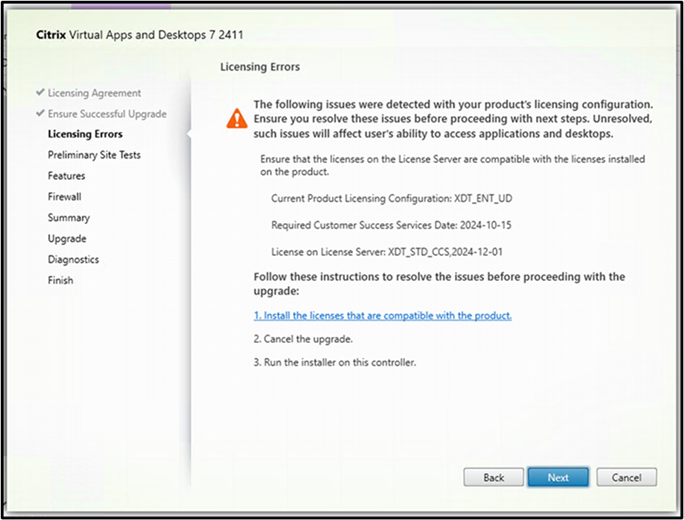
You get the following errors on the Licensing Errors page while upgrading using the metainstaller UI:
-
If you do not upgrade to the latest License Server version:
-
If there are any incompatibilities, such as an outdated License Server or unavailability of licenses:
-
-
If you are upgrading using the command-line, run the following commands to avoid upgrade failure (assuming you are inside the \x64 folder in the mounted ISO):
-
Run the following:
\x64\Licensing\CitrixLicensing.exe /quiet
<!--NeedCopy-->
If you have copied the Licensing binaries to any of the local drives, then run the following command:
\x64\Licensing\CitrixLicensing.exe /quiet /l install.log <!--NeedCopy--> -
Run the following:
\x64\XenDesktop Setup\XenDesktopServerSetup.exe  /components "CONTROLLER,DESKTOPSTUDIO,DESKTOPDIRECTOR" /CONFIGURE_FIREWALL
<!--NeedCopy-->
Uninstall core components
During upgrade, if you have installed License Server first using the commands \x64\Licensing\CitrixLicensing.exe /quiet or \x64\Licensing\CitrixLicensing.exe /quiet /l install.log and then installed the core components, then follow the same order to uninstall:
-
Uninstall License Server using the command line:
CitrixLicensing.exe /quiet /uninstall /l uninstall.log <!--NeedCopy--> -
Uninstall components using the GUI or command line. For information, see Remove components.
If you uninstall the License Server and components using the command line XenDesktopServerSetup.exe or removeall, then clean up the registry entry and the remaining files.
To clean registry entries :
-
Search for the registry key
Citrix Licensingand delete that entry. Mostly, you can find the entry in the following location:"Computer\HKEY_LOCAL_MACHINE\SOFTWARE\WOW6432Node\Microsoft\Windows\CurrentVersion\Uninstall\ <!--NeedCopy--> -
Delete the folder pointed by the Uninstall String in the registry key.
Share
Share
This Preview product documentation is Citrix Confidential.
You agree to hold this documentation confidential pursuant to the terms of your Citrix Beta/Tech Preview Agreement.
The development, release and timing of any features or functionality described in the Preview documentation remains at our sole discretion and are subject to change without notice or consultation.
The documentation is for informational purposes only and is not a commitment, promise or legal obligation to deliver any material, code or functionality and should not be relied upon in making Citrix product purchase decisions.
If you do not agree, select I DO NOT AGREE to exit.