-
-
Cloud Connector Standalone Citrix Secure Ticketing Authority (STA) service
-
-
-
This content has been machine translated dynamically.
Dieser Inhalt ist eine maschinelle Übersetzung, die dynamisch erstellt wurde. (Haftungsausschluss)
Cet article a été traduit automatiquement de manière dynamique. (Clause de non responsabilité)
Este artículo lo ha traducido una máquina de forma dinámica. (Aviso legal)
此内容已经过机器动态翻译。 放弃
このコンテンツは動的に機械翻訳されています。免責事項
이 콘텐츠는 동적으로 기계 번역되었습니다. 책임 부인
Este texto foi traduzido automaticamente. (Aviso legal)
Questo contenuto è stato tradotto dinamicamente con traduzione automatica.(Esclusione di responsabilità))
This article has been machine translated.
Dieser Artikel wurde maschinell übersetzt. (Haftungsausschluss)
Ce article a été traduit automatiquement. (Clause de non responsabilité)
Este artículo ha sido traducido automáticamente. (Aviso legal)
この記事は機械翻訳されています.免責事項
이 기사는 기계 번역되었습니다.책임 부인
Este artigo foi traduzido automaticamente.(Aviso legal)
这篇文章已经过机器翻译.放弃
Questo articolo è stato tradotto automaticamente.(Esclusione di responsabilità))
Translation failed!
Manage certificates
TLS uses certificates to establish trust between two parties. You must install a suitable certificate on each server providing a service, and ensure that machines connecting to that server trust that certificate. There are the following options for signing certificates:
- Self-signed certificates. These are not recommended. These are difficult to manage as you must manually copy this certificate to any other machine that must trust that certificate.
- Enterprise certification authority. If you have existing PKI in place, then this is normally the simplest option signing certificate for use between internal devices.
- Public certification authority. This requires that you prove ownership of the domain to the certificate authority. It has the advantage that unmanaged client devices are normally pre-configured to trust certificates from major public certification authorities.
Create a new certificate
Follow your organization’s policies and procedures for creating certificates.
Create certificate using Microsoft Certificate Authority
If the Microsoft Certificate Authority is integrated into an Active Directory domain or into the trusted forest the Delivery Controllers are joined to, you can acquire a certificate from the Certificates MMC snap-in Certificate Enrollment wizard. The Microsoft Certificate Authority needs to have a certificate template published suitable for use by web servers.
The root certificate is automatically deployed to other machine on the domain using group policy. Therefore all other machines on the domain trust certificates created using the Microsoft Certificate Authority. If you have machines not on the domain then you need to export the Root Certification Authority Certificate and import it into those machines.
-
On the server, open the MMC console and add the Certificates snap-in. When prompted select Computer account.
-
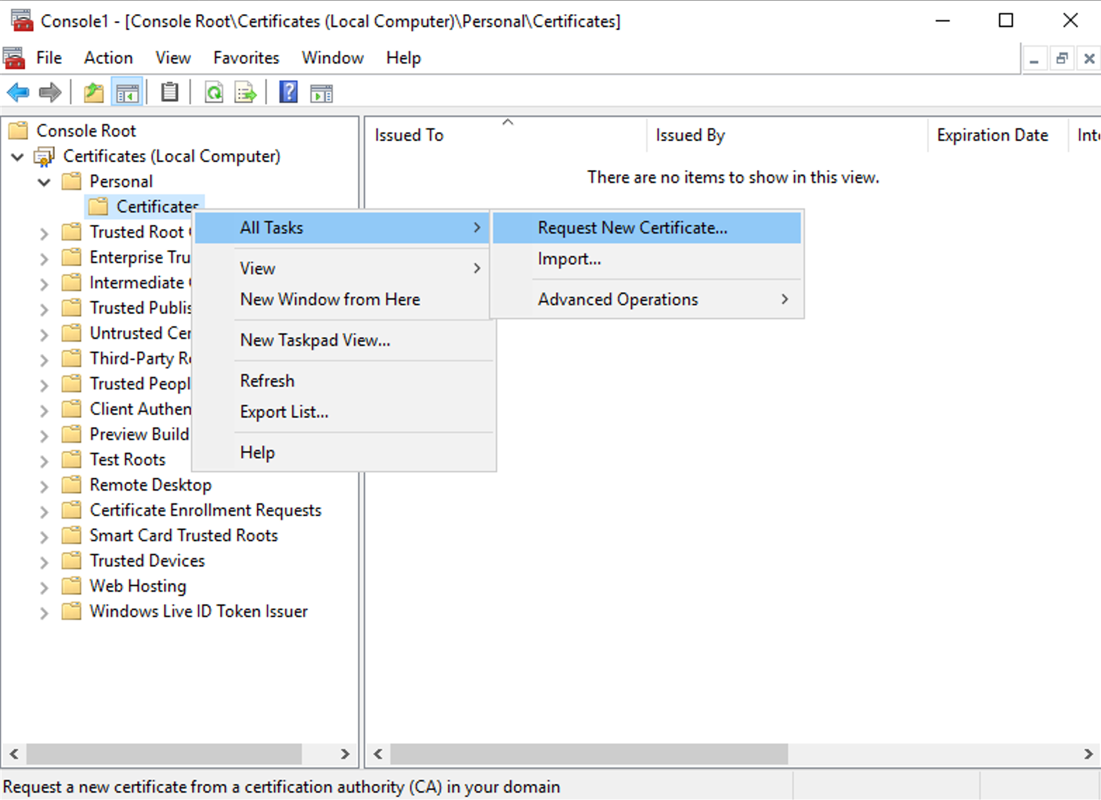
Expand Personal > Certificates, then use the All Tasks > Request New Certificate context menu command.
-
Click Next to begin, and Next to confirm that you are acquiring the certificate from Active Directory enrollment.
-
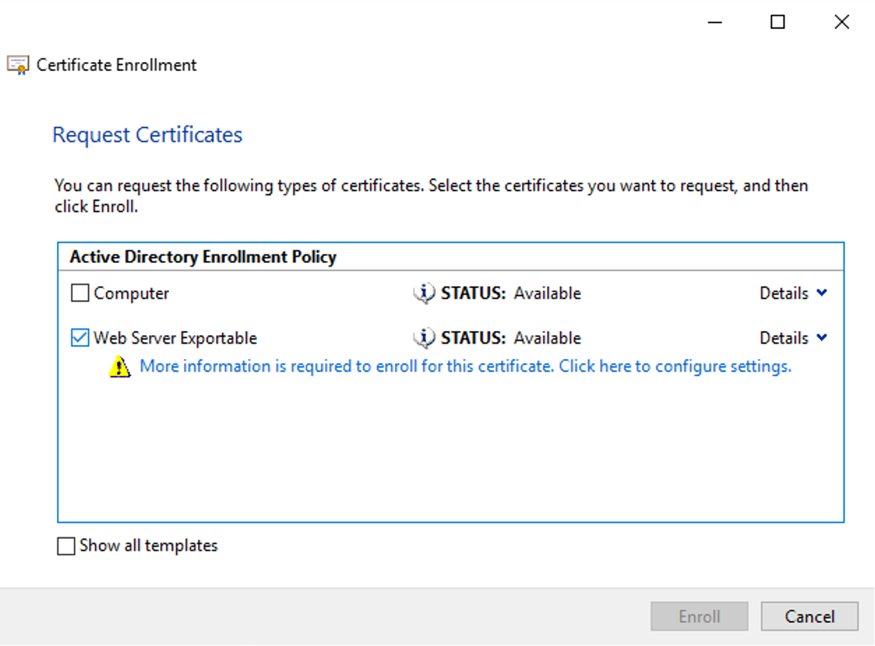
Select a suitable template such as Web Server Exportable. If the template has been set up to automatically provide the values for Subject you can click Enroll without providing more details. Otherwise click on More information is required to enroll for this certificate. Click here to configure settings.
-
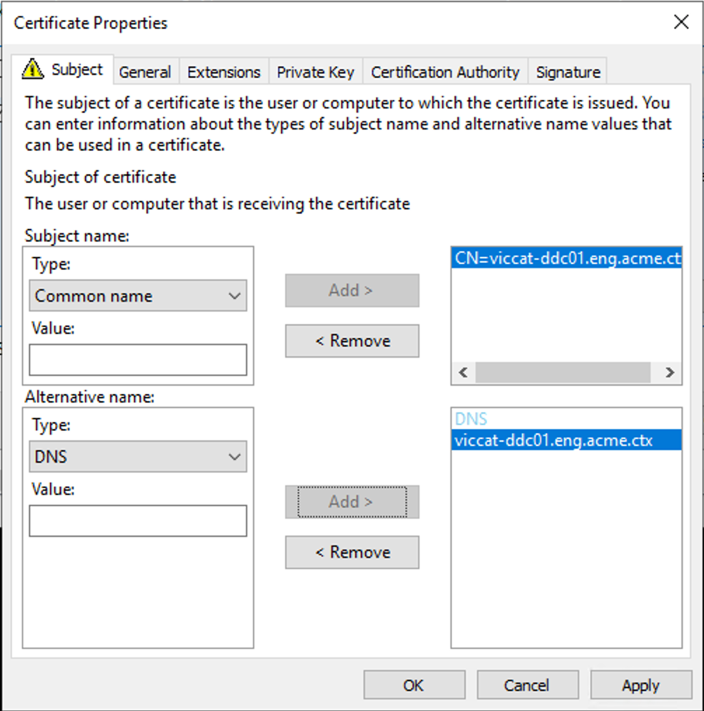
To provide more details for the certificate template, click the Details arrow button and configure the following:
Subject name: select Common Name and add the FQDN of the server.
Alternative name: select DNS and add the FQDN of the server.
-
Press OK.
-
Press Enroll to create the certificate. It is displayed in the list of certificates.

Create a certificate request using IIS
If IIS is installed on the server then complete the following steps:
- Open Internet Information Service (IIS) Manager
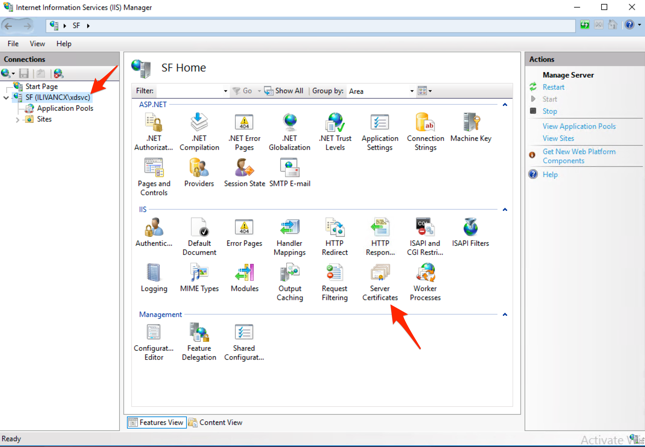
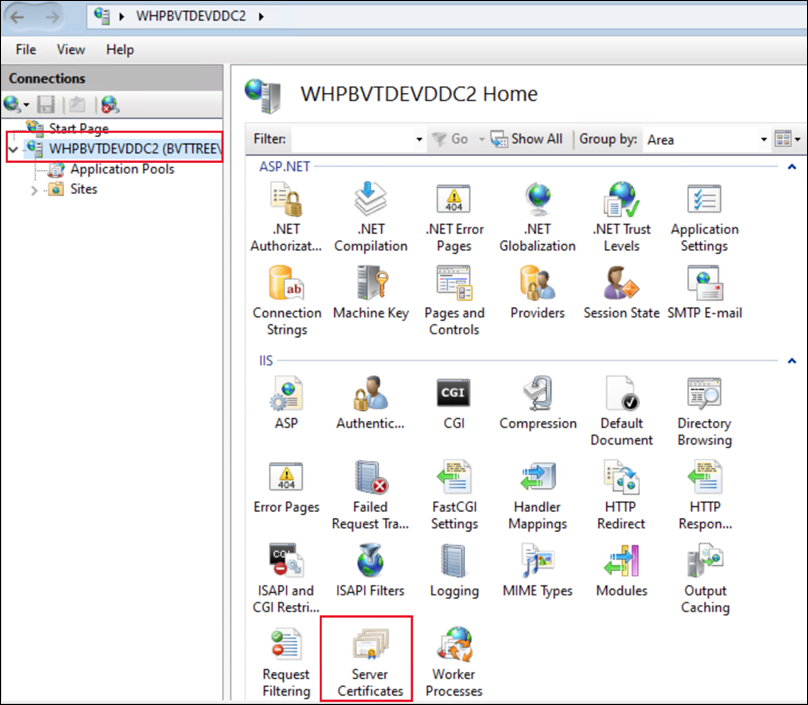
- Select the server node in the Connections list.
- Open Server Certificates.
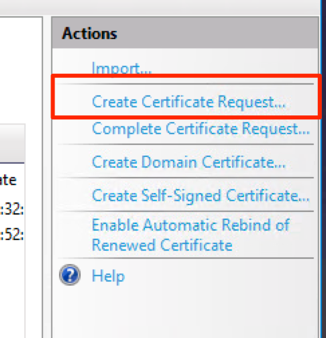
- From the Actions pane, select Create Certificate Request….
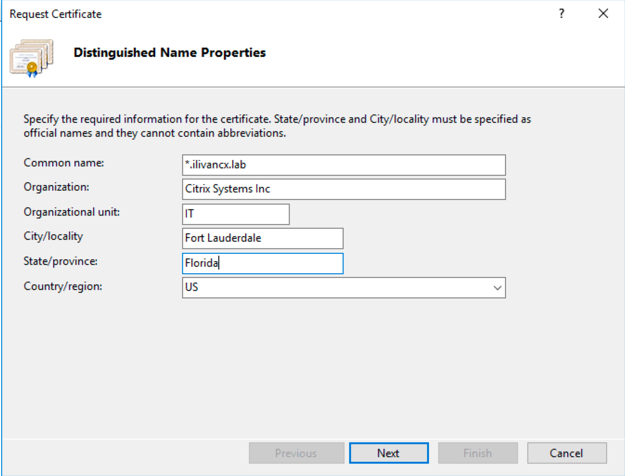
- Enter the Distinguished name properties.
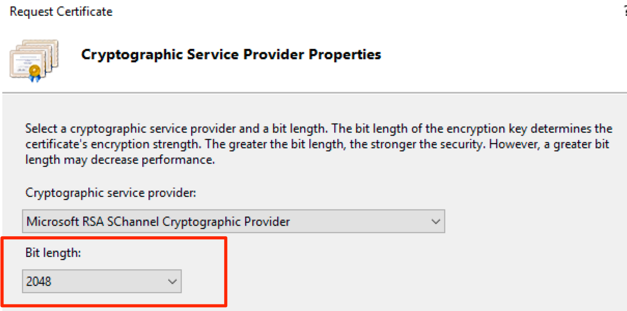
- On the Cryptographic Service Provider Properties screen, leave the Cryptographic service provider as the default. Select a key size of 2048 or higher.
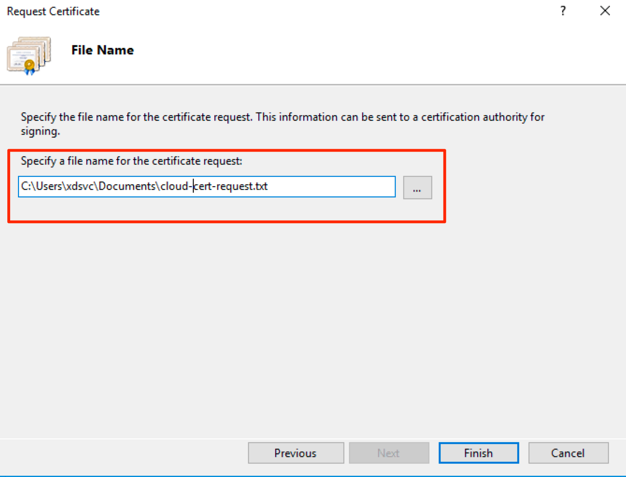
- Choose a file name and press Finish.
- Upload your CSR to your certificate authority.
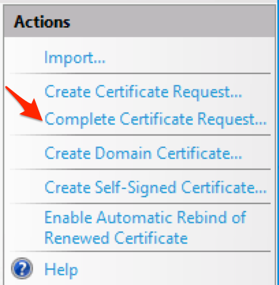
- Once you have received the certificate, from the Actions pane, select Complete Certificate Request….
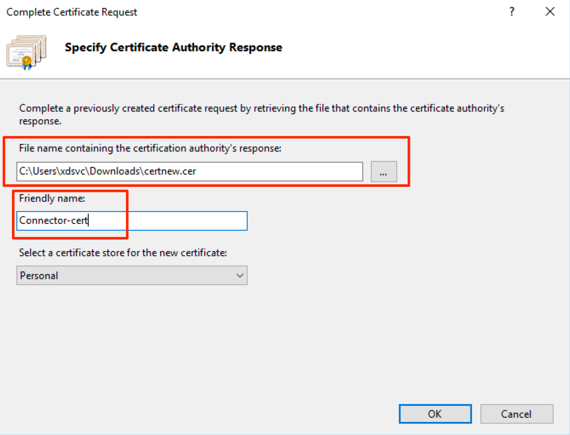
- Select the certificate, provide a Friendly name and press OK.
There is no way to set the subject alternative name. Therefore the certificate is limited to the server specified using the common name.
Create a certificate signing request from certificates snap-in
From within the Certificates mmc snap-in you can create a certificate signing request. This generates a file that you can send to a certificate authority who will provide the certificate. You must then import the certificate to combine it with the local private key.
-
On the server, open the MMC console and add the Certificates snap-in. When prompted select Computer account.
- Expand Personal > Certificates
- Select All Tasks > Advanced Operations > Create Custom Request.
- On Before You Begin, select Next.
- On the Select Certificate Enrollment Policy screen, select a suitable existing policy, or Proceed without enrollment policy.
- On the Custom request screen, if using an enrolment policy, choose an appropriate template, if available, such as Web Server Exportable.
- On the Certificate Information screen, expand Details and select Properties.
- In the Certificate Properties window, on the General tab, enter a suitable friendly name.
-
On the Subject tab:
- Under Subject name, select Common name and enter the FQDN of the server. You can enter a wildcard. Select Add.
- Under Subject name, add appropriate values for Organization, Organizational Unit, Locality, State, Country.
- Under Alternative name, select DNS. Add the server FQDN. You may add multiple server FQDNs or a wildcard FQDN.
-
On the Extensions tab:
- Under Key usage add Digital signature and Key encipherment.
- Under Extended Key Usage (application policies), add Server Authentication and Client Authentication.
-
On the Private Key tab.
- Under Select cryptographic Service Provider (CSP) choose a suitable provider.
- Under Key options, select a suitable key size. For RSA providers, at minimum use a key size of 2048. For greater security you may wish to choose 4096 but this will have a slight impact on performance.
- Under Key options, select Make private key exportable.
- Select OK.
- Select Next.
- Select Browse and save your request.
- Select Finish.
- Upload your CSR to your certificate authority.
- Once you have received the certificate, import it on the same server so it is linked to the private key.
Create a new self-signed certificate
A self-signed certificate is created during installation of a delivery controller™ and web studio. You can generate a new self-signed certificate and use it to replace the existing one.
Using IIS manager
If IIS is installed on the server then you can perform the following steps:
-
Log on to the server as an administrator.
- Open the IIS Manager
- Open Server Certificates
-
In the Actions pane, select Create Self-Signed Certificate.
-
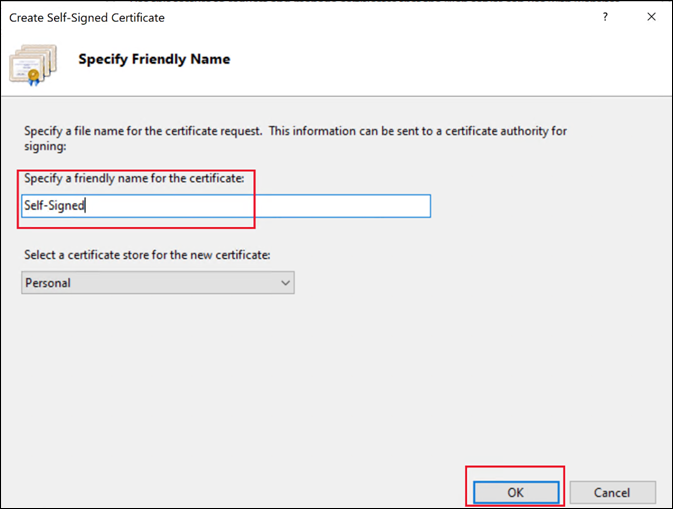
In Create Self-Signed Certificate, enter a name for the certificate and click OK. The self-signed certificate is then created.
Using PowerShell
You can use PowerShell to create a self-signed certificate:
$certSubject = "CN=myddc.example.com" # The FQDN of the server.
$friendlyName = "Self-Signed-3"
$expireYears = 5

## Create new self-signed certificate under LocalMachine\My
$certificate = New-SelfSignedCertificate -Subject $certSubject -CertStoreLocation "Cert:\LocalMachine\My\" -KeyExportPolicy Exportable -KeySpec Signature -KeyLength 2048 -KeyAlgorithm RSA -HashAlgorithm SHA256 -FriendlyName $friendlyName -NotAfter $([System.DateTime]::Now.AddYears($expireYears))

# Add to trusted root certificates
$rootCertStore = Get-Item "Cert:\LocalMachine\Root\"
$rootCertStore.Open([System.Security.Cryptography.X509Certificates.OpenFlags]::ReadWrite)
$rootCertStore.Add($certificate)
<!--NeedCopy-->
Import existing certificate
You can import an existing certificate into the server using any of the following methods.
Certificate import wizard
-
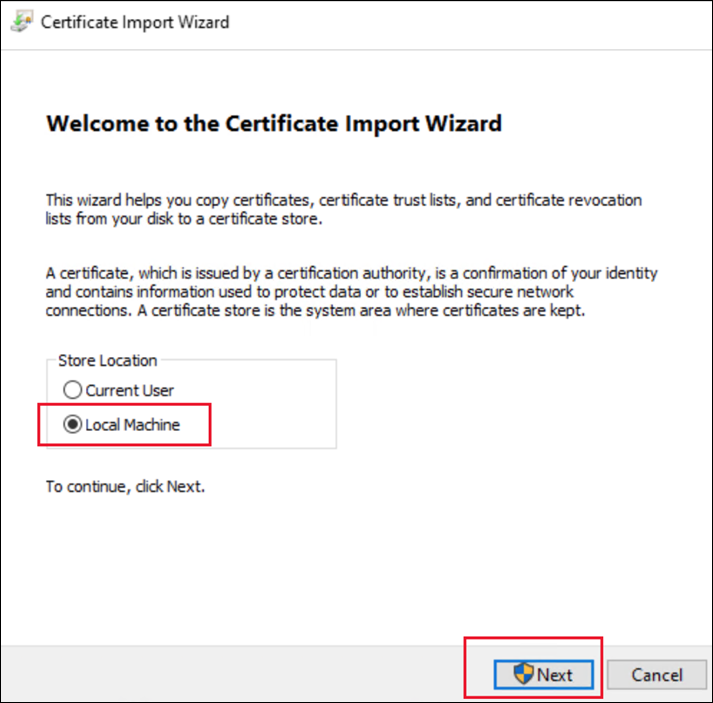
Double click the PFX file, or right click the file and select Install PFX. This opens the Certificate Import Wizard.
-
For Store Location, select Local Machine.
-
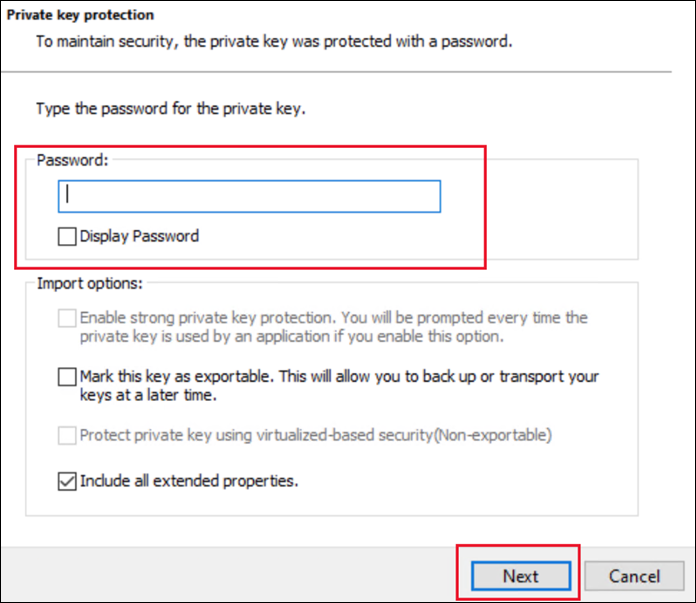
Enter the password if required.
-
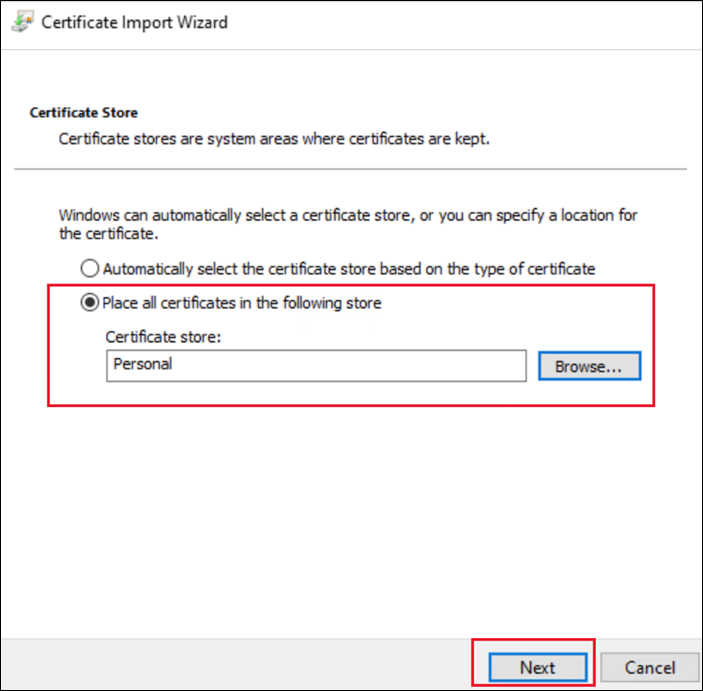
Select the Certificate Store. For server certificates, choose Personal. If this is a root certificate or self-signed certificate that you wish to trust from this machine then choose Trusted Root Certification Authorities.
Use the Manage Computer certificates console
-
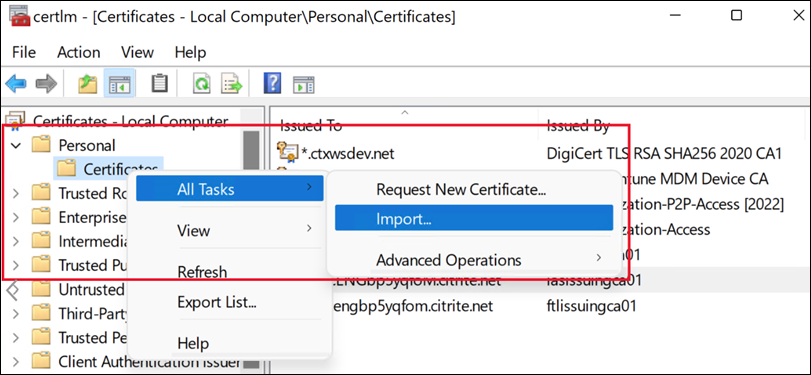
Open the Manage Computer Certificates console and navigate to the appropriate certificate store. For server certificates this is normally. Personal > Certificates. To trust a root or self-signed certificate, choose Trusted Root Certification Authorities > Certificates.
-
Right click the certificate and select > All Tasks > Import….
-
Select Browse… and select the file.
-
Enter the password if required.
Use PowerShell
To import a certificate, use the PowerShell cmdlet Import-PfxCertificate. For example, to import certificate certificate.pfx with password 123456 into the personal certificate store, run the following command:
Import-PfxCertificate -Password $(ConvertTo-SecureString -String "123456" -AsPlainText -Force) -CertStoreLocation Cert:\LocalMachine\My\ -FilePath .\Desktop\certificate.pfx
<!--NeedCopy-->
To import a trusted root certificate, set the CertStoreLocation to Cert:\LocalMachine\Root\.
Export certificate without private key
To export a certificate so that you can import it into other devices to trust the certificate, you should exclude the private key.
-
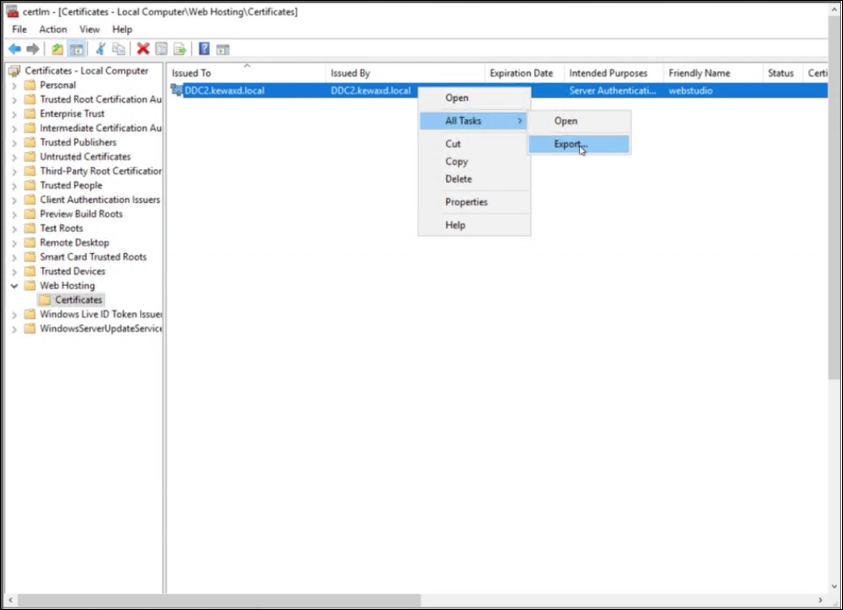
Open the Manage Computer Certificates. Navigate to Personal > Certificates and select the certificate you wish to export.
-
From the Action menu, select All Tasks then Export.
-
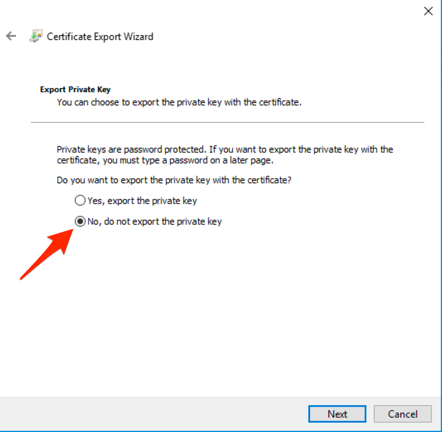
Choose No, do not export the private key, then press Next.
-
Select format DER encoded binary X.509 (.CER) (the default) and press Next.
-
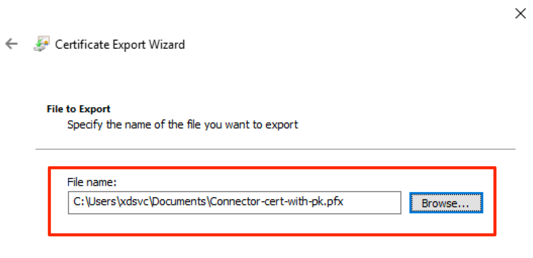
Enter a file name and press Next.
-
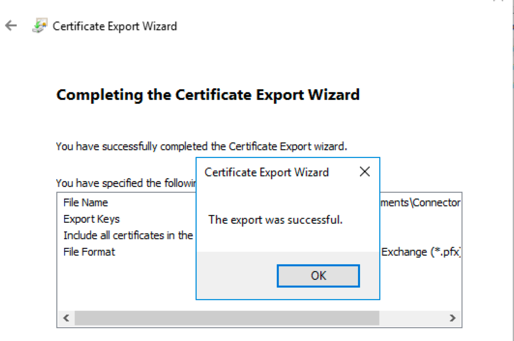
Select Finish.
Export certificate with private key
To export a certificate so that you can use it on other servers, you must include the private key.
-
Open the Manage Computer Certificates. Navigate to Personal > Certificates and select the certificate you wish to export.
-
From he Action menu, select All Tasks then Export.

-
Choose Yes, export the private key, then select Next.
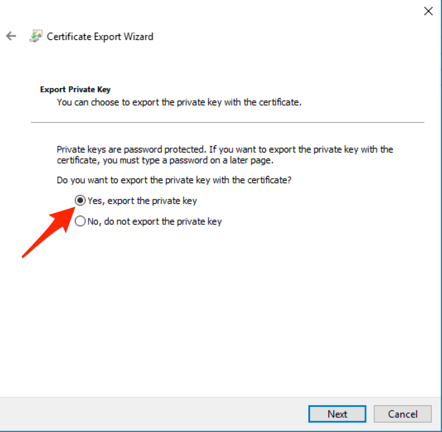
-
On the Security tab, enter a password then select Next.
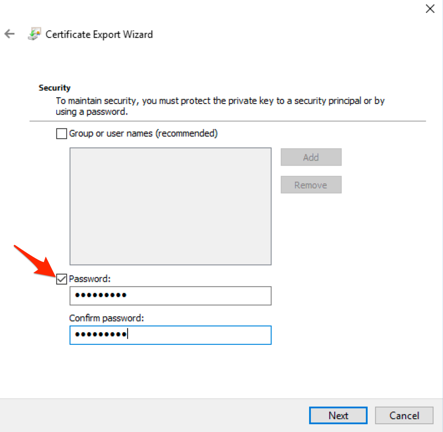
-
Enter a file name and select Next.

-
Select Finish.

Convert certificate to PEM format
By default, Windows exports certificates in PKCS#12 format as a .pfx file in that includes the private key. To use the certificate on a NetScaler® Gateway or license server, you must extract the certificate and private keys into separate files in PEM format. You can do this using openssl.
To export the certificate in PEM format run:
openssl pkcs12 -in name.pfx -clcerts -nokeys -out name.cer
<!--NeedCopy-->
It will ask you for the existing password and a new passphrase
To export the key in PEM format run:
openssl pkcs12 -in name.pfx -nocerts -out name.key
<!--NeedCopy-->
Trusting certificates
- If you use a certificate from a public certificate authority then devices are normally pre-configured with the root certificates.
- If you use an enterprise certificate authority then you must deploy the root certificate into any devices that must trust that certificate. If using Active Directory Certification Services, the root certificates are also deployed to all machines on the domain using Group Policy. You must manually import the root certificate onto non-domain-joined machines such as your NetScaler gateways, or machines on other domains.
- If you are using a self signed certificate then this must be manually installed onto any machine that needs to trust the certificate.
To export a self-signed or trusted root certificate from Windows, see export certificate without private key.
For Windows to trust the certificate, you must import the certificate into the Trusted Root Certification Authorities store. If using PowerShell, enter the store Cert:\LocalMachine\Root\.
For NetScaler to trust the certificate, first convert the certificate to PEM format, then Install the root certificate.
Share
Share
This Preview product documentation is Citrix Confidential.
You agree to hold this documentation confidential pursuant to the terms of your Citrix Beta/Tech Preview Agreement.
The development, release and timing of any features or functionality described in the Preview documentation remains at our sole discretion and are subject to change without notice or consultation.
The documentation is for informational purposes only and is not a commitment, promise or legal obligation to deliver any material, code or functionality and should not be relied upon in making Citrix product purchase decisions.
If you do not agree, select I DO NOT AGREE to exit.