Optional Configurations
1. Configure the Application Pool Identity for SRS
Overview
By default, Session Remote Start (SRS) runs under the SrsAppPool application pool, with its identity set to ApplicationPoolIdentity. However, if specific features require elevated permissions, the identity must be configured as a domain user or local user to ensure proper functionality.
Prepare the Identity
Domain User:
A domain user is required for the Launch All Desktops by AD Group feature. For security purposes, it is recommended to create a dedicated domain user with minimal access rights.
On the Domain Controller, create a user or use an existing Domain Service Account.
Open the Active Directory Users and Computer.
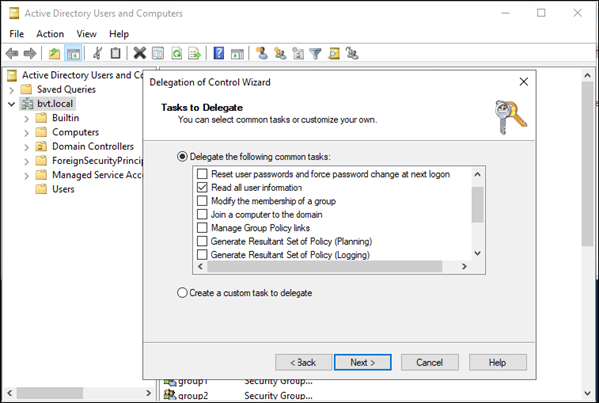
- In the left pane, right-click your domain and select Delegate Control from the context menu to open the Delegation of Control Wizard.
-
Add/Select the domain user created above and grant the Read all user information permission.
Local user:
A local user account on SRS server is required for the following features to work.
- Launch All Desktops by Tags
- Log off VDAs by a specified UPN (if they were pre-launched by SRS and not reconnected).
- Support pre-launch from a hibernated VM.
- Automatically log off VDAs pre-launched by SRS if they remain unconnected within the specified time.
- Telemetry data collection and analysis.
To enable the above features, a local user must be created on SRS server and configured with the necessary permissions.
Two options are available to create the local user:
- Reuse an existing standard local user.
- Create a new one by running
create-local-user.ps1onthe SRS server from the installation package downloaded from Citrix Downloads, as an administrator.
The script will create a standard local user with general access.

If none of the features listed above are required, you can skip the following steps in this section.
Configure Application Pool Identity
-
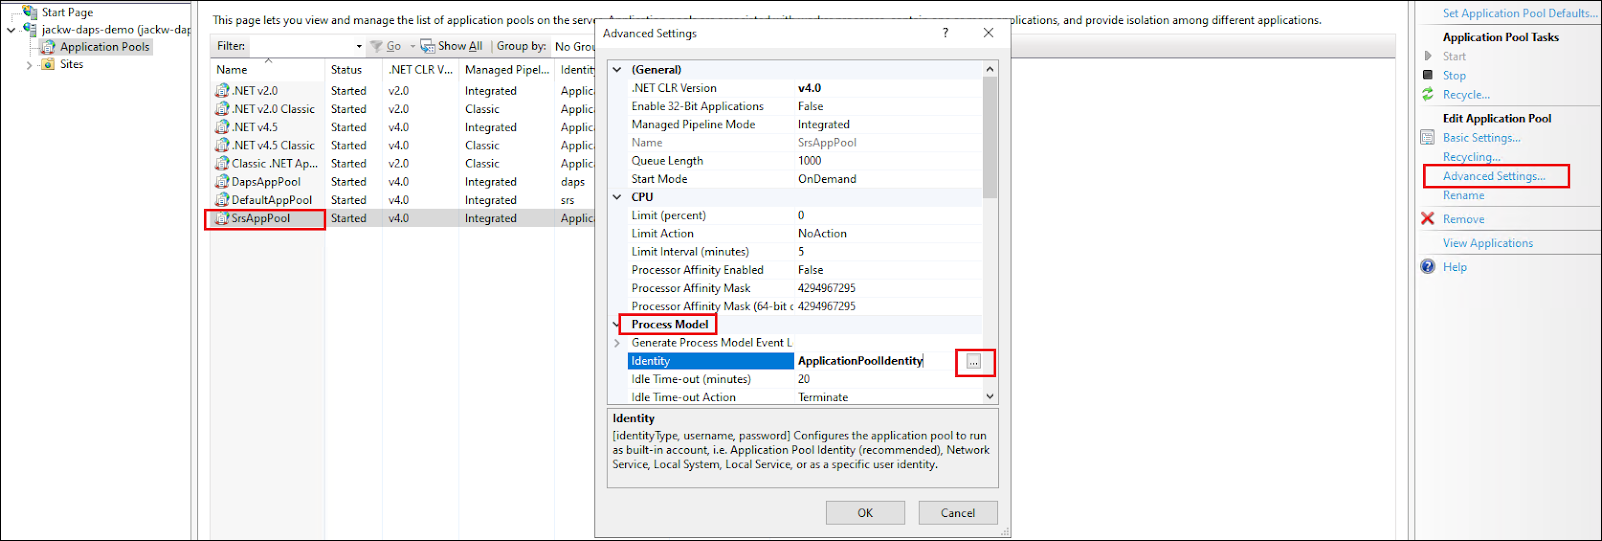
On the SRS server, open IIS Manager, from the Application Pools, highlight SrsAppPool and on the right side, select Advanced Settings under the Edit Application Pool. Scroll down to Process Model > Identity click on the three dots.
-
Select Custom account, click Set, and input the username and password of the user created above (domain or local user) to host Session Remote Start.

-
Ensure the Application Pool’s
setProfileEnvironmentattribute is enabled.- Navigate to the
%windir%/system32/inetsrv/configfolder. - Open the
applicationHost.configfile. - Locate the
<system.applicationHost><applicationPools><SrsAppPool><processModel>element. - Confirm that the
setProfileEnvironmentattribute is not present, which defaults the value to true, or explicitly set the attribute’s value to true.
- Navigate to the
2. Configuration for Accessing Other API Services
Overview
The following Session Remote Start (SRS) features require CVAD 2308 or later and Citrix DaaS™ REST APIs to be enabled and supported:
- Launch All Desktops by Tags.
- Log off VDAs by a specified UPN (if pre-launched by SRS and not reconnected).
- Support pre-launch from a hibernated VM.
- Automatically log off VDAs pre-launched by SRS if they remain unconnected within the specified time.
Additionally, Citrix Monitor Service API requires CVAD 2305 or later for the following feature:
- Telemetry
If none of the features listed above are required, you can skip the following steps in this section.
Connectivity test
Firstly, verify whether Session Remote Start (SRS) can communicate with the API services. These services are typically hosted on the Delivery Controller™ (DDC).
Execute the below test scripts in the installation package:
- For CVAD REST APIs (On-Prem), execute the
CvadApiConnectivityCheck-OnPrem.ps1. - For Citrix DaaS REST APIs, execute the
CvadApiConnectivityCheck-Cloud.ps1. - For Citrix Monitor Service API (On-Prem), execute the
MonitorServiceApiConnectivityCheck-OnPrem.ps1. TLS for Monitor OData API access should be enabled. See Securing On-Premises Monitor OData API Access. -
For Citrix Monitor Service API (DaaS), execute the
MonitorServiceApiConnectivityCheck-Cloud.ps1.
Configure the credentials
Session Remote Start (SRS) requires credentials to authenticate and issue API requests to external API services. These credentials are securely stored under a user account in the Windows Credential Manager to ensure secure access and authorization.
In the installation package, navigate to the SessionRemoteStart folder. Locate the PowerShell script store-cred.ps1 and execute it as an administrator to configure the required credentials for Session Remote Start (SRS). This will securely store the credentials in Windows Credential Manager for API authentication.
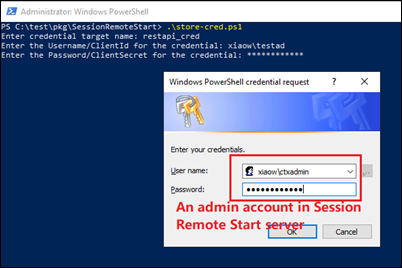
For On-Prem environment, provide the admin credential. For more information, see here. For the DaaS environment, provide the client identity. For more information, see here.
Note:
Different credential configurations can share the same actual credential. If multiple configurations refer to the same credential, only one entry needs to be created in Windows Credential Manager, and all configurations can reference it. This eliminates the need for duplicate credential entries.
A success message will be displayed after creation is complete.

3. Log configuration
Log Level Configuration
Currently, Session Remote Start logging supports CDF and File tracing. CDF logging is always enabled by default. File tracing availability depends on the configuration file settings.
Trace severity level
- 0 - Critical
- 1 - Urgent
- 2 - Significant
- 3 - Important
- 4 - ImportantDetailed
- 5 - Informational
- 6 - InformationalDetailed
- 7 - Notable
- 8 - NotableDetailed
- 9 - Insignificant
Log to File
Logging to file is enabled by default. To disable, set LogFileName in Web.config to empty.
The default log path is shown below, where {Session Remote Start user} should be replaced with the user hosting the SRS service. If the identity has been changed to another identity, replace Session Remote Start user with the corresponding user directory.
"C:\Users\{Session Remote Start user}\AppData\Roaming\Citrix\SessionRemoteStart\Logs\SessionRemoteStart.log".
Customers can change the log file location and permissions as per their requirements, please see the steps required to change the Log file location and permissions.
4. Log Rotation Configuration
New Log Rotation Settings in web.config
Two new configuration parameters have been added to the web.config file to support log rotation: MaxLogFileSizeMB and MaxBackupLogFiles.
-
MaxLogFileSizeMB: Sets the maximum size (in megabytes) for a log file. When this limit is reached (default: 100 MB), the application automatically compresses and moves the log file to the
Archivesubfolder within the log directory. A new, empty log file is then created to continue logging. -
MaxBackupLogFiles: Specifies the maximum number of archived log files to retain. When the number of backups exceeds this limit (default: 10), the oldest archived files are automatically deleted to make space for new ones.
5. Log to Event Viewer
Session Remote Start supports logging key operations to the Windows Event Log.
- Log Path:
Windows Logs > Application(File location:%SystemRoot%\System32\Winevt\Logs\Application.evtx) - Event Source Name:
"SessionRemoteStart"
This allows administrators to monitor and troubleshoot Session Remote Start events through the Windows Event Viewer.
To enable this feature, set LogToEventViewer to true in web.config. (See Configuration file).
Event types:
| Event ID | Description |
|---|---|
| 1 | Requests for enum, launch, and logoff operations. |
| 2 | Responses to enum, launch, and logoff requests. |
| 3 | Authentication requests from StoreFront™ to SRS. |
| 4 | Session launches via ICA® file. |
| 5 | Requests sent to StoreFront. |
| 6 | Requests sent to REST API. |
| 7 | Changes to Web.config. |
| 8 | Queries for groups/users under an AD group. |
| 9 | Reads from Windows Credential Manager. |
6. Change Log File/Telemetry File Location
If the Log File location is changed, make sure that the Session Remote Start service has the necessary permissions to modify the log file.
Log file permissions
-
Set an anonymous user identity to Application Pool Identity.
-
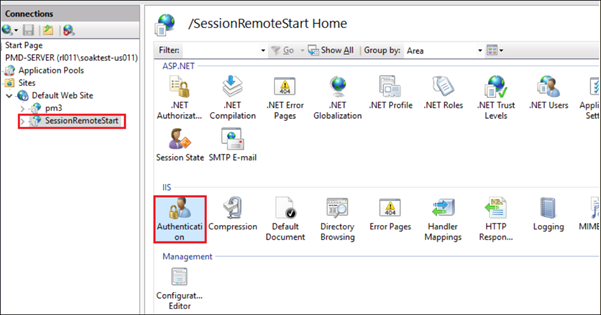
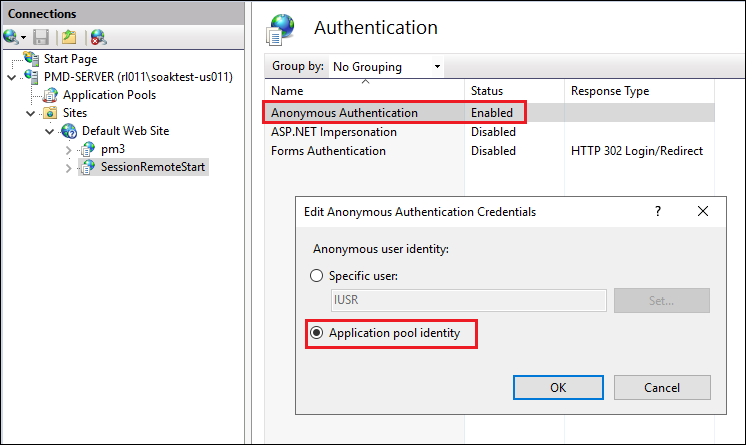
Open IIS Manager > Sites > Default Web Site > SessionRemoteStart and then open Authentication under SessionRemoteStart Home page.
- Right-click Anonymous Authentication and click Enable.
-
Again, right click on select Anonymous Authentication > choose Edit > select the identity consistent with Configuration for Accessing Other API Services.
-
-
Now you can create a folder at your preferred location, and grant permissions to log to the new folder.
-
For example, after the folder creation under
C:\SessionRemoteStartLog, right-click the folder and select Properties. In the Security tab, click Edit under Group or user names and then select Add to change the location to a local computer.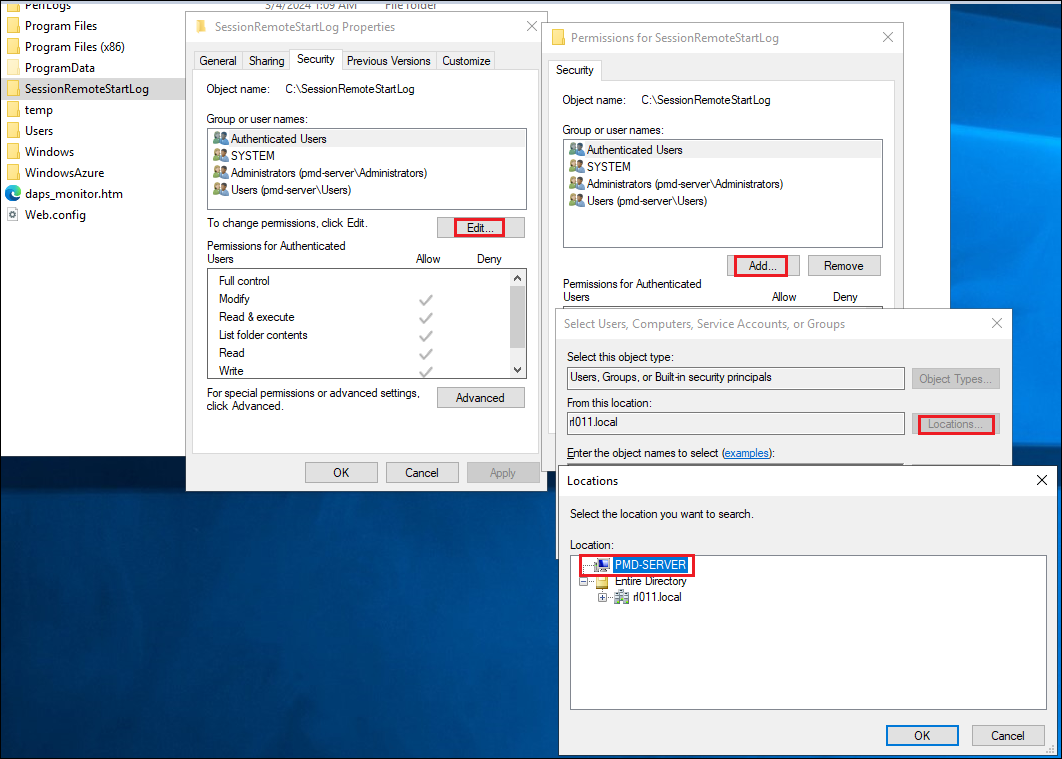
-
Input the Session Remote Start user created in the previous section. (If the default identity is used, input
IIS AppPool\SrsAppPoolinstead).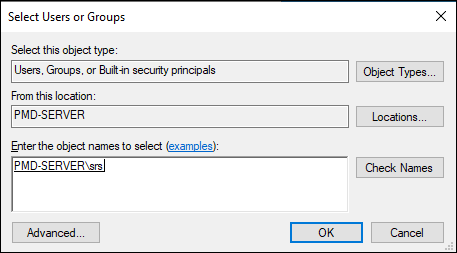
-
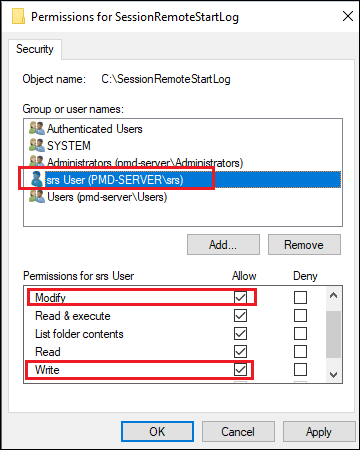
Grant Modify and Write permissions. (If the default identity is used, grant access to SrsAppPool)
-
7. Configure Inbound Firewall Rules
Specifying IP addresses and host names of the trusted services and StoreFront ensures that only these sources can communicate with Session Remote Start and helps to prevent DoS or other opportunistic attacks against the Session Remote Start server.
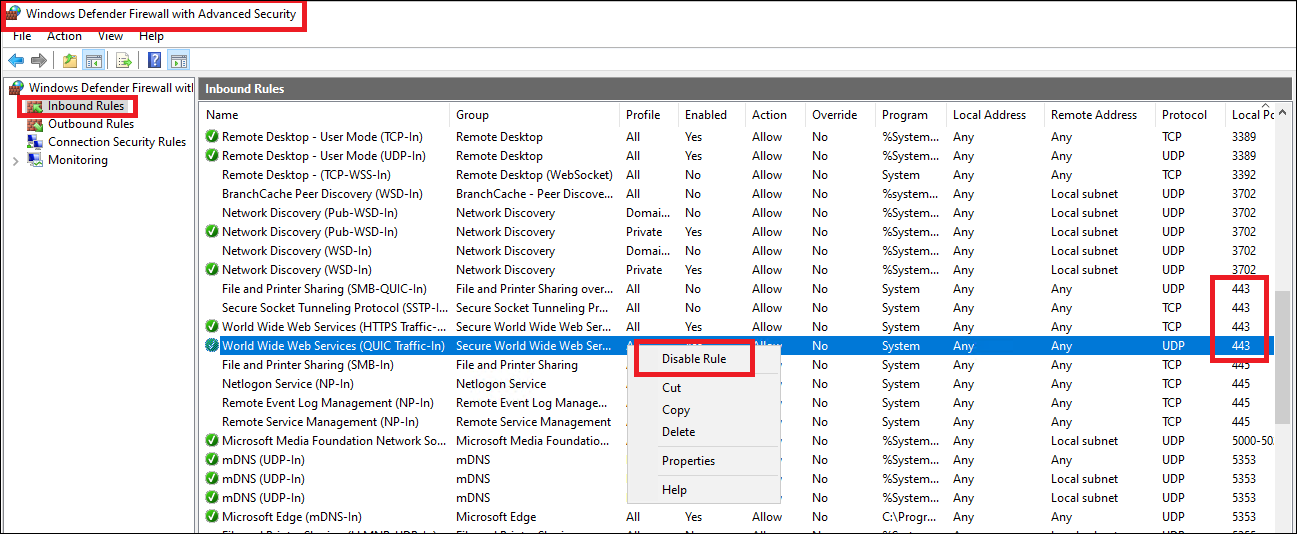
After creating the https binding on port 443, customers can configure inbound firewall rules by Windows Defender Firewall with Advanced Security UI to allow inbound TCP traffic.
-
Disable all 443 inbound rules except World Wide Web Service (HTTPS Traffic-In).
Note:
Remember to check if there are any enabled rules allowing all (all the limitations set to any) inbound traffic.
-
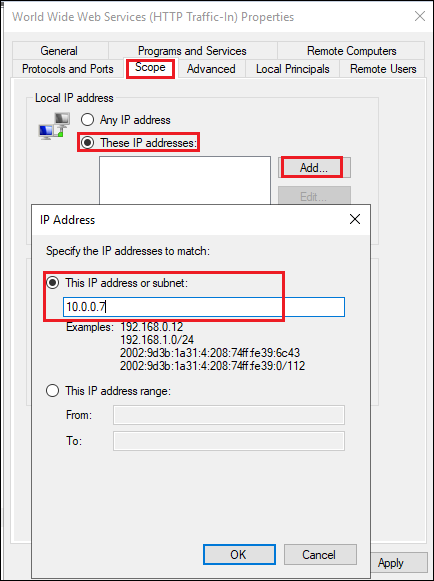
Double-click World Wide Web Service (HTTPS Traffic-In), and open the Properties configuration. Switch to the Scope tab.
-
Add local IP address limitation. This is the local endpoint(s) (Network Interface) for 3rd-party Auth Service and StoreFront.
-
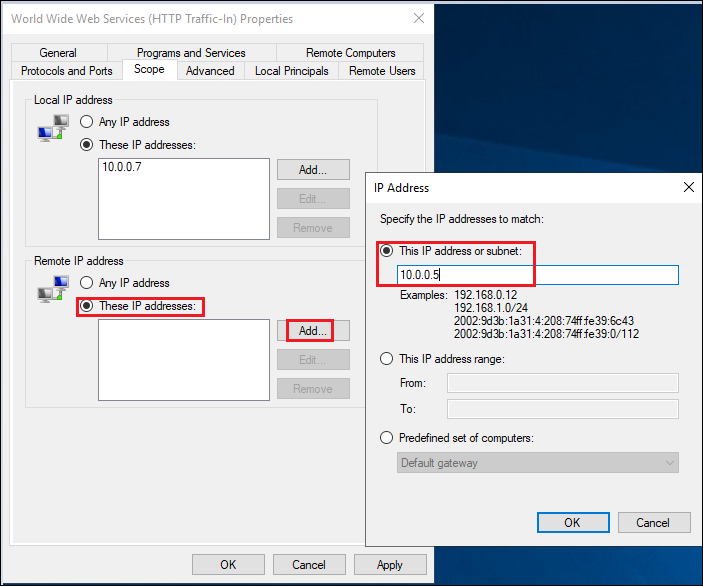
Add remote IP address limitation. Add IP addresses of 3rd-party Auth Service and StoreFront.
-
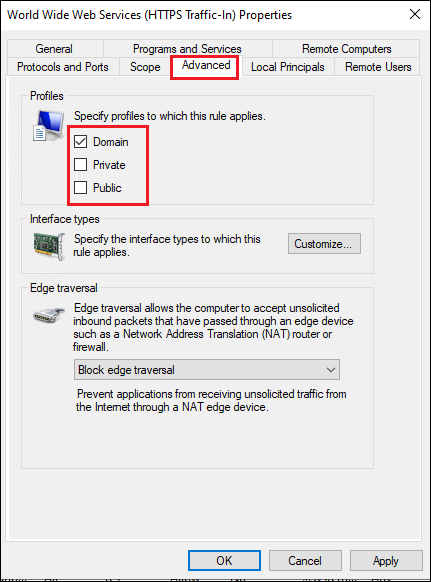
Switch to the Advanced tab and apply to related profile(s).
Third party firewall products will require configuring separately.
8. App Protection
If App Protection is enabled for a delivery group, the customization described in this Citrix documentation must be applied to the Session Remote Start store:
9. HTTP Proxy Configuration
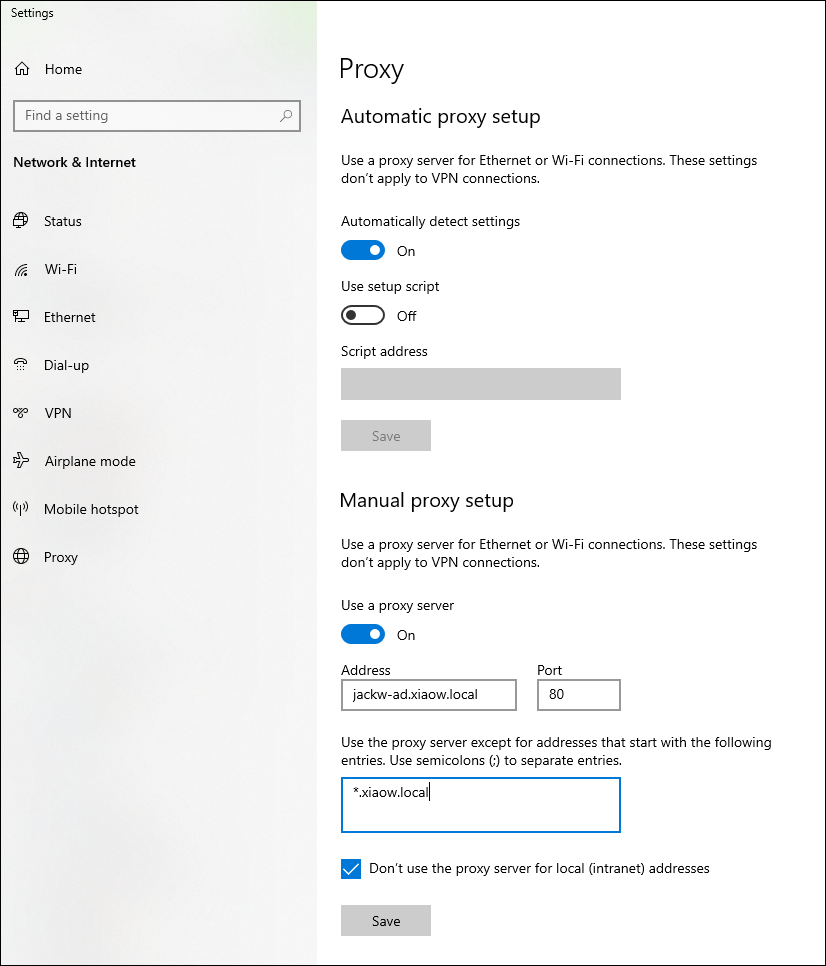
Session Remote Start supports only unauthenticated HTTP proxies.
-
Configure the WinINet HTTP proxy. e.g.
-
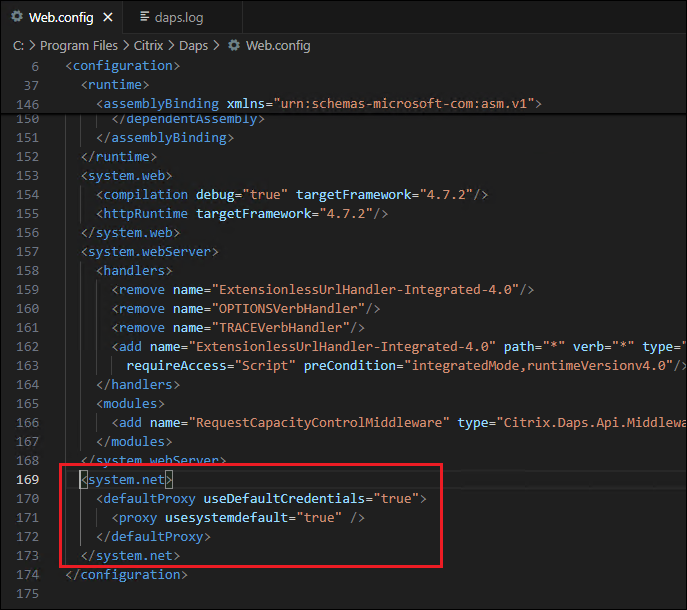
Append the following code to
web.config.
  <system.net>
    <defaultProxy useDefaultCredentials="true">
      <proxy usesystemdefault="true" />
    </defaultProxy>
  </system.net>
  <!--NeedCopy-->
10. mTLS configuration
Session Remote Start API does not require end-user authentication, unlike StoreFront. Therefore, it is essential to restrict access to trusted services only.
Enforcing Security with Mutual TLS (mTLS)
One way to ensure secure communication is by enforcing mutual TLS (mTLS) authentication between Session Remote Start and other trusted services.
Steps to Enable mTLS
- Edit the
Web.configfile. - Locate the
mTLSEnabledsetting and set it totrue. -
Specify the
certificate thumbprintto authenticate trusted services.
This configuration ensures that only authorized services with a valid certificate can access Session Remote Start, enhancing security.
11. Filtering Enumerated Resource Results Using Smart Access
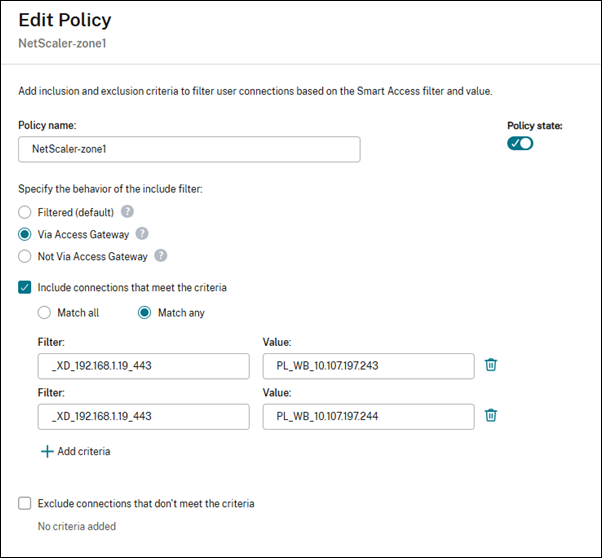
We support Access Gateway broker access rules to filter enumerated resources based on Smart Access policies.
For example, consider the below existing access policy.
Edit Web.config for Smart Access Filtering To enable Smart Access filtering for enumerated resource results, modify the Web.config file by adding or updating the following settings:

SmartAccessFarmName - Specifies the Smart Access farm name (example: _XD_192.168.1.19_443).
SmartAccessConditions - Defines the conditions for filtering enumerated resources based on Smart Access rules.
12. Multi-Monitor Resolution Management
When customers use multiple monitors with different resolutions or scaling settings, they may experience display inconsistencies. The Launch User Resource API allows them to configure screen resolution settings for a seamless experience.
During session preparation, SRS simulates the user’s screen layout based on the provided resolution settings, ensuring consistency across all monitors.
To ensure accurate simulation, customers must manually collect monitor layout and resolution details. Citrix provides the collect_screen_resolution_example.ps1 script to simplify this process.
Step 1: Collect Screen Layout
Run the following command on the Virtual Desktop Agent (VDA) to retrieve the screen layout:
.\collect_screen_resolution_example.ps1 -type ScreenLayout
This will output the current screen layout configuration.

Step 2: Collect Monitor Resolution and Scaling Information
If the client devices have different screen resolutions, run the script on the Citrix Workspace™ App (CWA) endpoint instead:
.\collect_screen_resolution_example.ps1 -type MonitorInfo
This will collect the details such as Device PPI and Scale Factor for the client device.

Then format this to former Screen XML attribute as:
<Screens>
    <Screen
        LeftPosition="0" TopPosition="0" Width="960" Height="1080" ScaleFactor=”100” DevicePpi=”166”
    />
    <Screen
        LeftPosition="960" TopPosition="0" Width="960" Height="1080" ScaleFactor=”100” DevicePpi=”166”
    />
</Screens>
<!--NeedCopy-->
And make this as the parameter for the Launch User Resource API.
13. Secure HDX Support
SRS supports secure HDX support without requiring additional configuration.
In this article
- 1. Configure the Application Pool Identity for SRS
- 2. Configuration for Accessing Other API Services
- 3. Log configuration
- 4. Log Rotation Configuration
- 6. Change Log File/Telemetry File Location
- 7. Configure Inbound Firewall Rules
- 8. App Protection
- 9. HTTP Proxy Configuration
- 10. mTLS configuration
- 11. Filtering Enumerated Resource Results Using Smart Access
- 12. Multi-Monitor Resolution Management
- 13. Secure HDX Support