Policies and actions
Note
Attention: Citrix Content Collaboration™ and ShareFile has reached its end of life and is no longer available to users.
You can create policies on Citrix Analytics to help you perform actions on user accounts when unusual or suspicious activities occur. Policies let you automate the process of applying actions such as disabling a user and adding users to a watchlist. When you enable policies, a corresponding action is applied immediately after an anomalous event occurs and the policy condition is met. You can also manually apply actions on user accounts with anomalous activities.
What are the policies?
A policy is a set of conditions that must be met to apply an action. A policy contains one or more conditions and a single action. You can create a policy with multiple conditions and one action that can be applied to a user’s account.
Risk score is a global condition. Global conditions can be applied to a specific user for a specific data source. You can keep a watch on user accounts that show any unusual activities. Other conditions are specific to data sources and their risk indicators. The conditions contain combinations of risk scores, default risk indicators, and custom risk indicators. You can add up to 4 conditions when creating a policy.
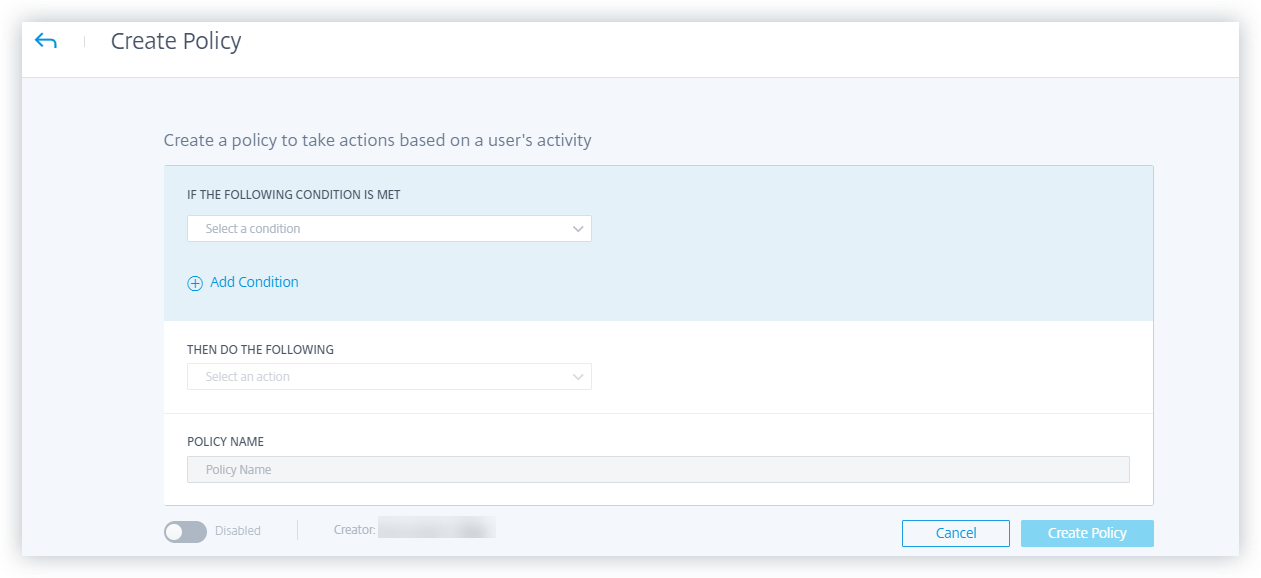
For example, if your organization uses sensitive data, you might want to restrict the amount of data shared or accessed by users internally. But if you have a large organization, it wouldn’t be feasible for a single administrator to manage and monitor many users. You can create a policy wherein, anyone who shares sensitive data excessively can be added to a watchlist or have their account disabled immediately.
Default policies
Default policies are predefined and enabled on the Policies dashboard. They are created based on pre-defined conditions and a corresponding action is assigned to every default policy. You can either use a default policy or modify it based on your requirements.
Citrix Analytics supports the following default policies:
- Successful credentials exploit
- Potential data exfiltration
- Unusual access from a suspicious IP
- First time access from device
- Virtual Apps and Desktops and Citrix DaaS- Impossible travel on access
- Gateway - Impossible travel on authentication
For information about the preset conditions and actions regarding the preceding default policies, see Continuous risk assessment.

For information about the pre-defined policy for the geofencing use case, see Preconfigured policy.
How to add or remove conditions?
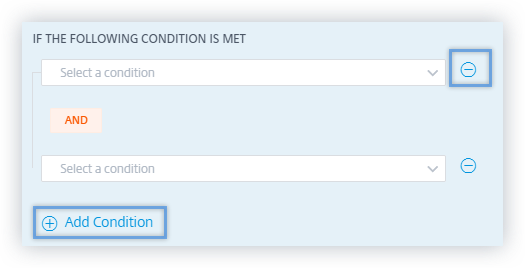
To add more conditions, select Add condition in the IF THE FOLLOWING CONDITION IS MET section of the Create Policy page. To remove a condition, select the - icon that is displayed next to the condition.
Default and custom risk indicators
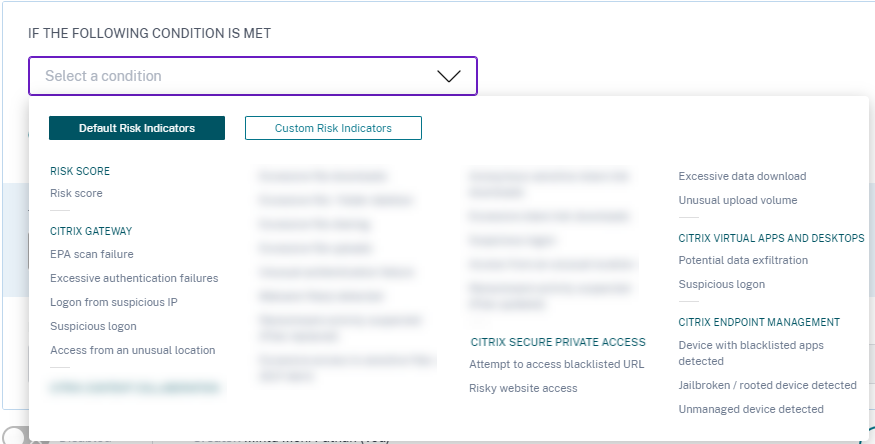
The conditions menu is segregated based on Default Risk Indicators and Custom Risk Indicators tabs on the Create Policy page. Using these tabs, you can easily identify the type of risk indicator that you want to choose when selecting a condition for policy configuration.
What are the actions?
Actions are responses to suspicious events that prevent future anomalous events from occurring. You can apply actions on user accounts that display unusual or suspicious behavior. You can either configure policies to apply action on the user’s account automatically or apply a specific action manually from the user’s risk timeline.
You can view global actions or actions for each Citrix data source. You can also disable previously applied actions for a user at any time.
Note
Irrespective of the data source that triggers a risk indicator, actions pertaining to other data sources can be applied.
The following table describes the actions that you can take.
| Action name | Description | Applicable data sources |
|---|---|---|
| Global actions | ||
| Add to watchlist | When you want to monitor a user for future potential threats, you can add them to a watchlist. | All data sources |
| The Users in Watchlist pane displays all the users that you want to monitor for potential threats based on the unusual activity on their account. Based on your organization’s policy, you can add a user to the watchlist using the Add to watchlist action. | ||
| To add a user to the watchlist, navigate to the user’s profile, from the Actions menu, select Add to watchlist. Click Apply to enforce the action. | ||
| Notify administrator(s) | When a risk indicator is triggered for a user, you can manually notify to the administrators or create a policy for automatic notification. You can select the administrators from the Citrix Cloud domain and other non-Citrix Cloud domains in your organization. If you are a Citrix Cloud administrator with full access permissions, by default, the email notifications are disabled for your Citrix Cloud account. To receive email notifications, enable it on your Citrix Cloud account. For more information, see Receive emailed notifications. If you are a Citrix Cloud administrator with custom access permissions (read-only and full access) to manage Security Analytics, the email notifications are enabled for your Citrix Cloud account. To stop receiving email notifications from Citrix Analytics, request your Citrix Cloud full access administrator to remove your name from the notify administrators distribution list. For information about, see Email distribution list. | |
| Request end user response | When there is any unusual or suspicious activity on the user’s account, you can notify the user to confirm if the user identifies the activity. Based on the activity, you can determine the next course of action to be taken on the user’s account. For more information, see Request end user response. | |
| Notify End User | When any unusual or suspicious activity occurs on the user’s account, you can notify the end user via an email notification. For more information, see Notify End User. | |
| Citrix Gateway actions | ||
| Log off active sessions | When the action is applied, it logs off the user session that is currently active. It does not block any future user sessions. | Citrix Gateway on-premises and Citrix Application Delivery Management |
| Lock user account | When a user’s account is locked due to anomalous behavior, they cannot access any resource through Citrix Gateway until the Gateway administrator unlocks the account. | Citrix Gateway on-premises |
| Unlock user account | When a user’s account is accidentally locked although anomalous behavior was not detected, you can apply this action to unlock it and restore access to the account. | Citrix Gateway on-premises |
| Citrix Virtual Apps and Desktops™ and Citrix DaaS actions | ||
| Log off active sessions | When the action is applied, it logs off the user session that is currently active. It does not block any future user sessions. | Citrix DaaS (formerly Citrix Virtual Apps and Desktops service) |
| Start session recording | If there is an unusual event on the user’s Virtual Desktops account, the administrator can begin recording the user’s current active sessions. If the user is on Citrix Virtual Apps and Desktops 7.18 or a later version, and logged in to the virtual session, an administrator can dynamically trigger start session recording action from Citrix Analytics for Security that starts the recording of the user’s current active session. | Citrix DaaS (formerly Citrix Virtual Apps and Desktops service) |
Notes
You can apply any action to a risk indicator irrespective of the data sources.
- Administrators can now run dynamic session recording actions on Citrix DaaS sites and dynamically record users’ virtual sessions.
- The Request End User Response and Notify End User actions cannot be applied to anonymous users since they don’t have email addresses in Active Directory. Therefore, ensure that either the email addresses of your users are available in the Active Directory with a connection established between your Active Directory and Citrix Cloud.
View-only sharing
Before applying the Change links to view-only sharing action on a user’s account, ensure that the following conditions are met:
Prerequisites
-
The administrator must have an Enterprise account in Content Collaboration to use the Change links to view-only sharing action.
-
The View-Only Sharing is a feature available on a request in the Enterprise accounts of Citrix Content Collaboration. Before applying the Change links to view-only sharing action in Citrix Analytics, ensure that the View-Only Sharing feature is already enabled in the Content Collaboration Enterprise accounts of the user and the administrator. For more information, see the Citrix support article- CTX208601.
Supported file types
The view-only sharing action applies only on the following file types:
-
Microsoft Office files
-
PDF
-
Image files (requires SZC v3.4.1 or later):
-
BMP
-
GIF
-
JPG
-
JPEG
-
PNG
-
TIF
-
TIFF
-
-
Audio and video files stored on a Citrix-managed Storage Zone.
Configure policies and actions
For example, following the steps below, you can create an Excessive file-sharing policy. Using this policy, when a user in your organization shares an unusually large amount of data, the share links are automatically expired. You are notified when a user shares data that exceeds that user’s normal behavior. By applying the Excessive file sharing policy, and taking immediate action, you can prevent data exfiltration from any user’s account.
To create a policy, do the following:
-
After signing in to Citrix Analytics, go to Security > Policies > Create Policy.

-
From the IF THE FOLLOWING CONDITION IS MET list box, select the default or the custom risk indicator conditions upon which you want an action applied.

-
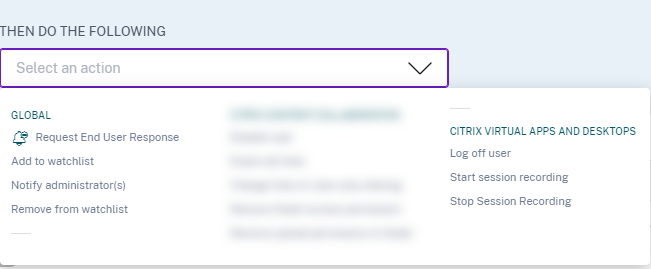
From the THEN DO THE FOLLOWING list, select an action.
-
In the Policy Name text box, provide a name and enable the policy using the toggle button provided.

-
Click Create Policy.
After creating a policy, the policy appears on the Policies dashboard.
The Policies dashboard displays the policies associated with the data sources that are successfully discovered and connected to Citrix Analytics. The dashboard does not display the policies that have conditions defined for the undiscovered data sources.
However, turning off data processing for an already connected data source does not affect the existing policies on the Policies dashboard.
Request end user response
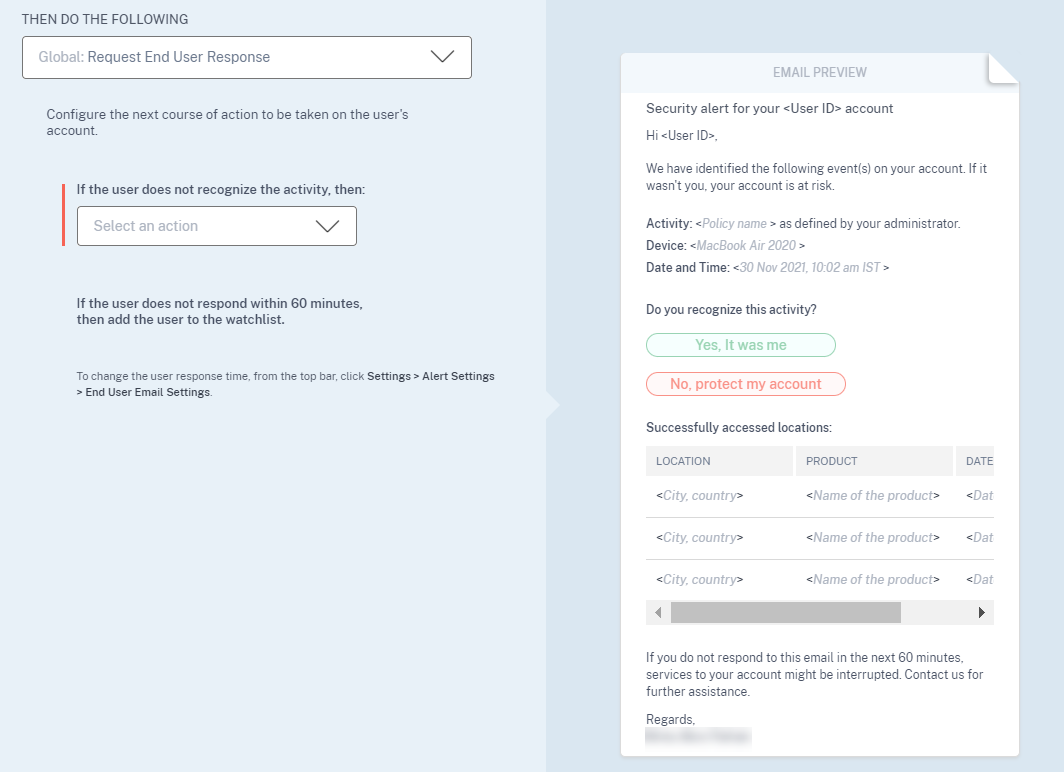
Request End User Response is a global action using which you can alert a user immediately after you detect an unusual activity in their Citrix account. When you apply the action, an email notification is sent to the user. The user needs to respond through email about the legitimacy of their activity.
Determine what action you want to apply for your users:
Based on the user’s response, you can determine the next course of action that you want to take. You can apply a global action such as Add to watchlist, Notify administrators. Or you can apply a data source specific action such as Citrix Gateway- Lock user.
If you receive a response that the user performed the reported activity, then the activity is not suspicious and you need not take action on the user’s account. The daily limit to send security alerts to the user is three emails.
Consider a Citrix Content Collaboration user whose risk score has exceeded 80 in a duration of 80 minutes. You can alert the user about this unusual behavior by applying the Request End User Response action. A security alert is sent to the user from the email ID security-analytics@cloud.com.
The email contains the following information:
-
User’s activity that triggered the risk indicator
-
User’s device
-
Date and time of the user activity
-
Locations (cities and countries) from where products or services are successfully accessed. If the city or country is unavailable, the corresponding value is shown as “Unknown”
The Request End User Response action is added to the user’s risk timeline.
If the user does not recognize the activity detected in their Citrix account, Citrix Analytics applies the action that you have defined.
If the user fails to send their response within one hour of receiving the email, Citrix Analytics adds the user to the watchlist. You can monitor the user and their account for any suspicious activities and take action accordingly.
How to set the user response time?
You can configure the user’s response time to your security alert email. If the user does not respond to the reported activity within the specified time period, the user is added to the watchlist for monitoring.
Follow the steps to configure the user’s response time:
-
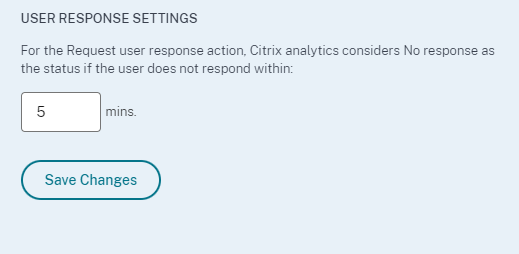
Click Settings > Alert Settings > End User Email Settings.

-
On the End User Email Settings page, enter the number of minutes on the text box.
-
Click Save Changes.
You can also add a banner, header text, and footer text in the security alert email to make it look legitimate, attract users’ attention, and increase the response time. For more information, see End user email settings.
Notify End User
Notify End User is a global action using which you can send email notifications to end users when unusual or suspicious behavior is detected on their Citrix accounts. The email subject line and message body are customizable. When the action is applied after a policy is triggered, an email notification is sent to the user. No response is requested from the end user and no disruptive actions are performed on the user’s account.
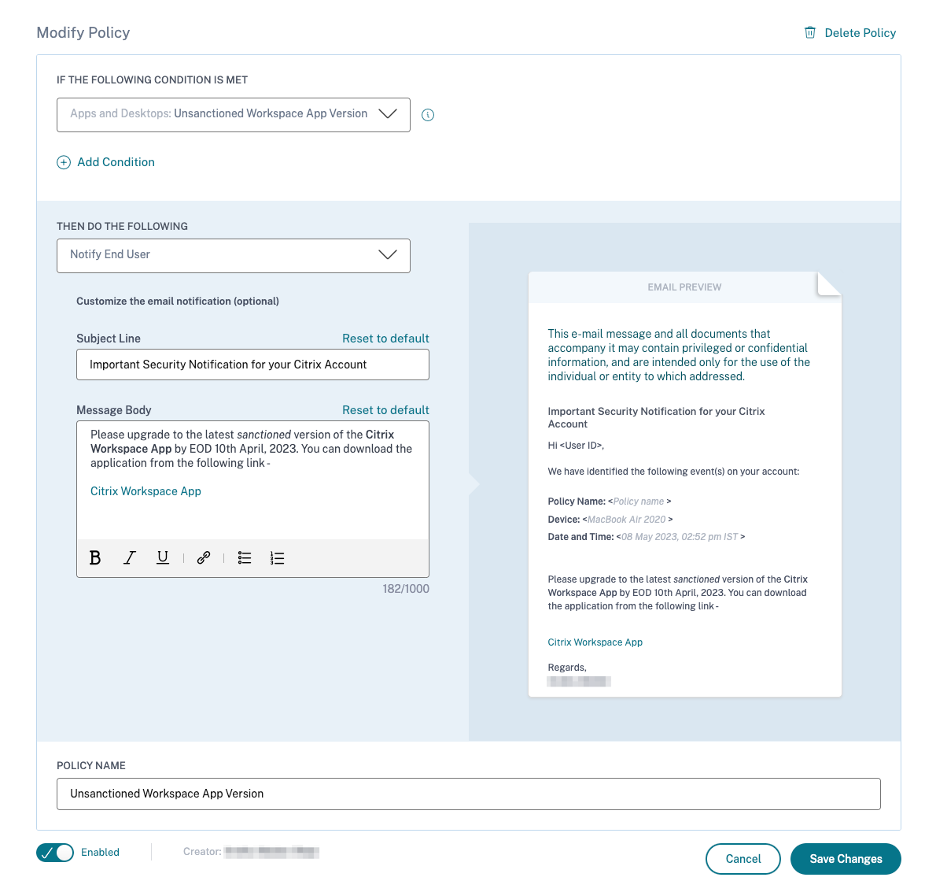
This action can help serve various compliance use cases based on a Built-In or Custom Risk Indicator Trigger(s). With the customizable email subject line and message body, it is also flexible enough to serve many generic end-user notification use cases, which do not require a response or disruptive action performed on the user’s account.
The email contains the following information:
-
Policy Name associated with the action.
-
User’s device (if available)
-
Date and time of the user activity
The end user email notification is sent from the email ID security-analytics@cloud.com.
Note
The daily limit across policies is three emails per user. Once this threshold is crossed, the action is not applied, and no email notification is sent out to the end user. The action is visible on the user’s timeline view with the message Daily email limit reached for the user.
The action is added to the user’s risk timeline. However, it is not a manual action and cannot be applied to a user from the timeline view.
Customization of end-user email content
Previously, Citrix Analytics administrators manually reached out to end-users to provide remediation instructions on the detection of suspected activity, which was a time-consuming process to close an incident.
The customization of end-user email content feature is introduced for request end-user response, notify end users and informational emails. The end-user response email seeks user validation/response, however, an informational email shows the kind of suspicious activity and what kind of remediation action has already been taken. The notify end user email informs the end user about compliance violations / suspicious activity on their Citrix account without requesting a response from them.
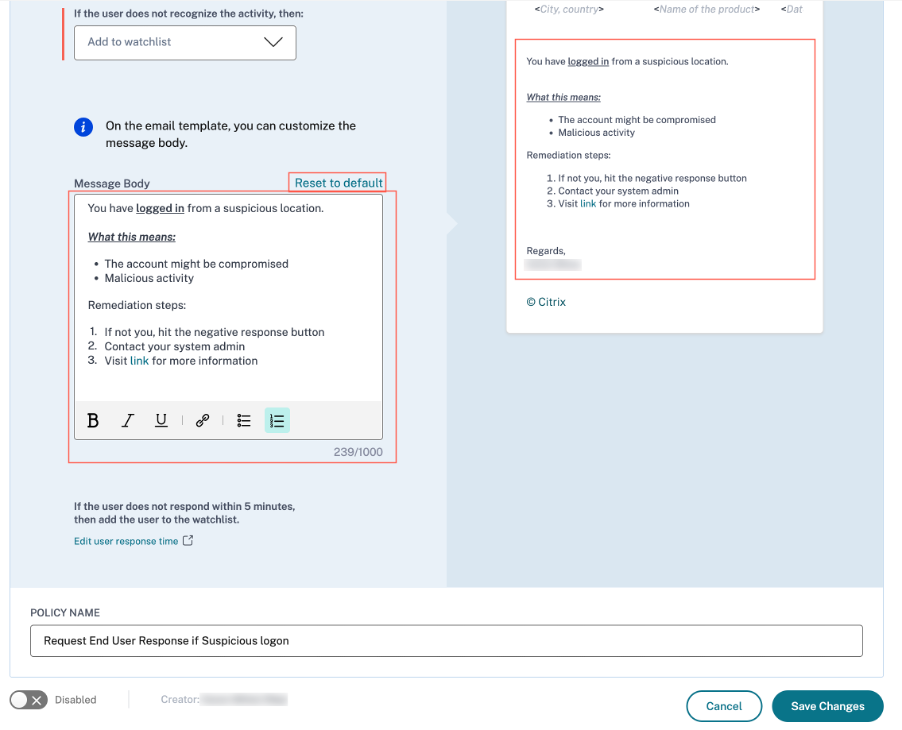
With the Customization of end-user email content feature, Citrix Analytics administrators can add a custom message in the request end-user response/notify end user/informational email body template. Using the rich text box editor, an administrator can alter the content per policy using various editing tools such as bold, italic, hyperlink, and so on.
Note
The Customization of end-user email content feature is only available for policy based actions and not for manual actions.
You can customize the content for three types of emails:
- Request End User Response email.
- Notify End User email
- Email sent when any of the following end-user actions is performed:
- Log off action under Citrix Apps and Desktop
- Log off and lock user under Citrix Gateway
You can view the list of policies at Security > Policies tab.
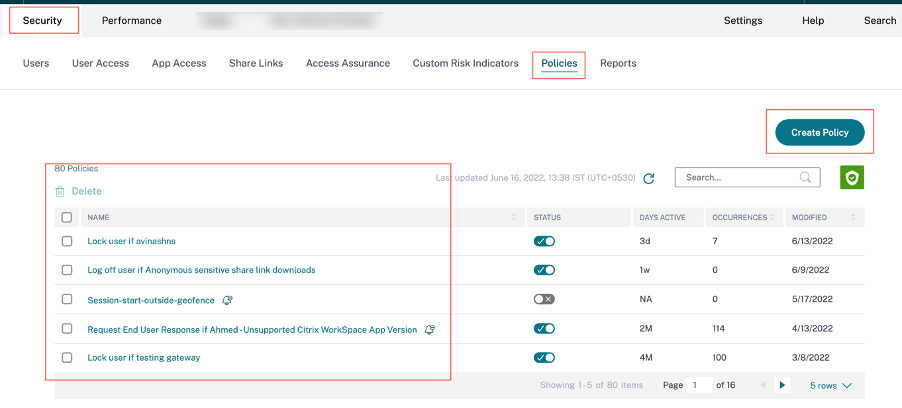
One can view the customized email body by clicking the existing policy or while creating a new policy. On the right-hand pane, you can get a preview of the updated email content.
Note
The administrator can set the content to the default template by clicking the Reset to default link. The character limit for the custom body is 1000.
For the Notify End User action, the Subject Line field is also customizable by the administrator. It can be reset to default by clicking the Reset to default link. The character limit for the custom email subject is 500.
Click Save Changes to create/update the policy. When the policy is triggered, the following email notification is sent to the end-user:
- Request End User Response email: A policy action that sends an email requesting for user response.
- Notify End User email: An email notification sent to end users informing them of compliance issues, suspicious activity, and so on. on their Citrix account.
- Informational email: An informational email that is sent after an end-user action.
The end-user can read the email and complete the remediation actions as requested by the administrator.
Note
The administrator with read only access cannot edit/add the email body.
Notify user after applying disruptive action
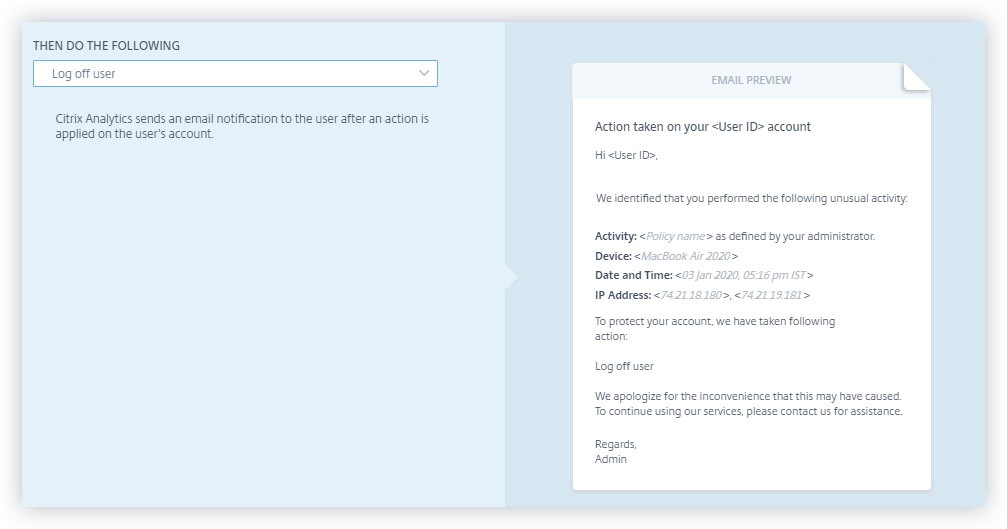
In this action type, you can apply a disruptive action such as Log off user and Lock user on the user’s account when an unusual activity is detected. When an action is applied to the user’s account, services to their account might be interrupted. In such instances, the user must contact the administrator to be able to access their account like before.
Consider a Citrix Content Collaboration user whose risk score has exceeded 80 in a duration of 80 minutes. You can log the user off. Once this task is performed, the user cannot access their account and an email notification is sent to the user from the email ID security-analytics@cloud.com. The email contains details of the event such as the activity, device, date and time, and the IP address. The user must contact the administrator to access their account as before.
Apply an action manually
Consider a user, Lemuel who signs in to a network by using a new device for the first time. To monitor her account since her behavior is unusual, you can use the Notify administrator(s) action.
To manually apply the action to the user, you must:
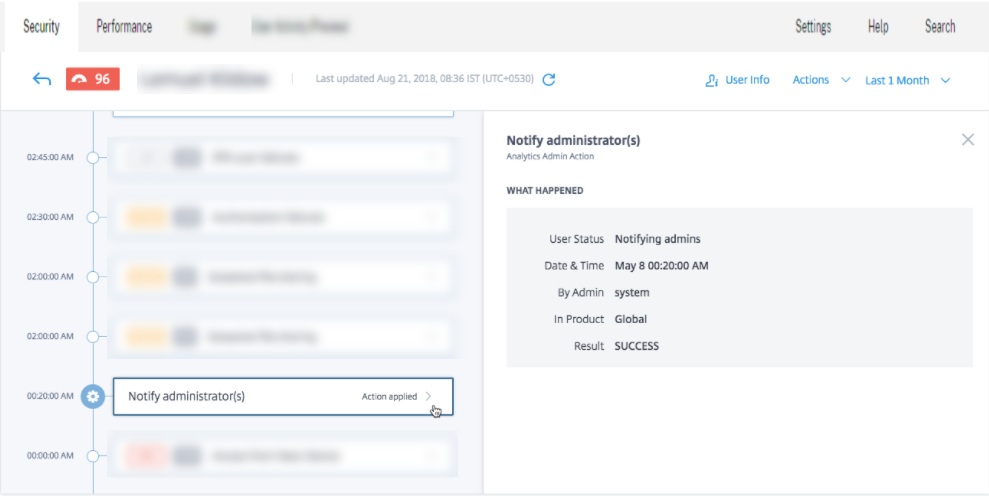
Navigate to a user’s profile and select the appropriate risk indicator. From the Actions menu, select the Notify administrator(s) action and click Apply.

An email notification is sent to all or selected administrators to monitor her account. The action applied is added to her risk timeline, and the action details are displayed on the right pane of the risk timeline page.
Notes
If you are a Citrix Cloud administrator with full access permissions, by default, the email notifications are disabled for your Citrix Cloud account. To receive email notifications, enable it on your Citrix Cloud account. For more information, see Receive emailed notifications.
If you are a Citrix Cloud administrator with custom access permissions (read-only and full access) to manage Security Analytics, the email notifications are enabled for your Citrix Cloud account. To stop receiving email notifications from Citrix Analytics, request your Citrix Cloud full access administrator to remove your name from the notify administrators distribution list. For information about, see Email distribution list.
Manage policies
You can view the Policies dashboard to manage all the policies created on Citrix Analytics to monitor and identify inconsistencies on your network. On the Policies dashboard, you can:
-
View the list of policies
-
Details of the policy
-
Name of the policy
-
Status – Enabled or disabled.
-
Duration of the policy – Number of days the policy has been active or inactive.
-
Occurrences – The number of times the policy is triggered.
-
Modified – Timestamp, only if the policy has been modified.
-
-
Delete the policy
-
To delete a policy, you can select the policy you want to delete and click Delete.
-
Or you can click the policy’s name to be directed to the Modify Policy page. Click Delete Policy. In the dialog, confirm your request to delete the policy.
-
-
Click a policy’s name to view more details. You can also modify the policy when you click its name. Other modifications that can be done are as follows:
-
Change the name of the policy.
-
Conditions of the policy.
-
The actions to be applied.
-
Enable or disable the policy.
-
Delete the policy.
-
Note
If you don’t want to delete your policy, you can choose to disable the policy.
To re-enable the policy on the Policies dashboard, do the following:
On the Policies dashboard, click the Status slider button and refresh the page. The Status slider button turns green.
On the Modify Policy page, click the Enabled slider button on the bottom of the page.
Supported modes
Citrix Analytics supports the following modes of policies:
-
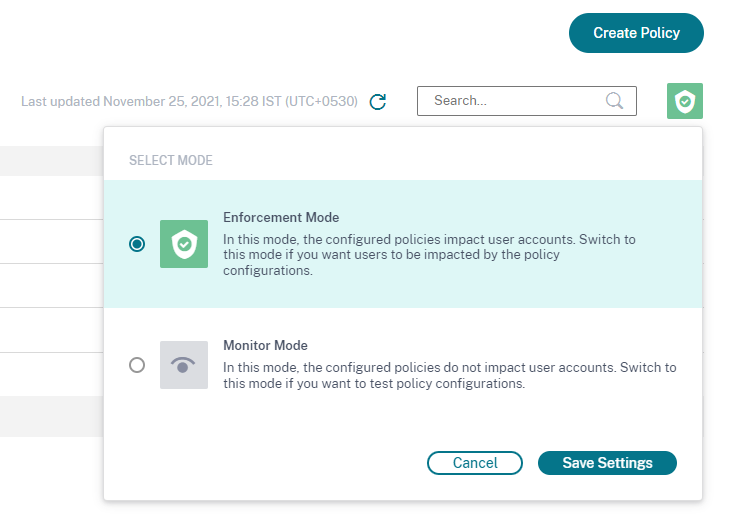
Enforcement mode - In this mode, the configured policies impact user accounts.
-
Monitor mode - In this mode, the configured policies do not impact user accounts. You can set policies to this mode if you want to test any policy configurations.
Use the following instructions to configure modes on policies:
-
Navigate to Security > Policies.
-
On the Policies page, select the icon at the top right corner that is displayed next to the Search bar. The SELECT MODE window is displayed.
-
Select the mode of your choice and click Save Settings.
Note
The default policies created by Analytics are set to monitor mode. As a result, the existing policies also inherit this mode. You can assess the impact of all the policies together and then, change them to enforcement mode.
Self-service search for Policies
On the self-service search page, you can view the user events that have satisfied the conditions defined in the policies. The page also displays the actions applied to these user events. Filter the user events based on the applied actions.