Citrix Virtual Apps and Desktops™ and Citrix DaaS risk indicators
Impossible travel
Citrix Analytics detects a user’s logons as risky when the consecutive logons are from two different countries within a time period that is less than the expected travel time between the countries.
The impossible travel time scenario indicates the following risks:
-
Compromised credentials: A remote attacker steals a legitimate user’s credentials.
-
Shared credentials: Different users are using the same user credentials.
When is the Impossible travel risk indicator triggered?
The Impossible travel risk indicator evaluates the time and estimated distance between each pair of consecutive user logons, and triggers when the distance is greater than an individual person can possibly travel in that amount of time.
Note
This risk indicator also contains logic to reduce false positive alerts for the following scenarios that do not reflect the users’ actual locations:
- When users log on to virtual apps and desktops from proxy connections.
- When users log on to virtual apps and desktops from hosted clients.
How to analyze the Impossible risk indicator
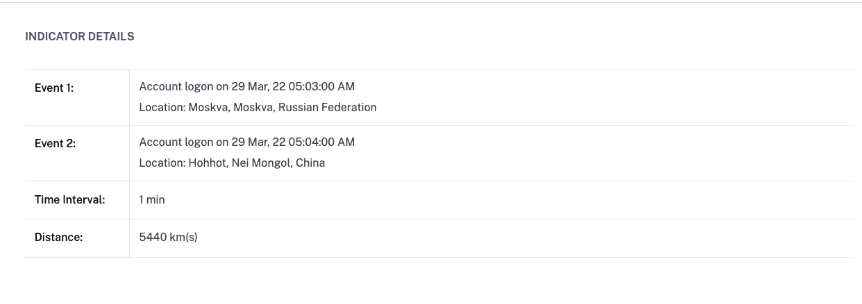
Consider the user Adam Maxwell, who logs on from two locations- Moskva, Russia and Hohhot, China within a time duration of one minute. Citrix Analytics detects this logon event as an impossible travel scenario and triggers the Impossible travel risk indicator. The risk indicator is added to Adam Maxwell’s risk timeline and a risk score is assigned to him.
To view Adam Maxwell’s risk timeline, select Security > Users. From the Risky Users pane, select the user Adam Maxwell.
From Adam Maxwell’s risk timeline, select the Impossible travel risk indicator. You can view the following information:
-
The WHAT HAPPENED section provides a brief summary of the impossible travel event.

-
The INDICATOR DETAILS section provides the locations from which the user has logged on, the time duration between the consecutive logons, and the distance between the two locations.
-
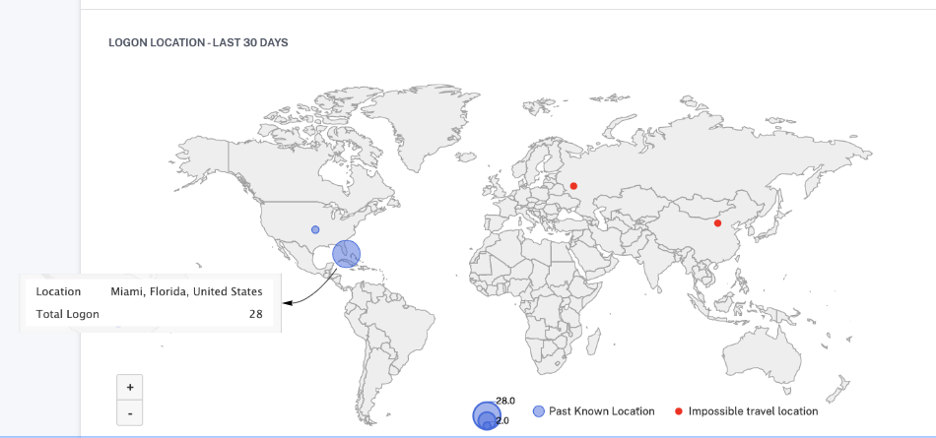
The LOGON LOCATION- LAST 30 DAYS section displays a geographical map view of the impossible travel locations and known locations of the user. The location data is shown for the last 30 days. You can hover over the pointers on the map to view the total logons from each location.
-
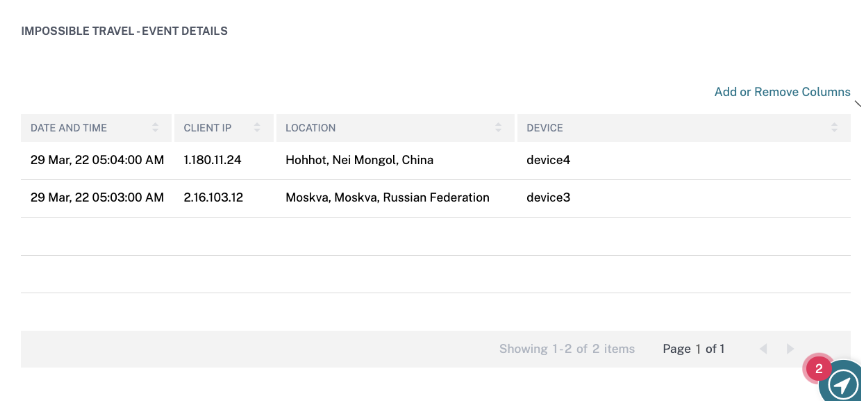
The IMPOSSIBLE TRAVEL- EVENT DETAILS section provides the following information about the impossible travel event:
- Date and time: Indicates the date and the time of the logons.
- Client IP: Indicates the IP address of the user device.
- Location: Indicates the location from where the user has logged on.
- Device: Indicates the device name of the user.
- Logon type: Indicates whether the user activity is session logon or account logon. The account logon event is triggered when a user’s authentication to their account is successful. Whereas the session logon event is triggered when a user enters their credential and logs on to their app or desktop session.
- OS: Indicates the operating system of the user device.
- Browser: Indicates the web browser that is used to access the application.
What actions you can apply to the users?
You can perform the following actions on the user’s account:
- Add to watchlist. When you want to monitor a user for future potential threats, you can add them to a watchlist.
- Notify administrator(s). When there is any unusual or suspicious activity on the user’s account, an email notification is sent to all or selected administrators.
- Log off user. When a user is logged off from their account, they cannot access the resource through Virtual Desktops.
- Start session recording. If there is an unusual event on the user’s Virtual Desktops account, the administrator can begin recording the user’s activities of future logon sessions. However, if the user is on Citrix Virtual Apps and Desktops 7.18 or later, the administrator can dynamically start and stop recording the user’s current logon session.
To learn more about actions and how to configure them manually, see Policies and Actions.
To apply the actions to the user manually, navigate to the user’s profile and select the appropriate risk indicator. From the Action menu, select an action and click Apply.
Note
Irrespective of the data source that triggers a risk indicator, actions pertaining to other data sources can be applied.
Potential data exfiltration
Citrix Analytics detects data threats based on excessive attempts to exfiltrate data and triggers the corresponding risk indicator.
The risk factor associated with the Potential data exfiltration risk indicator is the Data-based risk indicators. For more information about the risk factors, see Citrix user risk indicators.
The Potential data exfiltration risk indicator is triggered when a Citrix Receiver user attempts to download or transfer files to a drive or printer. This data might be a file-download event such as downloading a file to a local drive, mapped drives, or an external storage device. The data can also be exfiltrated using the clipboard or by the copy-paste action.
Note
The clipboard operations are supported only by the SaaS applications.
When is the Potential data exfiltration risk indicator triggered?
You can be notified when a user has transferred an excessive number of files to a drive or printer in a certain time period. This risk indicator is also triggered when the user uses the copy-paste action on their local computer.
When Citrix Receiver detects this behavior, Citrix Analytics receives this event and assigns a risk score to the respective user. The Potential data exfiltration risk indicator is added to the user’s risk timeline.
How to analyze the Potential data exfiltration risk Indicator?
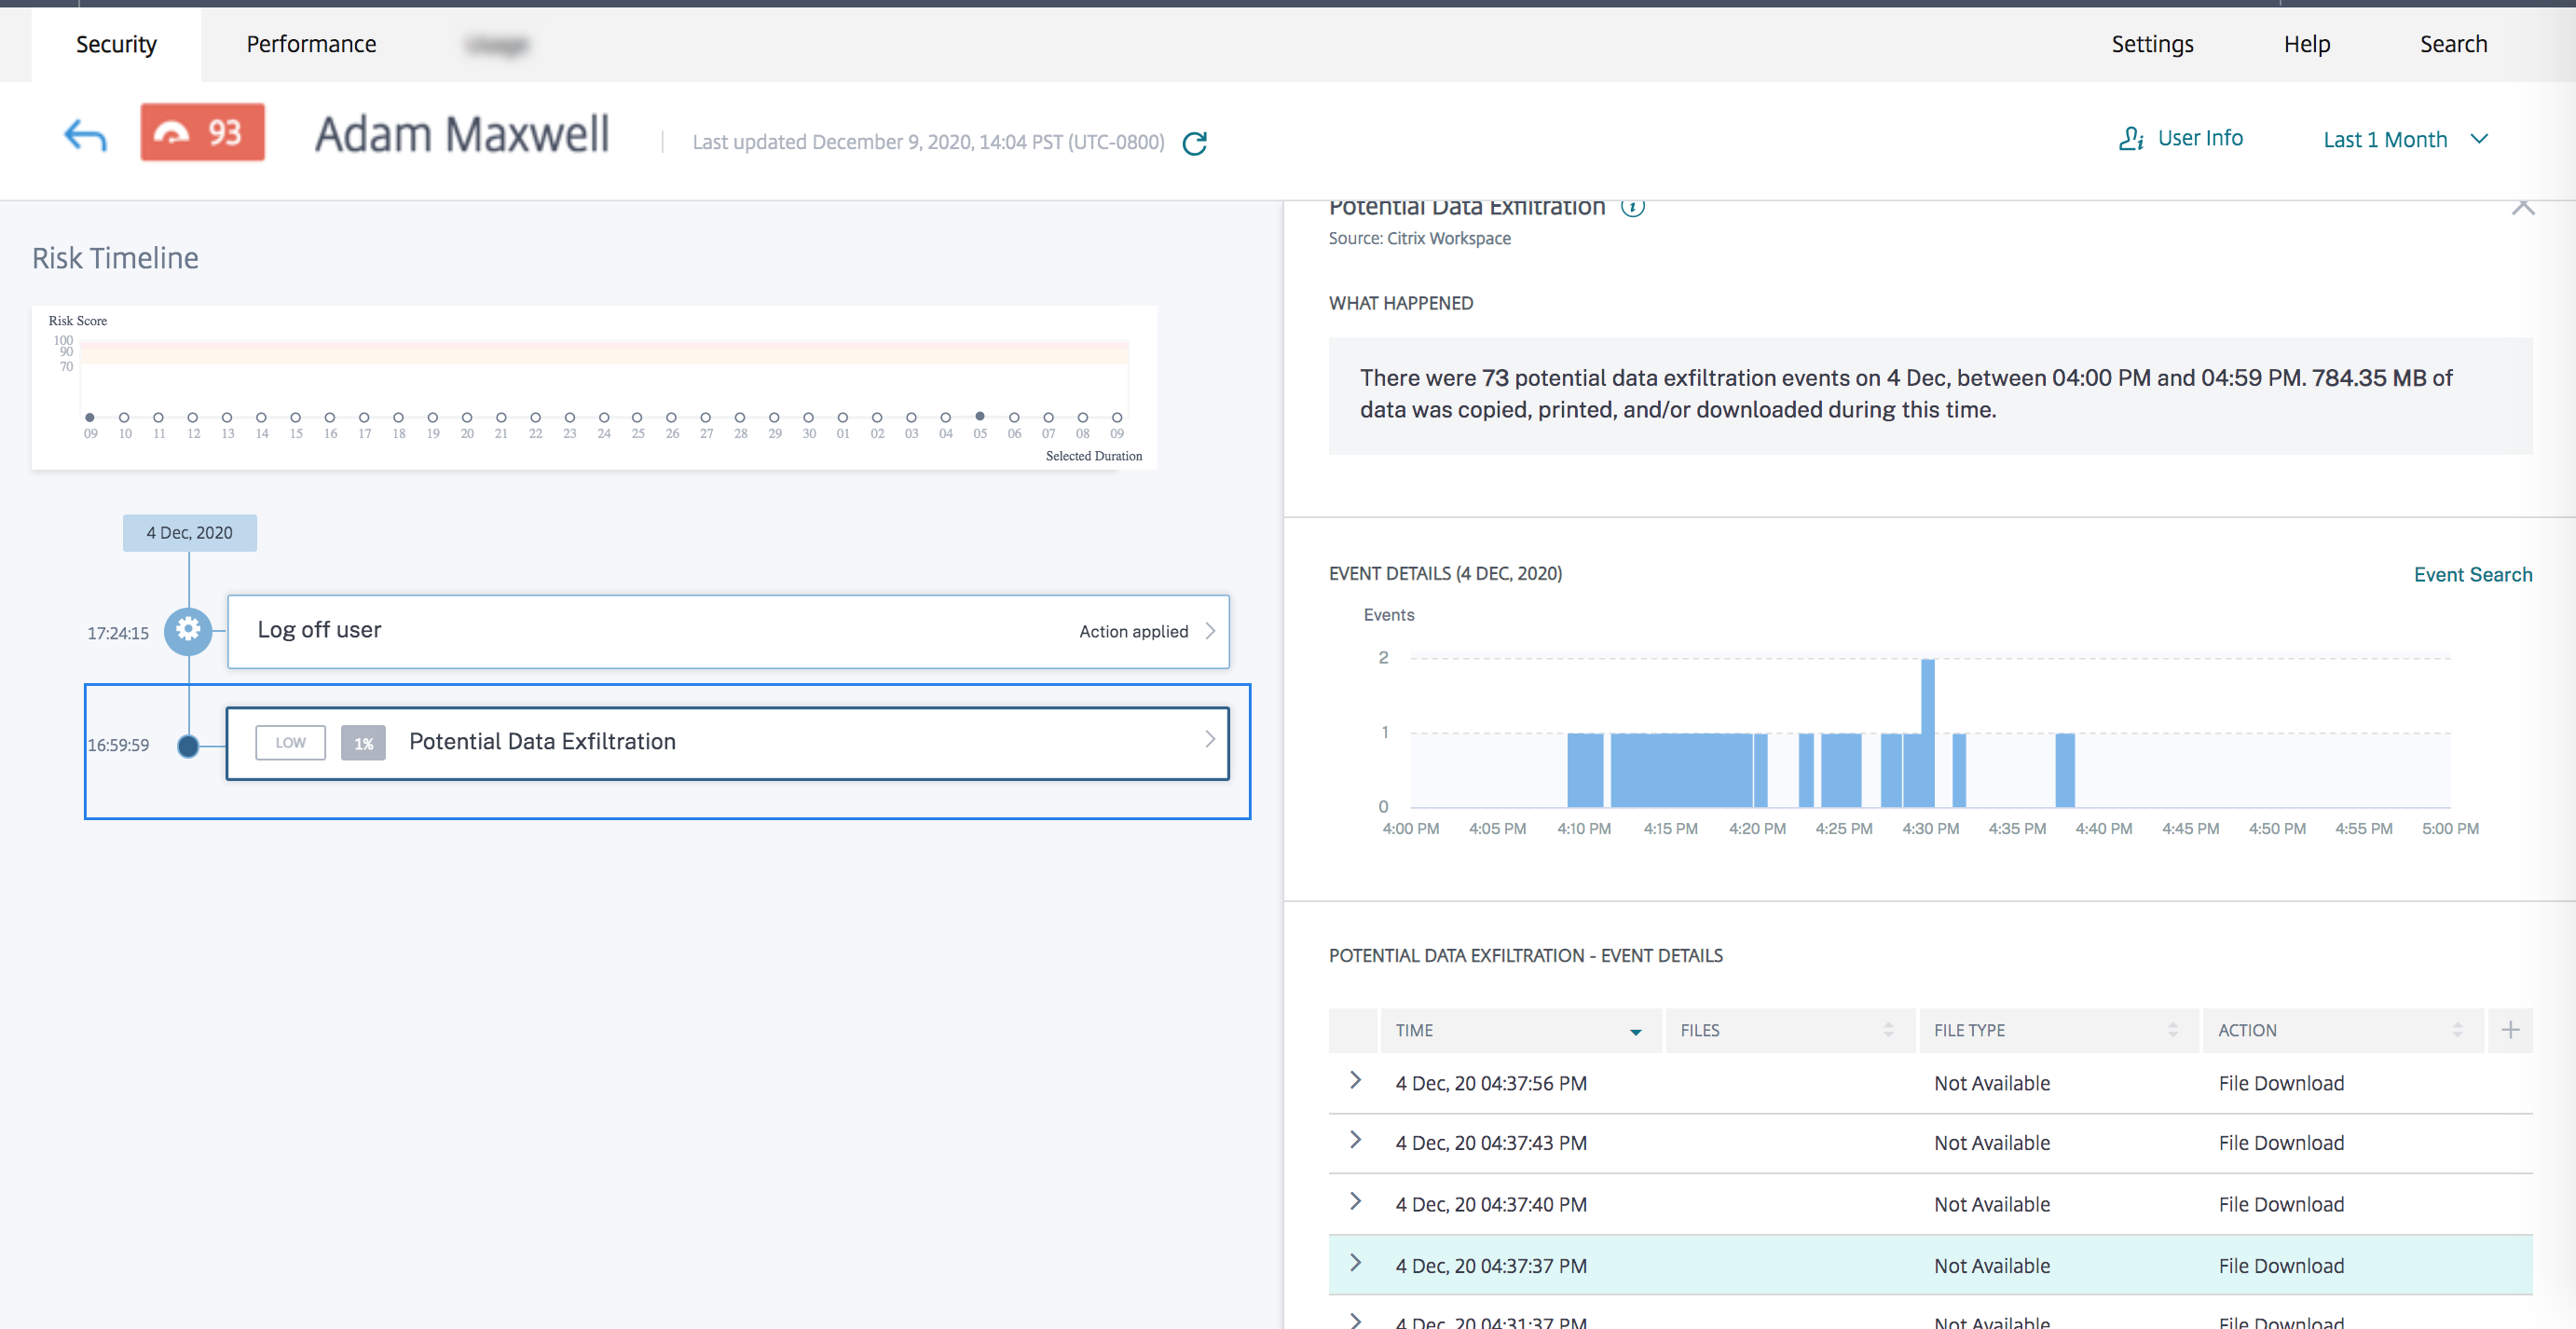
Consider the user Adam Maxwell, who is logged on to a session and attempts to print files that exceed the predefined limit. By this action, Adam Maxwell had exceeded his normal file transfer behavior based on machine learning algorithms.
From Adam Maxwell’s timeline, you can select the Potential data exfiltration risk indicator. The reason for the event is displayed along with the details such as the files transferred and the device used to transfer the file.
To view the Potential data exfiltration risk indicator reported for a user, navigate to Security > Users, and select the user.
-
The WHAT HAPPENED section, you can view the summary of the potential data exfiltration event. You can view the number of data exfiltration events during a specific time period.

-
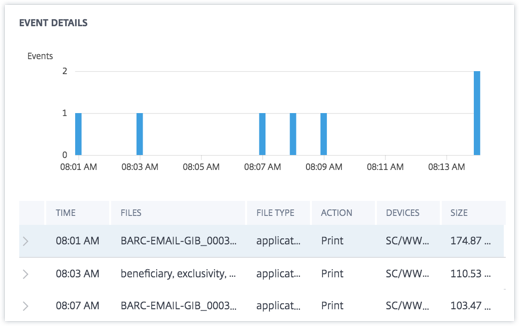
The EVENT DETAILS section, the data exfiltration attempts appear in a graphical and tabular format. The events appear as individual entries in the graph and the table provides the following key information:
-
Time. The time the data exfiltration event occurred.
-
Files. The file that was either downloaded, printed, or copied.
-
File type. The file type that was either downloaded, printed, or copied.
Note
The printed file name is available only from the SaaS apps printing event.
-
Action. The kinds of data exfiltration event that was performed – print, download, or copy.
-
Devices. The device used.
-
Size. The size of the file that is exfiltrated.
-
Location. The city from where the user is trying to exfiltrate data.
-
-
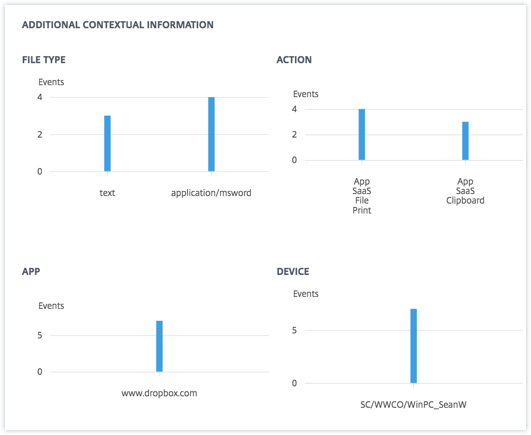
The ADDITIONAL CONTEXTUAL INFORMATION section, during the event’s occurrence, you can view the following:
-
The number of files that have been exfiltrated.
-
The actions performed.
-
The applications used.
-
Device used by the user.
-
What actions you can apply to the user?
You can perform the following actions on the user’s account:
-
Add to watchlist. When you want to monitor a user for future potential threats, you can add them to a watchlist.
-
Notify administrator(s). When there is any unusual or suspicious activity on the user’s account, an email notification is sent to all or selected administrators.
-
Log off user. When a user is logged off from their account, they cannot access the resource through Virtual Desktops.
-
Start session recording. If there is an unusual event on the user’s Virtual Desktops account, the administrator can begin recording the user’s activities of future logon sessions. However, if the user is on Citrix Virtual Apps and Desktops 7.18 or later, the administrator can dynamically start and stop recording the user’s current logon session.
To learn more about actions and how to configure them manually, see Policies and Actions.
To apply the actions to the user manually, navigate to the user’s profile and select the appropriate risk indicator. From the Action menu, select an action and click Apply.
Note
Irrespective of the data source that triggers a risk indicator, actions pertaining to other data sources can be applied.
Suspicious logon
Citrix Analytics detects the user’s logons that appear unusual or risky based on multiple contextual factors, which are defined jointly by the device, location, and network used by the user.
When is the Suspicious logon risk indicator triggered?
The risk indicator is triggered by the combination of the following factors, where each factor is regarded as potentially suspicious based on one or more conditions.
| Factor | Conditions |
|---|---|
| Unusual device | The user logs on from a device that has not been used in the last 30 days. |
| The user logs on from an HTML5 client or a Chrome client where the device signature is inconsistent with the user’s history. | |
| Unusual location | Log on from a city or a country that the user has not logged on in the last 30 days. |
| The city or country is geographically far from the recent (last 30 days) logon locations. | |
| Zero or minimum users have logged on from the city or the country in the last 30 days. | |
| Unusual network | Log on from an IP address that the user has not used in the last 30 days. |
| Log on from an IP subnet that the user has not used in the last 30 days. | |
| Zero or minimum users have logged on from the IP subnet in the last 30 days. | |
| IP threat | The IP address is identified as high risk by the community threat intelligence feed- Webroot. |
| Citrix Analytics recently detected highly suspicious logon activities from the IP address from other users. | |
How to analyze the Suspicious logon risk indicator
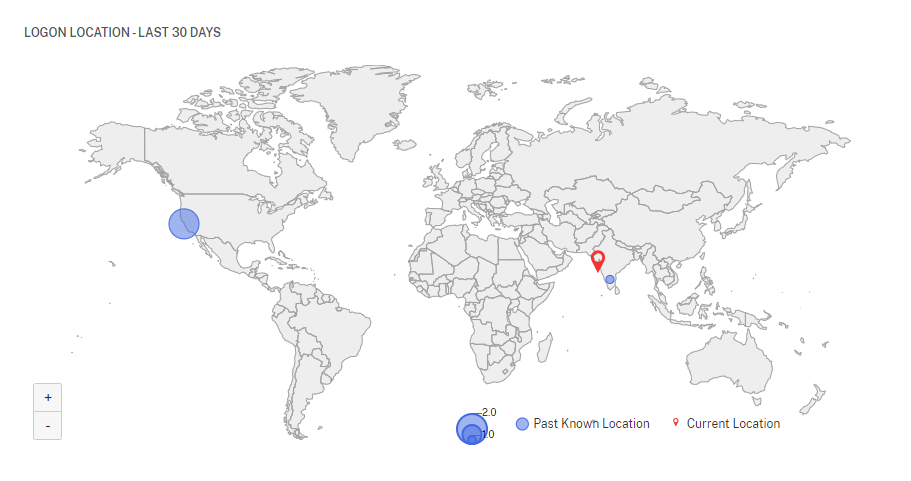
Consider the user Adam Maxwell, who logs on from Mumbai, India for the first time. He uses a new device or a device that was not used for the last 30 days to log on to Citrix Virtual Apps and Desktops and connected to a new network. Citrix Analytics detects this logon event as suspicious because the factors- location, device, and network deviate from his usual behavior and triggers the Suspicious logon risk indicator. The risk indicator is added to Adam Maxwell’s risk timeline and a risk score is assigned to him.
To view Adam Maxwell’s risk time, select Security > Users. From the Risky Users pane, select the user Adam Maxwell.
From Adam Maxwell’s risk timeline, select the Suspicious logon risk indicator. You can view the following information:
-
The WHAT HAPPENED section provides a brief summary of the suspicious activities that include the risk factors and the time of the event.

-
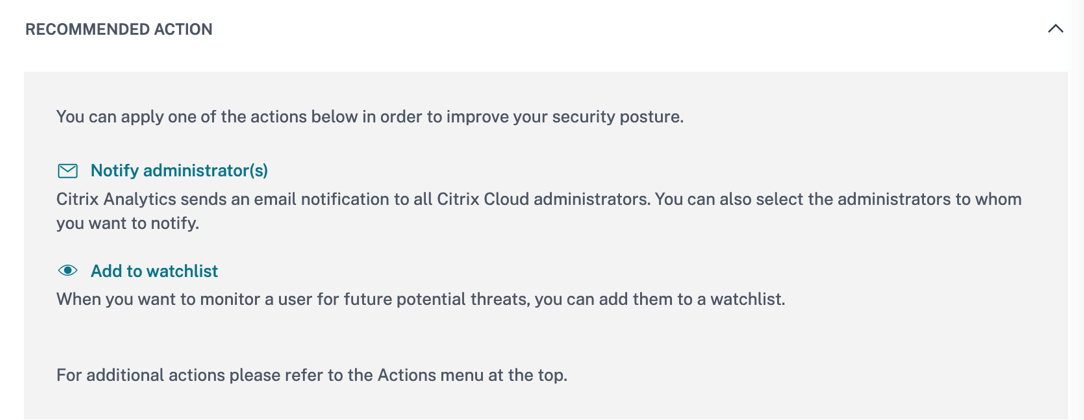
In the RECOMMENDED ACTION section, you find the suggested actions that can be applied on the risk indicator. Citrix Analytics for Security™ recommends the actions depending on the severity of the risk posed by the user. The recommendation can be one or combination of the following actions:
-
Notify administrator(s)
-
Add to watchlist
-
Create a policy
You can select an action based on the recommendation. Or you can select an action that you want to apply depending on your choice from the Actions menu. For more information, see Apply an action manually.
-
-
The LOGON DETAILS section provides detailed summary of the suspicious activities corresponding to each risk factor. Each risk factor is assigned a score that indicates the suspicion level. Any single risk factor does not indicate high risk from a user. The overall risk is based on the correlation of the multiple risk factors.
Suspicion level Indication 0–69 The factor appears normal and is not considered suspicious. 70–89 The factor appears slightly unusual and is considered moderately suspicious with other factors. 90–100 The factor is entirely new or unusual and is considered highly suspicious with other factors. 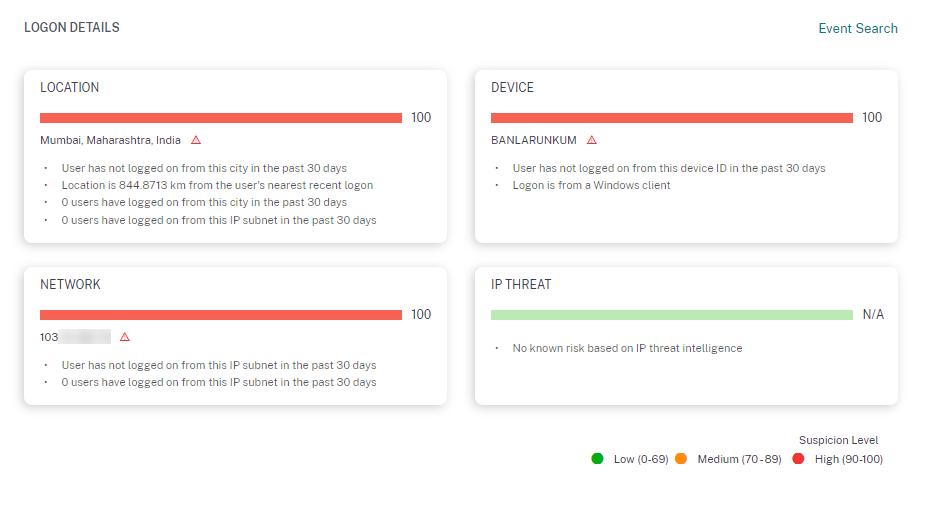
-
The LOGON LOCATION- LAST 30 DAYS section displays a geographical map view of the last known locations and the current location of the user. The location data is shown for the last 30 days. You can hover over the pointers on the map to view the total logons from each location.
-
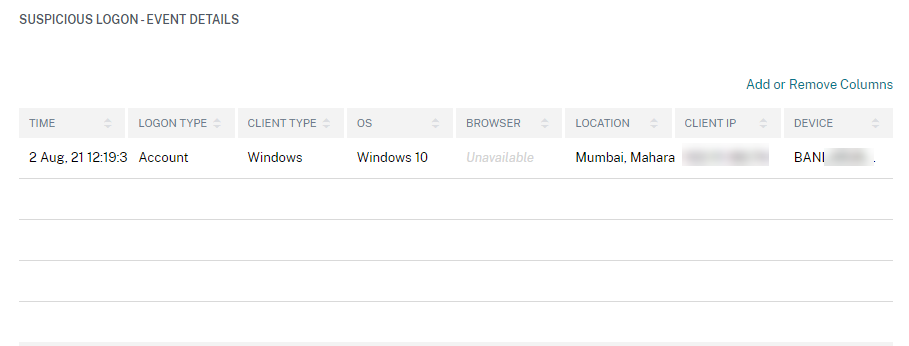
The SUSPICIOUS LOGON- EVENT DETAILS section provides the following information about the suspicious logon event:
-
Time: Indicates the date and time of the suspicious logon.
-
Logon type: Indicates whether the user activity is session logon or account logon. The account logon event is triggered when a user’s authentication to their account is successful. Whereas the session logon event is triggered when a user enters their credential and logs on to their app or desktop session.
-
Client type: Indicates the type of Citrix Workspace app installed on the user device. Depending on the operating system of the user device, the client type can be Android, iOS, Windows, Linux, Mac, and so on.
-
OS: Indicates the operating system of the user device.
-
Browser: Indicates the web browser that is used to access the application.
-
Location: Indicates the location from where the user has logged on.
-
Client IP: Indicates the IP address of the user device.
-
Device: Indicates the device name of the user.
-
What actions you can apply to the users?
You can perform the following actions on the user’s account:
-
Add to watchlist. When you want to monitor a user for future potential threats, you can add them to a watchlist.
-
Notify administrator(s). When there is any unusual or suspicious activity on the user’s account, an email notification is sent to all or selected administrators.
-
Log off user. When a user is logged off from their account, they cannot access the resource through Virtual Desktops.
-
Start session recording. If there is an unusual event on the user’s Virtual Desktops account, the administrator can begin recording the user’s activities of future logon sessions. However, if the user is on Citrix Virtual Apps and Desktops 7.18 or later, the administrator can dynamically start and stop recording the user’s current logon session.
To learn more about actions and how to configure them manually, see Policies and Actions.
To apply the actions to the user manually, navigate to the user’s profile and select the appropriate risk indicator. From the Action menu, select an action and click Apply.
Note
Irrespective of the data source that triggers a risk indicator, actions pertaining to other data sources can be applied.