-
-
Cloud Connector Standalone Citrix Secure Ticketing Authority (STA) service
-
-
-
-
-
This content has been machine translated dynamically.
Dieser Inhalt ist eine maschinelle Übersetzung, die dynamisch erstellt wurde. (Haftungsausschluss)
Cet article a été traduit automatiquement de manière dynamique. (Clause de non responsabilité)
Este artículo lo ha traducido una máquina de forma dinámica. (Aviso legal)
此内容已经过机器动态翻译。 放弃
このコンテンツは動的に機械翻訳されています。免責事項
이 콘텐츠는 동적으로 기계 번역되었습니다. 책임 부인
Este texto foi traduzido automaticamente. (Aviso legal)
Questo contenuto è stato tradotto dinamicamente con traduzione automatica.(Esclusione di responsabilità))
This article has been machine translated.
Dieser Artikel wurde maschinell übersetzt. (Haftungsausschluss)
Ce article a été traduit automatiquement. (Clause de non responsabilité)
Este artículo ha sido traducido automáticamente. (Aviso legal)
この記事は機械翻訳されています.免責事項
이 기사는 기계 번역되었습니다.책임 부인
Este artigo foi traduzido automaticamente.(Aviso legal)
这篇文章已经过机器翻译.放弃
Questo articolo è stato tradotto automaticamente.(Esclusione di responsabilità))
Translation failed!
Overview
Note:
Starting with version 2511, Citrix Web Studio™ (web-based) is the only management console for Citrix Virtual Apps and Desktops™. Citrix Studio (MMC-based) has been removed from the installer. This article applies only to Web Studio. For information about Citrix® Studio, see the equivalent article in Citrix Virtual Apps and Desktops 7 2212 or earlier.
Policies are a collection of settings that define how sessions, bandwidth, and security are managed for a group of users, devices, or connection types. Citrix® policies provide an efficient way to manage these aspects centrally. Each policy can include multiple settings and filters (object assignments) tailored to your environment.
Tools for managing policies
-
Web Studio
Policies that are created using Web Studio are stored in the site database, and the updates are pushed to the VDA when either of the following happens:
- When that VDA registers with the broker
- When a user launches a session
-
Group Policy Management Console (GPMC)
If your network environment uses Active Directory and you have permission to manage group policy, you can use the GPMC to create and edit policies.
In GPMC, you can configure Group Policy Objects (GPOs) with the settings and filters you need. These policies take priority over policies configured in Web Studio. For more information, see CTX238166.
Policy processing order
Group policy settings are processed in the following order:
- Site-level GPO (stored in the site database)
- Domain-level GPOs
- Organizational Units (OU) GPOs
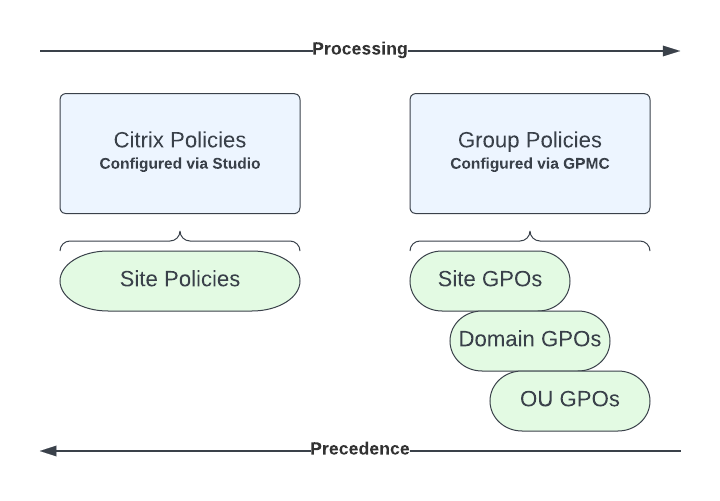
If different settings are applied for the same policy in two GPOs, the policy settings processed last overwrite the settings processed earlier. This configuration means that policy settings take precedence in the following order:
- OU GPOs (highest priority)
- Domain-level GPOs
- Site-level GPOs (lowest priority)
If you’re using multiple policies with conflicting settings, you can control precedence by assigning policy priorities. For more information, see Manage policy assignment exceptions.
Learn about the Web Studio > Policies interface
To access policies, settings, or templates, sign in to Web Studio and then select Policies in the left pane.
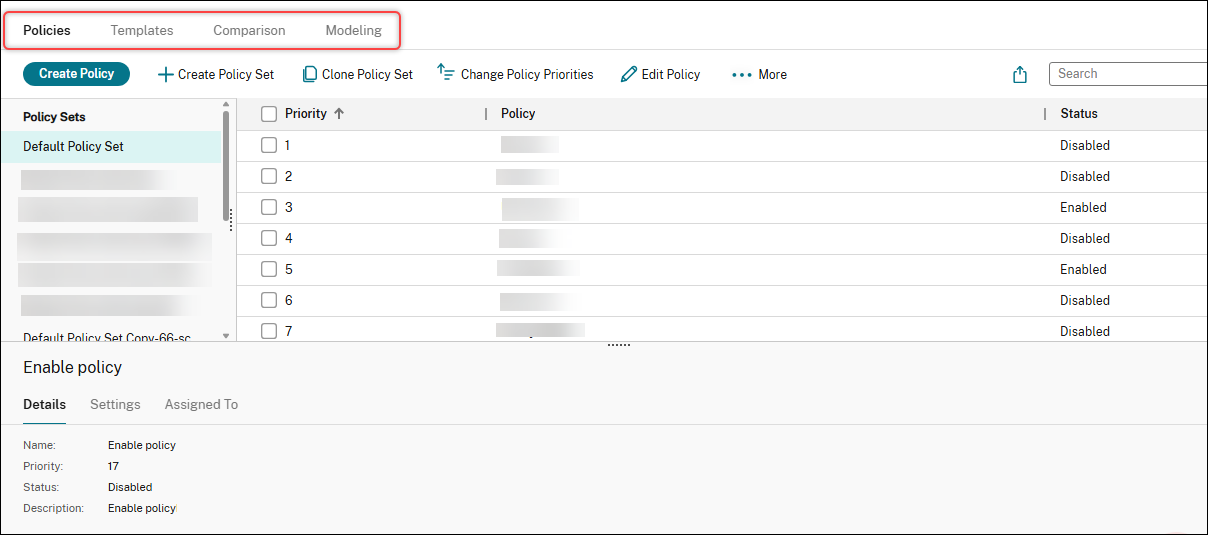
- The Policies tab lets you create and manage policy sets and policies. When you select a policy from a policy set, the following tabs appear:
- Overview – Displays the policy name, priority, status, and description.
- Settings – Lists all configured settings.
- Assigned To – Shows assigned delivery groups. You can edit or remove assignments. Policies are applied based on the delivery group of the desktop running the session. For details, see Create policies.
- The Templates tab lets you create policy templates and manage Citrix-provided and custom templates. When you select a template, the following tabs appear:
- Description – Explains the purpose of the template.
- Settings – Lists the configured settings. For details, see Create templates.
- The Comparison tab lets you compare settings in a policy or template with others. Use this feature to check for compliance or differences. For details, see Compare policies and templates.
- The Modeling tab lets you simulate connection scenarios and view effective policy results. For details, see Simulate and evaluate policies.
Policy configuration workflow
To configure Citrix policies using Web Studio, follow this workflow:
-
-
Configure policy settings.
Add and configure the settings required for your environment.
-
Assign the policy.
Assign the policy to the appropriate machine and user objects.
-
-
Arrange policies in priority order to determine which settings take precedence.
-
Use the Policy Modeling wizard to confirm the applied settings.
Share
Share
This Preview product documentation is Citrix Confidential.
You agree to hold this documentation confidential pursuant to the terms of your Citrix Beta/Tech Preview Agreement.
The development, release and timing of any features or functionality described in the Preview documentation remains at our sole discretion and are subject to change without notice or consultation.
The documentation is for informational purposes only and is not a commitment, promise or legal obligation to deliver any material, code or functionality and should not be relied upon in making Citrix product purchase decisions.
If you do not agree, select I DO NOT AGREE to exit.