使用脚本任务分析登录持续时间
较长的登录时间会降低用户的工作效率并导致糟糕的用户体验。 作为管理员,您可能希望获得登录时间的详细概述,以识别导致登录缓慢的过程,以便您可以采取相应的补救措施。
为了实现此目标,您可以使用脚本 analyzeLogonDuration.ps1。 它是一个 PowerShell 脚本,用于查询与登录过程相关的每个重大事件的事件日志。 该脚本具有以下优点以及更多优点:
- 它为您提供用户最近一次登录的登录时长细目。
- 它显示登录过程的所有主要连续阶段,并可以轻松查看哪个阶段正在减慢登录速度。
- 它可以让您检查一个阶段的结束和下一个阶段的开始之间是否存在延迟。
要了解更多好处,请访问 https://www.controlup.com/script-library-posts/analyze-logon-duration/。
工作区环境管理 (WEM) 为您提供了脚本任务功能,可自动为您运行脚本。 您需要做的就是配置一个脚本任务。 一般工作流程如下所示:
- 准备相关脚本.
- 当脚本任务被授予完全访问权限时,脚本的签名是强制性的。
- 添加脚本任务.
- 配置脚本任务.
- 查看任务执行报告.
准备相关脚本
准备一个包含以下两个脚本的 zip 文件:

-
analyzeLogonDuration.ps1。 您可以从 https://www.controlup.com/script-library-posts/analyze-logon-duration/获取此脚本。 -
runLogonDuration.ps1。 由于登录持续时间脚本需要域名和用户名,我们提供了一个包装脚本来将域和用户名传递给它。 比如我们提供了获取服务账户下的域名和用户名的方法。 但是,这个包装脚本需要一个用户会话。
在此示例中,脚本 runLogonDuration.ps1 包含以下内容:
  $User = tasklist /v /FI "IMAGENAME eq explorer.exe" /FO list | find "User Name:"
  $User = $User.Substring(14)
  $UserName = $User.Split("\")[1]
  $DomainName = "$env:userdomain\$UserName"
  &.\analyzeLogonDuration.ps1  -DomainUser $DomainUser
<!--NeedCopy-->
签署脚本
脚本任务需要以完全访问权限运行。 您需要为入口点脚本添加签名: runLogonDuration.ps1。 我们建议您使用官方证书,如果您有官方证书,您可以跳过 步骤 1 到 步骤 3。 如果您没有证书,您只能使用自签名 SSL 证书进行测试。 自签名 SSL 证书存在风险,因为它们没有经过第三方机构(通常是受信任的 SSL 证书公司)的验证。
步骤 1:创建自签名证书
- 以管理员身份打开 PowerShell。 右键单击 开始 按钮,然后选择
Windows PowerShell(管理员)或Windows 终端(管理员)。 - 使用
New-SelfSignedCertificatecmdlet 创建自签名证书。 指定证书的名称(友好名称)、有效期和用途(KeyUsage)等参数。
  $cert = New-SelfSignedCertificate -Type CodeSigningCert -DnsName "MyTestCertificate.com" -CertStoreLocation "cert:\LocalMachine\My" -NotAfter (Get-Date).AddYears(10) -KeyUsage DigitalSignature -FriendlyName "MyTestCertificate"
<!--NeedCopy-->
此命令创建一个有效期为一年的新证书并将其标记为 MyTestCertificate。 该证书存储在本地机器的个人存储中。
证书创建成功后,会显示以下详细信息:

第 2 步:导出自签名证书
如果需要,使用私钥导出证书。 要使用证书进行签名,您必须使用其私钥将其导出。 这对于在另一台机器上使用证书或保护密钥至关重要。 运行以下命令:
  $pwd = ConvertTo-SecureString -String "YourStrongPassword" -Force -AsPlainText
  Export-PfxCertificate -cert $cert -FilePath "C:\MyTestCertificate.pfx" -Password $pwd
<!--NeedCopy-->
用您选择的强密码替换 YourStrongPassword 。 此命令将证书导出到 .pfx 文件,其中包含私钥。
步骤3:安装证书
如果您已经导出证书并需要在同一台或不同的机器上安装它,您可以将其重新导入证书存储区。 将 *.pfx 文件复制到目标机器,然后使用 Import-PfxCertificate cmdlet。
  $pwd = ConvertTo-SecureString -String "YourStrongPassword" -Force -AsPlainText

  Import-PfxCertificate -FilePath "C:\MyTestCertificate.pfx" -CertStoreLocation "Cert:\LocalMachine\Root" -Password $pwd
<!--NeedCopy-->
步骤 4:使用证书对文件进行签名
如果使用官方证书,则需要输入正确的CN值。 在这个例子中,我们使用 MyTestCertificate.com。 要查找证书,请使用以下 cmdlet:
  $cert = ls Cert:\LocalMachine\Root| where {$_.subject -eq CN=MyTestCertificate.com"}
<!--NeedCopy-->
使用 Set-AuthenticodeSignature cmdlet 来签署 PowerShell 脚本或任何其他支持数字签名的文件。
  Set-AuthenticodeSignature -FilePath "C:\logonDuration\runLogonDuration.ps1" $cert -IncludeChain all -HashAlgorithm SHA1 -TimestampServer http://timestamp.digicert.com
<!--NeedCopy-->
此命令使用之前创建的证书将数字签名应用于 runLogonDuration.ps1 。
步骤5:验证签名
要验证文件是否已正确签名,可以使用以下命令:
  Get-AuthenticodeSignature -FilePath "C:\logonDuration\runLogonDuration.ps1"
<!--NeedCopy-->
如果脚本的签名有效,则会显示以下详细信息:

添加脚本任务
以下信息是对 添加脚本任务中指导的补充。 要创建分析登录持续时间的任务,请遵循该文章中的一般指导,并注意以下详细信息。
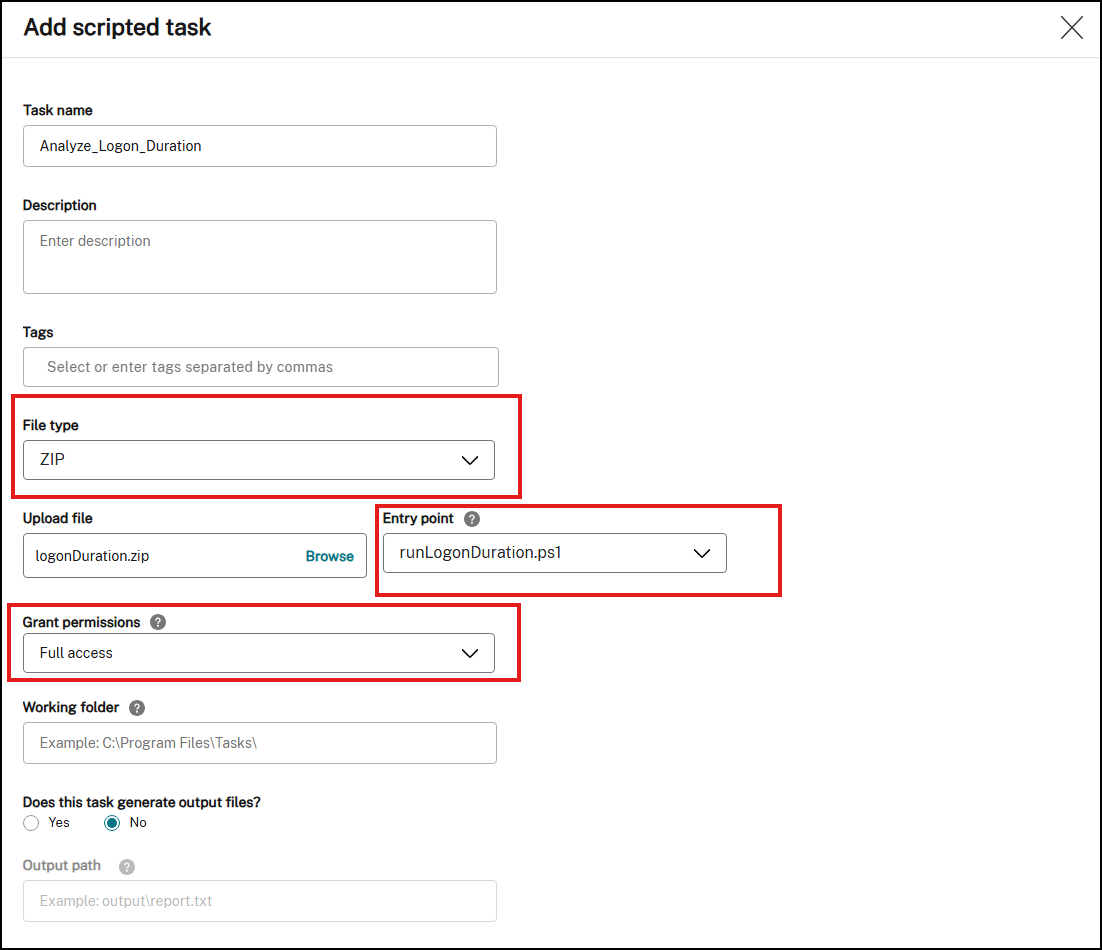
在 Web 控制台 > 脚本任务中,添加如下任务:
-
对于 文件类型,选择 ZIP。
-
创建一个包含以下两个脚本的 zip 文件。
analyzeLogonDuration.ps1runLogonDuration.ps1
-
浏览到 zip 文件进行上传,并将脚本
runLogonDuration.ps1设置为入口点。 -
授予权限 选项旨在增加额外的安全层,以防止来自不受信任的脚本的攻击,否则可能会带来安全风险。 Analyze_Logon_Duration 任务必须以完全访问权限运行。
配置脚本任务
以下信息是对配置脚本化任务中的指南的补充。 要配置 Analyze_Logon_Duration 任务,请按照该文章中的一般指导进行操作,并注意以下详细信息。
-
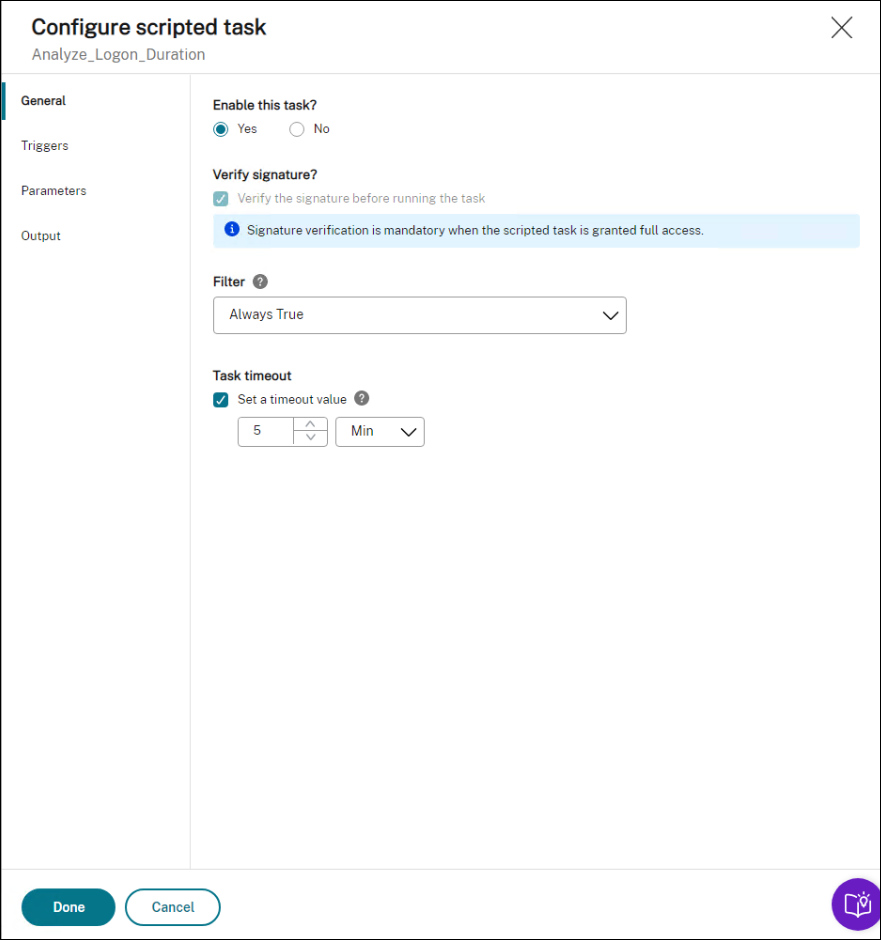
转到相关配置集,导航到 Scripted Task Settings,并在 General 中配置 Analyze_Logon_Duration 任务,如下所示:
- WEM 让您决定是否在运行任务之前验证签名。 当脚本任务被授予完全访问权限时,必须进行签名验证。 这可以保护脚本不被泄露,从而确保安全。 过滤器 和 任务超时 设置是可选的。
-
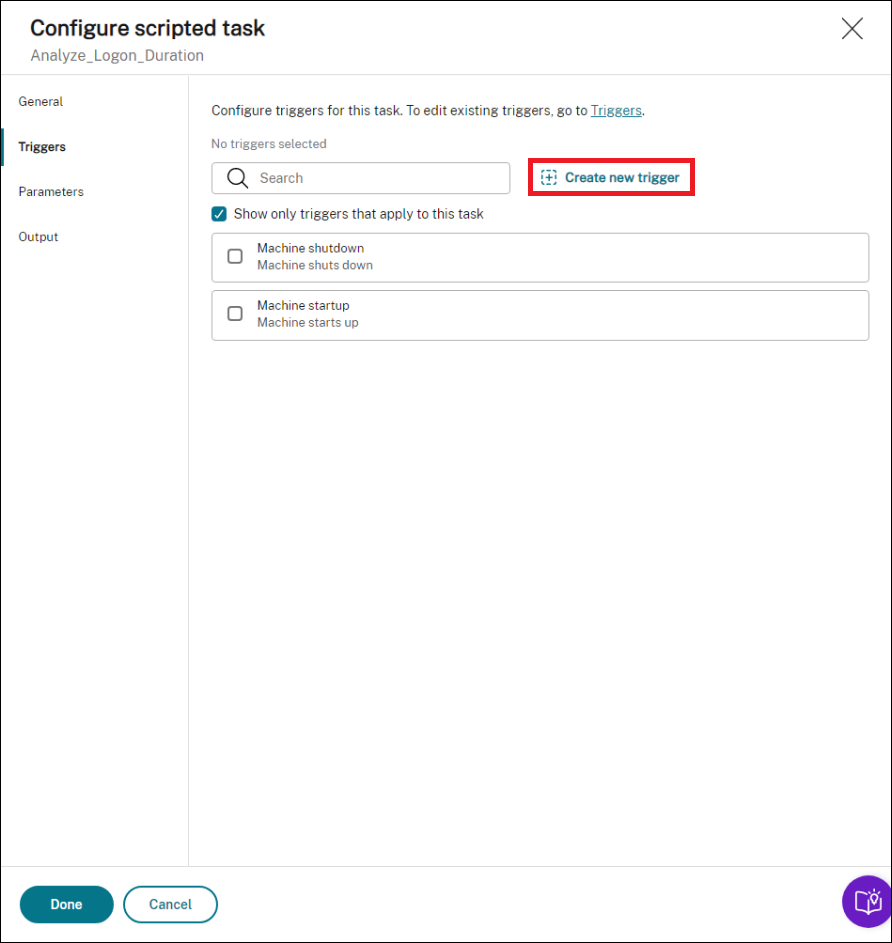
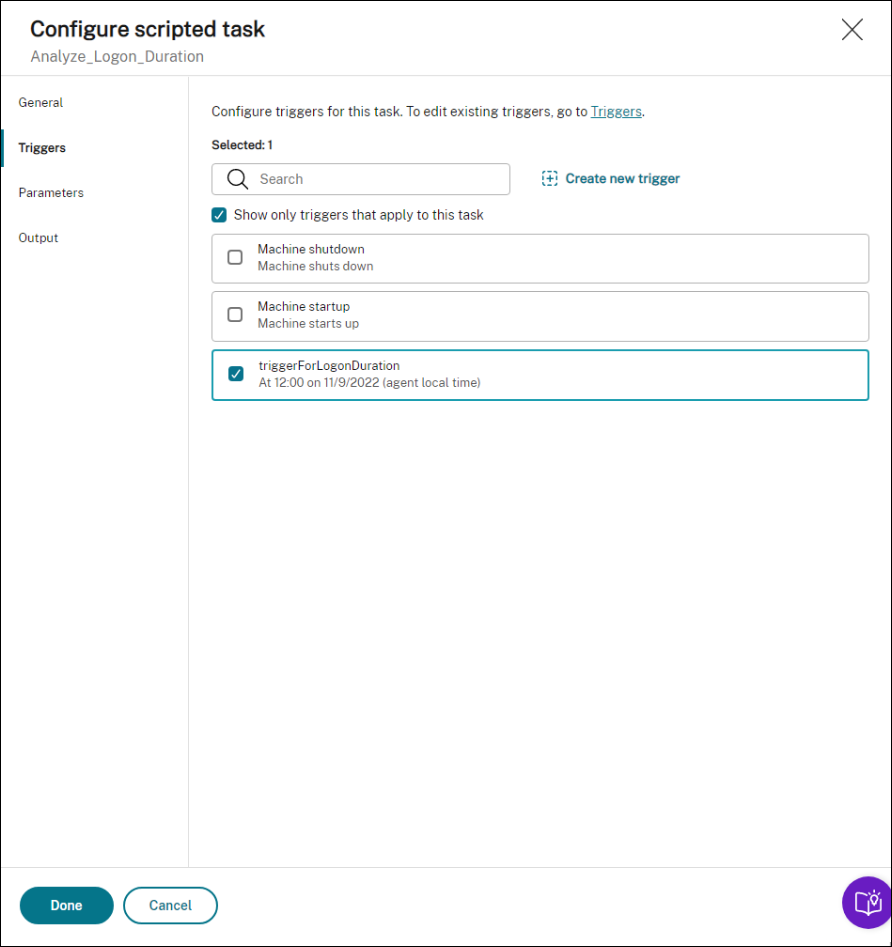
在 触发器中,为任务配置触发器。
-
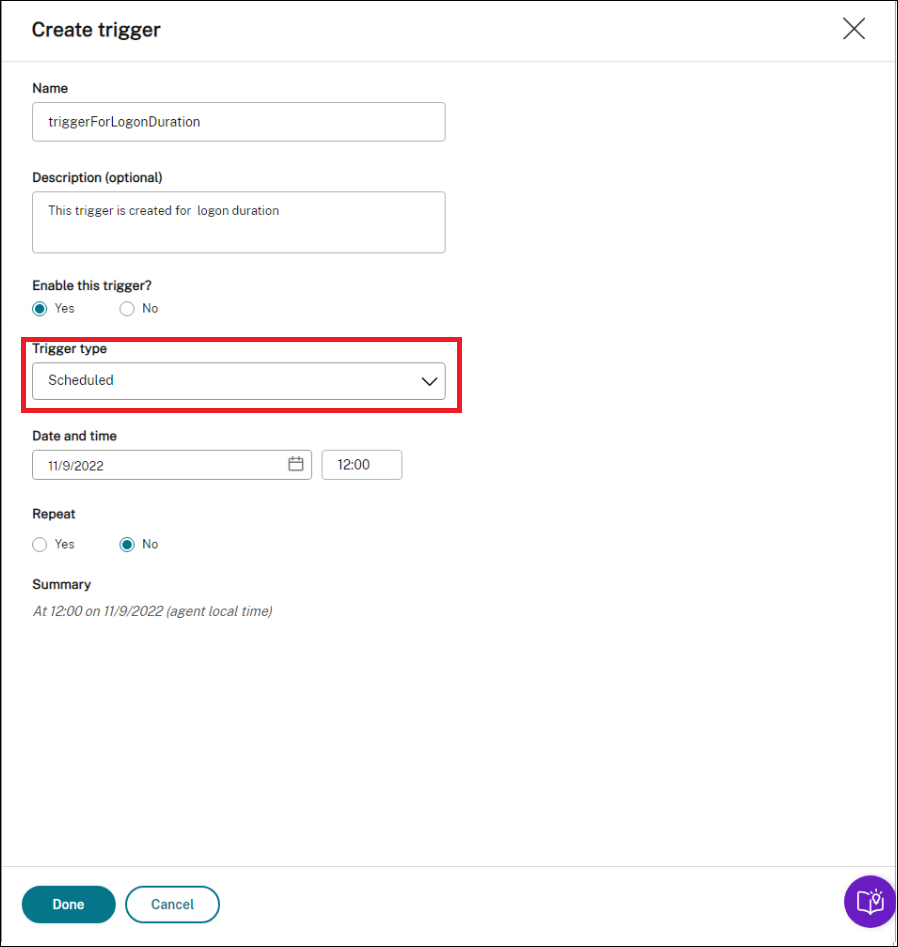
使用触发器来控制何时运行任务。 例如,您可以创建一个“计划”触发器来安排任务的运行,然后将触发器与任务关联起来。
-
-
在 参数中,选择是否将参数传递给任务。 在这个例子中,您可以跳过这一步。
-
在 输出中,配置设置如下。 设置正则表达式值:
  ((?<Key>[a-zA-Z]+\s+)+(?<value>\d+.\d+)\s)
<!--NeedCopy-->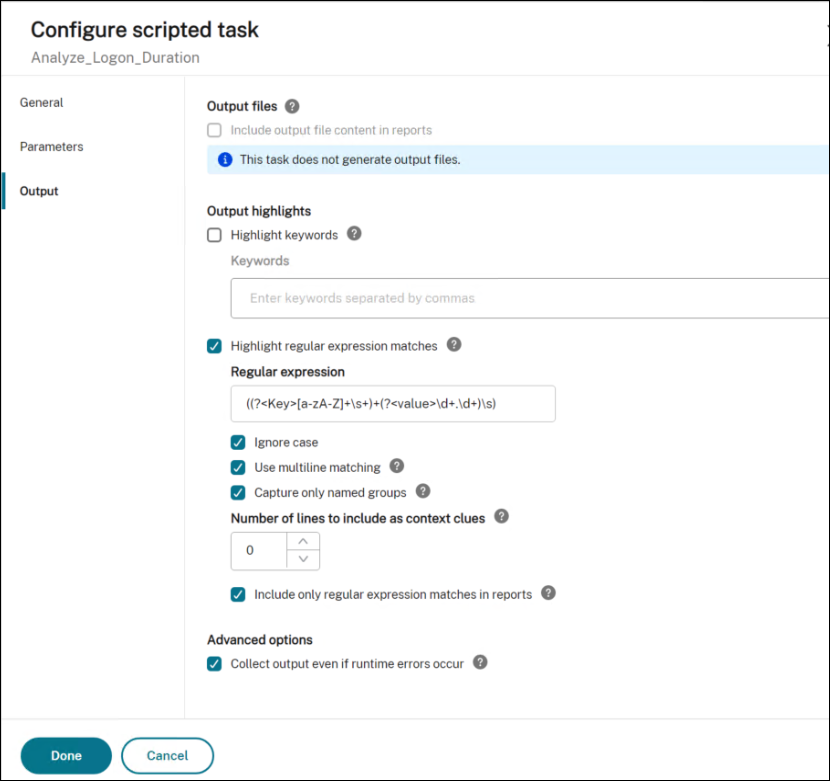
查看任务执行报告
任务成功运行后,您可以通过检查报告来查看结果。 有关详细信息,请参阅 报告。 在此示例中,您可以看到以下报告:
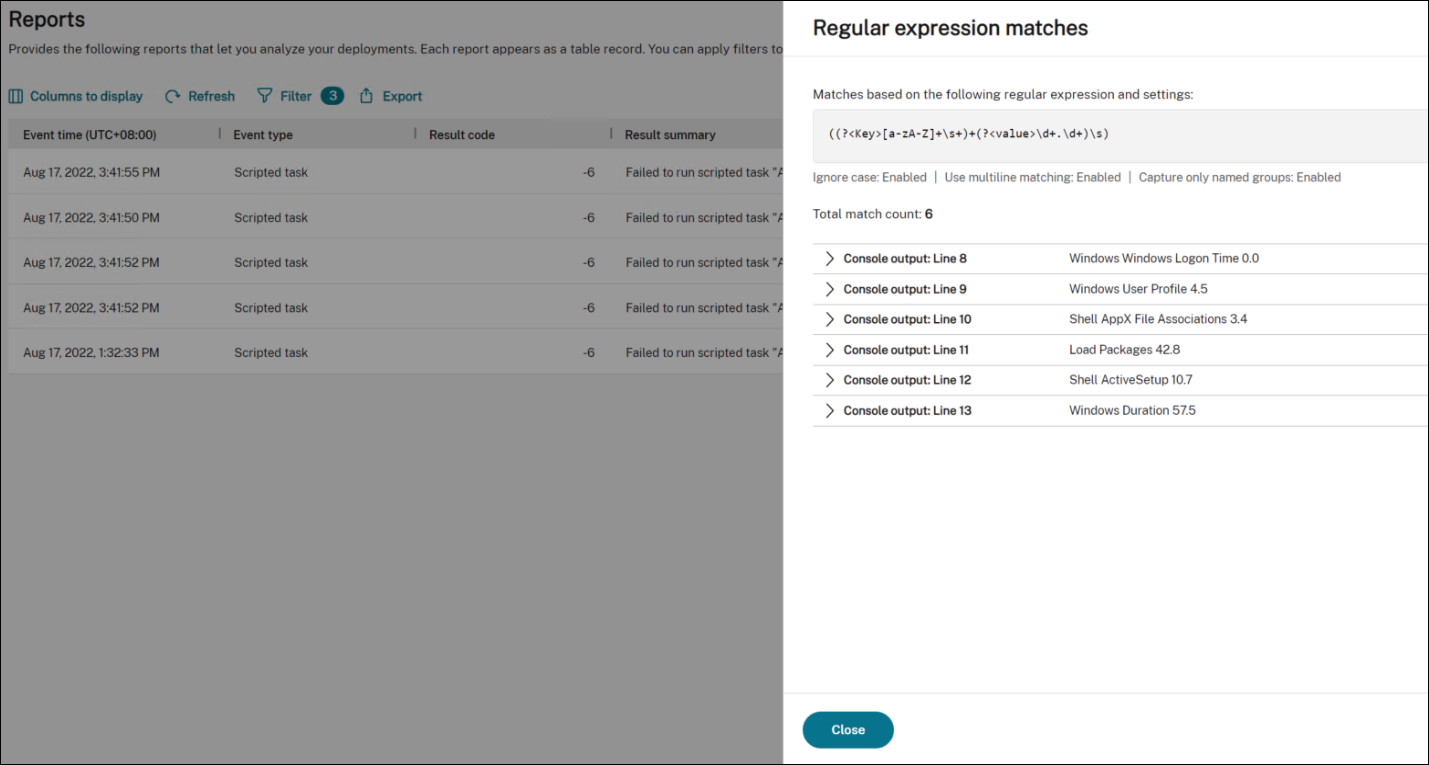
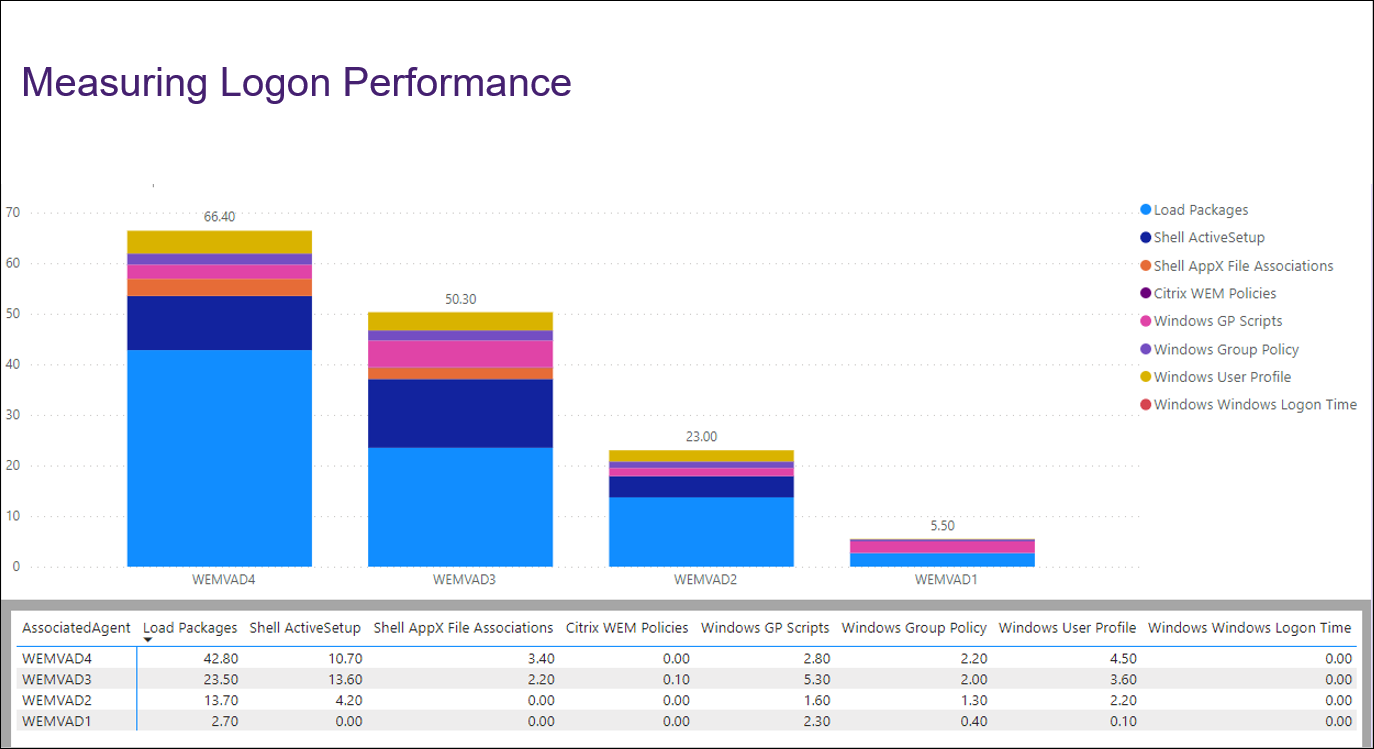
您可以使用过滤器将视图缩小到相关报告,然后将其导出。 有关导出报告的信息,请参阅 导出报告。 基于导出的数据,您可以进行进一步的分析。
以下是在 Power BI 中可视化感兴趣的数据的示例。 它显示用户登录时长的细目分类。
提示:
登录性能优化是工作区环境管理服务的亮点之一。 该功能可以改变整个登录过程,大幅减少登录时间。 参见 登录优化。