Get started
This article walks you through the process of setting up the Citrix ITSM Adapter service.
Preparations
To set up the ITSM Adapter service, make sure you have the following things ready:
-
An account with system administrator permission to your ServiceNow instance
After the service is set up, you can implement role-based access control on it. For more information, see Access management.
-
An active subscription to Citrix DaaS
You can also sign up for a free trial. For more information, see Verify you’ve subscribed to Citrix DaaS.
-
A Citrix Cloud administrator account with Full access
-
Connectivity between your ServiceNow instance and the IP address of the region where your Citrix Cloud account is located
Citrix Cloud region IP address US 52.158.218.132/30 EU 20.54.214.12/30 Asia Pacific 20.195.2.68/30 Japan 20.46.176.104/30
Verify you’ve subscribed to Citrix DaaS
Sign in to Citrix Cloud or sign up for a new account.
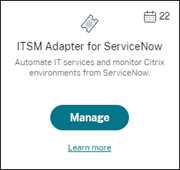
If you have an active subscription to Citrix DaaS or signed up for a free trial, the ITSM Adapter service appears in the My Services list. Otherwise, check with your Citrix representatives.
Tip:
The Manage button is available only when your organization has the valid subscription to Citrix DaaS Premium Edition. Before that, Request Demo is displayed.
Step 1: Install the Citrix ITSM Connector plug-in in ServiceNow
Install the Citrix ITSM Connector plug-in on your ServiceNow instance.
-
Sign in to your ServiceNow Service Management Portal using an account assigned with the
system administratorrole. -
Install the Citrix IT Service Management Connector plug-in for your ServiceNow instance:
-
In the left pane, select All Available Applications > All. To quickly locate the menu, type Applications in the Filter navigator field.
-
On the All applications page that appears, search for Citrix in the search bar.

-
In the search results, locate Citrix IT Service Management Connector, and then click Install.
-
Follow the onscreen instructions to complete the installation.
Note:
To verify you download the latest version of the Citrix ITSM connector plug-in, click Other App Versions.
-
Step 2: Configure the Citrix ITSM Connector plug-in
Configure the plug-in to set up its connection with Citrix Cloud.
Steps:
- Create the authentication credentials in Citrix Cloud.
- Add the authentication credentials to the plug-in.
Starting with the ITSM Adapter service version 22.3.0, a single ServiceNow instance can manage apps and desktops in multiple Citrix Cloud accounts.
Create the authentication credentials in Citrix Cloud
To communicate with Citrix Cloud, the Citrix ITSM connector plug-in must have the authentication credentials that the Citrix Cloud generates. You can configure one of the following credentials for the plug-in authentication:
- Secure clients
- Service principals (preview)
Create the authentication credentials in each Citrix Cloud account that you want to manage.
Create a secure client
The detailed steps are as follows:
-
Sign in to Citrix Cloud, and then select the Citrix Cloud account you want to manage.
-
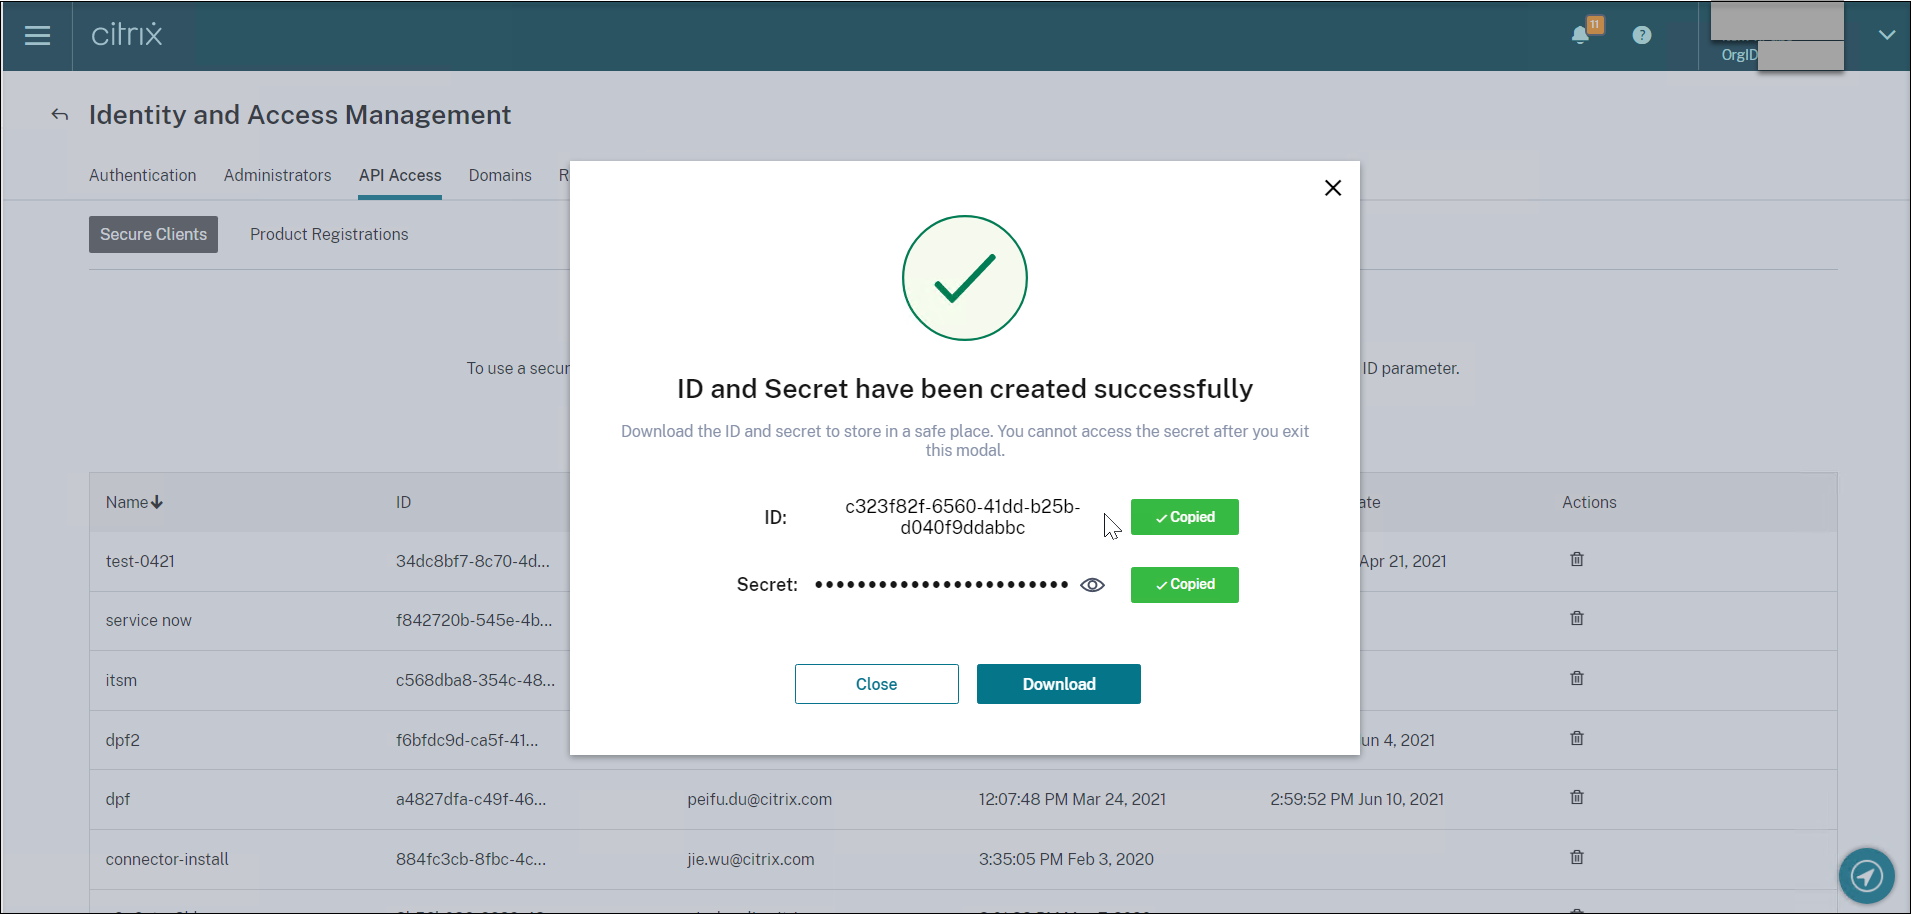
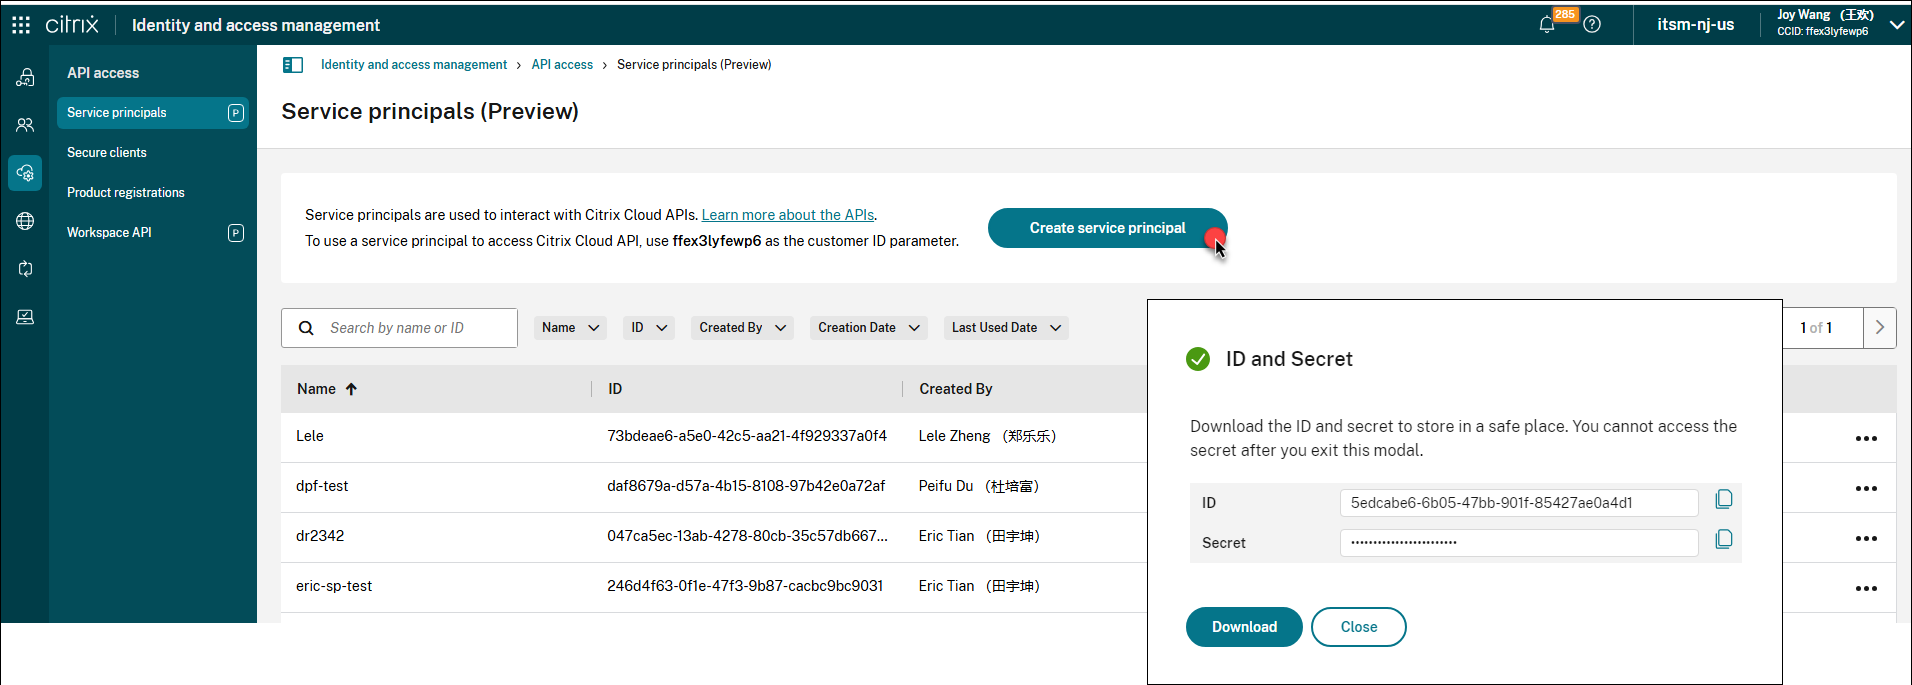
Create a Secure client or a Service principal for the Citrix ITSM connector plug-in. For more information, see Get started with Citrix Cloud APIs.
-
Store the ID and Secret in a safe place.
-
If you have more Citrix Cloud accounts to manage, repeat steps 1–3 for each.
Add the authentication credentials to the plug-in
After you create the authentication credentials (either Secret client or Service Principal) in your Citrix Cloud account, add them to the ITSM Connector plug-in. The plug-in uses the credentials to set up the connection with Citrix Cloud.
-
Sign in to your ServiceNow Service Management Portal.
-
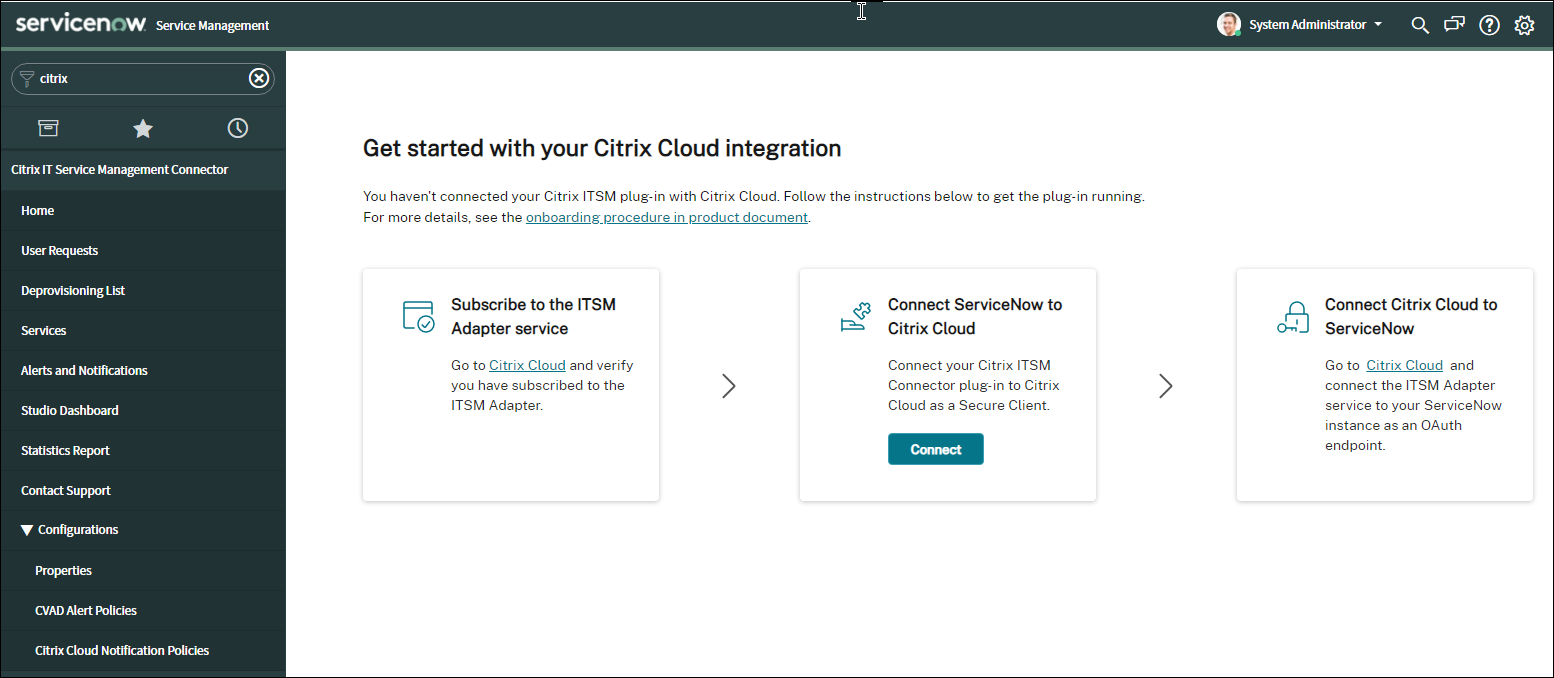
In the left pane, select Citrix IT Service Management Connector > Home.
-
On the Get started with your Citrix Cloud integration page that appears, click Connect.
-
In the Citrix Cloud Authentication dialog that appears, specify the following information:
- Citrix Deployment: For regions other than Citrix Cloud Japan, select Citrix Cloud.
- Customer ID: Type the CCID of your Citrix Cloud account.
- Service Principal ID / Secure Client ID and Service Principal Secret / Secure Client Secret: Type the pair of ID and Secret that you created in your Citrix Cloud account. For more information, see Create the authentication credentials in Citrix Cloud.
-
Click Test to test the connection to your Citrix Cloud account.
-
Save the configuration.
An acknowledgment from ServiceNow appears, indicating that the connection is up and running.

-
If you have more Citrix Cloud accounts to manage, follow these steps for each:
- Click Add customer.
- Repeat steps 4–6.
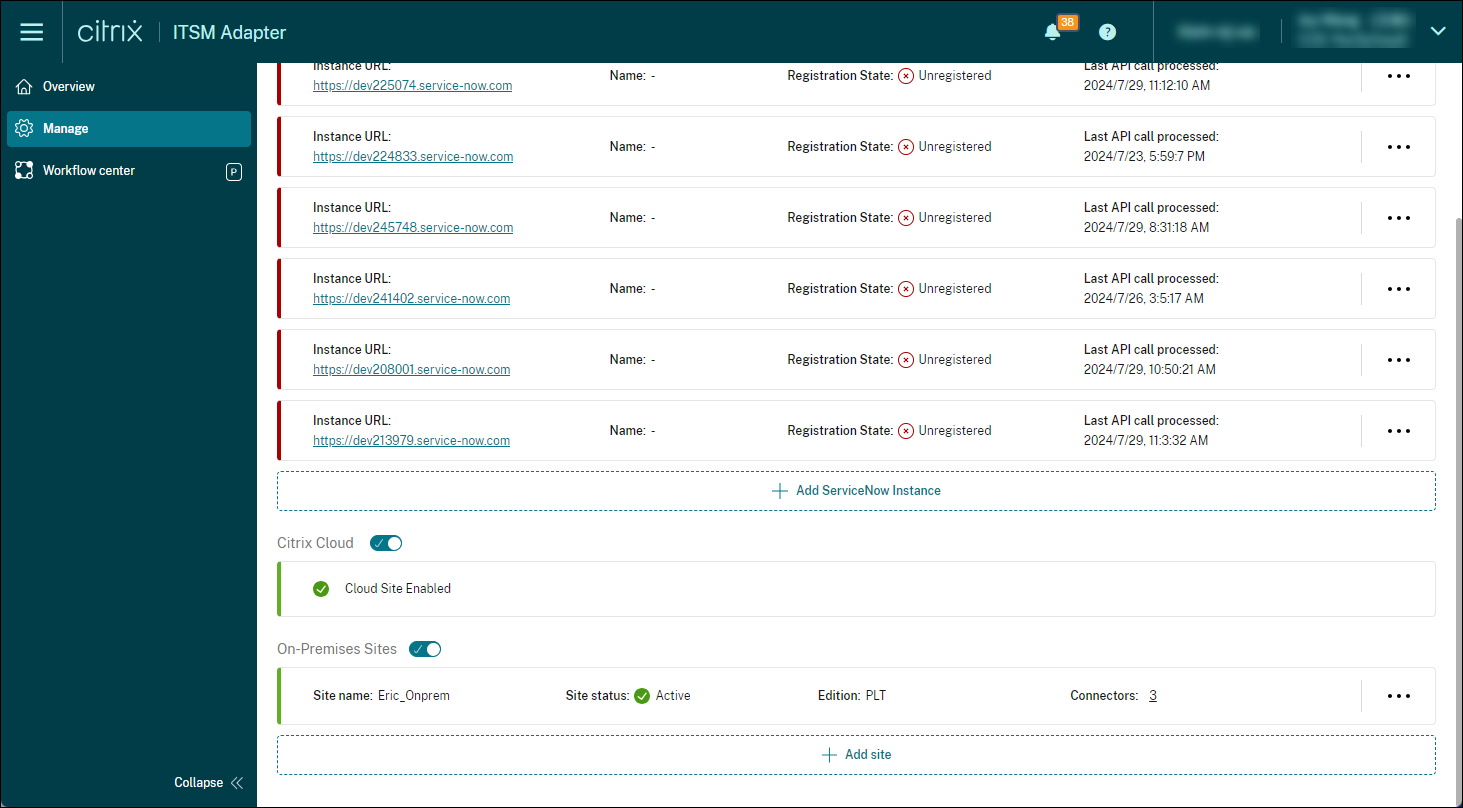
After the configuration completes, the ServiceNow instance automatically connects to Citrix Cloud using the provided authentication credentials. When you sign in to Citrix Cloud and go to the ITSM Adapter for ServiceNow > Manage page, you can see all instances that have set up connections with Citrix Cloud.
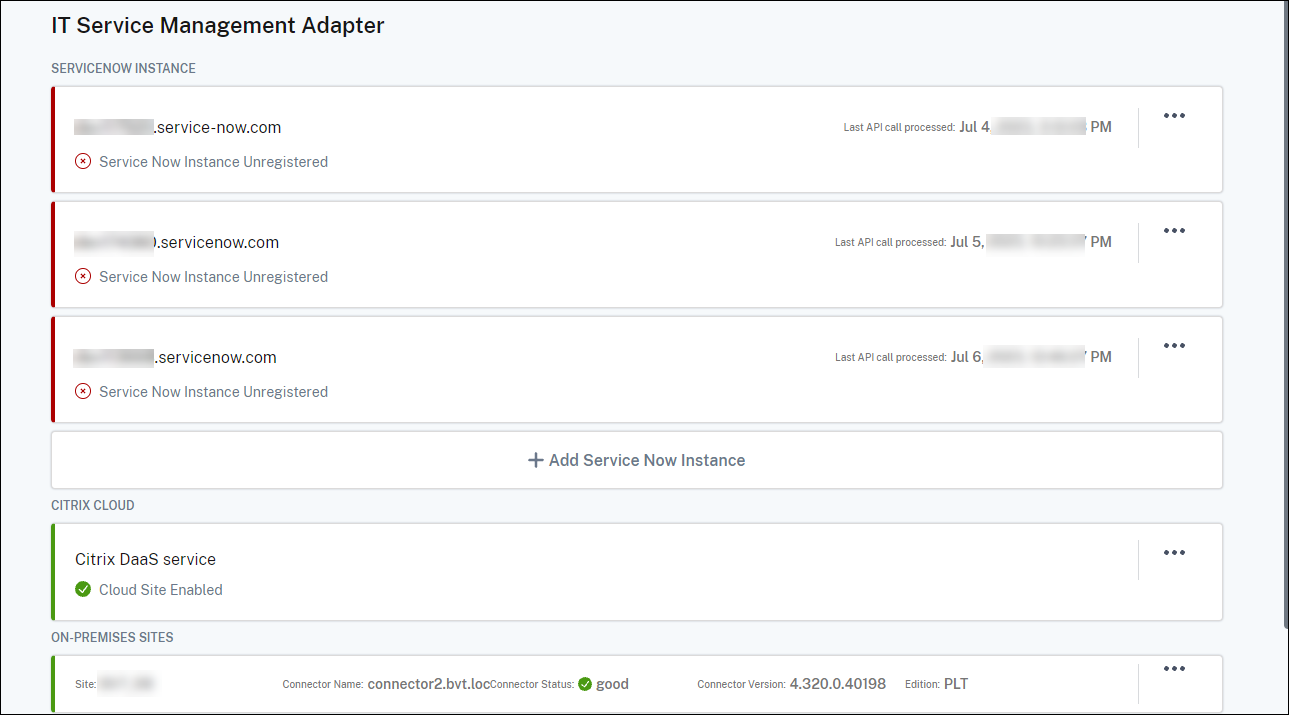
Those instances are in Unregistered status, indicating that Citrix Cloud hasn’t registered with them.
Decommission a Citrix account
To decommission a Citrix Cloud account from your ServiceNow instance, sign in to your ServiceNow Service Management Portal, on the Citrix IT Service Management Connector > Home page, click the ellipsis, and then click Decommission.
Note:
To completely remove Citrix ITSM data for a Citrix Cloud account, decommission the account. Manually deleting or editing an account might leave residual data in your environment.
Step 3: Register Citrix Cloud with your ServiceNow instance
To enable Citrix Cloud to send alerts and notifications to your ServiceNow instance, register Citrix Cloud with your ServiceNow instance by providing the following details:
-
URL of your ServiceNow instance
-
Authentication credentials that your ServiceNow instance generates
Starting with the ITSM Adapter service version 22.3.0, a single ServiceNow instance can manage multiple Citrix Cloud accounts. If you have multiple Citrix Cloud accounts to manage, add your ServiceNow information to each.
Steps:
-
Sign in to Citrix Cloud, and then select the Citrix Cloud account you want to manage.
-
Click the DaaS button on the top right. The DaaS home page appears.
-
In the left pane, scroll down and select ITSM Adapter. The ITSM Adapter home page appears.
-
In the left pane, select Manage. All instances that have established connections with Citrix Cloud appear.
-
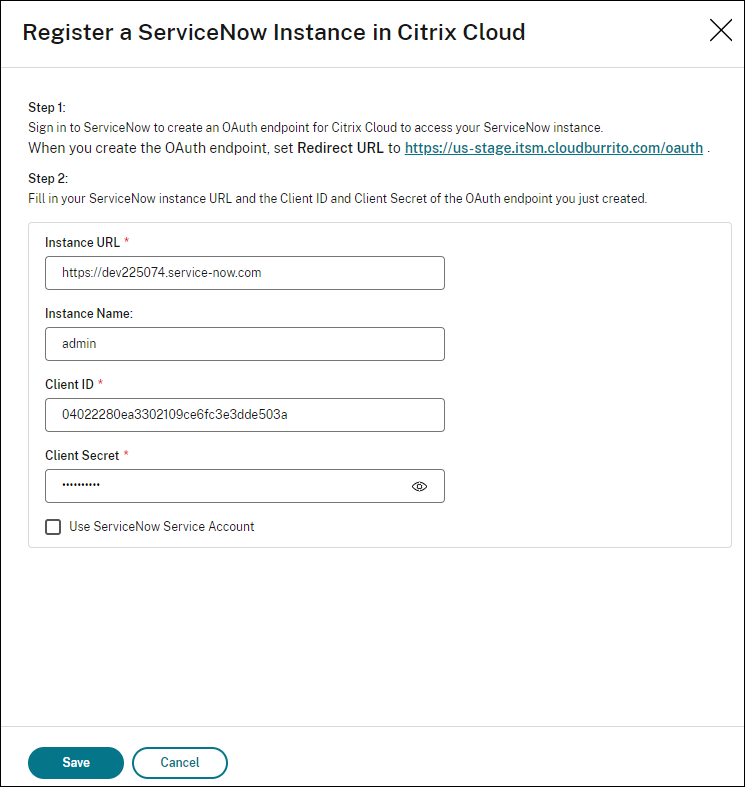
Locate the ServiceNow instance that you want to register with, and then select Register from the ellipsis menu. The following page appears with the URL of the ServiceNow instance automatically filled.
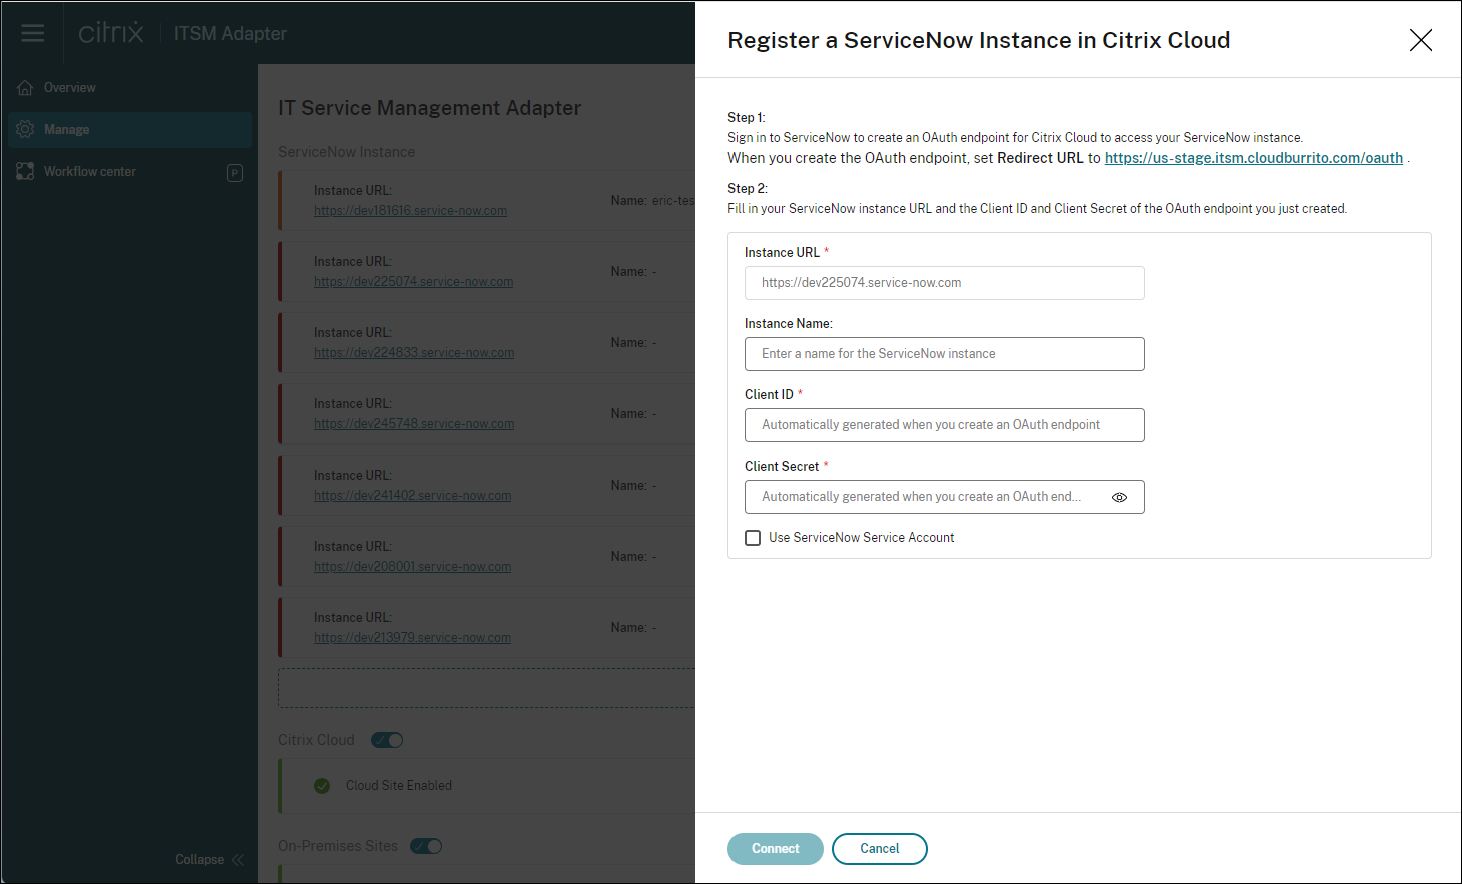
Alternatively, you can click Add ServiceNow Instance to start the registration.
-
Follow the onscreen instructions to have ServiceNow generate an OAuth endpoint for the Citrix Cloud account:
- Copy the Redirect URL provided in the instructions.
- Open a new tab in your browser to access your ServiceNow Service Management Portal.
- In the Portal, create an OAuth endpoint for the Citrix Cloud account. You must enter the Redirect URL copied in step
awhen creating the endpoint. For more information, see Create an OAuth Endpoint for a Citrix Cloud account.
-
Return to the tab that has the Register a ServiceNow Instance in Citrix Cloud dialog open and enter the required OAuth credentials:
- (Optional) Enter a descriptive name for the ServiceNow instance.
- Enter the OAuth endpoint details (Client ID and Client Secret) generated in step 5.
-
To use a ServiceNow service account for ServiceNow login and registration authorization, select Use ServiceNow Service Account, enter the service account’s user ID and password, and then click Validate to verify the service account credentials.
Note:
You can use a ServiceNow service account assigned with the
x_cion_citrix_it_s.ctx_itsm_adminrole to complete the validation. To enable ServiceNow to generate incidents for alerts and notifications from Citrix Cloud, make sure that this service account is also assigned the necessaryincident_managerrole.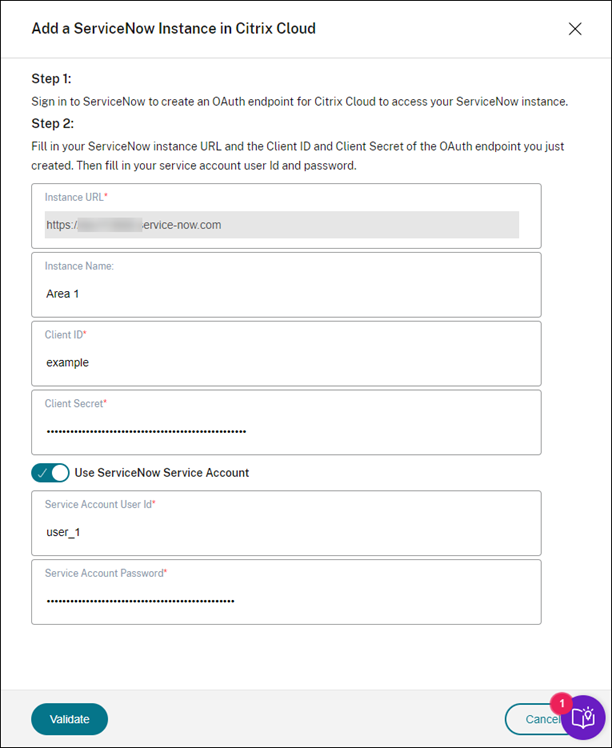
-
To use a ServiceNow user account for ServiceNow login and registration authorization, keep Use ServiceNow Service Account cleared and complete the following steps:
Note:
To complete this task, you can use a ServiceNow user account assigned with the
x_cion_citrix_it_s.ctx_itsm_adminrole. To enable ServiceNow to generate incidents for alerts and notifications from Citrix Cloud, make sure that this user account is also assigned the necessaryincident_managerrole.-
Click Connect. Your ServiceNow instance login page appears.
-
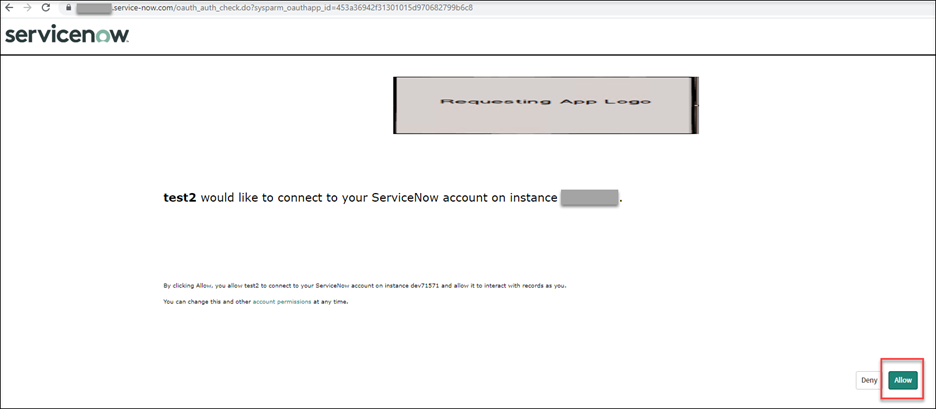
Type the user name and password of the ServiceNow user account, and then click Log in. A page appears, requesting your permission for the ITSM Adapter service to connect to this ServiceNow account in your ServiceNow instance.
-
Click Allow. You’re taken back to the Register a ServiceNow Instance in Citrix Cloud dialog.
-
Note:
Data sent from Citrix DaaS to ServiceNow through the OAuth endpoint-authenticated channel is stored in the ServiceNow database. The corresponding database records clearly indicate that they were created by the account that you used for ServiceNow login and registration authorization.
-
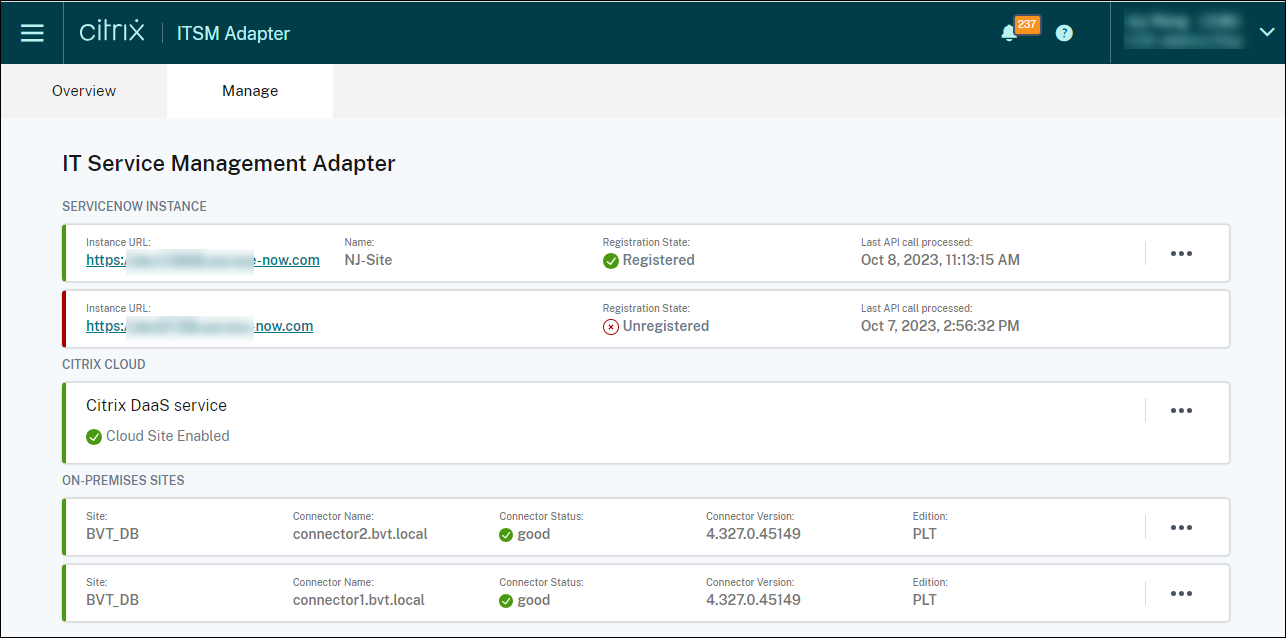
Click Save. The ITSM Adapter service starts testing the connections with the Citrix ITSM connector. If the test completes successfully, the status of the instance changes to Registered.
Tip:
If the instance status appears as ServiceNow Instance Unauthorized, check for expired OAuth credentials and reauthenticate if needed by selecting Reauthenticate from the ellipsis menu.
-
If you have more Citrix Cloud accounts to manage, repeat steps 1–7 for each.
After you complete the preceding steps successfully, IT help desks and end users can now access the Citrix ITSM services.
Register with a different ServiceNow instance
A Citrix Cloud account can be registered only with one ServiceNow instance. To register it with a different ServiceNow instance, first unregister the existing one.
- On the Manage page of the ITSM Adapter service, click the ellipsis next to the existing ServiceNow instance.
- Select Unregister.
- To register Citrix Cloud with a different ServiceNow service instance, locate the instance record and then select Register from the ellipsis.
- Follow the onscreen instructions to complete the procedure.
Create an OAuth Endpoint for a Citrix Cloud account
In your ServiceNow instance, create an OAuth Endpoint (including a Client ID and a Client Secret) for a Citrix Cloud account.
Steps:
-
Sign in to your ServiceNow Service Management Portal.
-
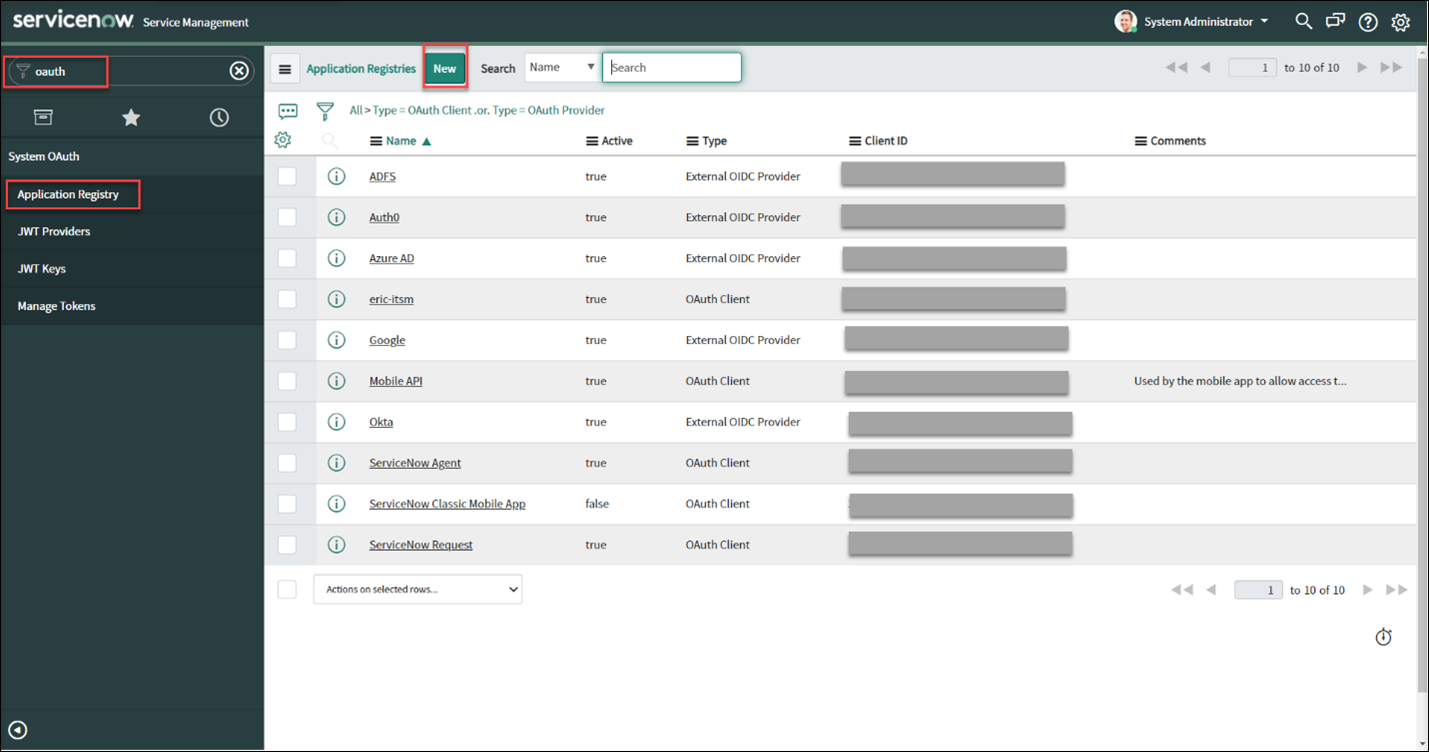
In the left pane, select System OAuth > Application Registry. To quickly locate the menu, type oauth in the Filter navigator field.
-
On the Application Registries page, click New next to Application Registries.
-
On the OAuth application page that appears, select Create an OAuth API endpoint for external clients.
-
On the Application Registries New record page that appears, create an OAuth endpoint:
- Type a name for the OAuth endpoint.
- Click the lock icon next to the Redirect URL field, and then type the Redirect URL that was prompted in the Add a ServiceNow Instance in Citrix Cloud dialog.
- Click Submit.
-
On the Application Registries page that appears, locate the OAuth endpoint that you created.
-
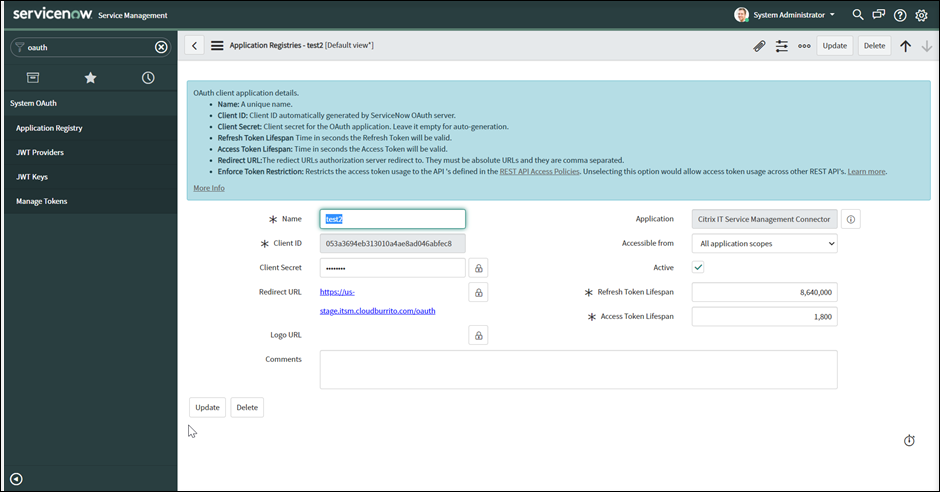
Click the OAuth endpoint name to open its detail page.
-
Store the Client ID and Client Secret.
-
Return to the Citrix Cloud console to continue the remaining steps.
Step 4: (Optional) Add on-premises sites to Citrix Cloud for management
If you have on-premises sites and want to manage their resources (such as sessions and machines) using ServiceNow ITSM workflows, follow these steps:
-
Sign in to Citrix Cloud and select your Citrix Cloud account.
-
Create resource locations for your on-premises sites and install Cloud Connectors on each location following the onscreen instructions.
For more information, see Cloud Connector Installation.
-
Add those on-premises sites to the ITSM Adapter service by completing the following steps:
-
On the ITSM Adapter for ServiceNow tile, click Manage. The ITSM Adapter page appears.
-
On the Manage menu, turn the Enable on-premises sites option on.
-
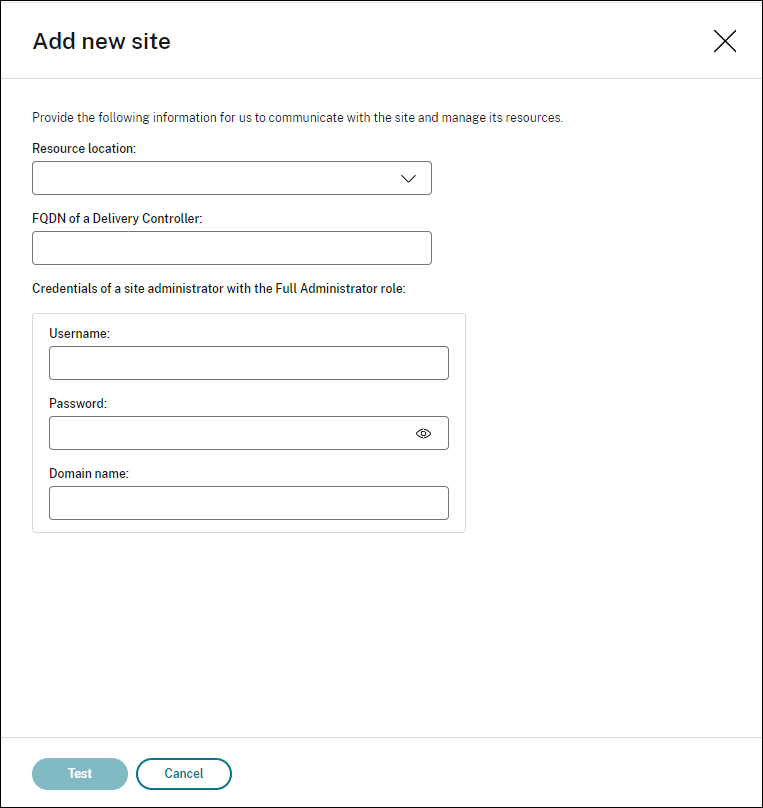
Click Add site. The Add site page appears.
-
Enter the following information for a site that you want to manage:
- Select the resource location where this site resides.
- Type the FQDN of a Delivery Controller in this site.
- Type the credentials of a site administrator with the Full Administrator role, including the user name, password, and domain name.
-
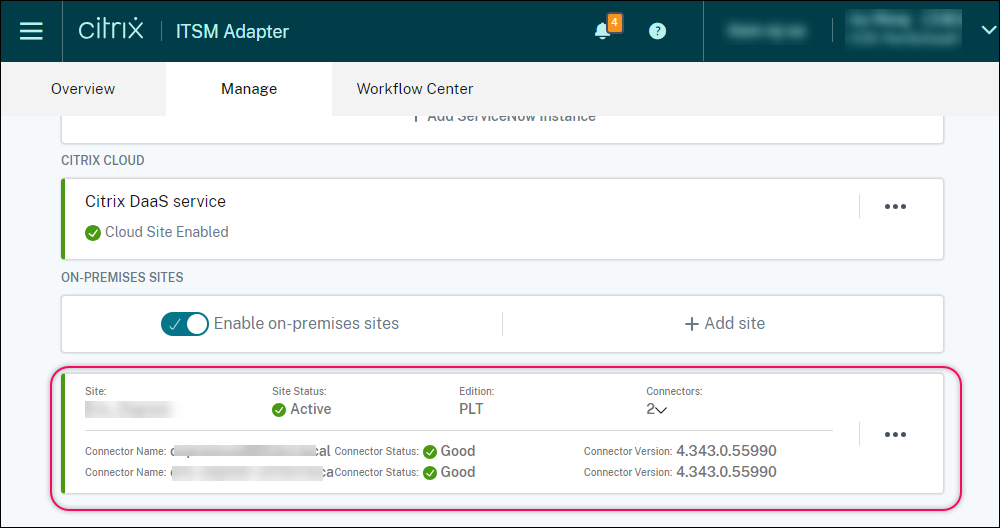
Click Test. The connectivity test begins. When it completes successfully, the Cloud Connectors in the selected resource location appear, as shown in the following screenshot.
-
Repeat steps c–e to add the remaining on-premises sites.
-