Citrix Analytics 服务
如果您是监视程序客户,并且具有本地 StoreFront 部署,则可以配置 StoreFront,以便将数据发送到监视程序中的 Citrix Analytics 服务。配置后,Citrix Workspace 应用程序和 Web 浏览器会将用户事件发送到 Citrix Analytics 进行处理。Citrix Analytics 聚合有关用户、应用程序、端点、网络和数据的衡量指标,以全面了解用户行为。要在 Citrix Analytics 文档中阅读有关此功能的信息,请参阅使用 StoreFront 载入 Virtual Apps and Desktops 站点。
要配置此行为,请执行以下操作:
- 从 Citrix Analytics 下载配置文件。
- 使用 PowerShell 将 Citrix Analytics 数据导入到本地 StoreFront 部署中。
配置 StoreFront 后,当 Citrix Analytics 服务请求时,Citrix Workspace 应用程序可以从 StoreFront 应用商店发送数据。
重要:
您的 StoreFront 部署必须能够联系 Citrix API 服务。请参阅分析网络要求。
从 Citrix Analytics 下载配置文件
重要:
初始配置需要包含敏感信息的配置文件。下载后保持文件安全。请勿与组织外部的任何人共享此文件。配置后,可以删除此文件。如果需要在另一台计算机上重新应用配置,可以从 Citrix Analytics 服务管理控制台重新下载该文件。
- 使用管理员帐户登录到监视程序 (
https://citrix.cloud.com/)。 - 选择一个监视程序客户。
-
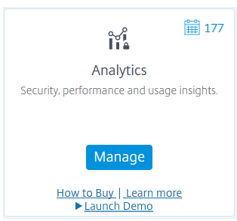
单击管理打开 Citrix Analytics 服务管理控制台。

- 在 Citrix Analytics 服务管理控制台中,选择设置 > 数据源。
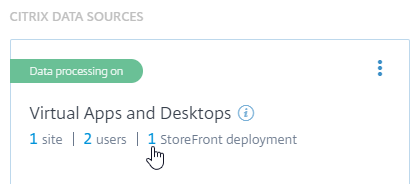
- 在“Virtual Apps and Desktops”卡中,选择 (⋮) 菜单图标,然后选择连接 StoreFront 部署。
- 在“连接 StoreFront 部署”页面上,选择下载文件以下载 StoreFrontConfigurationFile.json 文件。
示例配置文件
{
  "customerId": "<yourcloudcustomer>",
  "enablementService": " https://api.analytics.cloud.com /casvc/<yourcloudcustomer>/ctxana/v1/cas/<yourcloudcustomer>/XenDesktop/<deviceid>/dsconfigdata",
  "cwsServiceKey": "PFJTPn…….. T4=",
  "enablementServiceStatus": " https://api.analytics.cloud.com /casvc/<yourcloudcustomer>/ctxana/v1/cas/storefront/config",
  "instanceId": "d98f21d0-56e0-11e9-ba52-5136d90862fe",
  "name": "CASSingleTenant"
}
<!--NeedCopy-->
其中
customerId 是当前监视程序客户的唯一 ID。
cwsServiceKey 是标识当前监视程序客户帐户的唯一键。
instanceID 是生成的 ID,用于对从 Citrix Workspace 应用程序发送到 Citrix Analytics 的请求进行签名(确保安全)。如果您向监视程序注册多个 StoreFront 服务器或服务器组,则每个服务器或服务器组都具有唯一的 instanceID。
将 Citrix Analytics 数据导入到 StoreFront 部署中
- 将 StoreFrontConfigurationFile.json 文件复制到本地 StoreFront 服务器(或 StoreFront 服务器组中的一个服务器)上的合适的文件夹。以下命令假定该文件保存到桌面。
- 打开 PowerShell ISE 并选择以管理员身份运行。
-
运行以下命令:
Import-STFCasConfiguration -Path "$Env:UserProfile\Desktop\StoreFrontConfigurationFile.json" Get-STFCasConfiguration <!--NeedCopy--> -
此命令返回导入数据的副本,并在 PowerShell 控制台中显示该数据。

注意:
安装在 Windows Server 2012 R2 上的本地 StoreFront 服务器可能需要手动安装 C++ 运行时软件组件,以便它们可以注册到 CAS。如果在安装 Citrix Virtual Apps and Desktops 期间安装了 StoreFront,则不需要执行此步骤,因为 CVAD Metainstaller 已安装 C++ 运行时组件。如果仅使用未安装 C++ 运行时的 CitrixStoreFront-x64.exe Metainstaller 安装了 StoreFront,则在导入 CAS 配置文件后,它可能无法注册到监视程序。
将 Citrix Analytics 数据传播到 StoreFront 服务器组
如果要对 StoreFront 服务器组执行这些操作,则必须将导入的 Citrix Analytics 数据传播到服务器组的所有成员。在单个 StoreFront 服务器部署中不需要执行此步骤。
要传播数据,请使用以下方法之一:
- 使用 StoreFront 管理控制台。
- 使用 PowerShell cmdlet Publish-STFServerGroupConfiguration。
检查 StoreFront 服务器组 ID
要检查您的部署是否已成功注册到 Citrix Analytics 服务,可以使用 PowerShell 来发现部署的 ServerGroupID。
- 登录到您的 StoreFront 服务器或服务器组中的一台 StoreFront 服务器。
- 打开 PowerShell ISE 并选择以管理员身份运行。
-
运行以下命令:
$WebConfigPath = "C:\Program Files\Citrix\Receiver StoreFront\Framework\FrameworkData\Framework.xml"
$XMLObject = (Get-Content $WebConfigPath) -as [Xml]
$XMLObject.framework.properties.property
<!--NeedCopy-->
例如,这些命令生成如下所示的输出:
name value
---- -----
ClusterId 8b8ff5c8-44ba-46e4-87f0-2df8cff31432
HostBaseUrl https://storefront.example.com/
SelectedIISWebSiteId 1
AdminConsoleOperationMode Full
<!--NeedCopy-->
停止从 StoreFront 向 Citrix Analytics 发送数据
- 打开 PowerShell ISE 并选择以管理员身份运行。
-
运行以下命令:
Remove-STFCasConfigurationGet-STFCasConfiguration如果以前导入的 Citrix Analytics 数据已被成功删除,Get-STFCasConfiguration 将不返回任何内容。
-
如果要对 StoreFront 服务器组执行这些操作,请传播所做的更改并从服务器组的所有成员中删除导入的 Citrix Analytics 数据。在服务器组中的一个服务器上,运行以下命令:
Publish-STFServerGroupConfiguration -
在任何其他服务器组成员上,运行以下命令以确认已成功从组中的所有服务器中删除 Citrix Analytics 配置:
Get-STFCasConfiguration - 使用管理员帐户登录到监视程序 (
https://citrix.cloud.com/)。 - 选择一个监视程序客户。
- 单击管理打开 Citrix Analytics 服务管理控制台。
- 在 Citrix Analytics 服务管理控制台中,选择设置 > 数据源。
-
在 Virtual App and Desktops 卡中,选择 StoreFront 部署计数:

- 通过引用其主机基本 URL 和 ServerGroupID 来确定要删除的 StoreFront 部署。
-
在 (⋮) 菜单中,选择从 Analytics 中删除 StoreFront 部署。

注意:
如果要从服务器端而非从 Citrix Analytics 中删除配置,StoreFront 部署条目将保留在 Citrix Analytics 中,但不会从 StoreFront 接收任何数据。如果仅从 Citrix Analytics 中删除配置,则 StoreFront 部署条目将在下次应用程序池回收时重新添加(在 IIS 重置时或每 24 小时自动完成)。
将 StoreFront 配置为使用 Web 代理联系监视程序并注册到 Citrix Analytics
如果 StoreFront 位于 Web 代理后面的主机 Web 服务器上,注册到 Citrix Analytics 将失败。如果 StoreFront 管理员在其 Citrix 部署中使用 HTTP 代理,绑定到 Internet 的 StoreFront 流量必须通过 Web 代理传输,然后才能到达云中的 Citrix Analytics。StoreFront 不会自动使用托管操作系统的代理设置;需要进行额外的配置来指示应用商店通过 Web 代理发送出站流量。可以通过向应用商店 web.config 文件中添加新部分来配置 <system.net> 代理配置。请对 StoreFront 服务器上将用于将数据发送到 Citrix Analytics 的每个应用商店执行此操作。
方法 1:通过 PowerShell 为一个或多个应用商店设置应用商店代理配置(推荐)
运行 PowerShell 脚本 Config-StoreProxy.ps1 会为一个或多个应用商店自动执行此过程,并自动插入有效 XML 以配置 <system.net>。该脚本还将应用商店 web.config 文件备份到当前用户的桌面,从而允许在必要时还原未修改的 web.config 文件。
注意:
多次运行脚本可能会导致添加
<system.net> XML 的多个副本。每个应用商店应该只有<system.net>的一个条目。添加多个副本会阻止应用商店代理配置正常工作。
-
打开 PowerShell ISE 并选择以管理员身份运行。
-
将
$Stores = @("Store","Store2")设置为包括您希望使用 Web 代理配置的应用商店。 -
请指定以下任一项:
- IP 地址,或
- Web 代理的 FQDN
-
运行以下 PowerShell:
$Stores = @("Store","Store2") $ProxyIP = "10.0.0.1" $ProxyFQDN = "proxyserver.example.com" $ProxyPort = 8888 # Set this for every Store using Stores array function Set-StoreProxyServer() # Tested with both IP and FQDN { [CmdletBinding()] param([Parameter(Mandatory=$true,ParameterSetName="ProxyIP")][Parameter(Mandatory=$true,ParameterSetName="ProxyFQDN")][array]$Stores, [Parameter(Mandatory=$true,ParameterSetName="ProxyIP")][string]$ProxyIP, [Parameter(Mandatory=$true,ParameterSetName="ProxyFQDN")][string]$ProxyFQDN, [Parameter(Mandatory=$true,ParameterSetName="ProxyIP")][Parameter(Mandatory=$true,ParameterSetName="ProxyFQDN")][int]$ProxyPort) foreach($Store in $Stores) { Write-Host "Backing up the Store web.config file for store $Store before making changes..." -ForegroundColor "Yellow" Write-Host "`n" if(!(Test-Path "$env:UserProfile\desktop$Store")) { Write-Host "Creating $env:UserProfile\desktop$Store\ directory for backup..." -ForegroundColor "Yellow" New-Item -Path "$env:UserProfile\desktop$Store" -ItemType "Directory" | Out-Null Write-Host "`n" } Write-Host "Copying c:\inetpub\wwwroot\Citrix$Store\web.config to $env:UserProfile\desktop$Store..." -ForegroundColor "Yellow" Copy-Item -Path "c:\inetpub\wwwroot\Citrix$Store\web.config" -Destination "$env:UserProfile\desktop$Store" -Force | Out-Null if(Test-Path "$env:UserProfile\desktop$Store\web.config") { Write-Host "$env:UserProfile\desktop$Store\web.config file backed up" -ForegroundColor "Green" } else { Write-Host "$env:UserProfile\desktop$Store\web.config file NOT found!" -ForegroundColor "Red" } Write-Host "`n" Write-Host "Setting the proxy server to $ProxyAddress for Store $Store..." -ForegroundColor "Yellow" Write-Host "`n" $StoreConfigPath = "c:\inetpub\wwwroot\Citrix$Store\web.config" $XMLObject = (Get-Content $StoreConfigPath) -as [Xml] if([string]::IsNullOrEmpty($ProxyFQDN)) { $ProxyServer = ("HTTP://$ProxyIP"+":"+$ProxyPort) } else { $ProxyServer = ("HTTP://$ProxyFQDN"+":"+$ProxyPort) } $XMLObject = (Get-Content $StoreConfigPath) -as [Xml] # Create 3 elements $SystemNet = $XMLObject.CreateNode("element","system.net","") $DefaultProxy = $XMLObject.CreateNode("element","defaultProxy","") $Proxy = $XMLObject.CreateNode("element","proxy","") $Proxy.SetAttribute("proxyaddress","$ProxyServer") $Proxy.SetAttribute("bypassonlocal","true") # Move back up the XML tree appending new child items in reverse order $DefaultProxy.AppendChild($Proxy) $SystemNet.AppendChild($DefaultProxy) $XMLObject.configuration.AppendChild($SystemNet) # Save the modified XML document to disk $XMLObject.Save($StoreConfigPath) Write-Host "Getting the proxy configuration for c:\inetpub\wwwroot\Citrix$Store..." -ForegroundColor "Yellow" $XMLObject = (Get-Content $StoreConfigPath) -as [Xml] $ConfiguredProxyServer = $XMLObject.configuration.'system.net'.defaultProxy.proxy.proxyaddress | Out-Null Write-Host ("Configured proxy server for Store $Store"+": "+ $ConfiguredProxyServer) -ForegroundColor "Green" Write-Host "`n" } Write-Host "Restarting IIS..." -ForegroundColor "Yellow" IISReset /RESTART } Set-StoreProxyServer -Stores $Stores -ProxyFQDN $ProxyFQDN -ProxyPort $ProxyPort # OR Set-StoreProxyServer -Stores $Stores -ProxyIP $ProxyIP -ProxyPort $ProxyPort <!--NeedCopy--> -
检查 C:\inetpub\wwwroot\Citrix< Store>\web.config 现在是否包含在 web.config 文件末尾的新
<system.net>部分中。</dependentAssembly> </assemblyBinding> </runtime> <system.net> <defaultProxy> <proxy proxyaddress="HTTP://proxyserver.example.com:8888" bypassonlocal="true" /> </defaultProxy> </system.net> </configuration> <!--NeedCopy--> -
按照将 Citrix Analytics 数据导入到 StoreFront 部署中所述导入 Citrix Analytics 数据。
方法 2:在应用商店 web.config 文件中手动添加 <system.net> 部分
必须对 StoreFront 服务器上将用于将数据发送到 Citrix Analytics 的每个应用商店执行此操作。
-
备份应用商店的 web.config 文件,并将其复制到 C:\inetpub\wwwroot\Citrix< Store>\web.config 之外的其他位置。
-
使用 FQDN 和端口组合或使用 IP 和端口组合通过代理设置修改以下 XML。
例如,如果使用 FQDN 和端口组合,请使用以下
<system.net>元素:<system.net> <defaultProxy> <proxy proxyaddress="HTTP://proxyserver.example.com:8888" bypassonlocal="true" /> </defaultProxy> </system.net> <!--NeedCopy-->例如,如果使用 IP 和端口组合,请使用以下
<system.net>元素:<system.net> <defaultProxy> <proxy proxyaddress="HTTP://10.0.0.1:8888" bypassonlocal="true" /> </defaultProxy> </system.net> <!--NeedCopy--> -
在应用商店 web.config 文件的末尾,插入适当的
<system.net>元素,如下所示:<runtime> <gcServer enabled="true" /> <assemblyBinding xmlns="urn:schemas-microsoft-com:asm.v1"> <dependentAssembly> <assemblyIdentity name="System.Web.MVC" publicKeyToken="31BF3856AD364E35" culture="neutral" /> <bindingRedirect oldVersion="0.0.0.0-5.0.0.0" newVersion="5.0.0.0" /> </dependentAssembly> <dependentAssembly> <assemblyIdentity name="Newtonsoft.Json" publicKeyToken="30ad4fe6b2a6aeed" culture="neutral" /> <bindingRedirect oldVersion="0.0.0.0-9.0.0.0" newVersion="9.0.0.0" /> </dependentAssembly> </assemblyBinding> </runtime> Insert the <system.net> element here </configuration> <!--NeedCopy--> -
按照将 Citrix Analytics 数据导入到 StoreFront 部署中所述导入 Citrix Analytics 数据。