Applications
Applications is where you add, edit, and remove the device’s programs and remote connections — browsers, Citrix StoreFront™ resources, RDP and Omnissa Horizon sessions, and local applications.
The corresponding software must be installed on the device (for example Citrix Workspace™ app, a web browser, or Omnissa Horizon Client).
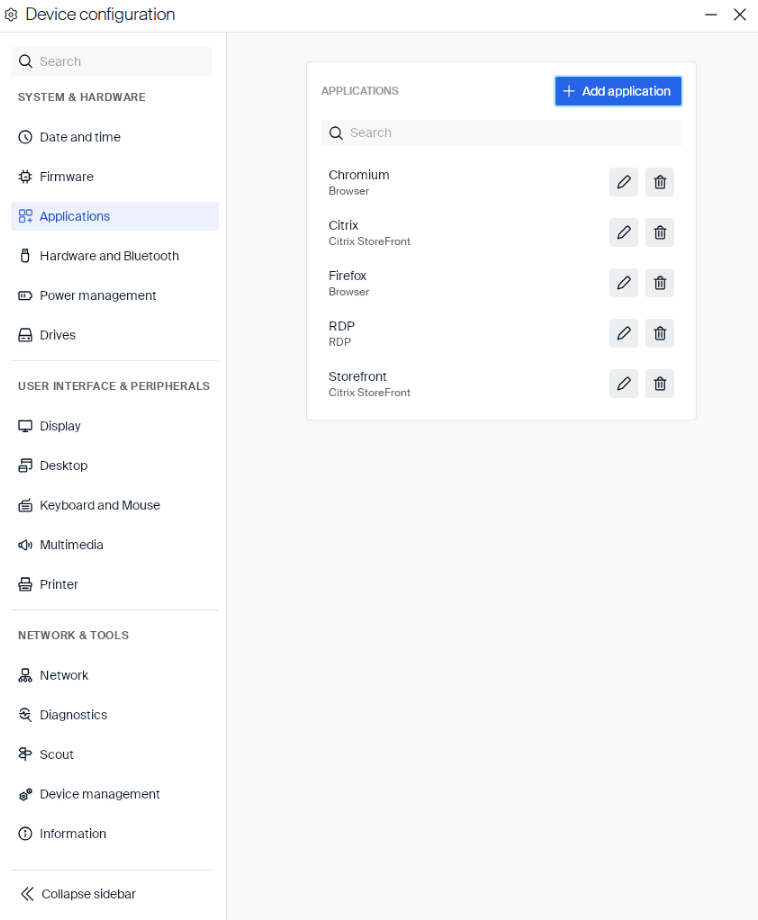
Each row shows the application’s name and type. Use the search field to filter the list, the pencil icon to edit an application, and the trash icon to remove it.
Adding an Application
-
Click Add application.
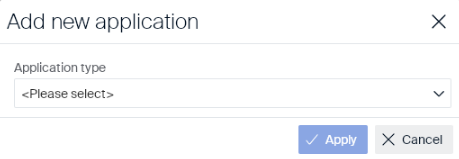
-
Open the Application type dropdown and select a type:
Browser,Citrix StoreFront,Local application,Omnissa Horizon, orRDP.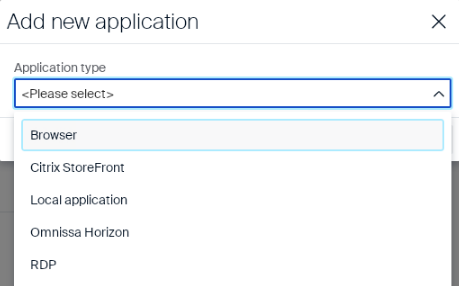
-
Fill in the fields for the selected type (see the sections below), then click Apply.
Common Fields
Regardless of type, every application you add or edit includes these fields:
| Field | Type | Description |
|---|---|---|
| Name | Text field | Name of the application. Required — cannot be empty. |
| Restart application | Toggle | Restarts the application immediately if it closes unexpectedly or is closed by the user. Not available for Omnissa Horizon. |
| Start automatically | Toggle | Starts the application automatically after eLux® starts. |
| after (seconds) | Number field | Delay before the automatic start, in seconds. Only shown when Start automatically is on. |
| Desktop icon | Toggle | Adds a shortcut icon for the application on the desktop. |
Browser
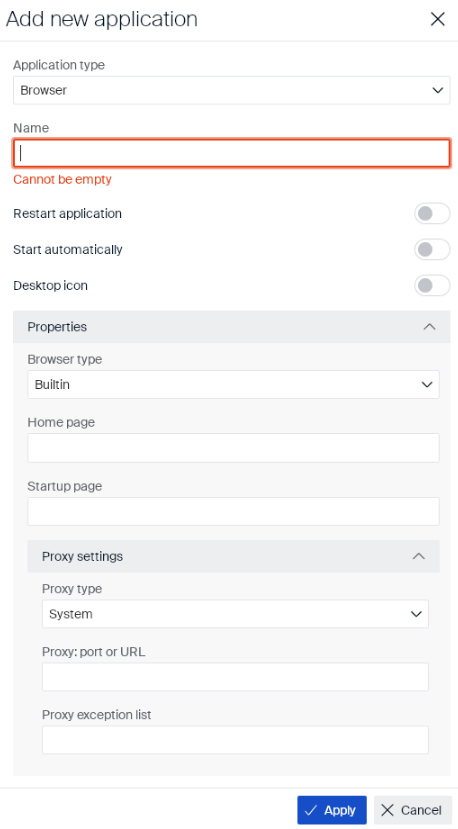
Besides the common fields, when you add a Browser application, you’re presented with the following fields, which control which browser engine is used and what page it opens to:
| Field | Type | Description |
|---|---|---|
| Browser type | Dropdown |
Builtin (built-in browser), Chromium, Google Chrome, or Firefox. |
| Home page | Text field | Web page that opens when the user clicks Home. |
| Startup page | Text field | Web page that opens when the browser starts. |
Proxy Settings
Proxy settings determine whether the browser’s traffic goes through a proxy server, and how it’s configured:
| Field | Type | Description |
|---|---|---|
| Proxy type
|
Dropdown
|
Manual (Proxy:Port) — specify a proxy server and port. |
Auto (URL) — use a proxy configuration file. |
||
System (default) — use the proxy defined for the network profile under Network > Advanced. |
||
| Proxy: port or URL | Text field | The proxy server and port, or the proxy configuration file URL. Only used with Manual or Auto. |
| Proxy exception list | Text field | Addresses that bypass the proxy. |
Note:
For the built-in browser, leave Proxy type set to
System.
Local Application
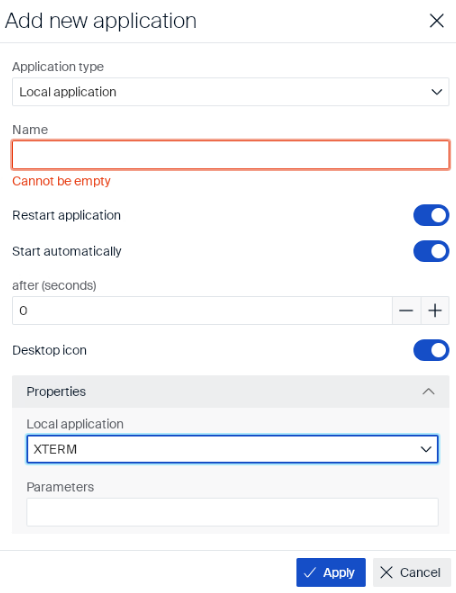
A Local application launches a program that’s already installed on the device. Besides the common fields, you’re presented with the following fields:
| Field | Type | Description |
|---|---|---|
| Local application | Dropdown |
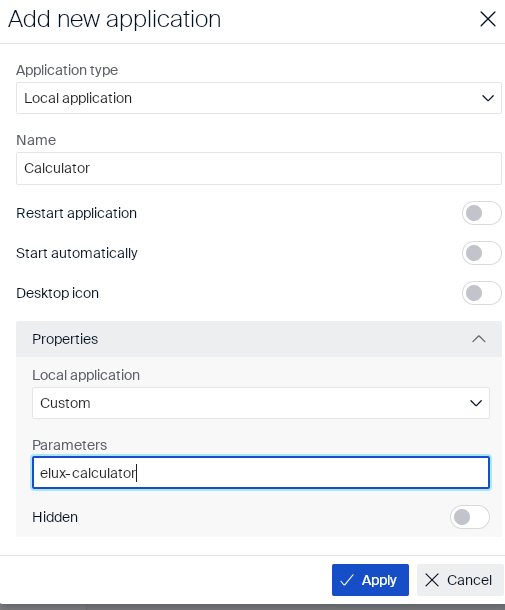
XTERM, File manager, or Custom to start a specific program via Parameters. |
| Parameters | Text field | For a predefined application, additional command-line parameters. For Custom, the program name to start, plus any parameters. |
| Hidden | Toggle | Hides the application from the desktop. Use with Start automatically for a background application. |
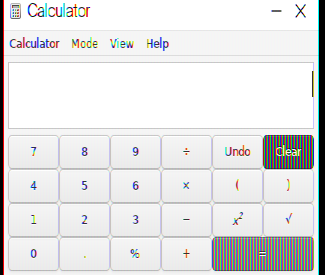
Example — a Custom local application named Calculator, started via Parameters elux-calculator (the eLux-owned command name, which won’t change in future releases):
Citrix StoreFront
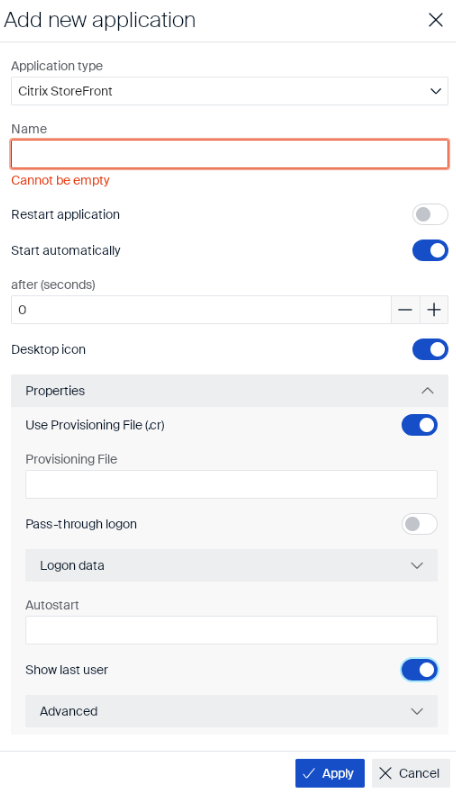
A Citrix StoreFront application connects the user to Citrix-published desktops and applications through a store.
Besides the common fields, you’re presented with the following fields:
| Field | Type | Description |
|---|---|---|
| Use Provisioning File (.cr) | Toggle | Use a StoreFront provisioning file instead of specifying store URLs directly. |
| Provisioning File | Text field | Path to the provisioning file. Only shown when Use Provisioning File is on. |
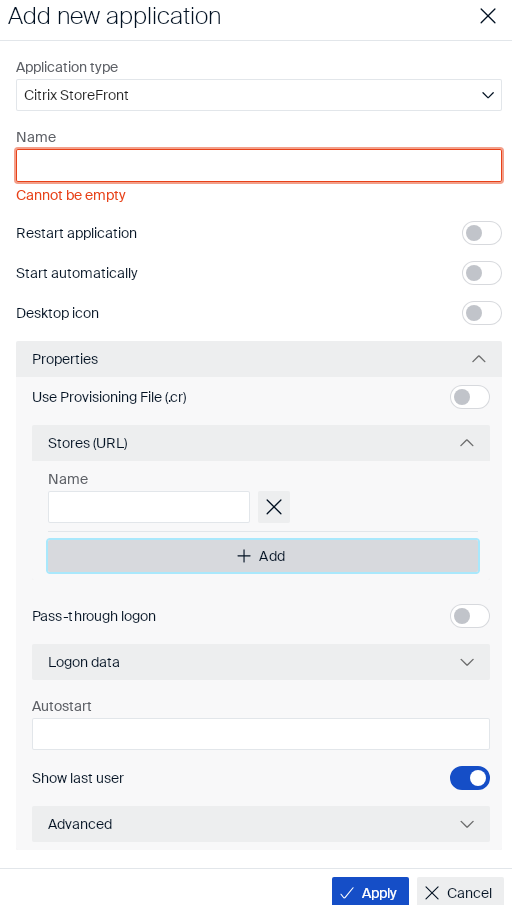
| Stores (URL) | Collapsible list | One or more StoreFront store URLs to connect to. Only shown when Use Provisioning File is off — see below. |
| Pass-through logon | Toggle | Logs the user in to the store via single sign-on, using the AD credentials from the eLux desktop login. |
| Logon data | Collapsible section | Fixed credentials for automatic store logon, used instead of pass-through logon — see below. |
| Autostart | Text field | Names of the StoreFront resources to start automatically, separated by semicolons — the names must match exactly as shown in StoreFront. |
| Show last user | Toggle | Shows the last signed-in user’s name (not the password) in the logon dialog. |
Stores (URL)
When Use Provisioning File is off, Stores (URL) lets you list the StoreFront store URLs to connect to directly, instead of using a provisioning file:
| Field | Type | Description |
|---|---|---|
| Name | Text field | URL of a StoreFront store. Click + Add for another store, or the X to remove one. |
Logon Data
Logon data lets you provide fixed credentials for automatic sign-in, used instead of pass-through logon:
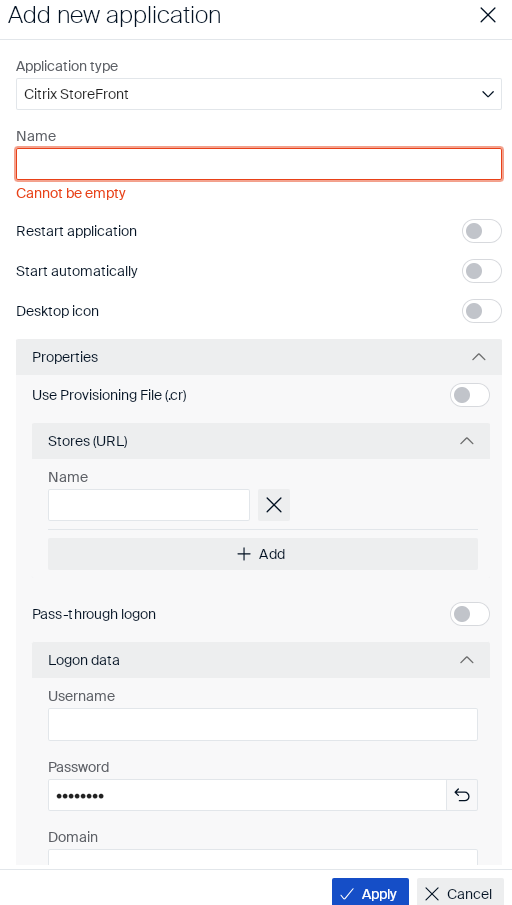
| Field | Type | Description |
|---|---|---|
| Username | Text field | User name for automatic logon (used instead of pass-through logon). |
| Password | Text field | Password for automatic logon. |
| Domain | Text field | Domain for automatic logon. |
Advanced
The Advanced section controls how a StoreFront session behaves once it’s running — whether it opens in a window or full screen, what happens on reconnect, and how the user is logged off:
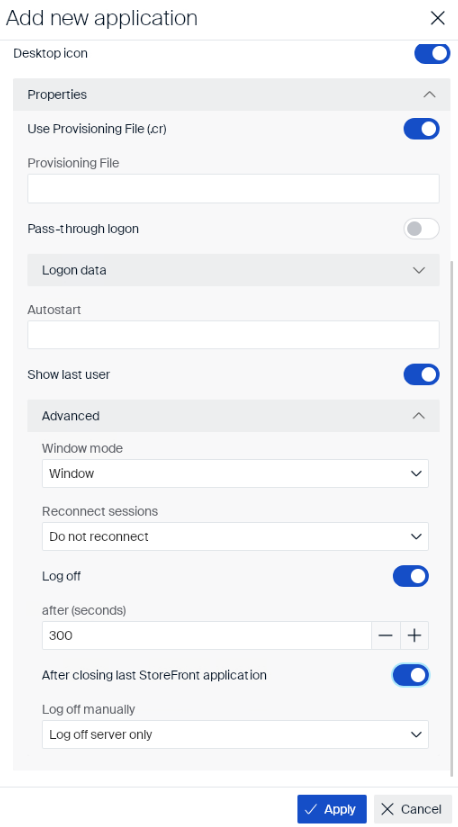
| Field | Type | Description |
|---|---|---|
| Window mode | Dropdown |
Window or Full screen. |
| Reconnect sessions
|
Dropdown
|
Do not reconnect (default) — the connection to a desktop or published application isn’t restored on reconnect. |
Disconnected sessions only — restores a disconnected session. |
||
Active and disconnected sessions — restores either an active or a disconnected session. |
||
| Log off | Toggle | Automatically logs off from the StoreFront server after a delay. Doesn’t affect the launched desktop. |
| after (seconds) | Number field | Delay before automatic log off, in seconds. Default: 300. Only shown when Log off is on. |
| After closing last StoreFront application | Toggle | Logs off automatically once the last open StoreFront resource is closed, instead of waiting for the delay. |
| Log off manually
|
Dropdown
|
Log off server only (default) — logs off only from the StoreFront server. |
Log off server and applications — also logs off the virtual desktop or published applications. |
||
Log off server and disconnect applications — logs off the server but only disconnects the virtual desktop or published applications, so the user can reconnect later. |
RDP
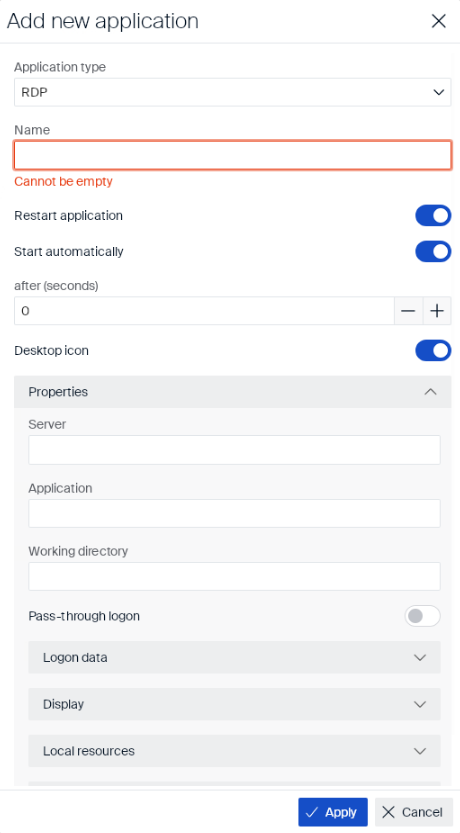
An RDP application opens a remote Windows desktop, or a specific Windows program on a server. Besides the common fields, you’re presented with the following fields:
| Field | Type | Description |
|---|---|---|
| Server | Text field | Name or address of the RDP server. |
| Application | Text field | Path of the application to start on the server. Leave empty to start a full desktop. |
| Working directory | Text field | Working directory for the application on the server. |
| Pass-through logon | Toggle | Logs the user in using the AD credentials from the eLux desktop login. |
Logon Data
Logon data lets you provide fixed credentials for automatic sign-in, used instead of pass-through logon:
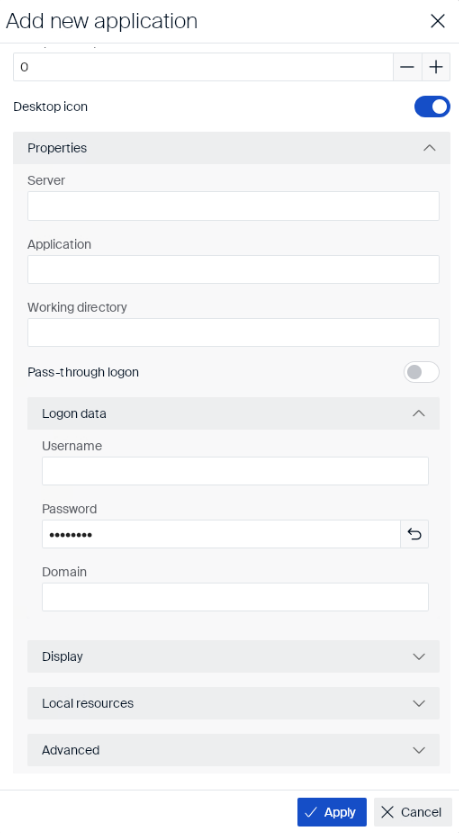
| Field | Type | Description |
|---|---|---|
| Username | Text field | User name for automatic logon (used instead of pass-through logon). |
| Password | Text field | Password for automatic logon. |
| Domain | Text field | Domain for automatic logon. |
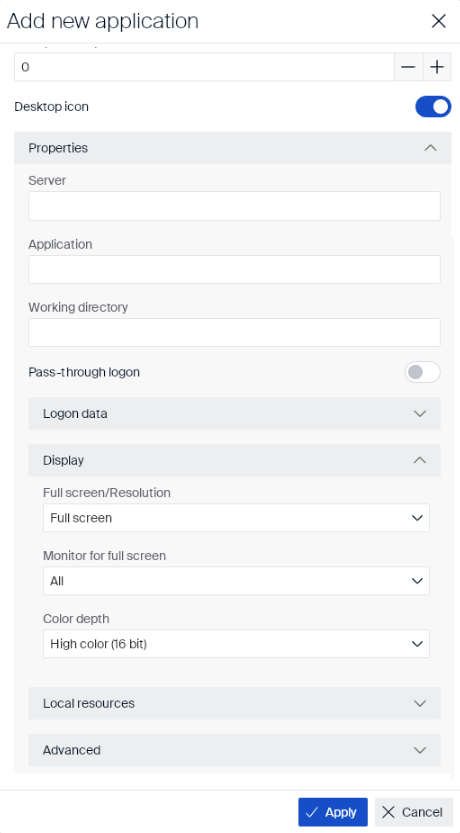
Display
Display settings control how the session window appears — its size, which monitor it uses, and the color quality:
| Field | Type | Description |
|---|---|---|
| Full screen/Resolution | Dropdown |
Full screen, or a specific resolution: 640x480, 800x600, 1024x768, 1152x864, or 1280x1024. |
| Monitor for full screen | Dropdown |
All, or a specific connected monitor. Only applies when Full screen/Resolution is Full screen. |
| Color depth | Dropdown |
256 (8 bit), High color (16 bit) (default), True color (24 bit), or True color (32 bit). |
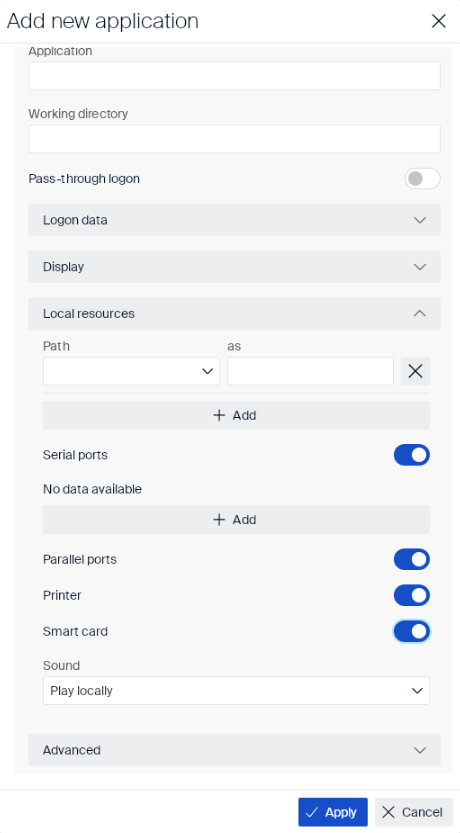
Local Resources
Local resources settings decide which of the device’s local drives, ports, and peripherals are shared into the session:
| Field | Type | Description |
|---|---|---|
| Path / as | Dropdown + text field | Maps a local drive or folder into the session. Click + Add for another mapping. |
| Serial ports | Toggle | Makes local serial (COM) ports available in the session. |
| COM port / as | Dropdown + number field | Only shown after turning on Serial ports and clicking + Add. Maps a local COM port to a port number in the session. |
| Parallel ports | Toggle | Makes local parallel ports available in the session. |
| Printer | Toggle | Makes locally connected printers available in the session. |
| Smart card | Toggle | Allows certificate-based logon using a smart card. |
| Sound | Dropdown |
Off — session sound is disabled. Play locally (default) — plays session sound on the device. Play remotely — plays session sound on the server. |
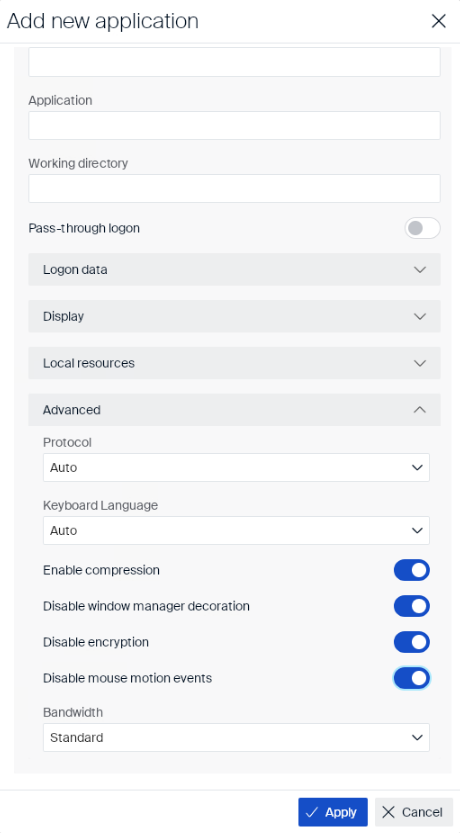
Advanced
Advanced settings fine-tune the RDP protocol itself — connection version, keyboard layout, and performance trade-offs for slower connections:
| Field | Type | Description |
|---|---|---|
| Protocol | Dropdown |
Auto (default) — the RDP protocol version is detected automatically. RDP V4 or RDP V5 — force a specific version. |
| Keyboard Language | Dropdown |
Auto (default) — matches the device’s Keyboard configuration, or a specific language. |
| Enable compression | Toggle | Compresses session data to reduce bandwidth use. |
| Disable window manager decoration | Toggle | Hides the window frame around the session. |
| Disable encryption | Toggle | Disables session encryption. Can improve performance; disabled by default for security. |
| Disable mouse motion events | Toggle | Sends mouse position only on click, not continuously. Reduces bandwidth use, useful on slow connections. |
| Bandwidth | Dropdown |
Standard, Modem, Broadband, or LAN. |
Omnissa Horizon
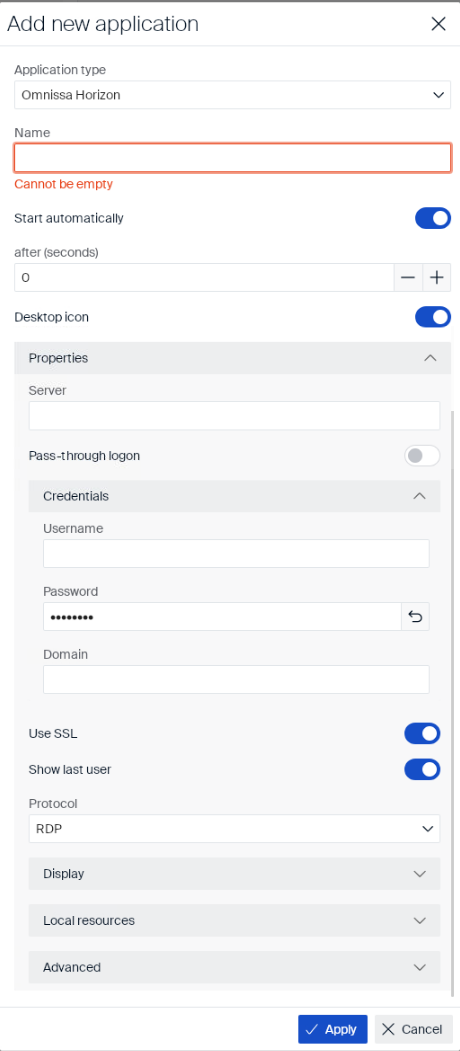
An Omnissa Horizon application connects to a VDI desktop through Omnissa Horizon (formerly VMware Horizon). Besides the common fields, you’re presented with the following fields:
| Field | Type | Description |
|---|---|---|
| Server | Text field | Name or address of the Omnissa Horizon server. |
| Pass-through logon | Toggle | Logs the user in using the AD credentials from the eLux desktop login. |
| Username | Text field | User name for automatic logon (used instead of pass-through logon), under Credentials. |
| Password | Text field | Password for automatic logon, under Credentials. |
| Domain | Text field | Domain for automatic logon, under Credentials. |
| Use SSL | Toggle | Connects to the server over SSL/TLS. |
| Show last user | Toggle | Shows the last signed-in user’s name (not the password) in the logon dialog. |
| Protocol | Dropdown |
RDP (default), PCoIP, or Omnissa Blast. |
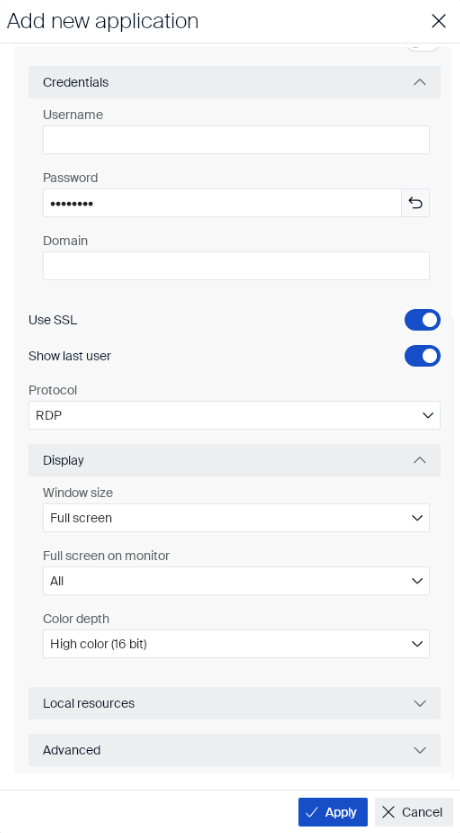
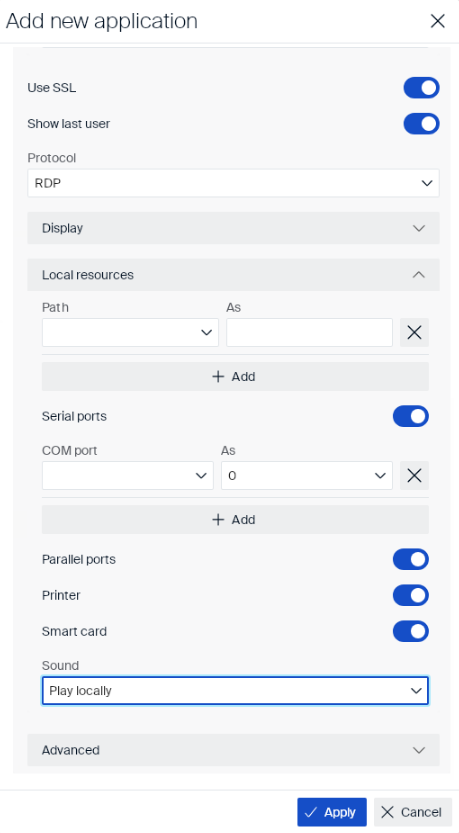
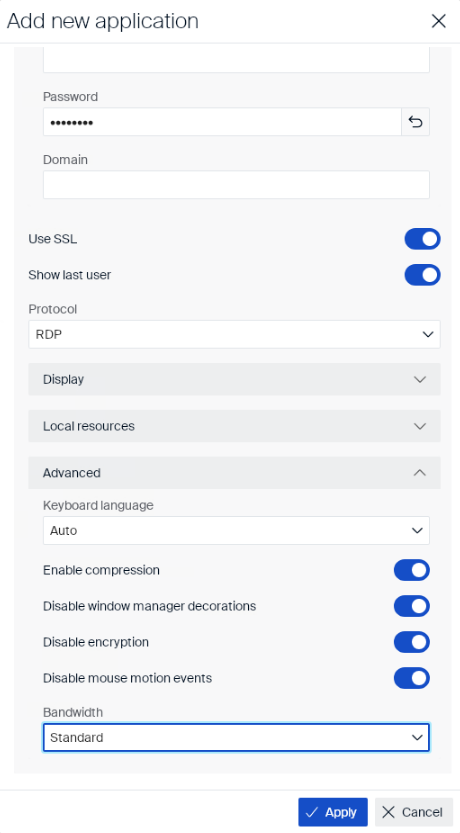
Display, Local resources, and Advanced use the same fields as RDP, with these differences:
-
Display: fields are named Window size, Full screen on monitor, and Color depth — same meaning as RDP’s equivalents.
-
Local resources: identical to RDP.
-
Advanced: identical to RDP, except there is no separate Protocol field here (Protocol is set under Properties, described above).
New Applications
eLux now ships a modern calculator and a modern screenshot tool.
Calculator
The bundled calculator is now MATE Calculator. It shows as Calculator everywhere it appears — the app menu, the window title bar, and the taskbar — and it’s actively maintained, unlike the galculator tool it replaces.
To make the calculator available on a device, enable calc under Packages → FPM in the desktop_environment EPM.
You can start it in two ways:
| Command | Notes |
|---|---|
elux-calculator |
Recommended — the eLux-owned command name, which won’t change in future releases. |
galculator |
Still works, for existing local application definitions. |
Note:
When adding the calculator as a Local Application, use
elux-calculatoras shown in the example above.
Screenshot
The bundled screenshot tool is now Flameshot. You can capture a region or the full screen, annotate it with arrows, text, blur, and highlight, then save it or paste it straight into another application as a real image.
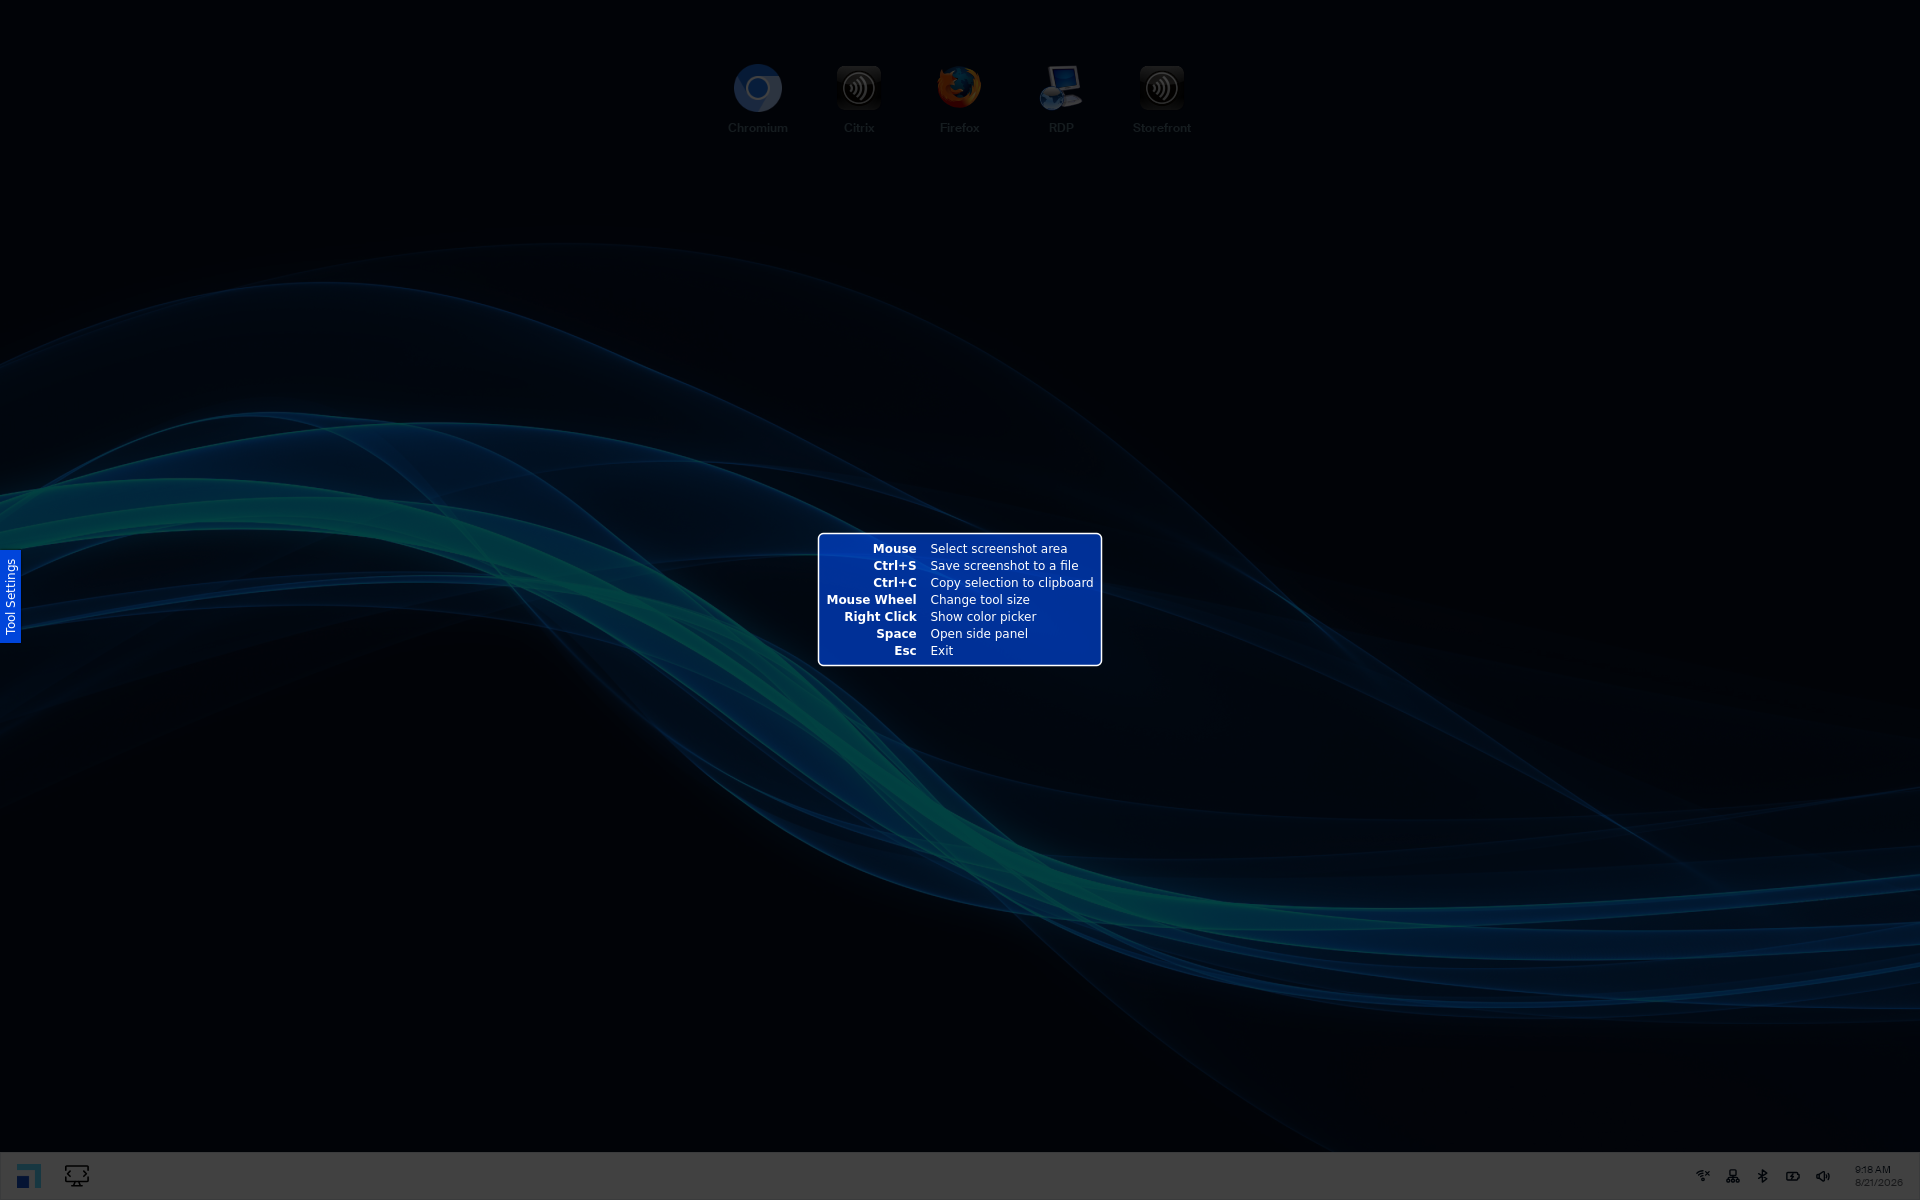
Screenshots save to /home/elux/Screenshots. This folder is recreated automatically if you delete it.
To make the screenshot tool available on a device, enable both of the following under Packages → FPM in the desktop_environment EPM:
- screenshot — ships the tool itself.
- QT — a dependency required by Flameshot.
You can trigger a capture in several ways:
| Shortcut or command | What it does |
|---|---|
| Opens the capture UI — drag a region, annotate, then save or copy it. | |
| Ctrl + Print | Captures the full screen straight to the clipboard. |
| Super + Shift + S | Opens the capture UI. |
elux-screenshot (terminal) |
Opens the capture UI. |
flameshot full -p /home/elux/Screenshots (terminal) |
Saves a full-screen capture directly to the Screenshots folder. |
The legacy mate-screenshot command still works.