Entra ID authentication via OIDC and single sign-on to VDA
This article describes how to configure StoreFront and a NetScaler ADC to allow users to authenticate with Entra ID via OIDC, then single sign-on to an Entra joined VDA.
IMPORTANT:
Entra ID authentication via OIDC and single sign-on to VDA is currently in preview. This feature is provided without support and is not yet recommended for use in production environments.
Prerequisites
- NetScaler ADC
- StoreFront 2507 LTSR CU1 or higher
- Modern experience
- Microsoft Entra ID and account with one of the following permissions:
- Cloud Application Administrator
- Application Administrator
- Global Administrator
- DaaS subscription with connectors. This is not available with CVAD.
- Published desktops and/or apps
- For launches from a web browser into Citrix Workspace app, to enable SSO to VDAs, Citrix web extension.
Known issues and limitations
- Enabling Federated Authentication Service on a store using Entra ID authentication is not supported and might result in launch failures.
- If a store includes a Citrix Virtual Apps and Desktops site and a user authenticates using Entra ID via OIDC, StoreFront does not enumerate any resources from that site. [WSP-30880]
- Entra ID SSO to VDAs is only supported when using OIDC based authentication. It is not supported with SAML.
- StoreFront uses a large amount of RAM when a user is part of many Entra groups. [WSP-29276]
Entra ID authentication using OIDC
This section describes how to configure NetScaler and StoreFront so users can authenticate using Entra ID. In this configuration, users can either have a hybrid identity, or an Entra only identity without an Active Directory account.
Create a Microsoft Azure Entra ID application
An App Registration in Microsoft Entra ID defines your application so that Entra ID recognizes it—in this case, NetScaler OIDC. This registration also manages the application’s authentication and authorization requests. Because OAuth requires a trusted Identity Provider (IdP) to authenticate users and issue tokens, registering your app tells Entra ID: “This application uses you as its IdP for OAuth flows.”
- Sign in to the Azure portal for the Entra ID tenant that you use for NetScaler or StoreFront authentication.
- Go to Microsoft Entra ID resource > Manage > App registrations, then select New registration.
- Name the application, for example, NetScaler StoreFront Authentication.
- Under Supported account types, select Accounts in this organizational directory only.
-
Under Redirect URI, select Web for the type of application you want to create. Enter the URI where the access token is sent. Use the format <NetScaler Virtual Server URL>/oauth/login, for example
https://netscalerentra.customer.com/oauth/login.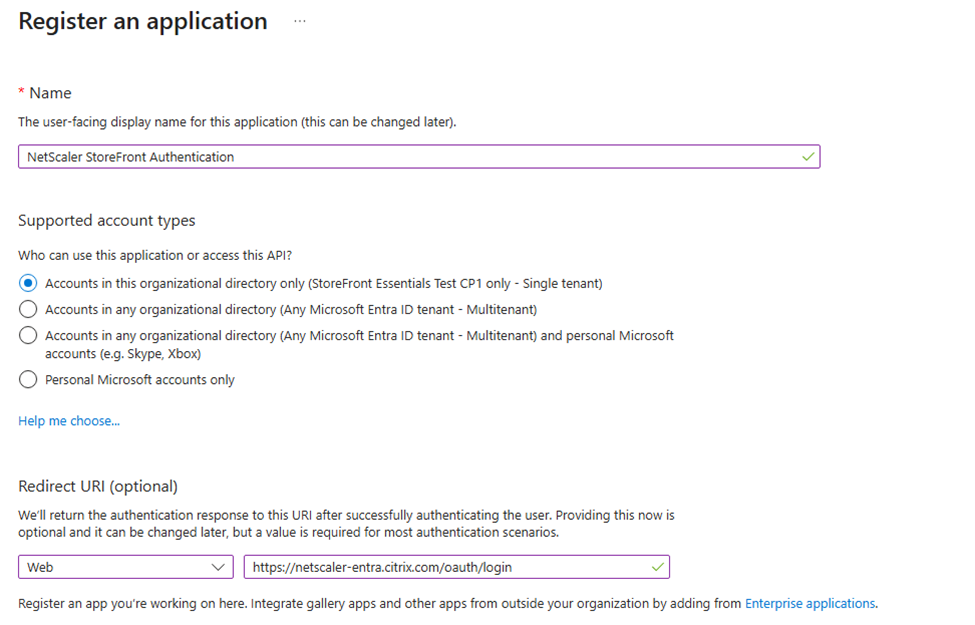
Create client secret
To create client secret:
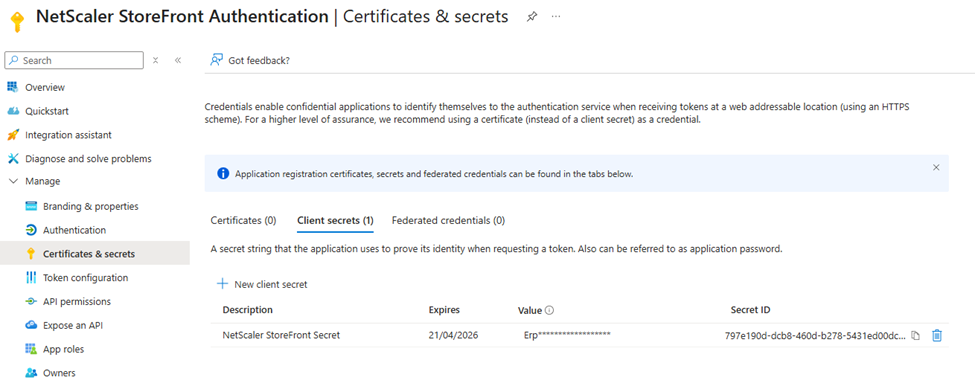
- After you register the application, go to Manage > Certificates & Secrets.
- Select Client secrets, and then select New client secret. Your app uses these credentials to securely communicate with the IdP and request tokens.
- Provide a description of the secret and a duration.
- After you create the secret, record the secret value because you need it later in the setup process and it’s only visible during this stage of creation.
Configure application permissions
To configure app permissions:
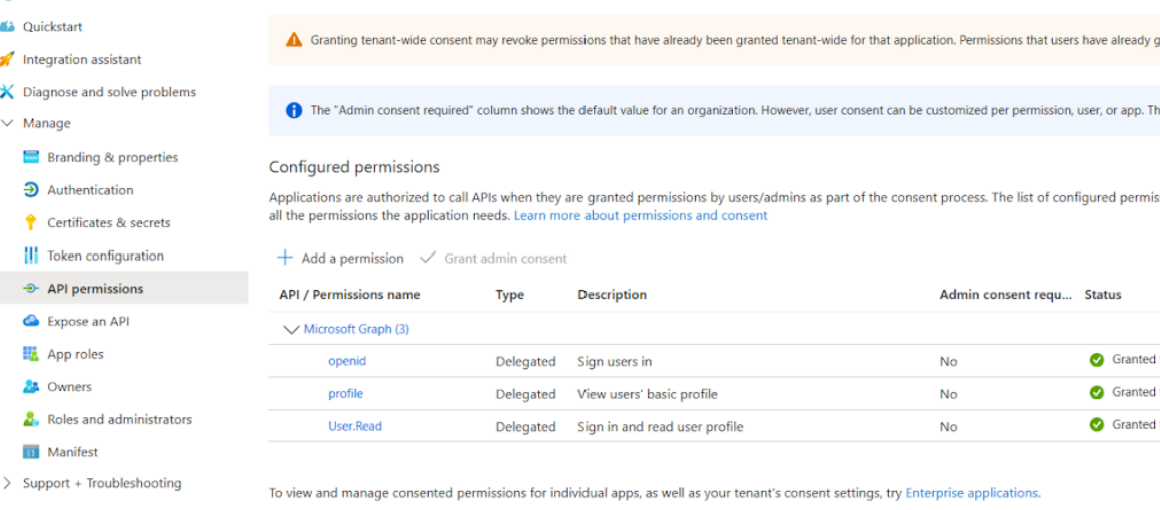
- Go to Manage > App registrations, then select your application.
- Select Manage > API Permissions.
- The User.Read permission is already added by default.
- Add openid and profile.
- Select Grant admin consent for <tenant name> and accept.
“Grant admin consent for” in API permissions in Microsoft Entra ID means that an administrator gives approval, on behalf of all users in the organization, for an application to access specific resources or APIs with the requested permissions.
Configure Citrix DaaS to enable XML trust
By default Citrix DaaS authenticates requests using the user’s Active Directory credentials. With Entra ID authentication, StoreFront does not have the credentials. Therefore you must configure DaaS to trust StoreFront without requiring using authentication. It is strongly recommended that you enable security keys to provide service level authentication instead.
- Sign in to Citrix Cloud and go to the DaaS console.
- Go to Settings.
-
Turn on XML trust.

- (Optional step) For added security you can enable security keys between DaaS and StoreFront. For more information, see Manage security keys in the Citrix DaaS™ documentation.
Configure NetScaler authentication profile
This section describes how to configure a NetScaler authentication profile that you can bind to your gateway VPN virtual server. This configuration tells the ADC how to redirect users to an external OAuth IdP (like Microsoft Entra ID) for sign-in and how to handle the OAuth tokens received after authentication. It specifies endpoints, client credentials, scopes, and how the ADC extracts user information from tokens.
You need the client secret from the previous steps and the Microsoft Entra ID authentication endpoints. You can find the authentication endpoints in the Azure portal by going to your App Registration Overview and clicking the Endpoints tab.
Create authentication virtual server
The authentication virtual server handles user authentication.
add authentication vserver EntraId_Authentication_VirtualServer SSL 0.0.0.0 443 \
  -state ENABLED \
  -authentication ON \
  -td 0 -appflowLog ENABLED \
  -noDefaultBindings NO
bind ssl vserver EntraId_Authentication_VirtualServer \
  -certkeyName <Certificate Key Name>
<!--NeedCopy-->
Create OAuth policy and action
The OAuth action specifies how NetScaler ADC interacts with an OAuth IdP such as Microsoft Entra ID. This action allows the Citrix Gateway to redirect users to the IdP for sign-in and handle the OAuth token returned. It sets the userNameField to oid which causes the gateway to pass the OID as the username when authenticating to StoreFront. StoreFront validates that the oid matches the details it gets from looking up the Entra ID access token, otherwise authentication fails.
You need the Client ID and Client secret from the previous steps.
add authentication OAuthAction EntraId_Oauth_Server \
  -authorizationEndpoint "https://login.microsoftonline.com/<TenantId>/oauth2/v2.0/authorize\?prompt=login" \
  -tokenEndpoint "https://login.microsoftonline.com/<TenantId>/oauth2/v2.0/token" \
  -clientID <ClientId> \
  -clientSecret <ClientSecret> \
  -Attribute1 email \
  -Attribute2 family_name \
  -Attribute3 given_name \
  -Attribute4 upn \
  -CertEndpoint "https://login.microsoftonline.com/<TenantId>/discovery/v2.0/keys" \
  -userNameField oid \
  -allowedAlgorithms HS256 RS256 RS512 \
  -PKCE ENABLED \
  -tokenEndpointAuthMethod client_secret_post \
  -OAuthType GENERIC \
  -grantType CODE \
  -refreshInterval 1440
add authentication Policy EntraId_Authentication_Policy \
  -rule true \
  -action EntraId_Oauth_Server
<!--NeedCopy-->
The authorizationEndpoint includes the query string parameter prompt=login so that users are forced to reauthenticate when they attempt to access StoreFront through the NetScaler.
Bind the authentication policy to the virtual server
bind authentication vserver EntraId_Authentication_VirtualServer \
  -policy EntraId_Authentication_Policy \
  -priority 100 \
  -gotoPriorityExpression END
<!--NeedCopy-->
Create authentication profile
add authentication authnProfile EntraId_Auth_Profile \
  -authnVsName EntraId_Authentication_VirtualServer \
  -AuthenticationLevel 0
<!--NeedCopy-->
Create VPN Virtual Server and bind the authentication profile
Complete steps 1, 2 and 4 from Integrate NetScaler Gateway with StoreFront, using the authentication profile created in the previous steps.
Alternatively, if you already have a suitable Citrix Gateway then you can bind the new authentication profile to it. Running this command replaces the existing authentication profile.
set vpn vserver <StoreFront ICA Proxy vServer> \
  -authentication ON \
  -authnProfile EntraId_Auth_Profile
<!--NeedCopy-->
Entra ID token injection configuration for SSO to StoreFront
After the Citrix gateway authenticates the user, it must pass sufficient information to StoreFront so that it can validate the user is authenticated and look up group membership. By default, the Citrix gateway only sends the Active Directory username and password. In the case of Entra ID authentication, it must pass the Entra ID access token so that StoreFront can look up user information using the Microsoft Graph API. To achieve this you must add a re-write policy that adds the Entra ID token to the call it makes to authenticate the user to StoreFront. If the rewrite Entra ID access token policy does not take effect, log in will fail.. If the rewrite policy feature is disabled by default is not already enabled then you must enable it first.
enable ns feature Rewrite
add rewrite action EntraId_Oauth_Insert_AccessToken_Header insert_http_header X-Citrix-OIDC-Access-Token "AAA.USER.ATTRIBUTE(\"accesstoken\")" \
  -comment "A rewrite policy to add the OAUTH access_token to subsequent user authentication requests"
add rewrite policy EntraId_Oauth_Insert_AccessToken_Policy "HTTP.REQ.URL.TO_LOWER.ENDSWITH(\"gatewayauth/login\") || HTTP.REQ.URL.TO_LOWER.ENDSWITH(\"citrixagbasic/authenticate\")" EntraId_Oauth_Insert_AccessToken_Header \
  -comment "A rewrite policy to add the OAUTH access_token to subsequent user authentication requests"
bind vpn vserver <StoreFront ICA Proxy vServer> \
  -policy EntraId_Oauth_Insert_AccessToken_Policy \
  -priority 100 \
  -gotoPriorityExpression END \
  -type REQUEST
<!--NeedCopy-->
Configure Citrix Gateway within StoreFront
-
Configure the Citrix Gateways.
-
Set Login type to Domain.
-
Specify a valid callback URL. This is required for Entra ID authentication with StoreFront.
-
-
Configure the gateway for remote access for the Store aggregating the Citrix DaaS resources.
-
Enable and configure Entra ID authentication from NetScaler Gateway. Run the following PowerShell, replacing the Tenant ID with the ID from your Entra ID tenant and
/Citrix/EntraStorewith the store path.
  $store = Get-STFStoreService /Citrix/EntraStore
  $authenticationService = Get-STFAuthenticationService -Store $store
  Set-STFEntraIdSettings -AuthenticationService $authenticationService -TenantId "<Your tenant id>" -Enabled $true
  <!--NeedCopy-->
Configure Entra ID SSO to VDAs
Once you have configured StoreFront and your Citrix gateway to authenticate users using Entra ID, you can enable Entra ID SSO to VDAs without needing FAS. Only enable this once you have completed DaaS configuration. For more information see Microsoft Entra single sign-on. This requires the following additional configuration for StoreFront and the NetScaler ADC.
Configure NetScaler ADC content switching
Normally all requests to StoreFront go via the gateway VServer and hence require authentication. When the user launches an Entra ID joined VDA, Citrix Workspace app must again authenticate to Azure (SSO if the Entra ID session is still valid) and retrieve an access token. As part of this flow, StoreFront generates a token that must be validated by a service running in Citrix Cloud. This service must be able to call back to StoreFront endpoint /Citrix/<StoreWeb>/Tickets/RedeemStoreTicket to validate the token. As this service does not have access to the NetScaler session, it is necessary to bypass the VPN virtual service for calls to redeem the ticket. To achieve this, you can use a content switcher.
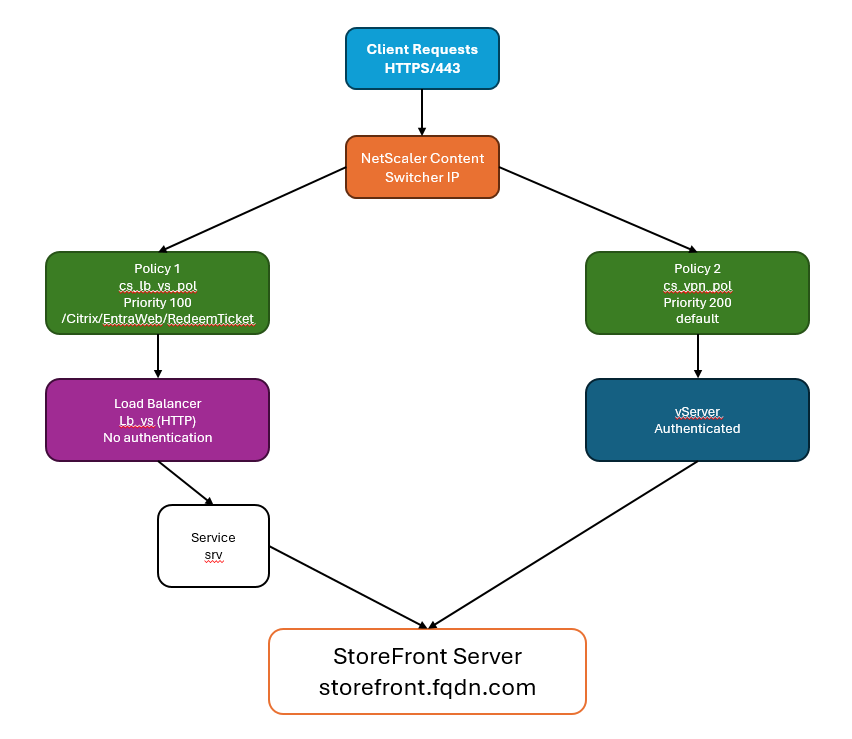
Calls to /Citrix/<StoreWeb>/Tickets/RedeemStoreTicket are directed to a load balancer which forwards the requests to StoreFront, bypassing the gateway. Note that the load balancer is required as the content switcher cannot be configured to direct traffic directly to a URL and requires a virtual server as a target. The load balancer does not perform any load balancing and merely forwards traffic to StoreFront. If you already have a suitable StoreFront load balancer on the same machine then you can use this instead.
All other calls are directed to the gateway’s VPN virtual server.
Create load balancer to pass through from content switcher to StoreFront
If you already have a load balancer virtual server fronting your StoreFront server group and running on the same machine as the gateway then you can skip this step and configure the content switch to send traffic directly to that virtual server. Otherwise you must create a load balancer to pass through traffic to the StoreFront server(s). This is because content switcher actions must reference a virtual server.
The steps are slightly different depending on whether StoreFront is configured for HTTPS (recommended) or HTTP.
StoreFront is configured for HTTPS
Create a service stf_srv representing StoreFront using its IP address and bind it to an SSL load balancer with no persistence.
add service stf_srv <StoreFront Ip Address> SSL 443
add lb vserver lb_vs SSL <lb_vs Ip Address> 443 -persistenceType NONE -cltTimeout 180
bind lb vserver lb_vs stf_srv
<!--NeedCopy-->
StoreFront is configured for HTTP
Create a service stf_srv representing StoreFront using its FQDN and bind it to an HTTP load balancer with no persistence.
add server storefront1 <storefront fqdn>
add service stf_srv storefront1 HTTP 80
add lb vserver lb_vs HTTP 0.0.0.0 0 -persistenceType NONE -cltTimeout 180
bind lb vserver lb_vs stf_srv
<!--NeedCopy-->
Create SSL content switching virtual server
Create an SSL content switching virtual server to handle client requests. This content switching virtual server listens for HTTPS traffic on port 443 and routes requests to either the gateway VPN virtual server or pass through to StoreFront via the load balancer.
By default content switching is disabled so you must enable it if you have not previously done so.
enable feature CS
add cs vserver cs_vs SSL <cs_vs Ip Address> 443 -cltTimeout 180 -persistenceType NONE
bind ssl vserver cs_vs -certkeyName <Certificate Name>
<!--NeedCopy-->
Create content switching policy for ticket redemption
Create a content switching policy for load balancing based on a URL containing a StoreFront ticket redemption path.
This policy matches requests when the URL contains /Citrix/<StoreWeb>/Tickets/RedeemStoreTicket and routes them to the load balancer without going through the VPN Virtual Server.
Replace StoreEntraWeb with the name of the StoreFront website from the StoreFront virtual server web policy. You can either use the load balancer lb_vs created in the earlier step, or an existing load balancer virtual server fronting your StoreFront servers.
add cs action cs_lb_vs -targetLBVserver lb_vs
add cs policy cs_lb_vs_pol -rule "HTTP.REQ.URL.CONTAINS(\"/Citrix/<StoreWeb>/Tickets/RedeemStoreTicket\")" -action cs_lb_vs
bind cs vserver cs_vs -policyName cs_lb_vs_pol -priority 100
<!--NeedCopy-->
Create content switching policy for all other traffic
Create a catch-all content switching policy to send all other StoreFront traffic via the VPN virtual server for authentication.
add cs action cs_vpn_vs -targetVserver <VPN vServer>
add cs policy cs_vpn_pol -rule TRUE -action cs_vpn_vs
bind cs vserver cs_vs -policyName cs_vpn_pol -priority 110
<!--NeedCopy-->
Configure VDA Entra ID single sign-on
Single sign-on enables users to authenticate once when they sign in to the Citrix Gateway—and then access their virtual desktops and applications without having to re-enter their credentials to the VDA.
$store = Get-STFStoreService /Citrix/EntraStore
Set-STFStoreLaunchOptions -StoreService $store -EntraIdSsoEnabled $true
<!--NeedCopy-->
Considerations for enabling or disabling Entra ID SSO
- Only enable Entra ID single sign-on once you have completed all configuration described at Microsoft Entra single sign-on. Otherwise single sign-on will fail and users may experience launch delays or errors.