Citrix Provisioning™ Accelerator
Citrix Provisioning Accelerator optimizes the capability of Citrix Provisioning services and is available only on XenServer.
Some of the benefits of using Citrix Provisioning Accelerator are:
- Less administration time
- Greater employee productivity
- Decreased security vulnerability window
- Save money on storage and networking
- More scalability on existing infrastructure
- Faster deployments of more users and desktops
- More GTM and increased business agility
Note:
- PVS-Accelerator is available for XenServer Premium Edition customers. To use the PVS-Accelerator feature, upgrade the Citrix License Server to version 11.14 or later.
- To use PVS-Accelerator with UEFI-enabled VMs, use Citrix Provisioning 1906 or later.
- To enable Citrix Provisioning Accelerator for targets using IPv6 streaming use XenServer8.
How does PVS-Accelerator work
Citrix Provisioning Accelerator enables a provisioning proxy to reside in Dom0 (the XenServer Control Domain) on a XenServer host. This is the location where streaming of a provisioning virtual disk is cached at the proxy before being forwarded to the VM. Using the cache, subsequent VM booting (or any I/O requests) on the same host are streamed from the proxy rather than streaming from the server over the network. Using this model, more local resources on the XenServer host are consumed, but streaming from the server over the network saves resources, effectively improving performance.
Considerations
Consider the following when using the PVS-Accelerator feature:
- Citrix Provisioning target devices are aware of their proxy status. No additional configuration is required once the capability is installed.
-
Do not disable Citrix Provisioning Accelerator on a VM using the XenCenter. If you do, provisioning fails to recognize the configuration change and continues to believe that the accelerator feature is enabled on that VM. If you want to disable this feature for a single device, see:
Limitations
- In environments where multiple Citrix Provisioning servers are deployed with the same VHD, but have different file system timestamps, data might be cached multiple times. Due to this limitation, we recommend using VHDX format, rather than VHD for virtual disks.
- After reinstalling XenServer, the accelerator cache remains configured in the Citrix Provisioning database. This process causes an error in the VM setup wizard because Citrix Provisioning assumes that the cache still exists. To resolve this issue, delete and then add the XenServer host using the provisioning console. This procedure enables Citrix Provisioning to clear the stored cache configuration. After the stored cache configuration has been cleared, the administrator can create one in XenCenter.
Enable Citrix Provisioning Accelerator
Complete the following configuration settings in XenServer and in Citrix Provisioning to enable the Citrix Provisioning Accelerator feature:
-
Configure Citrix Provisioning Accelerator in XenServer by using XenCenter or the xe CLI. This configuration includes adding a Citrix Provisioning site and specifying the location for Citrix Provisioning cache storage.
- For information about configuring the PVS-Accelerator using the xe CLI, see Configure PVS-Accelerator in XenServer by using the CLI.
- For more information about configuring the PVS-Accelerator using XenCenter, see Enabling PVS-Accelerator.
For information on specifying the location for Citrix Provisioning cache storage, see:
-
Complete the cache configuration for the Citrix Provisioning Site using the Citrix Virtual Desktops™ Setup Wizard or Streamed VM Setup Wizard. See Configure cache in Citrix Provisioning
Configure cache in Citrix Provisioning
Before doing this, create a Citrix Provisioning Site object. For information, see Enable PVS-Accelerator.
Use the Citrix Virtual Desktops Setup Wizard or Streaming VM Wizard (depending on your deployment type) to access the Proxy capability. Although both wizards are similar and share many of the same screens, the following differences exist:
- The Citrix Virtual Desktops Setup Wizard is used to configure VMs running on the XenServer hypervisor that is controlled using Citrix Virtual Desktops.
- The Streaming VM Wizard is used to create VMs on a host. It does not involve Citrix Virtual Desktops.
To configure Citrix Provisioning Accelerator using the provisioning console:
-
Use the Configuration Wizard to assign IPv4 and IPv6 streaming addresses to Citrix Provisioning Servers. See Select network addresses for the stream service.
Note:
To enable Citrix Provisioning Accelerator for targets using IPv6 streaming, use XenServer8.
- Navigate to the site where this Citrix Provisioning server is a member.
-
Select the site, then right-click to expose a contextual menu.
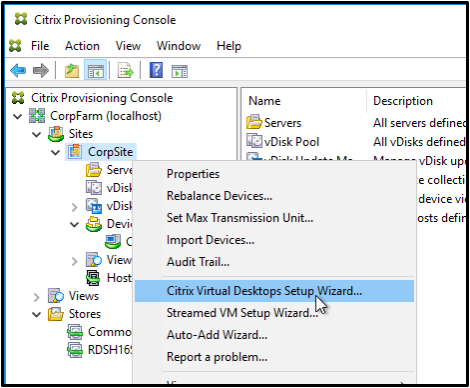
- Select the appropriate Wizard based on how you intend to use the accelerator feature.
-
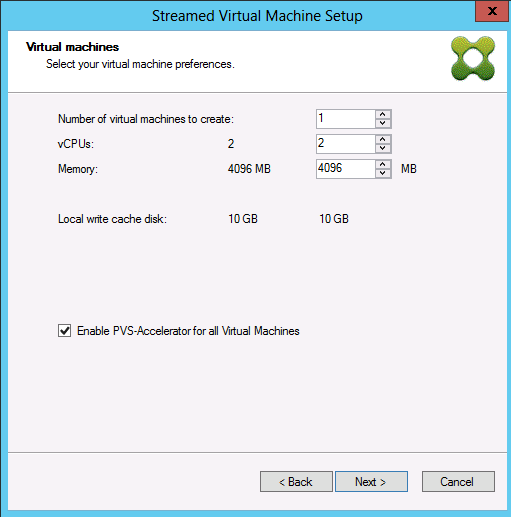
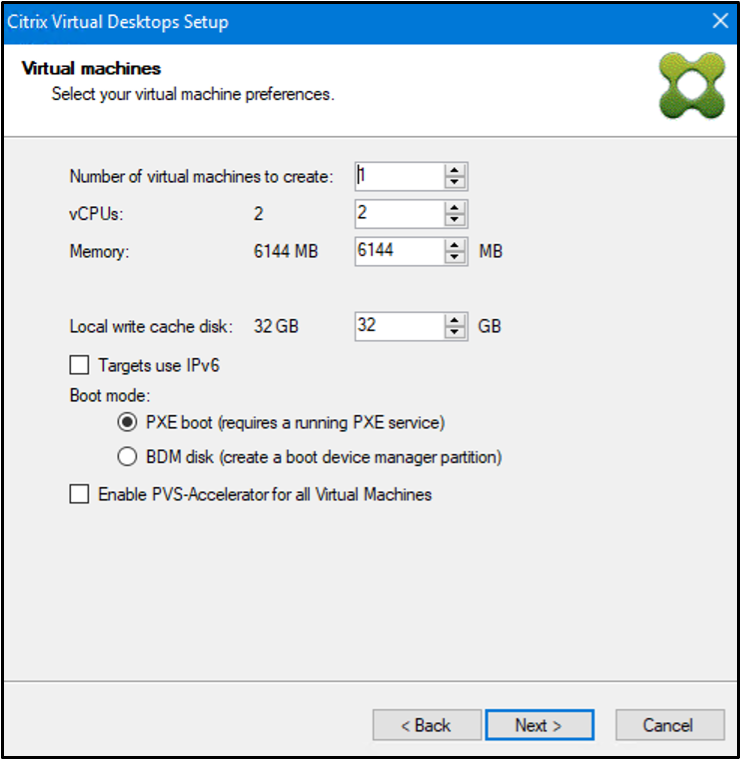
Select the option Enable PVS-Accelerator for all Virtual Machines to enable the PVS-Accelerator feature.
-
If you are enabling virtual disk caching for the first time, the XenServer screen appears on the Streamed Virtual Machine Setup wizard. It displays the list of all Citrix Provisioning sites configured on XenServer that have not yet been associated with a Citrix Provisioning site. Using the list, select a Citrix Provisioning site to apply PVS-Accelerator. This screen is not displayed when you run the wizard for the same Citrix Provisioning site using the same XenServer.
- Click Next to complete the caching configuration.
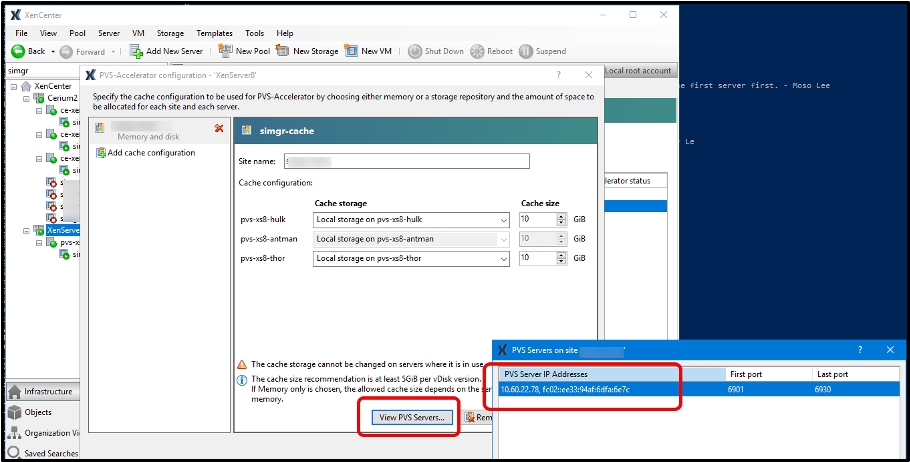
- Click Finish to provision Streamed VMs and associate the selected Citrix Provisioning site with the PVS Accelerator in XenServer.
-
When this step is complete, the View PVS Servers button in the PVS-Accelerator configuration window is enabled in XenCenter. Click View PVS Servers to display the IP addresses of all PVS Servers associated with the Citrix Provisioning site. You must see all IPv4 and IPv6 addresses.
Troubleshoot
When a proxy cache configuration is tied to a provisioning server and you reinstall XenServer on the host that had the accelerator feature enabled, Citrix Provisioning and XenServer become out of sync. This occurs because the reinstallation of XenServer wipes the previously configured proxy cache configuration. Reconfiguration of Citrix Provisioning server also causes the previously configured Citrix Provisioning site object to become out of sync.
In this scenario, Citrix Provisioning assumes that the proxy cache configuration still exists, and when the Streamed VM Setup Wizard is used, it fails. This process indicates that the provided UUID (associated with the proxy configuration) is invalid.
To resolve the issue, delete all previously configured VMs associated with this cache configuration, including the host. Reconfigure Citrix Provisioning and set up the cache again.
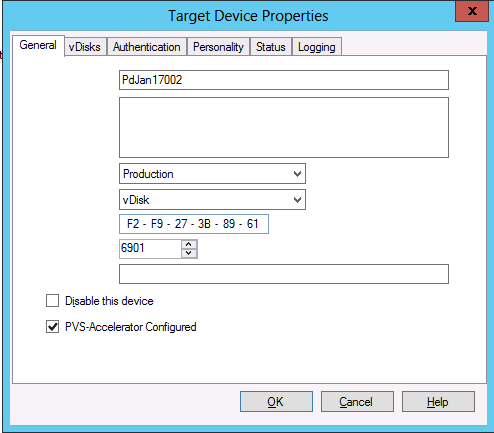
Enable or disable Citrix Provisioning Accelerator for individual devices
Use the Target Device Properties screen to enable or disable the feature for an individual device.
Note:
Do not disable the Citrix Provisioning Accelerator on a VM using the XenCenter. If you do, provisioning fails to recognize the configuration change and continues to believe that the accelerator feature is enabled on that VM.
To enable or disable this feature for an individual device:
- Go the Target Device Properties screen.
- In the General tab, select (or deselect) PVS-Accelerator Configured.
-
Click OK to apply the change.
Disable Citrix Provisioning Accelerator for all devices on a host
If you enable PVS-Accelerator for a host, you can disable it using the Virtual Host Connection Properties screen for all devices on the specified host.
Important:
You cannot use the Virtual Host Connection Properties screen to enable PVS-Accelerator on the specified host. Enable the feature using one of the Wizards (Citrix Virtual Apps and Desktops™ Setup Wizard or Streamed VM Wizard) while creating devices.
To disable this feature for all devices on the specified host:
- Access the Virtual Host Connection Properties screen.
- In the General tab, select (or deselect)PVS-Accelerator Enabled.
- Select Yes when you are prompted to confirm the action.
- After verifying the action, click OK to apply the change.