Store configuration
This article is a reference document to help you get started with Citrix Workspace app for Linux.
Verify the current version of the Citrix Workspace app installed in your system. For more information see, Verify the version of the Citrix Workspace app section.
Store
A store aggregates available applications and desktops for a user into a single place. A user can have multiple stores and switch across stores as needed. An admin delivers the store URL that has pre-configured resources and settings. You can access these stores through the Citrix Workspace app.
For more information on the store, see the StoreFront documentation.
Types of stores
You can add the following store types in the Citrix Workspace app:
Workspace
Citrix Workspace is a cloud-based enterprise app store that provides secure and unified access to apps, desktops, and content (resources) from anywhere, on any device. These resources can be Citrix DaaS, content apps, local and mobile apps, SaaS and Web apps, and browser apps. For more information, see Citrix Workspace Overview.
StoreFront
StoreFront is an on-premises enterprise app store that aggregates applications and desktops from Citrix Virtual Apps and Desktops sites into a single easy-to-use store for users.
For more information, see StoreFront documentation.
Citrix Gateway Store
Configure Citrix Gateway to enable users to connect from outside the internal network. For example, users who connect from the Internet or from remote locations.
Custom web stores
Starting with 2203, you can access your organization’s custom web store from the Citrix Workspace app.
To use this feature, if Global App Configuration Service is available:
The administrator must add the domain or the custom web store to the list of allowed URLs in the Global App Configuration Service. After you’ve added the domain or the custom web store, provide the custom web store URL or email address in the Add Account screen in the Citrix Workspace app. The custom web store opens in the native Workspace app window.
For more information about configuring web store URLs for end-users, see Global App Configuration Service.
Note:
The Pinning multi-monitor screen layout feature isn’t supported in the custom web store.
To remove the custom web store, go to Accounts > Add or Remove accounts, select the custom web store URL, and click Remove.
As a prerequisite, you must enable the custom web store in the AuthManConfig.xml file. To enable it:
- Navigate to the
$ICAROOT/config/AuthManConfig.xmlconfiguration file. -
Add the following entries:
<key>AppConfigEnabled</key>
<value>true</value>
<!--NeedCopy-->
To use this feature, if Global App Configuration Service isn’t available:
Perform the following configuration changes:
- Navigate to the
$ICAROOT/config/AuthManConfig.xmlconfiguration file. -
Add the following entries:
<key>AppConfigEnabled</key> <value>false</value> <!--NeedCopy--> -
Add the list of URLs that must be considered for the custom web store in the following way.
<AllowedWebStoreCache>
<value><URL1></value>
<value><URL2></value>
..
<value>....</value>
</AllowedWebStoreCache>
<!--NeedCopy-->
Note:
You can only use the URLs listed in the
AuthManConfig.xmlfile for the custom web store. You can add extra URLs in theAuthManConfig.xmlfile that you want to be considered for the custom web store.
Adding store URL to Citrix Workspace app
You can provide users with the account information that they need to access virtual desktops and applications using the following:
- Providing users with account information to enter manually
- Configuring email-based auto-discovery
- Adding store through CLI
Provide users with account information to enter manually
After installing the Citrix Workspace app successfully and when you launch the app for the first time, the following screen appears. Users are required to enter an email or server address to access the apps and desktops. When a user enters the details for a new account, Citrix Workspace app tries to verify the connection. If successful, Citrix Workspace app prompts the user to log on to the account.
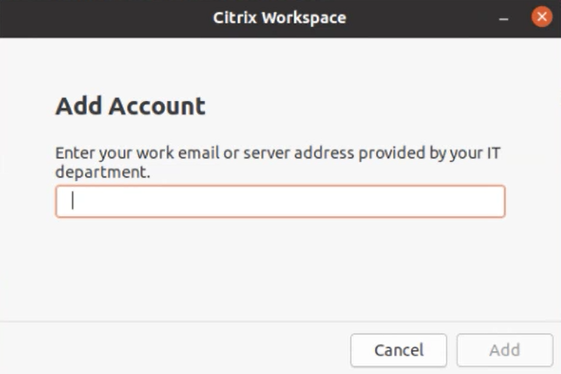
To enable users to set up accounts manually, be sure to distribute the information required to connect to their virtual desktops and applications.
- To connect to a Workspace store, provide the Workspace URL.
- To connect to a StoreFront store, provide the URL for that server. For example:
https://servername.company.com. - To connect through Citrix Gateway, provide users with the Citrix Gateway fully qualified domain name.
Email-based auto-discovery of store
You can now provide your email address in Citrix Workspace app to automatically discover the store associated with the email address. If there are multiple stores associated with a domain, by default the first store returned by the Global App Configuration Service is added as the store of choice. Users can always switch to another store if necessary.
To disable this feature, do the following:
- Navigate to
$ICAROOT/config/AuthManConfig.xmlfile. -
Set the following entry to false.
<key>AppConfigEnabled</key>
<value>false</value>
<!--NeedCopy-->
Adding store through CLI
Install Citrix Workspace app for Linux as an administrator using the command-line interface.
For more information, see the Storebrowse section.
Enhanced the user interface for seamless login experience
Starting with the 2405 release, Citrix Workspace™ app for Linux’s user interface has been enhanced to be more modern and provides seamless login experience for first time users.
Previously, Citrix Workspace app for Linux were using two different GTK windows for store addition and enumeration of the resources. With this release, Citrix Workspace app displays the Welcome page with the option to add the store.
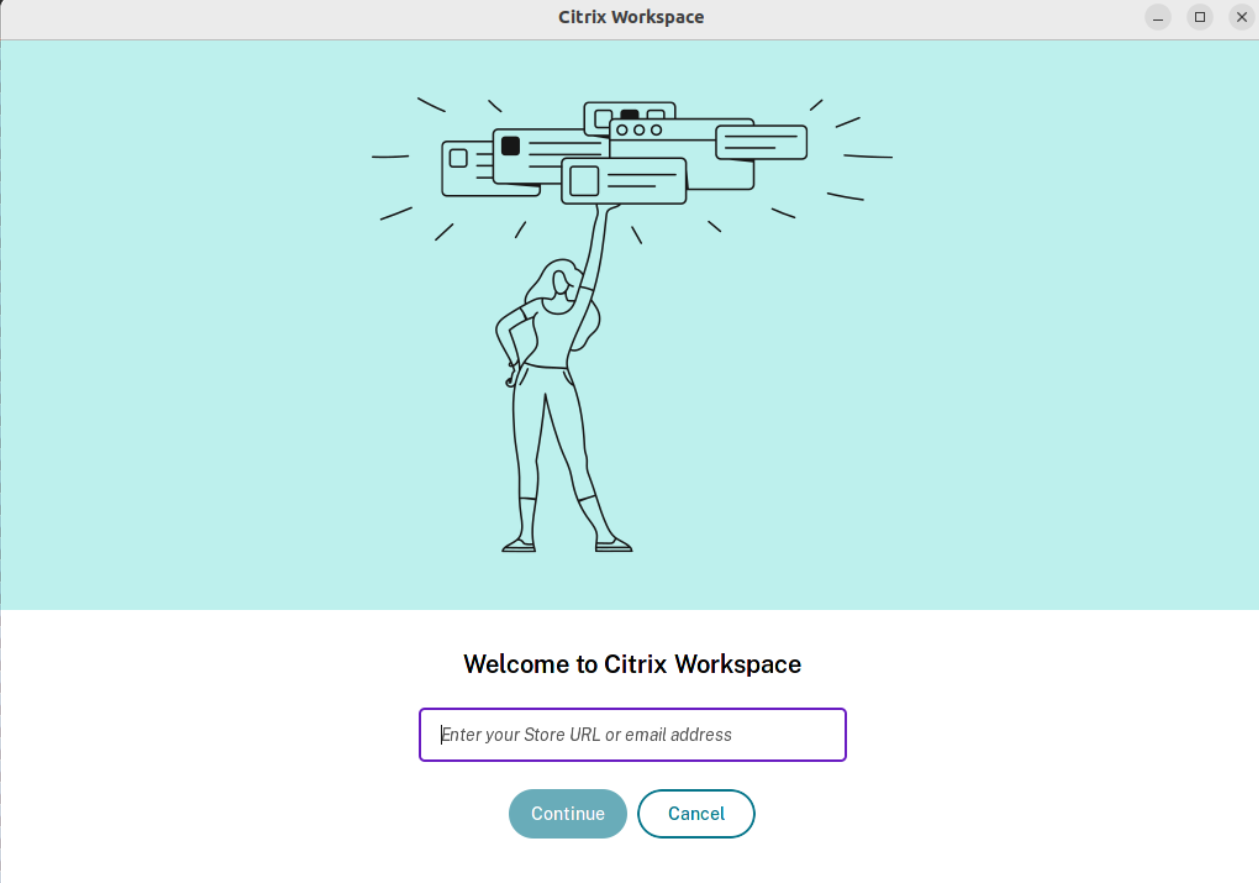
This feature also includes the following enhancements to the UI:
After completing the installation, the option to login now or skip login for later is displayed. If the user enters invalid store url, invalid or incomplete e-mail id, or invalid IP adress, an intuitive error message is displayed based on the input.
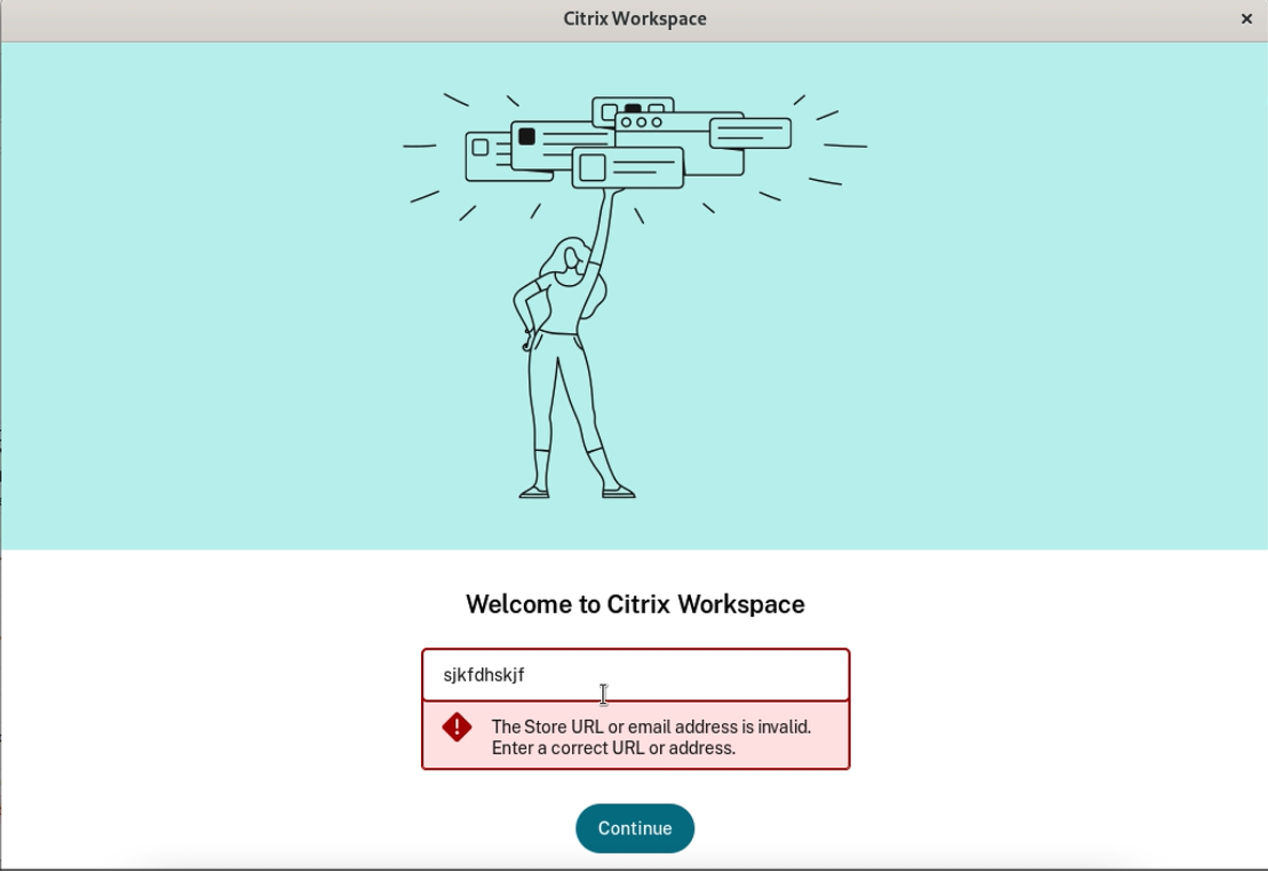
This feature is disabled by default.
To enable this feature, do the following:
- Navigate to /opt/Citrix/ICAClient/config/AuthmanConfig.xml.
- Add the following entry:
          <key>AccountConfigEnabled</key>

           <value>true</value>

<!--NeedCopy-->
Set up
You can download the installation package, customize the configuration, and then install the Citrix Workspace app.
You can modify the contents of the Citrix Workspace app package and then repackage the files.
Customize installation
- Expand the Citrix Workspace app package file into an empty directory. The package file is called platform.major.minor.release.build.tar.gz (for example,
linuxx86-<version>.tar.gzfor the Linux/x86 platform). - Make the required changes to the Citrix Workspace app package. For example, you can add a TLS root certificate to use a certificate from the Certificate Authority that is not a part of the standard Citrix Workspace app installation.
- Open the
PkgIDfile. -
Add the following line to indicate that the package was modified:
MODIFIED=traceinfo
where,
traceinfois information indicating who made the change and when. - Save and close the file.
- Open the package file list, platform/platform.psf (for example, linuxx86/linuxx86.psf for the Linux/x86 platform).
- Update the package file list to reflect the changes you made to the package. Not updating might cause an error when installing the new package. Changes can include updating the size of any files you modified, or adding new lines for any files you added to the package. The columns in the package file list are:
- File type
- Relative path
- Subpackage (always set to
cor) - Permissions
- Owner
- Group
- Size
- Save and close the file.
- Use the tar command to rebuild the Citrix Workspace app package file. For example,
tar czf ../newpackage.tar.gz *, wherenewpackagezis the name of the new Citrix Workspace app package file.
Latest webkit support
Citrix Workspace app for Linux requires libwebkit2gtk (2.16.6+).
libwebkit2gtk has the following advantages:
- Improved UI experience. webkit2gtk is compatible with the browser content redirection feature. Use webkit2gtk Version 2.24 or later for an even better YouTube viewing experience.
- webkit2gtk Version 2.16.6 and later improves the sign-in experience and the time that it takes to sign in.
- The app works better with newer Linux distributions and provides with the latest
webkitsecurity fixes.
Note:
webkit2gtk isn’t available on some Linux distributions. As a workaround, consider the following options:
- Build webkit2gtk from the source before installing Citrix Workspace app 1906.
- Move to a later Linux distribution that supports webkit2gtk 2.16.6 or later.
Launch
You can start Citrix Workspace app either at a terminal prompt or from one of the supported desktop environments.
Ensure that the environment variable ICAROOT is set to point to the actual installation directory.
Tip:
The following instruction does not apply to installations made from the Web packages, and where the tarball is used. This instruction is applicable when the requirements for self-service haven’t been met.
Terminal prompt
To start the Citrix Workspace app at the terminal prompt:
- Type
/opt/Citrix/ICAClient/selfservice -
Press Enter (where /opt/Citrix/ICAClient is the directory in which you installed Citrix Workspace app). The Do you accept the EULA? dialog box appears.
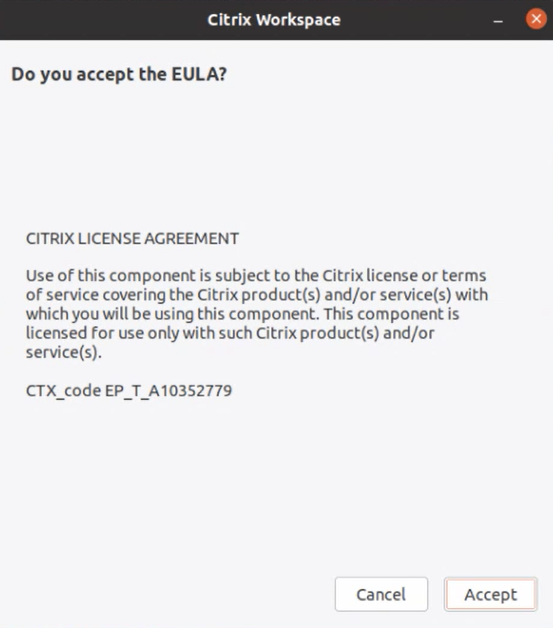
- Click Accept to continue with adding the store.
Note:
The Do you accept the EULA? dialog box appears only if you access the Citrix Workspace app for Linux first time after the installation.
Linux desktop
You can start the Citrix Workspace app from a desktop environment using a file manager.
On some desktops, you can also start Citrix Workspace app from a menu. Citrix Workspace app is available in different menus depending on your Linux distribution.
On Ubuntu, the Citrix Workspace app icon appears as follows:

Preferences
To set preferences, click Preferences from the Citrix Workspace app menu. You can control the following:
- How desktops are displayed
- Connect to different applications and desktops
- Manage file and device access
Manage an account
To access desktops and applications, you need an account with Citrix Virtual Apps and Desktops or Citrix DaaS (formerly Citrix Virtual Apps and Desktops service). Your IT help desk might ask you to add an account to Citrix Workspace for this purpose. Or they might ask you to use a different Citrix Gateway or Access Gateway server for an existing account. You can also remove accounts from Citrix Workspace.
- On the Accounts page of the Preferences dialog, do one of the following:
- To add an account, click Add. Contact your system administrator for more information.
- To change details of a store that the account uses, such as the default gateway, click Edit.
- To remove an account, click Remove.
- Follow the on-screen prompts. When prompted, authenticate to the server.
Desktop display
You can display desktops across the entire screen on your user device (full screen mode), which is the default, or in a separate window (windowed mode).
- On the General page of the Preferences dialog box, select a mode using the Display desktop in option.
Use the You can enable Desktop Viewer toolbar functionality to dynamically modify the window configuration of your remote session.
Desktop Viewer
Your requirements for the way users access virtual desktops can vary from user to user and might vary as your corporate needs evolve.
Use the Desktop Viewer when users interact with their virtual desktop. The user’s virtual desktop can be a published virtual desktop, or a shared or dedicated desktop. In this access scenario, the Desktop Viewer toolbar functionality allows the user to switch a session between windowed and full-screen session window, including multi-monitor support for the intersected monitors. Users can switch between desktop sessions and use more than one desktop using multiple Citrix Virtual Apps and Desktops™ or Citrix DaaS connections on the same user device. Buttons to minimize all desktop sessions, send the Ctrl+Alt+Del sequence, disconnect, and log off from the session are provided to manage a user’s session conveniently.
Pressing Ctrl+Alt+Break displays the Desktop Viewer toolbar buttons in a pop-up window.
Enhanced Desktop Viewer toolbar
Starting with the 2408 version, Citrix Workspace app for Linux provides an enhanced Desktop Viewer toolbar.

The enhanced Desktop Viewer toolbar provides the following options:
- Show or hide toolbar - Click this button to show or hide the Desktop Viewer toolbar
- Switch desktop - Click this button to see the available open desktops. You can switch to another desktop by clicking the desktop that you want to access. The opened desktop shows in the front.
- Ctrl+Alt+Del - Click this button to access the shortcuts. The available shortcut is Ctrl+Alt+Del.
- Devices - Click this button to access the options in the Devices section.
- Preferences - Click this button to access the options in the Preferences section.
- Minimize - Click this button to minimize the virtual session.
- Fullscreen or Restore - Click the “Fullscreen” button to expand the desktop session to full screen. Click the “Restore” button to restore the full screen session to the previous window mode.
- Disconnect / Sign out - Click this button to sign out or to disconnect from a virtual session.
You can float or rotate the toolbar as per your preference across the screen. By default, the new toolbar is available.
Customize toolbar
Previously, you could completely disable the Desktop Viewer toolbar. However, you couldn’t enable or disable a few options on the toolbar. Starting with the 2408 release, you can customize the Citrix Workspace app toolbar by adding and removing options on the toolbar.
To hide Devices option on the toolbar, do the following:
- Navigate to the $HOME/.ICAClient/wfclient.ini file.
- Go to the [WFClient] section and add the following entry as required to hide the options on the toolbar:
    DevicesButtonVisible=False
<!--NeedCopy-->
Accessibility support for enhanced Desktop Viewer toolbar
Starting with the 2408 version, you can access the enhanced Desktop Viewer toolbar using the keyboard of your endpoint devices. With this feature, you can invoke the toolbar, navigate through the options, and select the required options using the keyboard shortcuts.
Use the following keyboard shortcuts to access the toolbar:
-
Ctrl + Shift + t: Show the toolbar and move focus to the first button. -
Tab: Navigate the options in the forward direction. -
Space: Select a menu. -
UpandDownarrow keys: Navigate across submenus. -
Enter: Select a submenu. -
Esc: When focus on sub-menu, quit the submenu. When focusing on the toolbar, remove the focus and quit the keyboard shortcut mode.
Modify or disable a keyboard shortcut combinations
You can modify or disable a shortcut key combination as per your preference.
To modify a shortcut key combination:
For example, if you want to modify the shortcut Ctrl + Shift + t, do the following:
- Navigate to the
$HOME/.ICAClient/wfclient.inifile. - Go to the
[WFClient]section and add the following entry:
WCAGModeKeyCombination="Ctrl+Shift+W"
<!--NeedCopy-->
Note:
Make sure the new shortcut key doesn’t conflict with other shortcuts.
To disable a shortcut key combination:
For example, if you want to disable the shortcut Ctrl + Shift + t, do the following:
- Navigate to the
$HOME/.ICAClient/wfclient.inifile. - Go to the
[WFClient]section and add the following entry with empty key:
WCAGModeKeyCombination=
<!--NeedCopy-->
Automatic session reconnects
Citrix Workspace app can reconnect to desktops and applications that are disconnected. For example, a network infrastructure issue.
- On the General page of the Preferences dialog box, select an option in Reconnect apps and desktops.
Access local files
A virtual desktop or application needs access to files on your device. You can control the extent to which this access happens.
- On the File Access page of the Preferences dialog box, select a mapped drive and then one of the following options:
- Read and write - Allow the desktop or application to read and write to local files.
- Read only - Allow the desktop or application to read but not write to local files.
- No access - Do not allow the desktop or application to access local files.
- Ask me each time - Display a prompt each time the desktop or application access local files.
- Click Add, specify the location, and select a drive to map to it.
Microphone and Webcam
To set up a microphone or a webcam, you can change the way a virtual desktop or application accesses your local microphone or webcam:
On the Mic & Webcam page of the Preferences dialog box, select one of the following options:
- Use my microphone and webcam - Allow the microphone and webcam to be used by the desktop or application.
- Don’t use my microphone or webcam - Do not allow the microphone or webcam to be used by the desktop or application.
Connect
Citrix Workspace app provides users with secure, self-service access to virtual desktops and applications, and on-demand access to Windows, web, and Software as a Service (SaaS) applications. Citrix StoreFront or legacy webpages created with Web Interface manage the user access.
To connect to resources using the Citrix Workspace UI
The Citrix Workspace app home page displays virtual desktops and applications that are available to the users based on their account settings (that is, the server they connect to) and settings configured by Citrix Virtual Apps and Desktops or Citrix DaaS administrators. Using the Preferences > Accounts page, you can configure the URL of a StoreFront server or, if email-based account discovery is configured, by entering the email address.
Tip:
If you use the same name for multiple stores on the StoreFront server, you avoid duplications by adding numbers. The names for such stores depend on the order in which they’re added. For Citrix Workspace app, the store URL is displayed and uniquely identifies the store.
After connecting to a store, the self-service shows the tabs: FAVORITES, DESKTOPS, and APPS. To launch a session, click the appropriate icon. To add an icon to FAVORITES, click the Details link next to the icon and select Add To Favorites.
Configure connection settings
You can configure some default settings for connections between Citrix Workspace app and Citrix Virtual Apps and Desktops or Citrix DaaS servers. You can also change these settings for individual connections, if necessary.
Although the tasks and responsibilities of administrators and users can overlap, the term “user” is used to distinguish user tasks from those tasks that an administrator performs.
Connect to resources from a command line or browser
You create connections to servers when you click a desktop or application icon on the Citrix Workspace app home page. Also, you can open connections from a command line or from a web browser.
To create a connection to a Program Neighborhood or StoreFront server using a command line
Prerequisite:
Ensure that the store is known to Citrix Workspace app. If necessary, add it using the following command:
```
./util/storebrowse --addstore \<store URL\>
<!--NeedCopy--> ```
-
Get the unique ID of the desktop or application that you want to connect to. This ID is the first quoted string on a line acquired in one of the following commands:
-
List all desktops and applications on the server:
./util/storebrowse -E <store URL> <!--NeedCopy--> -
List the desktops and applications that you’ve subscribed to:
     ./util/storebrowse -S <store URL>
 <!--NeedCopy-->
-
-
Run the following command to start the desktop or application:
   ./util/storebrowse –L <desktop or application ID> <store URL>
   <!--NeedCopy-->
If you can’t connect to a server, you might need to check your administrator for issues like server location or SOCKS proxy. For more information, see proxy server.
To create a connection from a web browser
Configuration for starting sessions from a web browser is typically carried out automatically during installation. Because of the wide variety of browsers and operating systems, some manual configuration can be required.
If you set up .mailcap and MIME files for Firefox, Mozilla, or Chrome manually, use the following file modifications. Using these modifications, the .ICA files start up the Citrix Workspace app executable, wfica. To use other browsers, modify the browser configuration accordingly.
-
Run the following commands for non-administrator installation of Citrix Workspace app. The settings of ICAROOT might be changed if they’re installed to a non-default location. You can test the result with the command
xdg-mime query default application/x-ica, which must return “wfica.desktop.”export ICAROOT=/opt/Citrix/ICAClientxdg-icon-resource install --size 64 $ICAROOT/icons/000_Receiver_64.png Citrix Workspace appxdg-mime default wfica.desktop application/x-icaxdg-mime default new_store.desktop application/vnd.citrix.receiver.configure -
Create or extend the file /etc/xdg/mimeapps.list (for administrator installation) or
$HOME/.local/share/applications/mimeapps.list (mimeapps.list). The file must start with [Default Applications], and follow by:application/x-ica=wfica.desktop;application/vnd.citrix.receiver.configure=new_store.desktop;You might require to configure Firefox on its Preferences/Applications setting page.
For “Citrix ICA® settings file content,” select:
-
“Citrix Workspace app Engine (default)” in the drop-down menu
or
-
“Use other …” and then select the file /usr/share/applications/wfica.desktop (for an administrator installation of Citrix Workspace app)
or
-
$HOME/.local/share/applications/wfica.desktop (for a non-administrator installation).
-
Connection Center
Users can manage their active connections using the Connection Center. This feature is a useful productivity tool that enables users and administrators to troubleshoot slow or problematic connections. With Connection Center, users can manage connections by:
- Closing an application.
- Logging off a session. This step ends the session and closes any open applications.
- Disconnecting from a session. This step cuts the selected connection to the server without closing any open applications (unless the server is configured to close applications on disconnection).
- Viewing connection transport statistics.
Manage a connection
To manage a connection using the Connection Center:
-
On the Citrix Workspace app menu, click Connection Center.
The servers that are used appear and active sessions are listed.
-
Do one of the following:
- Select a server, disconnect or log off, or view its properties.
- Select an application, close the window.
User Interface enhancement
Previously, the settings menu was available from the Preferences option in the Desktop Viewer.
Starting with version 2106, the settings menu appears in line with the Self-Service plug-in. The menu options are now improved to align with the look and feel of the native Citrix Workspace. This enhancement results in a seamless and a better user experience.
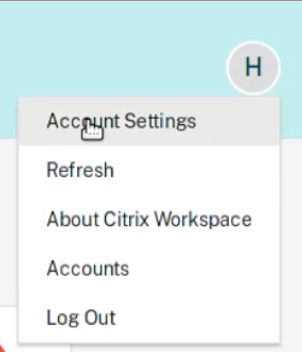
Note:
This enhancement is available by default in Citrix Workspace app Version 2106 in cloud deployments.
To switch to the native and old style appearance, do the following:
Navigate to $ICAROOT/config/AuthManConfig.xml and set the value of WebUISettings to False.
Addition of DisableClientAppManagement flag
Citrix Workspace app for Linux introduces a new configuration flag called DisableClientAppManagement. This flag allows for improved control over client app behavior.
The DisableClientAppManagement flag disables various Client App Management operations, including:
- GACS discovery calls
- Settings synchronization or retrieval related to client apps
By default, the DisableClientAppManagement flag is set to false, meaning that Client App Management operations are enabled. When set to true, the flag skips all related operations during runtime, creating a lighter or more restricted environment as needed.
This enhancement offers a configurable option to adapt the Citrix Workspace app’s behavior based on specific deployment needs or system constraints.