Session experience
Enhanced Connection Strength Indicator
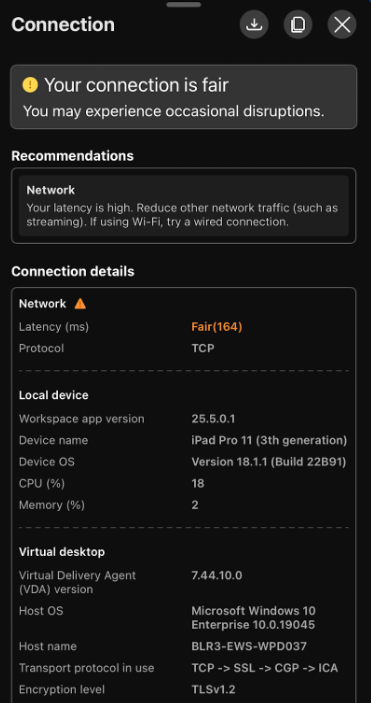
From 25.7.2, we have enhanced the connection strength indicator. This enhancement provides real-time insights into your connection quality and helps self-troubleshoot connectivity issues. This capability can be accessed from the toolbar and is enabled by default.
Prerequisites:
-
To use this feature, enable the enhanced Desktop Viewer toolbar. Administrators must enable the new toolbarfeature through Global App Configuration service. This feature is only available in VDA 2407 or later.
-
The Supportability Virtual Channel must be enabled on the client side, which is enabled by default in Citrix Workspace app iOS 24.12.0.
Benefits:
- Immediate feedback: The network strength icon notifies users when network issues are detected.
- Enhanced troubleshooting: Real-time statistics and diagnostics assist users and IT teams in identifying and resolving connectivity issues.
Connection Strength Indicator Enhancements
- Brand-new UI: The user interface has been redesigned for improved clarity and a better user experience.
- Additional connection details: The indicator now displays current device CPU and memory usage.
- Scored metrics and recommendations: Latency and bandwidth scores are calculated and displayed. If a score is “Fair” or “Poor,” a recommendation appears to help address the issue.
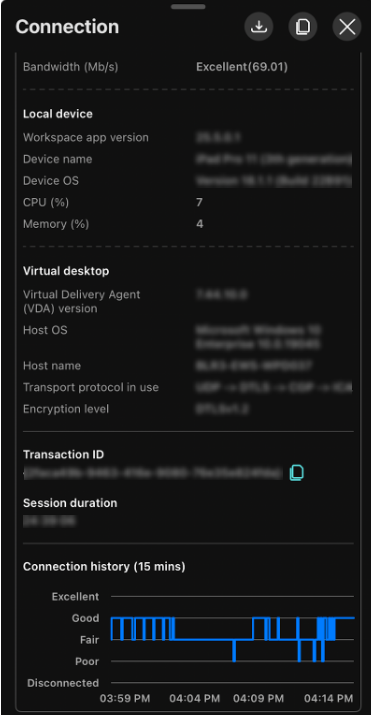
- Connection history: The last 15 minutes of connection scores are recorded and shown in a chart at the bottom of the layout. This composite score is based on bandwidth and latency, and historical data is included in logs when copied or downloaded.
- Download details: All connection metrics, including latency, bandwidth, CPU, and memory usage, are recorded. Connection history for the last 15 minutes is also included in the downloadable logs.
Enhanced session resolution
Starting with version 25.3.0, Citrix Workspace app for iOS introduces enhancements to session resolution, for a more seamless user experience. Defaulting to Auto, the DPI settings adjust automatically whenever a user launches a session, enhancing the overall experience.
To ensure a consistent and user-friendly experience, virtual desktops now launch in landscape mode by default. This caters to widescreen applications and multitasking needs. This feature is enabled by default.

Default landscape orientation for virtual desktops
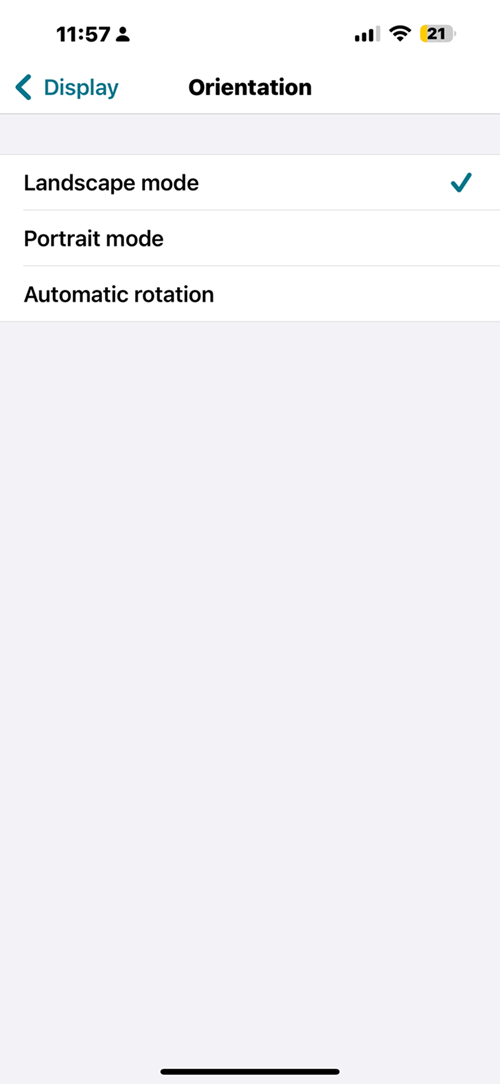
Starting with version 25.1.0, Citrix Workspace app enforces landscape orientation by default when launching a virtual desktop on iPhone devices. This ensures an optimal and consistent user experience for widescreen applications and multitasking. Users can configure orientation settings through the app or HDX-Toolbar to lock in landscape, lock in portrait, auto-adjust based on application metadata, or follow the device’s screen orientation. This flexibility accommodates various workflows, including apps designed for portrait mode, while maintaining a seamless and user-friendly experience.
To configure the default orientation, navigate to Settings > Display > Orientation > Landscape mode.
Enhanced secured ICA®
Starting with version 25.1.0, the new ICA encryption feature improves security by using modern encryption algorithms. This increases the security posture of our product, and subsequently gives our customers a way to enhance the security posture of their environments in a simple and reliable manner. It simplifies setup by eliminating complex certificate management and enables easy configuration through Citrix policy settings. The feature works seamlessly across all supported platforms.
Prerequisites:
- Ensure that the deployment is configured for either CVAD Service or on-premises use.
- Supported platforms include Windows, Linux, Mac, Android, iOS, HTML5, and Chrome OS.
- Administrative access to Citrix Studio is necessary.
Configuration
The feature can be activated or deactivated using a single policy or Delivery Group property. Access the Delivery Controller™ (DDC) and make the following changes:
- Navigate to Settings > Computer Setting - ICA to configure the required policy.
- Run the following command to update Group Policy:
gpupdate/force - Relaunch the session to apply the changes.
DPI matching
The DPI matching feature ensures that the virtual session is rendered according to the DPI of the device. Starting with the 25.1.0 release, a new display setting enhances DPI matching capabilities:
- Automatic Resolution Detection: The app automatically identifies the resolution of the device’s screen.
- Dynamic DPI Adjustment: The DPI of the virtual desktop session dynamically adjusts to match the detected resolution of the display. This ensures optimal clarity, readability, and usability on the respective display.
- Smooth scaling UI elements, fonts, and images scale smoothly without distortion or pixelation when the DPI is adjusted.
- Supports resolutions up to 4K.
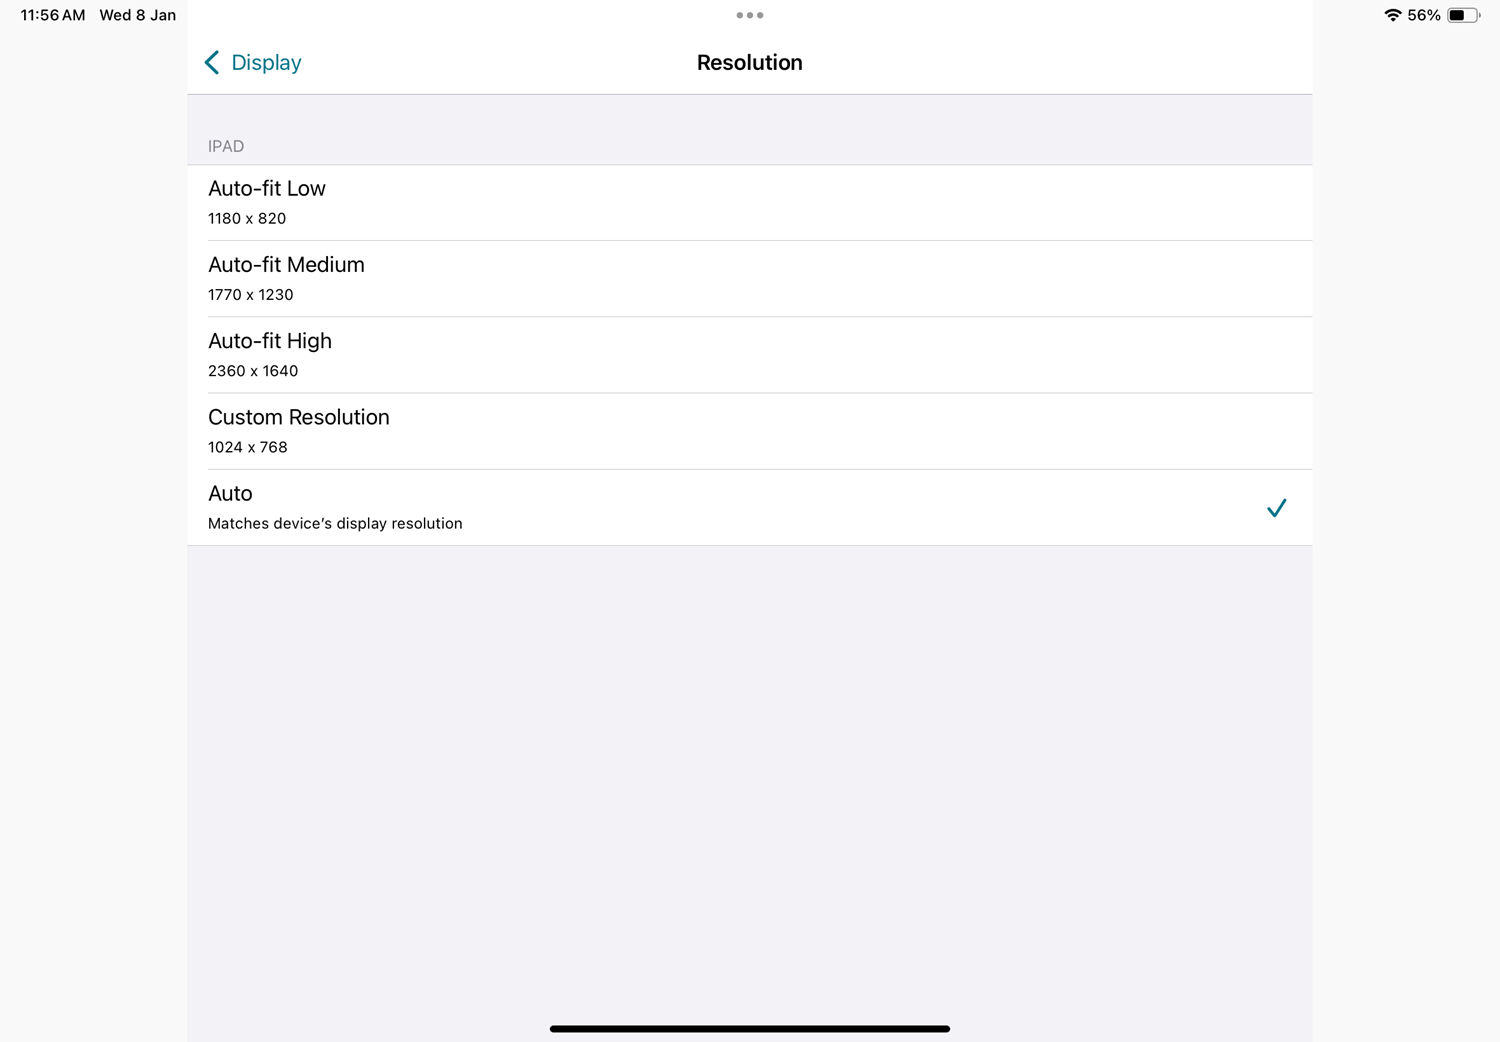
Auto (DPI Matching) option enables automatic DPI adjustment for a seamless display experience. DPI settings are accessible within the app by navigating to Settings > Display > Resolution.
Connection Strength Indicator
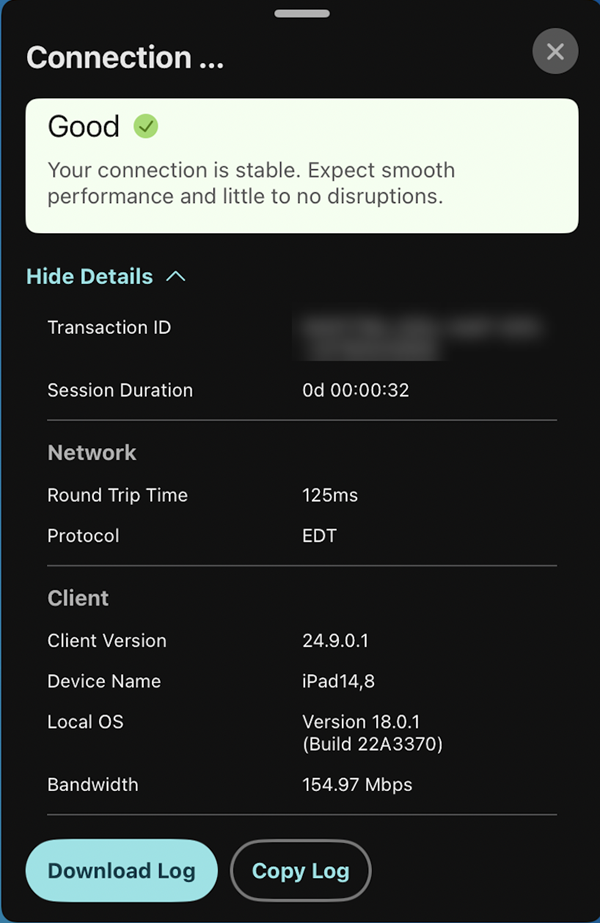
Starting with version 24.12.0, Citrix Workspace app for iOS supports the Connection Strength Indicator on the Desktop Viewer toolbar. This feature displays a network strength icon that alerts you of network issues. By clicking the icon, you can view real-time connection statistics for the client, gateway, and VDA, and copy diagnostic information to share with IT for advanced troubleshooting.
Prerequisites:
-
To use this feature, enable the enhanced Desktop Viewer toolbar. Administrators must enable the new toolbarfeature through Global App Configuration service. This feature is only available in VDA 2405 or later.
-
The Supportability Virtual Channel must be enabled on the client side, which is enabled by default in Citrix Workspace app iOS 24.12.0.
Launch of In-Memory ICA solution
Starting with version 24.12.0, Citrix Workspace app for iOS enhances support for in-memory hybrid launches using the Citrix Workspace launcher. This improvement allows for a more efficient and secure user experience, eliminating the need to download ICA files.
Prerequisites:
Citrix Workspace app for iOS 24.12.0 or higher.
Configuration
To launch Citrix Workspace app without downloading an ICA file, follow these steps on your iOS device:
- Open a supported web browser (Safari, Chrome, or Firefox).
- Go to your organization’s store URL and sign in using your credentials.
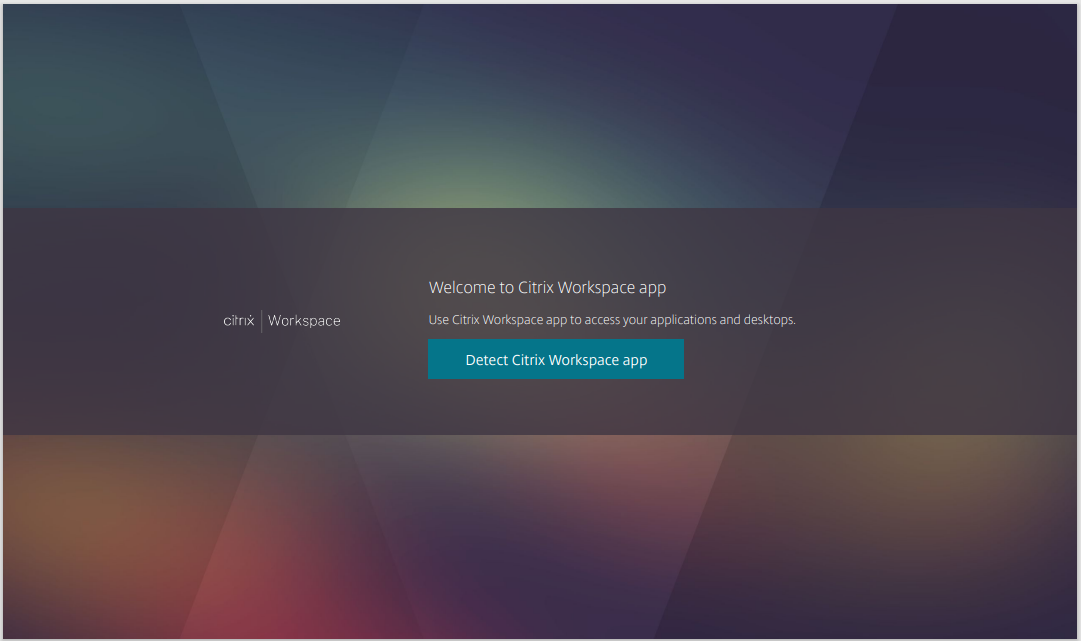
- On the welcome screen, locate and tap Detect Citrix Workspace app. This initiates the client detection process, which opens the Citrix Workspace app.
- After detection, return to the browser. You are now on the organization store’s home screen.
You can now directly access and open your apps and desktops from the organization store interface without requiring an ICA file download.
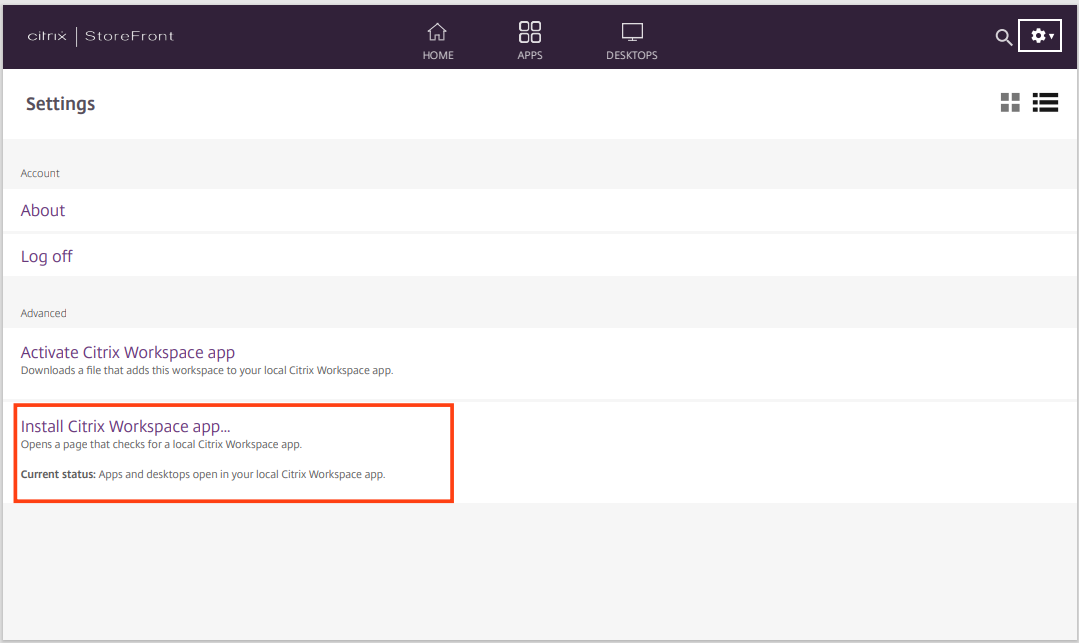
If you skip the client detection during the initial login, then you can navigate from Settings > Install Citrix Workspace App > Client detection.
Limitation:
If client detection fails, the system automatically downloads an ICA file, and the session launches from the downloaded file.
Support for Rapid Scan
Starting with the 24.9.0 version, Citrix Workspace app for iOS supports the Rapid scan feature. You can use this feature to scan multiple documents with an iOS device, and then transfer those scanned documents to a Mac device using the Citrix Workspace app for Mac and iOS.
If you’re signed into Citrix Workspace on both your Mac and iOS device, you can use Rapid Scan to scan documents with your iPhone or iPad. The scanned files are saved on your Mac, and you can also access them remotely from a virtual desktop using Client Drive Mapping. This feature works for both cloud and on-premise stores.
Prerequisites:
- Ensure that both devices are logged into the same Citrix Workspace account.
- Both devices must be connected to the same Wi-Fi network.
- The Citrix Workspace app for Mac must be version 24.9.0 or higher.
How to Use Rapid Scan:
- Open the Citrix Workspace app on your Mac.
-
Long-press (or right-click) the Citrix Workspace icon in the Dock or menu bar.
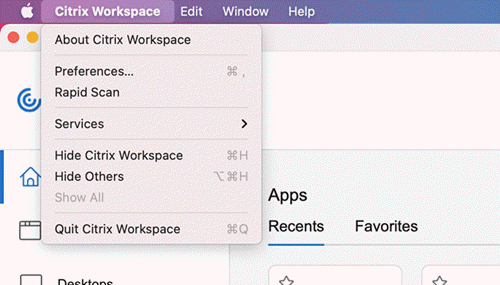
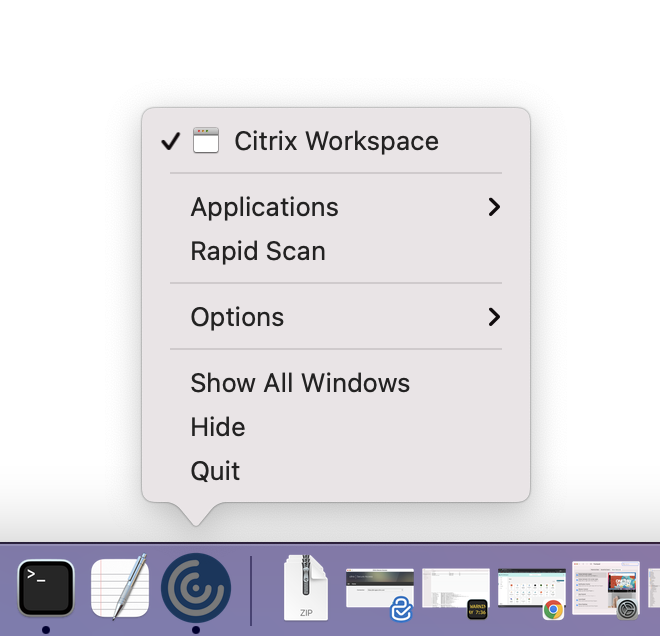
- Select Rapid Scan from the menu. A QR code appears on your Mac screen.
- On your iOS device, go to Settings and tap Rapid Scan.
- Scan the QR code displayed on your Mac using your iOS device.
- When the confirmation window appears on your Mac, click Yes to establish the connection. You can now use your iOS device to scan documents.
- Choose to save the scanned files in PDF or JPEG format.
- By default, the scanned documents are saved to the Downloads folder on your Mac.
- After the download is complete, click Open in Finder on your Mac to locate the scanned documents.
Access scanned documents from a Virtual Desktop:
- Client Drive Mapping (CDM) must be enabled to access your Mac’s storage drives inside the Virtual Desktop. This allows you to transfer files between your Mac and the Virtual Desktop. Please contact your administrator to enable this feature.
- Once CDM is enabled, your local drives are visible in the Virtual Desktop.
- When prompted, allow Read & Write permissions to access your local disk from the Virtual Desktop.
- Navigate to the folder where the scanned documents are stored (the Downloads folder by default) and copy the files to the Virtual Desktop’s storage.
Support for Apple’s native non-mirror mode
You can now extend the display using Apple’s non-mirror mode available with iPad OS 16.2. You can multi-task by running the Citrix Workspace app, virtual apps, and virtual desktops on the external monitor and leaving the iPad screen free to run other native apps.
Note:
Support for Apple’s non-mirror mode extend display is available on selected iPad models only. For more information, see the Apple documentation.
If you don’t want to use this technical preview feature, you can always use Citrix Workspace app in full-screen mode.
Support for sustainability initiative
Starting with version 24.9.0, users see a prompt to sign out of their desktop session upon closing a virtual desktop. This feature helps conserve energy by signing out from VMs when not needed. Previously, these sessions remained in a disconnected state, leading to unnecessary energy consumption.
When disconnecting from a session without sustainability enabled, users see a prompt with a Disconnect and Don’t ask again option for automatic future disconnects. This default text is localized.
If users disconnect with sustainability enabled, the system prompts them to Log out to help conserve energy. As an administrator, you can customize the sustainability message.
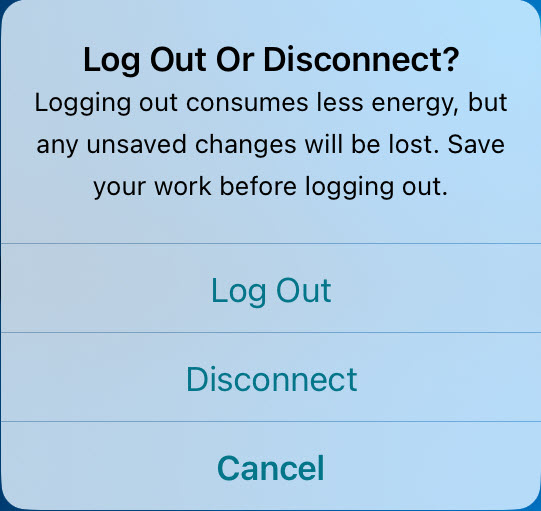
Admins can choose to display the sustainability alert, which includes a leaf icon, and customize the title and prompt message. If the admin doesn’t provide a title or prompt message and turns off the leaf icon while enabling the sustainability feature, a default message appears Disconnect Desktop? Your work remains just as you left it the next time you connect to Managed %@ desktop. The %@ is replaced by the Virtual Desktop app name. These default messages are localized.
Note that messages configured by the admins are not localized, so admins must ensure clarity and accuracy in their text.
For more information on how to enable and customize this feature, see Sustainability initiative from Citrix Workspace app in Citrix Workspace app for Windows documentation.
Enhanced multi-app window management
Starting with version 24.9.0, Citrix Workspace app for iOS now supports seamless multi-app window management for iPads connected to external monitors. This feature enhances multitasking and productivity by allowing native multi-app experiences. It can also be enabled when the iPad device is not connected to external monitors.
With this feature, you can:
- Switch between applications and open a single app in separate windows, enhancing workflow and productivity.
- Use multiple apps in one session while connected to external monitors.
To enable the seamless multi-app, follow these steps:
- Go to Application Settings > Advanced > Multitasking.
- Enable Separate Session Window.
- Enable Multi Windows for Seamless App Session.
Limitation:
- Stage Manager must be enabled on devices and keep it enabled during use.
- You might see a gray overlay after the launch and the HDX session window shows. This happens while the server is starting up. After a couple of seconds/minutes, the users can see the app picture and use it normally.
- This feature is only available on Stage Manager-supported devices such as Apple Silicon chip-equipped iPads.
In this article
- Enhanced Connection Strength Indicator
- Enhanced session resolution
- Default landscape orientation for virtual desktops
- Enhanced secured ICA®
- DPI matching
- Connection Strength Indicator
- Launch of In-Memory ICA solution
- Support for Rapid Scan
- Support for Apple’s native non-mirror mode
- Support for sustainability initiative
- Enhanced multi-app window management