Peripheral devices
Citrix® X1 Mouse
Citrix X1 Mouse pairing and connection status
This feature lets you have more control over the Citrix X1 Mouse pairing process. On the Settings screen, you can:
- Pair the Citrix X1 Mouse. You can also pair an X1 Mouse when you are in a session.
- View the connection status.
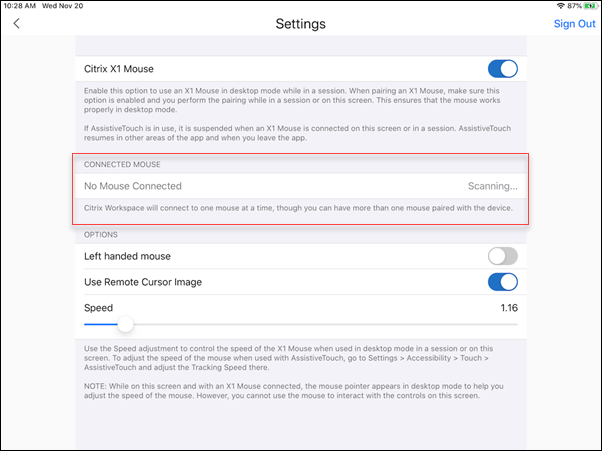
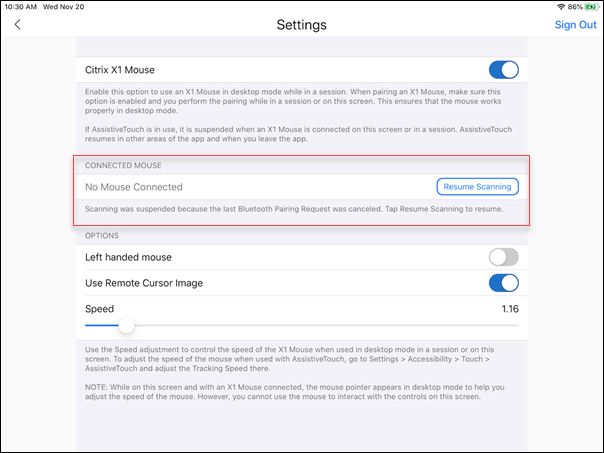
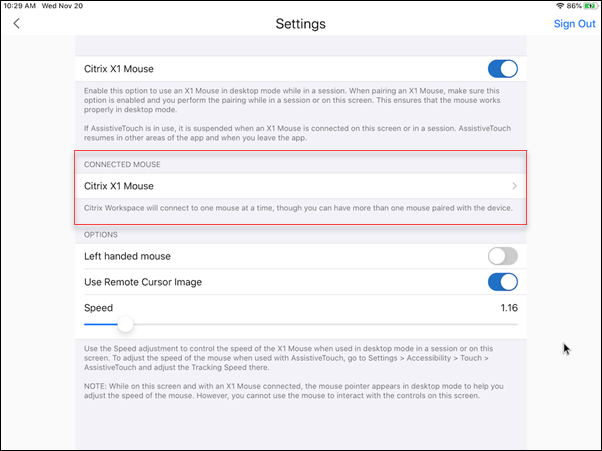
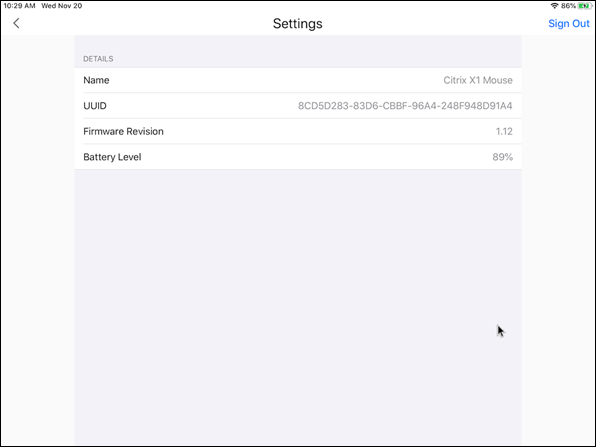
- View the Citrix X1 Mouse properties such as Name, UUID, Firmware Revision, and Battery Level. To do so, tap the Citrix X1 Mouse entry under CONNECTED MOUSE.

Connected mouse properties:
AssistiveTouch
With the AssistiveTouch feature enabled on iOS 13 or later, you can see the AssistiveTouch cursor if you switch between desktop mouse mode and AssistiveTouch mode.
Note:
In desktop mouse mode, the pointer cursor appears. In AssistiveTouch mode, the round cursor appears.
The AssistiveTouch cursor appears in the following cases:
- Leave a session
- Go to the iOS App Switcher screen
- Go to the iOS home screen or another app
Desktop mode resumes when you navigate back to Citrix Workspace app and when you are in a session.
External monitor and toolbar support
You can use the Citrix X1 Mouse to operate the toolbar on an external monitor. You can move the toolbar notch horizontally, while the toolbar is closed. When you connect your iOS device to the external monitor, Citrix Workspace app automatically detects the screen resolution of the external monitor. You can use the Display button on the toolbar to select a particular screen resolution. You can access the Display option without having to add an account or sign in first.
Generic Mouse
Generic mouse and trackpad support
You can use a generic mouse or trackpad to right-click, scroll, and hover in HDX™ sessions. The actions are similar to the Citrix X1 Mouse. The style of the local mouse cursor changes to match that of the remote cursor.
Notes:
- This feature is available on iPadOS 13.4 and later.
- This feature isn’t supported on iPhones.
Limitation
If you have an external monitor connected while in a session, the generic mouse cursor remains on the native device due to an iOS limitation.
Generic mouse support on external monitors
You can use a generic mouse on external monitors connected to an iPad. Generic mouse is supported on devices running iOS 13.4 or later.
Important:
To use a generic mouse with external monitors, ensure that Presentation mode is turned off in your Citrix Workspace app by navigating to Settings > Display options.
The toolbar on the external monitor is hidden when you use a generic mouse. Also, the mouse pointer is mirrored on the external monitor and appears on both your iPad screen and on the external monitor simultaneously.
Extended multi-monitor support with Generic Mouse for iPad
You can extend the desktop session onto an external monitor when you connect your iPad with a Generic Mouse. This feature supports iPadOS version 14.0 and later.
Note:
- This feature can be partially available in earlier versions. To use the complete feature, upgrade to version 22.1.0.
- Disable AssistiveTouch in iOS Settings > Accessibility > Touch > AssistiveTouch for the Citrix Workspace app to receive primary mouse clicks.
Configure Extend mode
To enable the Extend mode:
-
Connect the external monitor to the iPad using the HDMI cable and the required adapters.
Note:
The setup works best with an Apple’s USB-C to Digital AV Multiport Adapter or Lightning Digital AV Adapter.
-
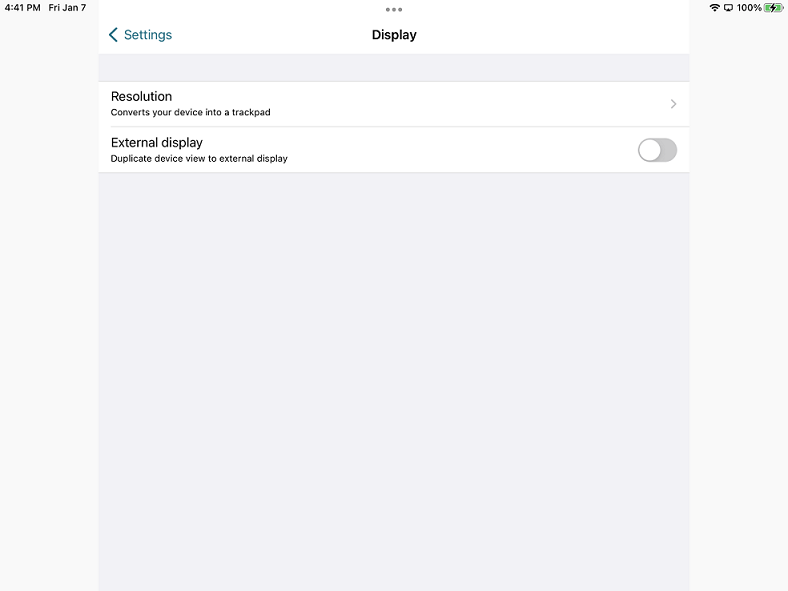
Navigate to the application Settings > Display options and toggle ON the External display. Different display modes appear. Mirror and Presentation modes also use Generic Mouse, if the iPadOS version is 14.0 and later.
-
Select the Extend option.
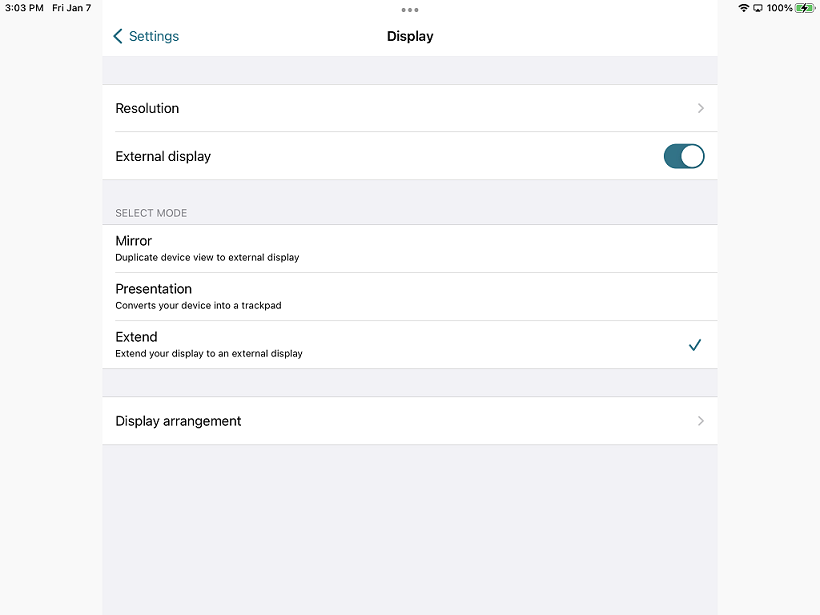
You can select one of the following display modes:
- Mirror: Allows you to mirror the display on the external monitor connected to the iPad.
- Presentation: Allows you to change your external monitor to trackpad.
- Extend: Allows you to display different views or screens on each display.
Note:
- Set the Extend mode before you launch and extend the desktop session.
- The Extend mode isn’t supported on the iPhone until announced.
Configure display arrangement
To configure the display arrangement:
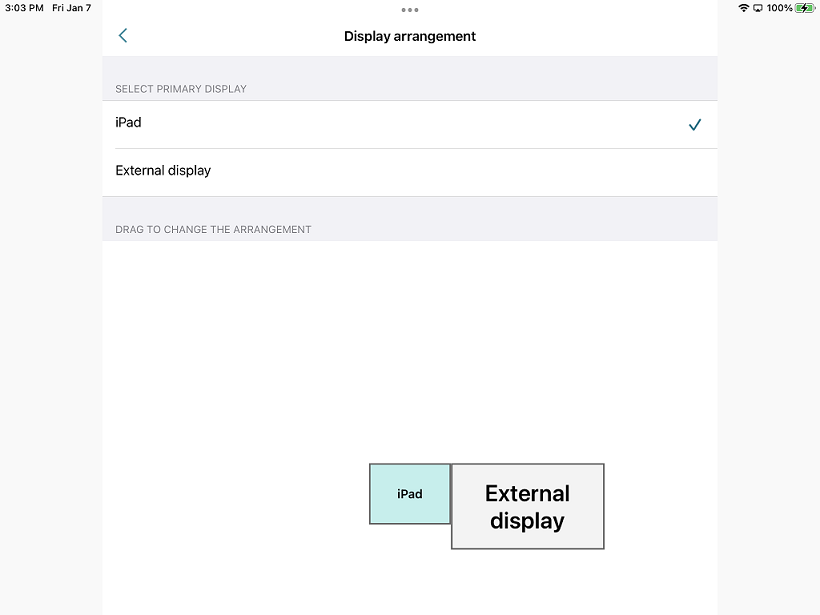
- Select the Extend mode, the Display arrangement option appears.
- Reposition the External display tile left, top, right, or bottom to the iPad display.
Note:
You can adjust the display arrangement when you’re in a session using the in-session toolbar > Display setting icon.
Note:
The external display resolution depends on:
- adapters
- iPad
- other hardware used
Generic Mouse mode versus Citrix X1 Mouse mode
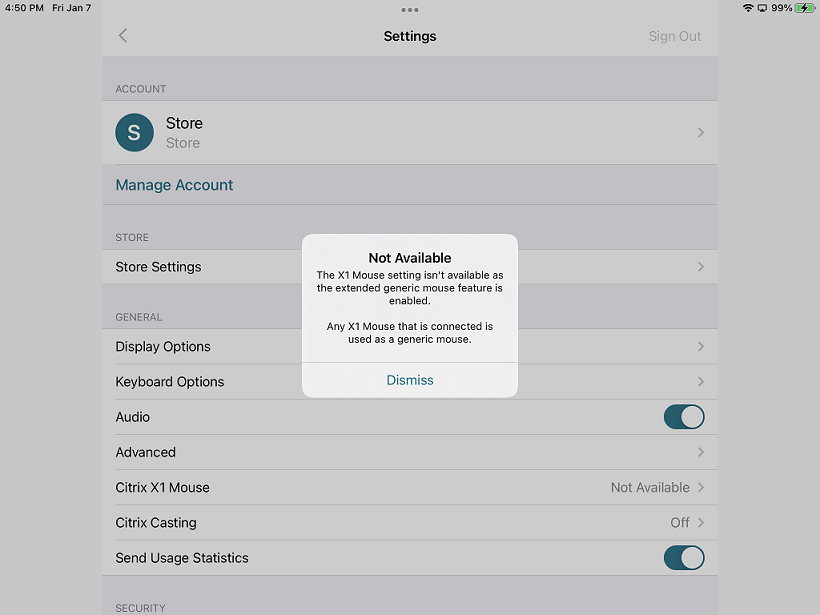
The Generic Mouse mode automatically takes precedence over the Citrix X1 Mouse mode. If you have an X1 Mouse connected, it’s used as a Generic Mouse instead. So, the X1 Mouse settings page isn’t accessible when the Generic Mouse feature flag is enabled.
Note:
For iPadOS version 14.0 and later, any X1 Mouse that is connected to the iPad behaves as a bluetooth mouse.
Generic Mouse icon
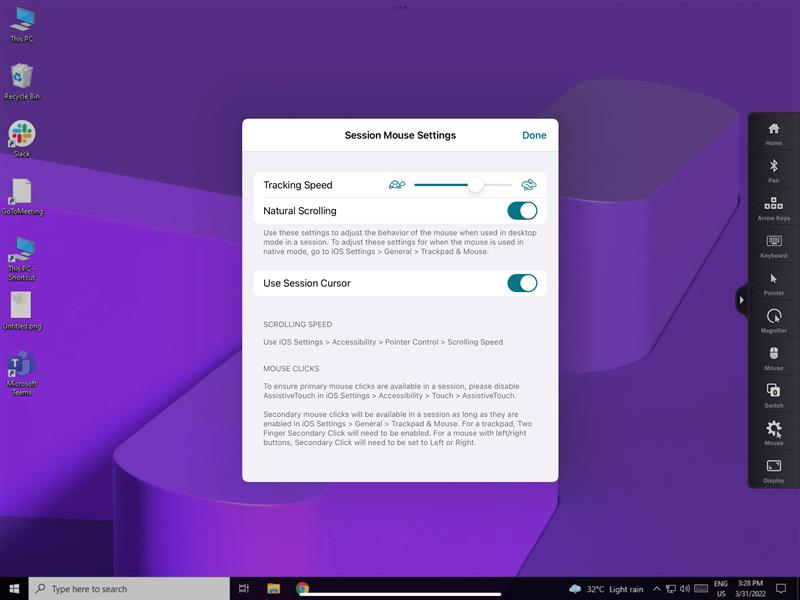
The Mouse settings icon is added on the in-session toolbar next to the Display settings icon. Use the Mouse settings to adjust the tracking speed of the Generic Mouse when you are in a session. You can also toggle using the remote cursor image.
Note:
You can adjust the tracking speed of the native mouse from the iOS settings.
Feature limitations
-
To ensure that the Citrix Workspace app receives primary mouse clicks, disable AssistiveTouch in iOS Settings > Accessibility > Touch > AssistiveTouch.
-
Tracking Speed and Natural Scrolling options from iOS settings doesn’t affect the generic mouse inside the session. However, scrolling speed can be controlled from the iOS Settings. You can access Tracking speed and Natural scrolling options from the Mouse Settings screen inside the session toolbar.
-
When an iPad is used in the split mode and the monitor is connected, the generic mouse works only in the mirror mode inside a desktop session.
-
If the native cursor is over the multi-tasking menu before the app obtains the pointer lock, that is, before the session launch, the mouse events aren’t received. As a workaround, pull down the Notification Center and move the native pointer to a different location and dismiss the Notification Center.
-
Audio redirection fails when you connect an iPad to an external monitor. The audio plays through the iPad speakers. [HDX-39159]
Known issues in the feature
- While the session is active, the desktop image that appears on an iPad or an external monitor gets disturbed when you change the:
- Display arrangement
- Resolution
- Orientation or
- Display modes
As a workaround, disconnect and reconnect the monitor. If the issue persists, disconnect, and relaunch the session. [HDX-37038] [HDX-36979] [HDX-36925] [HDX-36924].
-
On rare occasions, you can observe a few seconds lag in the audio when the video is played on the external monitor. [HDX-39159]
-
On rare occasions, the VDA display is truncated on an iPad and on the external monitor. As a workaround, disconnect, and reconnect the monitor. If the issue persists, disconnect and relaunch the session. [HDX-37100]
-
When you maximize the video to full-screen on the external monitor, you might observe video quality issues. [HDX-39159]
-
On rare occasions, inside a desktop session, an attempt to move the apps from an iPad to the external monitor fails. As a workaround, disconnect and reconnect the monitor. If the issue persists, disconnect, and relaunch the session. [HDX-36981]
-
On rare occasions, when you connect an iPad to an external monitor using third-party adapters, the Display Modes aren’t visible under the Display Options. [HDX-39713]
- Sometimes, a line is observed under the mouse pointer inside the VDA session. [RFIOS-9569]
Keyboard support
Right option key mapping for Alt key
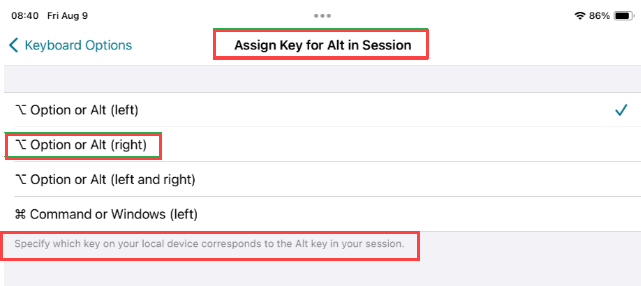
Starting with version 24.12.0, Citrix Workspace app for iOS introduces an enhancement allowing users to map the right Option key to Alt key in the session. This new option complements the existing mappings - left Option key, Command or Windows key, and both Option keys - offering users greater flexibility in keyboard configuration.
Keyboard layout synchronization
Keyboard layout synchronization enables users to switch preferred keyboard layouts on the client device. This feature is disabled by default.
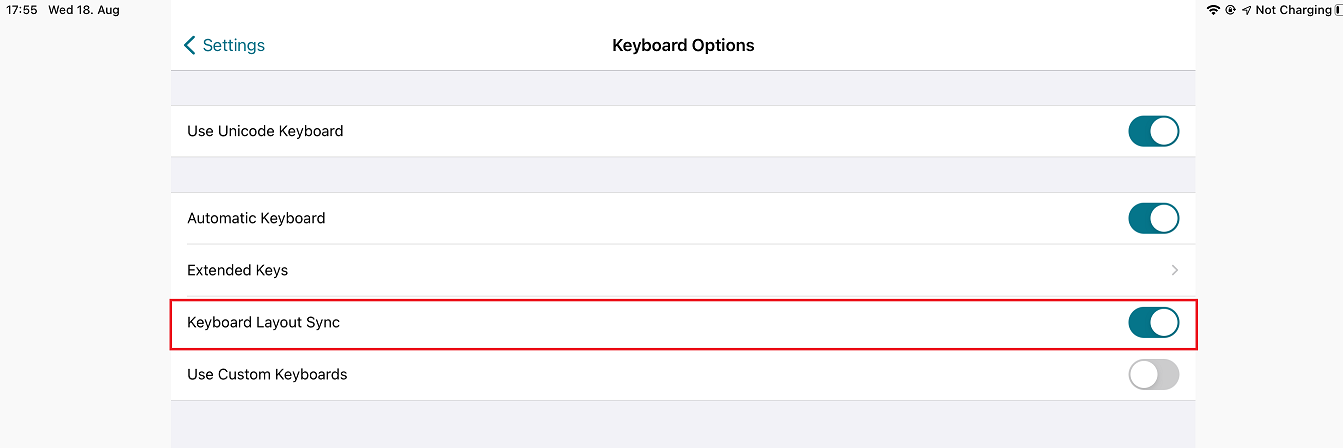
To enable keyboard layout synchronization, go to Settings > Keyboard Options and enable the Keyboard Layout Sync option.
Note:
Using the local keyboard layout option activates the client IME (Input Method Editor). If you are working in Japanese, Chinese, or Korean language and prefer to use the server IME, disable the local keyboard layout option by clearing the option in Preferences > Keyboard.
Prerequisites
- For Linux VDA, enable Client keyboard layout sync and IME improvement policy.
- For Windows VDA, enable Unicode Keyboard Layout Mapping, Client Keyboard Layout Sync, and IME Improvement policies.
- The VDA must be version 7.16 or later.
Keyboard layout support for Windows VDA & Linux VDA
| Keyboard layout on iOS | Keyboard Language | Keyboard Layout on Windows | Keyboard Layout on Linux |
|---|---|---|---|
| Belarusian(Belarus) | Belarusian(Belarus) | Belarusian(Belarus) Keyboard | by |
| Bulgarian | Bulgarian | Bulgarian (Typewriter) keyboard | bg |
| Chinese (Simplified) | Chinese (Simplified, China) | Citrix IME - Chinese (Simplified, China) | zh |
| Chinese (Traditional) | Chinese (Traditional, Taiwan) | Citrix IME - Chinese (Traditional, Taiwan) | tw |
| Croatian | Croatian (Croatia) | Croatian keyboard | hr |
| Czech | Czech | Czech keyboard | cz |
| Danish | Danish | Danish keyboard | df |
| Dutch | Dutch (Netherlands) | United States-International keyboard | us |
| Dutch(Belgium) | Dutch | Belgian (Period) Keyboard | be |
| English (Australia) | English (Australia) | US keyboard | us |
| English (Canada) | English (Canada) | US keyboard | us |
| English (UK) | English (United Kingdom) | United Kingdom keyboard | gb |
| English(US) | English (United States) | US keyboard | us |
| Estonian | Estonian | Estonian keyboard | ee |
| Finnish | Finnish | Finnish keyboard | fi |
| French (Canada) | French (Canada) | French Keyboard | fr |
| French (Switzerland) | French (France) | Swiss French Keyboard | ch |
| French(French) | French (France) | French Keyboard | fr |
| German (Austria) | German (Austria) | German keyboard | at |
| German (Switzerland) | German (Switzerland) | Swiss German keyboard | ch |
| German(Germany) | German (Germany) | German keyboard | at |
| Greek | Greek | Greek keyboard | gr |
| Hungarian | Hungarian | Hungarian keyboard | hu |
| Icelandic | Icelandic | Icelandic keyboard | is |
| Irish | Irish | ie | |
| Italian | Italian (Italy) | Italian keyboard | it |
| Japanese | Japanese | Citrix IME - Japanese | jp |
| Korean | Korean | Citrix IME - Korean | kr |
| Latvian | Latvian | Latvian keyboard | lv |
| Norwegian | Norwegian (Bokmål) | Norwegian keyboard | no |
| Polish | Polish | Polish (Programmers) keyboard | pl |
| Portuguese (Brazil) | Portuguese (Brazil) | Portuguese (Brazil ABNT) keyboard | br |
| Portuguese (Portugal) | Portuguese (Portugal) | Portuguese keyboard | pt |
| Romanian | Romanian (Romania) | Romanian (legacy) keyboard | ro |
| Russian(Russia) | Russian | Russian keyboard | ru |
| Slovak | Slovak | Slovak keyboard | sk |
| Slovenian | Slovenian | Slovenian keyboard | si |
| Spanish (Mexico) | Spanish (Mexico) | Latin American keyboard | latam |
| Spanish (Spain) | Spanish (Spain) | Spanish keyboard | es |
| Swedish(Sweden) | Swedish (Sweden) | Swedish keyboard | se |
| Turkish | Turkish | Turkish F keyboard | tr |
| Ukrainian | Ukrainian | Ukrainian keyboard | ua |
Special key support
Support for the following single keys on an external keyboard of iOS 13.4 and later:
- PageUp
- PageDown
- Home
- End
- F1
- F2
- F3
- F4
- F5
- F6
- F7
- F8
- F9
- F10
- F11
- F12
Special key combinations support
This release adds support for the following key combinations on iOS external keyboards:
- Windows + R
- Windows + D
- Windows + E
- Windows + L
- Windows + M
- Windows + S
- Windows + CTRL+ S
- Windows + T
- Windows + U
- Windows + Number
- Windows + UP
- Windows + Down
- Windows + Left
- Windows + Right
- Windows + X
- Windows + K
- CTRL + ESC
Extended keyboard enhancements
Starting with the 23.5.0 version, extended keyboard functionality is enhanced to provide a better user experience. The following are the enhancements:
- Pin or unpin the extended toolbar UI.
- Rotate the extended toolbar in sync with screen rotation.
- Support Windows icon key and 3-key combination shortcuts.
- Improve experience in multiple monitor use case scenarios.
- Auto open or collapse the extended toolbar UI.
- Improve the experience for Stage Manager mode (on iPad with M1 chip).
IME user interface
Generally, IME provides UI components such as candidate window and composition window. The composition window contains the composition characters and composition UI elements, for example, underline and background color. The candidate window displays the candidate list.
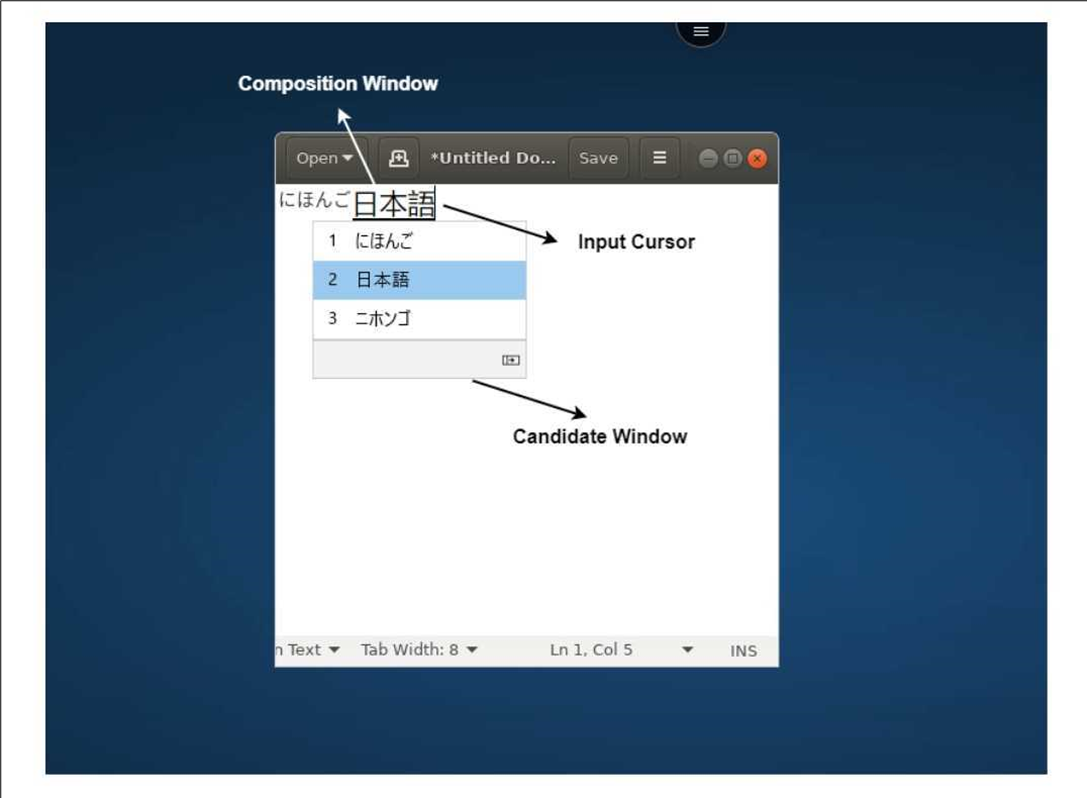
The composition window enables you to distinguish between the confirmed characters and the composing characters. The composition window and the candidate window move with the input cursor.
As a result, the feature provides:
- An enhanced input of characters at the cursor location in the composition window.
- An enhanced display in the composition and the candidate window.
Currently, you can use this feature on the sessions hosted on Windows VDAs and supports both soft keyboards and external physical keyboards.
Generic Client IME for East Asian languages
Generic Client Input Method Editor (IME) feature enhances input and display experience with Chinese, Japanese, and Korean (CJK) language characters on iOS devices. This feature allows you to compose CJK characters at the cursor position when you are in a session with your client IMEs. The feature is available for the Windows VDA environments. You are recommended to use the client IME instead of the VDA-side IME for a better user experience.
Prerequisites
-
Enable the Client keyboard layout synchronization and IME improvement and Enable Unicode keyboard layout mapping on your Windows VDA through the group policy.

For more information see, Knowledge Center article CTX312404.
You can also enable the options using the following registries on your Windows VDA:
-  HKLM\Software\Citrix\ICA\IcaIme\DisableKeyboardSync value = DWORD 0
-  HKEY_LOCAL_MACHINE\SOFTWARE\Citrix\CtxKlMap\EnableKlMap value = DWORD 1
-  HKEY_LOCAL_MACHINE\SOFTWARE\Citrix\CtxKlMap\DisableWindowHook value = DWORD 1
-
Enable the Settings > Keyboard Options > Keyboard Layout Sync option from Citrix Workspace app.
Support for scancode input mode
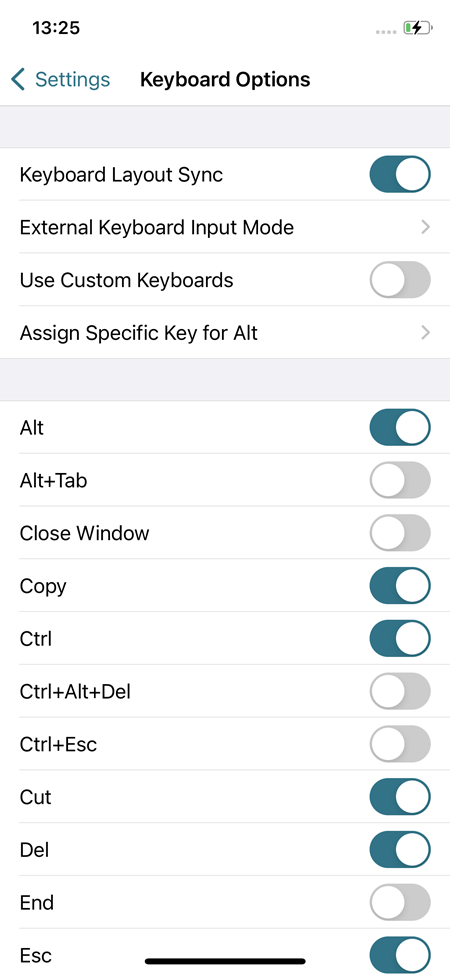
Starting with the 24.1.0 release, you can select Scancode as the keyboard input mode while using an external physical keyboard. This feature is helpful when you use iOS devices with an external Windows PC’s standard keyboard. With Scancode, you can use the keyboard layout of the VDA instead of the iOS’s keyboard. In this way, you can completely follow the input style of the external Windows keyboard instead of iOS. It is beneficial when typing in East-Asian languages, as it significantly improves the overall user experience. The end user might find themselves using the keyboard layout of the server instead of the client. For more understanding, see the Use Case section in this article.
To use the Scancode feature, do the following steps:
- Open Citrix Workspace app for iOS and navigate to Settings > Keyboard Options.
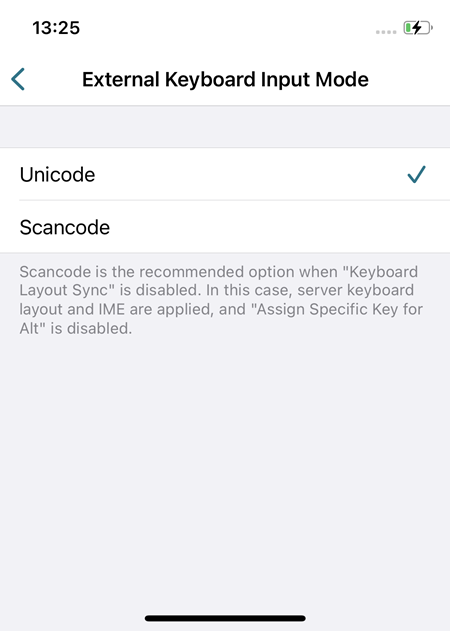
- Tap Input mode for external keyboards.
- Select one of the following options:
- Scancode: Sends the key position from the client-side keyboard to VDA and VDA generates the corresponding character. Applies server-side keyboard layout.
- Unicode: Sends the key from the client-side keyboard to VDA and VDA generates the same character in VDA. Applies client-side keyboard layout.
By default, Unicode is selected as the input mode for both software or touch keyboard and external keyboard.
-
Tap Scancode.
When you are in a session, you can switch the remote, server, or VDA keyboard layout and input with the remote, server, or VDA keyboard layout.
Use case
For example, consider a scenario where you’re using a US international keyboard layout that is connected to your iOS device. When you choose Scancode and type the key next to the CapsLock on your external keyboard, the scancode 1E is sent to the VDA. The VDA then uses 1E to display the character a. If you choose Unicode and type the key next to CapsLock on your external keyboard, the character a is sent to the VDA. So, even if the VDA uses another keyboard layout that has a different character in the same position, the character a appears on the screen.
Note:
Unicode is the preferred mode for typing when you use a touch keyboard on your mobile devices. Because the keys on a touch keyboard generally don’t generate a scancode.
Enhancements to external keyboard shortcut support
Starting with the 24.1.0 version, Citrix Workspace app for iOS now enables you to use more shortcuts from external keyboards when in a remote desktop or app session. The following are important improvements made to external keyboard shortcuts:
- Support for Windows keyboard specific keys such as Insert, Delete, and number pad.
- When you keep a key pressed down and don’t release it, the remote desktop/app responds correctly.
- Support shortcuts with more than three keys.
In addition, you can now configure the specific key for Alt by using the following options via Settings > Keyboard Options > Assign Specific Key for Alt:
- Option or Alt (left): Sends Alt using Option (left) or Alt (left).
- Command or Windows (left): Sends Alt using Command (left) or Windows (left) keys.
- Option or Alt (left and right): Sends Alt using the Option or Alt (left and right) key.
Assigning specific key for Alt option helps to avoid conflict between the macOS Option key and the Windows Alt key.
Limitations
The following iOS system shortcuts are currently not supported:
- Command (Windows)-H: Go to the Home screen.
- Command (Windows)-Space bar: Show or hide the Search field.
- Command (Windows)-Tab: Switch to the next most recently used app among your open apps.
- Command (Windows)-Shift-3: Take a screenshot.
- Command (Windows)-Shift-4: Take a screenshot and immediately open Markup to view or edit it.
- Command (Windows)-Option (Alt)-D: Show or hide the Dock.
- Command (Windows)-Ctrl-Q: Lock the device.
-
AltGr in the Europe keyboard is not supported. If you want to enter special characters with AltGr, use the following shortcuts instead:
- macOS Option+* shortcut or
- Windows OS Alt + number pad shortcut.
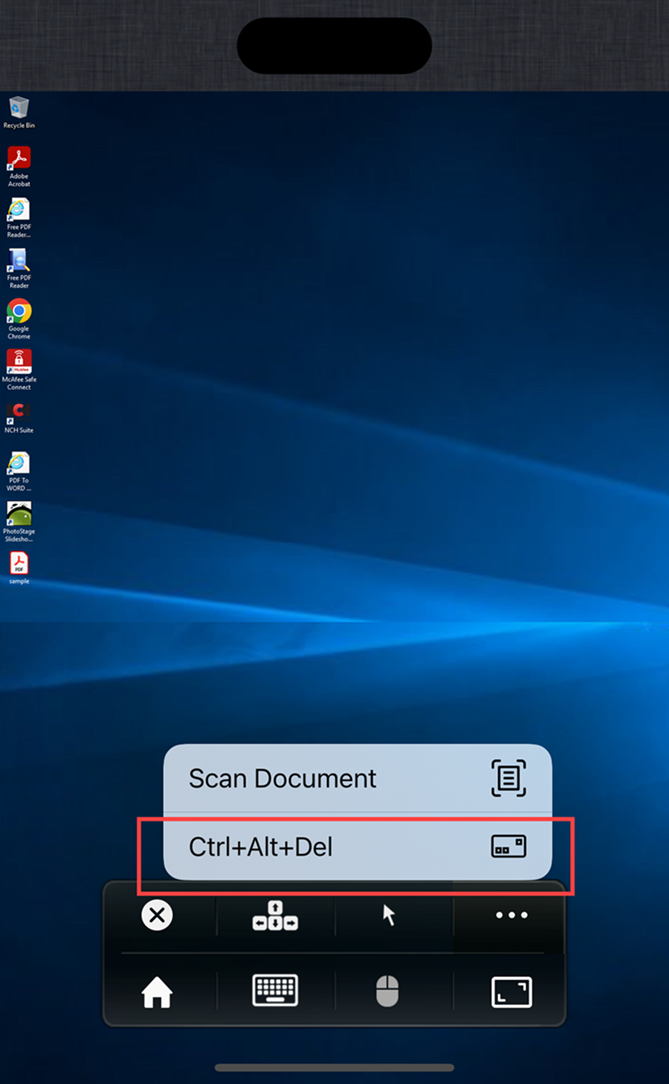
Addition of Ctrl+Alt+Del shortcut to Session Toolbar
Starting with the version, the session toolbar now has an option to perform the Ctrl+Alt+Del function with the tap of a button. This option facilitates users to sign out, switch users, lock the system, or access the Task Manager.
Detect and display keyboard language change in the virtual session
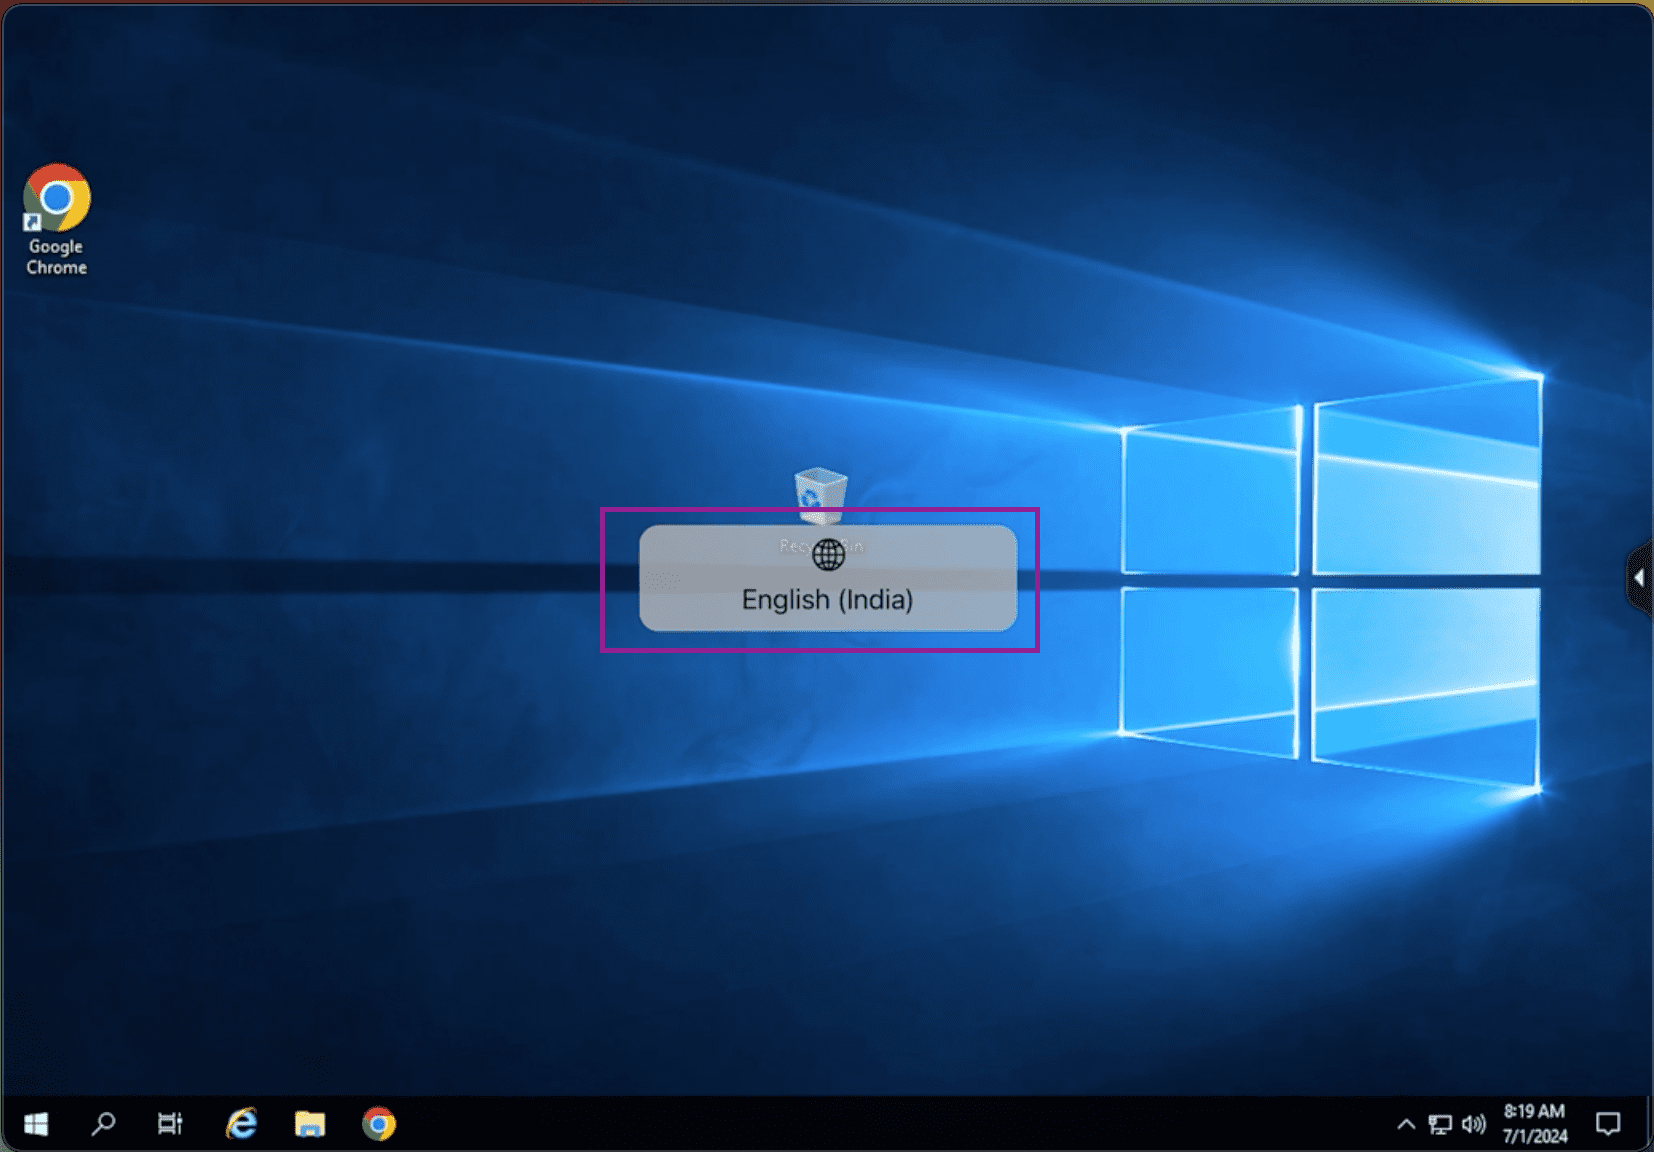
Starting with the 24.7.0 version, Citrix Workspace app for iOS now automatically detects and displays a message within the virtual session when user switches the keyboard language. When you switch keyboard languages using the globe key in the device keyboard or external keyboard, a message appears on the screen notifying about the current keyboard language. This feature ensures that you’re aware of the current keyboard language within the virtual session.
Microphone and camera access
You can now access your microphone and camera for audio-video conferencing through a VDA session. Citrix Workspace app requires your permission to access microphone or camera which can be provided by navigating to Settings on your device and enabling the camera or microphone.
Also, microphone and camera access per store as a part of the client-selective trust security feature has been included to allow Citrix Workspace app to trust access from a VDA session.
Citrix Workspace app requires the user’s permission to access the microphone or camera.
You can configure the access levels by navigating to Settings > Store Settings. In the Store Settings menu, click a store to enable the required microphone or camera access. The selected setting for microphone or camera access is applied on a per store basis.
External Webcam support
Citrix Workspace app for iOS now supports externally connected webcams within your DaaS sessions. Connect a webcam via USB and use it for video conferencing by clicking the Camera icon, then selecting the External Webcam option. It enhances the session experience by using the resources available to end users.
Note:
- The External Webcam is only supported on iPads running iOS 17 or later with a USB-C connector.
- The External Webcam option appears only after an external camera is detected.
- The client app settings have no effect on the camera within an HDX session. You must use the camera floating button that is enabled by Citrix to switch the camera position.
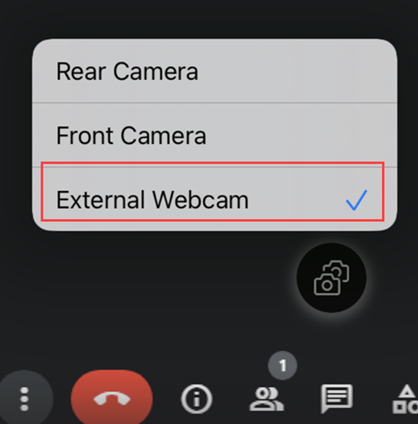
The next time you use a video conferencing app, the system remembers your preference and uses the camera preference accordingly. For example, if you concluded the last video call with External Webcam preference, next time the External Webcam is selected by default.
You can change your camera preference by tapping the camera icon on your screen. You can also change the camera preference during your calls.
This feature is available for customers on both cloud and on-premises stores.
Support for Accessibility and VoiceOver
Starting with the 24.9.0 version, Citrix Workspace app for iOS supports the Accessibility and VoiceOver feature. This feature helps end users who have difficulty seeing the screen. The narrator reads the screen elements aloud when using the Citrix Workspace and the virtual sessions UI.
To enable the VoiceOver feature, navigate to iOS Settings > Accessibility > VoiceOver and turn it on.
You must use the accessibility standard gestures provided by iOS to interact with the Citrix Workspace app. For example, you can swipe left and right on the screen to navigate between the menus as the voiceover for each item plays. For more information, see Get started with accessibility features on iPhone and Get started with accessibility features on iPad in the Apple support documentation.
Support for multiple audio devices
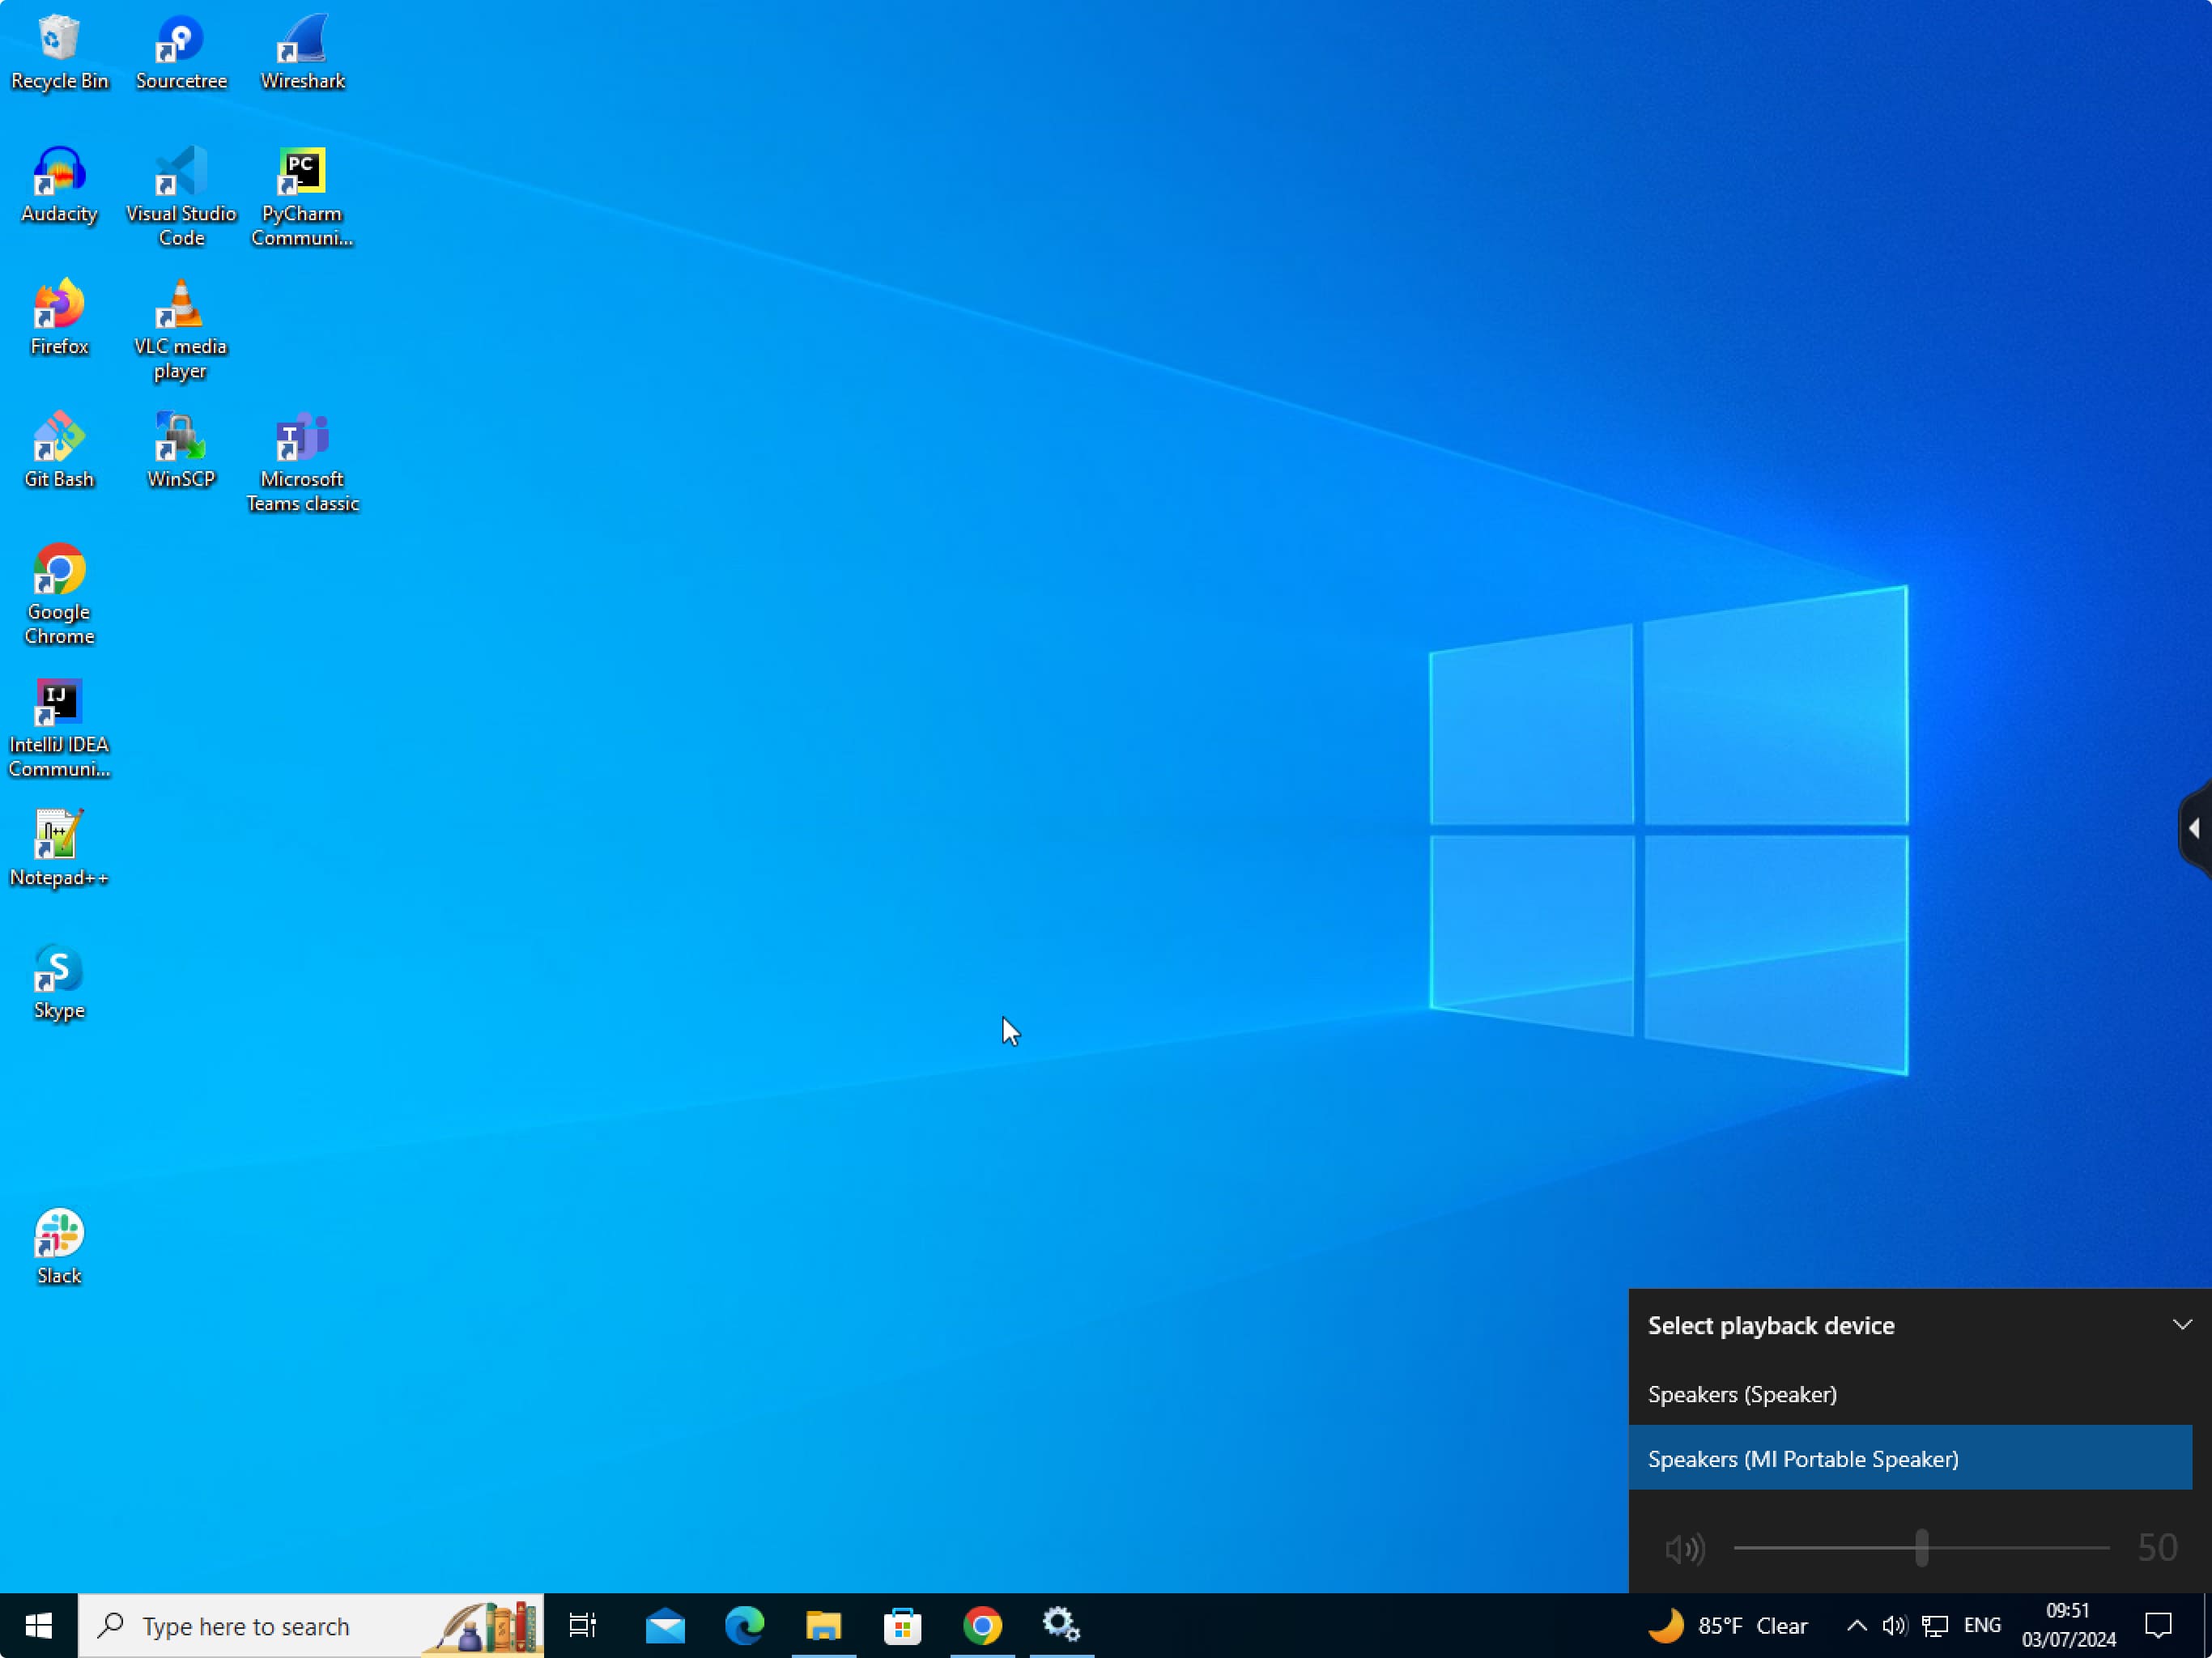
Starting with the 24.7.0 version, Citrix Workspace app for iOS supports displaying all available audio devices that are connected locally in the virtual desktop session. With this feature, you can switch audio devices within the virtual desktop session. If you switch audio devices in the device settings locally, the changes are applied to the virtual desktop session automatically. This feature is also supported for plug-and-play devices.
Limitation
- Devices that are speaker-only and microphone-only are not supported.
- Apple’s AirPlay devices are not supported.
- This feature supports either a bluetooth device or a wired headset device at a time in the virtual session.
Support for adaptive audio
Starting with the 24.5.0, Citrix Workspace app for iOS supports HDX adaptive audio. This feature improves the user experience by providing improved audio quality and low latency.
For more information, see the Audio policy setting article in the Citrix Virtual Apps and Desktops documentation.
Rear camera support
Starting with the 23.2.0 version, Citrix Workspace app for iOS now supports switching the camera position from front to rear and the other way around within an HDX session.
When you invoke the camera in the virtual session, a camera floating button appears on the screen to allow the switching of the camera position. You can also move the floating button freely around the screen and place it anywhere.
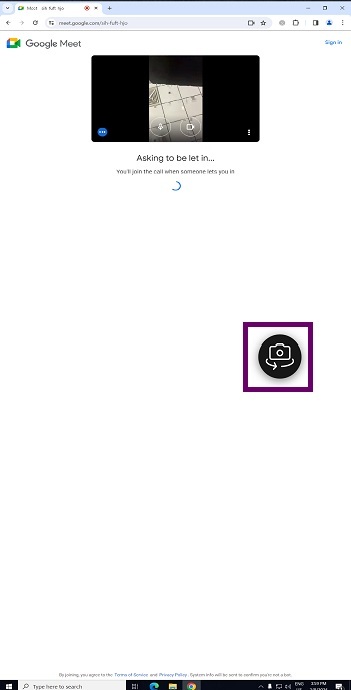
To switch the camera position between the front and rear positions in the virtual sessions, do the following steps:
- Open a client app that captures video.
- Start the video recording.
- Tap the camera floating button that appears on the screen to switch between front and rear camera.
Note:
The client app settings have no effect on the camera within an HDX session. You must use the camera floating button that is enabled by Citrix to switch the camera position.
Known issues
The floating button is partially or fully obstructed when the Casting feature or the Document Scan feature is enabled.
Graphics and Display
Improved graphics performance
Starting with the 24.1.0 version, Citrix Workspace app for iOS supports hardware accelerated H.264 video encoding or decoding. The multimedia engine of Citrix HDX now uses Apple’s Video Toolbox framework for encoding and decoding. This framework compresses and decompresses video faster and in real time. This enhancement reduces the load on the CPU during multimedia usage.
Client Drive Mapping (CDM)
You can select a specific device storage access for every configured store. Device storage access has the following options.
- No access
- Read-only access
- Read and write access
- Ask me every time
If you select Ask me every time, a prompt appears, asking you to select the type of device storage access at every launch. By default the No access option is selected.
Note:
This feature applies only on direct ICA® launches and Citrix Gateway configured stores. Stores without end-to-end SSL setup aren’t supported.
The Device Storage settings are available under a new section in the settings called Store Settings. To view Device Storage, navigate to Settings > Store Settings.
Citrix Ready® workspace hub
The Citrix Ready workspace hub combines digital and physical environments to deliver apps and data within a secure smart space. The complete system connects devices (or things), like mobile apps and sensors, to create an intelligent and responsive environment.
Citrix Ready workspace hub is built on the Raspberry Pi 3 platform. The device running Citrix Workspace app connects to the Citrix Ready workspace hub and casts the apps or desktops on a larger display.
For more information about the Citrix Ready workspace hub, see the Citrix Ready workspace hub documentation.
Citrix Ready workspace hub supports a Secure Sockets Layer (SSL) connection between mobile devices and the hub for security purposes. Set a Fully Qualified Domain Name (FQDN) either manually or automatically to uniquely identify each device. For more information, see the Security connection in the Citrix Ready workspace hub documentation.
Citrix Ready workspace hub is enabled on Citrix Workspace app when all the following system requirements are met:
- Citrix Workspace app 1810.1 for iOS or later
- Bluetooth enabled
- Mobile device and workspace hub using the same Wi-Fi network
Configure Citrix Ready workspace hub
To turn on Citrix Ready workspace hub features, go to Settings and tap Citrix Casting to enable the feature on your device. For more information, see the help documentation for the iOS devices.
Citrix Workspace app integrates a new procedure to add or to remove a workspace hub from the trusted list on iOS devices. For more information, see Security Connection.
Support for document scanner
Starting with the 24.5.0 version, Citrix Workspace app for iOS supports the document scanner feature. With this feature, you can now scan and save multiple documents, all within the desktop session. This feature is enabled by default.
Prerequisites
- Client drive mapping (CDM) must be enabled for the store.
- The document scanner feature requires read and write access on your device. To enable access, follow these steps:
- From your profile, tap Application Settings > Store Settings.
- Tap your current store.
- Tap Device Storage and then select Full Access.
To scan documents using the document scanner, do the following steps:
-
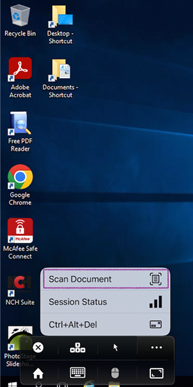
From the in‑session toolbar, tap the ellipsis menu and select Scan Document. The camera app opens.
-
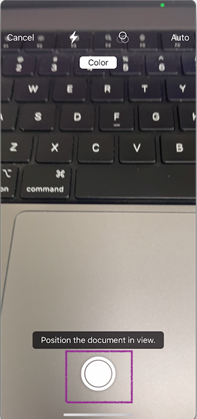
Tap the shutter button to capture the photo. If you choose to capture again, tap Retake.
-
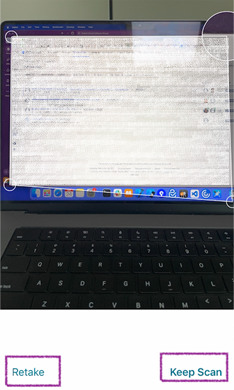
Optional: Crop the scanned document. After cropping to the required size, tap Keep Scan. The camera app opens again to allow you to capture more images.
-
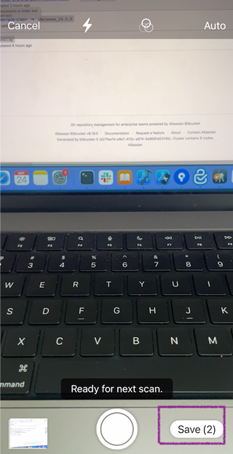
After capturing the required images, tap Save.
-
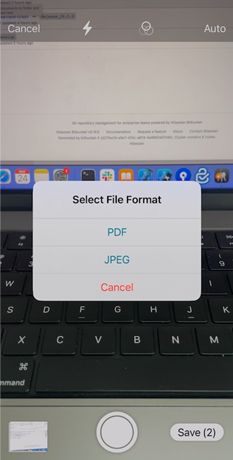
Select the file format option to save the scanned document in the required format.
-
Tap OK.
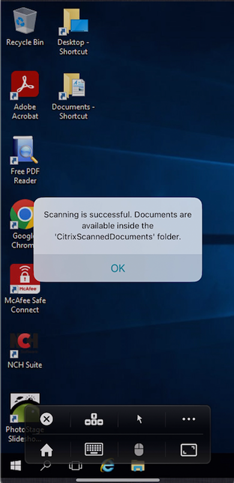
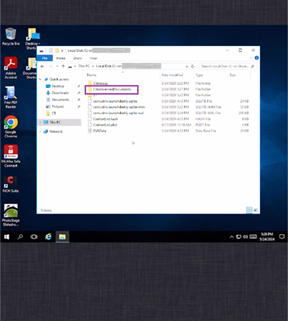
All scanned documents are accessible inside the CitrixScannedDocuments folder on the device’s local storage.You can also access the CitrixScannedDocuments in the session file manager.
Support for AirPrint enabled printers
Starting with the 23.9.0 version, end users can now print documents from their active sessions on iOS devices with AirPrint technology enabled printers. It eliminates the need to have printers connected via cable or network. The AirPrint enabled printers are listed along with the other available printers once users initiate a print command.
To print using an AirPrint enabled printer, users must ensure the following.
- The required printer must be AirPrint compatible and AirPrint enabled.
- The user’s device must be connected to the same Wi-Fi network as the AirPrint enabled printer.
This functionality is available for iOS platforms on both cloud and on-premises environments.