Prepare your OS image for layering on Google Cloud
This topic explains how to prepare a clean OS image for import into a new OS layer. Before you start, make sure that you meet the requirements. While preparing the image, you can Expedite Microsoft Ngen.exe operations, if you think it is taking too long.
If using Windows 10 and not running Citrix Provisioning, Citrix machine creation, or View, you can speed up desktop start times by removing Windows 10 built-in applications. However, we recommend removing the apps on a new version of the OS layer, not in the OS image itself.
Install the OS on a virtual machine
-
Get familiar with the guidelines for preparing an OS layer, including requirements and recommendations. Be sure to read the sections on what to include, and what not to include in an OS layer layer.
-
Navigate to the Google Cloud portal.
-
Select Marketplace in the left column, and deploy a new virtual machine.
Note:
When configuring the new instance network, make sure the VM is on a network that is accessible to the appliance.
-
If you are using a Windows Server operating system, scroll to Operating systems, and select a Windows Server 2019 or Windows Server 2016 operating system.
-
If you are bringing Windows 10 from another platform (it is not available in the Marketplace), follow the steps in the Bringing your own licenses tutorial.
-
Configure the new instance:
-
When selecting a network for the new instance, make sure that the VM is on a network that is accessible to the appliance.
-
When selecting storage, any type of storage is fine.
-
Run the App Layering OS Machine Tools on the image
-
On the new machine, open a web browser, navigate to the Download Center and download the OS Machine Tools.
-
Download the following zip file onto the OS image:
Citrix_App_Layering_OS_Machine_Tools_20.x.x.exe <!--NeedCopy--> -
Run the file, and it copies files to:
c:\windows\setup\scripts
<!--NeedCopy-->
Note:
The file must be extracted to the above directory. Do not change the directory.
If using Key Management Service, configure license activation
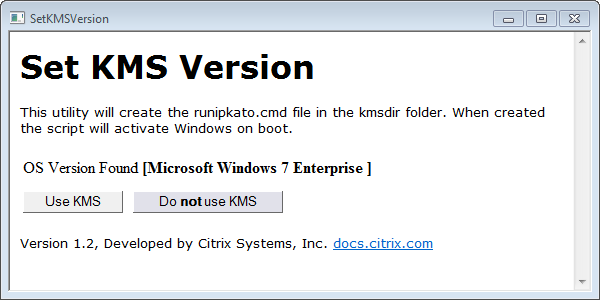
Once the scripts are extracted, the SetKMSVersion utility asks you to choose whether to use Key Management Service (KMS) licensing.
Note:
Publishing images into environments where both KMS and Active Directory-based activation (ADBA) are being used at the same time causes problems with activation.
-
In the following dialog box, select whether to use Key Management Service (KMS) licensing.

To configure scripts for KMS, do the following.
-
Navigate to:
c:\windows\setup\scripts <!--NeedCopy--> -
Run SetKMSVersion.exe as Administrator to create a script file in the
c:\windows\setup\scripts\kmsdirfolder.
When the operating system starts, the appropriate KMS activation script is run.
Install the App Layering services
- On the new machine, navigate to
C:\Windows\Setup\scriptsand run setup_x64.exe to install the App Layering drivers on the OS machine. - The installation prompts you for the location of the Unattend.xml file (the default location is ‘C:\windows\panther).
- Ensure that this machine is not joined to a domain.
- Perform pending reboots on the OS machine so that you can import this image into a layer.
- Make sure that the new OS machine is in one of the following states before proceeding.
- Running
- Stopped
- Stopped (deallocated)
Expedite a Microsoft Ngen.exe operation, if necessary
Once all software updates have been installed, you must allow Ngen.exe to essentially recompile .NET byte code into native images and construct the registry entries to manage them.
Ngen.exe is the Microsoft Native Image Generator, which is part of the .NET system. Windows determines when to run Ngen.exe based on what software is being installed and what Windows detects in the configuration.
Important:
When
Ngen.exeis running, you must let it complete. An interruptedNgen.exeoperation can leave you with non-functioning.NETassemblies or other problems in the.NETsystem.
Normally, Ngen.exe is a background operation that pauses when there is foreground activity. If you want to expedite an Ngen.exe operation, you can bring the task into the foreground to complete it as quickly as possible.
To bring the task into the foreground:
- Open a command prompt as Administrator.
-
Go to the
Microsoft.NET\Frameworkdirectory for the version currently in use:cd C:\Windows\Microsoft.NET\FrameworkNN\vX.X.XXXXX <!--NeedCopy--> -
Enter the following
Ngen.execommand to run all queued items. This command processes queued component installs before building assemblies.ngen eqi 3 <!--NeedCopy-->The
Ngen.exetask moves to the foreground in the command prompt, and lists the assemblies being compiled. It is OK if you see compilation messages.You can use the Task Manager to see if an instance of
MSCORSVW.EXEis running. If it is, allow it to complete, or runngen update eqi 3.Caution:
Do not reboot to stop the task. Allow the task to complete!
- Ensure that all
Ngen.exeprocesses have run to completion.