Configure Adaptive Authentication service

The following high-level steps are involved in configuring the Adaptive Authentication service.

  1. Provision Adaptive Authentication
  2. Configure Adaptive Authentication policies
  3. Enable Adaptive Authentication for Workspace

Prerequisites

  • Reserve an FQDN for your Adaptive Authentication instance. For example, aauth.xyz.com, assuming xyz.com is your company domain. This FQDN is referred as the Adaptive Authentication service FQDN in this document and is used when provisioning the instance. Map the FQDN with the IdP virtual server public IP address. This IP address is obtained after provisioning in the Upload Certificate step.
  • Procure a certificate for aauth.xyz.com. Certificates must contain the SAN attribute. Else the certificates aren’t accepted.

  • Adaptive Authentication UI does not support uploading of certificate bundles. To link an intermediate certificate, see Configure intermediate certificates.

  • Choose your connectivity type for the on-premises AD/RADIUS connectivity. The following two options are available. If you do not want data center reachability, use the connector connectivity type.

  • Configure a network time protocol (NTP) server to avoid time skews. For details, see How to synchronize system clock with servers on the network.

Points to note

  • Citrix recommends not to run clear config for any Adaptive Authentication instance or modify any configuration with the prefix AA (example, AAuthAutoConfig) including certificates. This disrupts Adaptive Authentication management and user access is impacted. The only way to recover is through reprovisioning.
  • Do not add SNIP or any additional routes on the Adaptive Authentication instance.
  • User authentication fails if the customer ID isn’t in all lowercase. You can convert your ID to all lowercase and set it on the NetScaler instance by using the command set cloud parameter -customerID <all_lowercase_customerid>.
  • The nFactor configuration that is required for the Citrix Workspace or the Citrix Secure Private Access service is the only configuration customers are supposed to create directly on the instances. Currently there are no checks or warnings in NetScaler that prevents admins from making these changes.
  • It’s recommended that all custom configurations are made in the user interface and not directly on the Adaptive Authentication instances. This is because the changes made on the instances aren’t auto-synced with the user interface and hence the changes are lost.
  • Do not upgrade the Adaptive Authentication instances to random RTM builds. All upgrades are managed by Citrix Cloud.
  • Only a Windows-based cloud connector is supported. Connector appliance isn’t supported in this release.
  • If you’re an existing Citrix Cloud customer and have already configured Azure AD (or other authentication methods), to switch to Adaptive Authentication (for example, device posture check), you must configure Adaptive Authentication as your authentication method and configure the authentication policies in the Adaptive Authentication instance. For details, see Connect Citrix Cloud to Azure AD.
  • For RADIUS server deployment, add all connector private IP addresses as the RADIUS clients in the RADIUS server.
  • In the current release, the external ADM agent isn’t allowed and therefore Citrix Analytics (CAS) is not supported.
  • NetScaler Application Delivery Management service collects the backup for your Adaptive Authentication instance. To extract the backup from ADM, onboard the ADM service. For details, see Config backup and restore. Citrix does not take the backups explicitly from the Adaptive Authentication service. Customers must take the backup of their configurations from the Application Delivery Management service if necessary.
  • The Adaptive Authentication instances fail to establish the tunnel if a proxy is configured in the customer’s setup. Therefore, it is recommended that you disable proxy configuration for Adaptive Authentication.
  • If you are using third-party authentication services such as SAML, authentication might fail if all claims are not found. Therefore, it is recommended that customers add an additional factor such as NOAUTH in the multifactor authentication configuration to pass all the claims.
  • It is recommended that you keep the debug log level disabled during normal operations and only enable as required. If the debug log level is enabled always, it causes a tremendous load on the Management CPU. This can result in system crashes during high traffic loads. For details, see CTX222945.

How to configure the Adaptive Authentication service

Access the Adaptive Authentication user interface

You can access the Adaptive Authentication user interface by one of the following methods.

  • Manually type the URL https://adaptive-authentication.cloud.com.
  • Log in using your credentials and select a customer.

    After you’re successfully authenticated, you’re redirected to the Adaptive Authentication user interface.

OR

  • Navigate to Citrix Cloud > Identity and Access Management.
  • In the Authentication tab, in Adaptive Authentication, click the ellipsis menu and select Manage.

The Adaptive Authentication user interface appears.

The following figure illustrates the steps involved in configuring Adaptive Authentication.
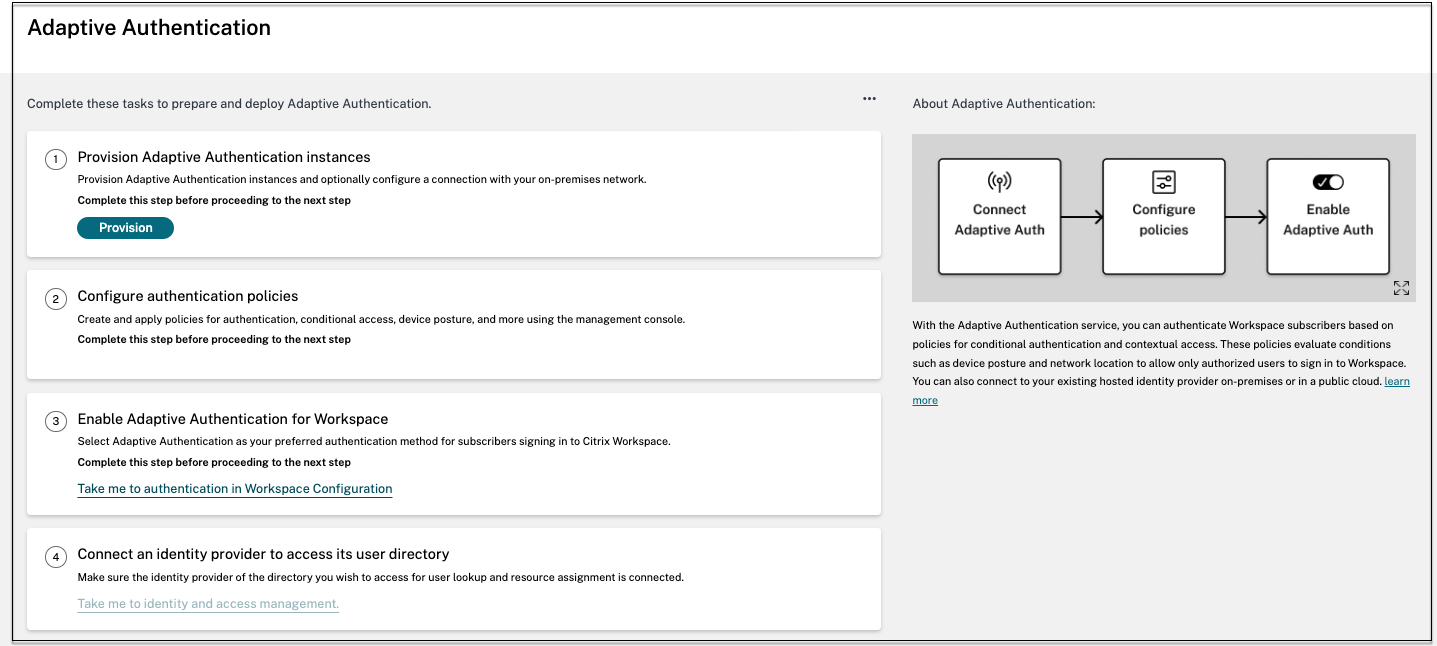
Provisioning the main page

Step 1: Provision Adaptive Authentication

Important:

Customers interested in the Adaptive Authentication service are required to click the link as shown in the following screenshot and complete the Podio form. The Citrix Adaptive Authentication team then enables the provisioning of Adaptive Authentication instances.

Podio form

Perform the following steps to provision the Adaptive Authentication instance:

  1. On the Adaptive Authentication UI, click Provision.
  2. Select the preferred connection for Adaptive Authentication.

    • Citrix Cloud Connector: For this connection type, you must set up a connector in your on-premises network. Citrix recommends that you deploy at least two Citrix Cloud Connectors in your environment to set up connection to the Citrix Gateway hosted on Azure. You must allow your Citrix Cloud Connector to access the domain/URL you’ve reserved for the Adaptive Authentication instance. For example, allow https://aauth.xyz.com/*.

      For details on Citrix Cloud Connector, see Citrix Cloud Connector.

    • Azure VNet peering - You must set up the connectivity between the servers using Azure’s VNet peering.

    Connection type

    To add a Citrix Cloud Connector as your preferred connection:

    Perform the following steps.

    • Select the Citrix Cloud Connector option, and then select the end user agreement checkbox.
    • Click Provision. Provisioning might take up to 30 minutes to set up.

    Note:

    For connector connectivity type, make sure that your Adaptive Authentication FQDN is reachable from the connector virtual machine after provisioning.

    To set up Azure VNet peering:

    If you select Azure VNet peering as your connection, you must add a subnet CIDR block that must be used to provision the Adaptive Authentication instance. You must also ensure that the CIDR block does not overlap with your organization’s other network ranges.

    For details, see Set up connectivity to on-premises authentication servers using Azure VNet peering.

  3. Set up credentials to access the instances that you’ve enabled for Adaptive Authentication. You need the management console access for creating policies for authentication, conditional access, and so on.

    1. In the Console access screen, enter the user name and password.
    2. Click Next.

    Note:

    Users created from the Console access screen are provided with “SuperUser” privileges that have the shell access.

    Console access

  4. Add the Adaptive Authentication service FQDN and upload the certificate-key pair. You must enter the Adaptive Authentication service FQDN of your choice for the publicly accessible authentication server. This FQDN must be publicly resolvable.

    1. In the Upload Certificate screen, enter the FQDN that you’ve reserved for Adaptive Authentication.
    2. Select the certificate type.

      • Adaptive Authentication service supports certificates of type PFX, PEM, DER for provisioning of instances.
      • Certificate bundle is only supported for certificates of type PEM. For other bundle types, Citrix recommends installing the root and intermediate certificates and linking them to the server certificate.
    3. Upload the certificate and the key.

    Note:

    • Install your intermediate certificate on the Adaptive Authentication instance and link it with the server certificate.

      1. Log in to the Adaptive Authentication instance.
      2. Navigate to Traffic Management > SSL. For details, see Configure intermediate certificates.
    • Only public certificates are accepted. Certificates signed by private or unknown CAs aren’t accepted.
    • Certificate configuration or certificate updates must be done using the Adaptive Authentication UI only. Do not change it directly on the instance as this might result in inconsistencies.

    Add FQDN

  5. Upload the certificate and the key.

    The Adaptive Authentication instance now is connected to the Identity and Access Management service. The Adaptive Authentication method status is displayed as Connected.

    Adaptive Authentication connected on IDAM

  6. Set up an IP address through which the Adaptive Authentication management console can be accessed.
    1. In the Allowed IP addresses screen, for each instance, enter a public IP address as the management IP address. To restrict the access to the management IP address, you can add multiple IP addresses that are allowed to access the management console.
    2. To add multiple IP addresses, you must click Add, enter the IP address, and then click Done. This must be done for every IP address. If you do not click the Done button, the IP addresses aren’t added to the database but are only added in the user interface.

    Allowed IP addresses

  7. If you’re using the connector connectivity type, then specify a set of resource locations (connectors) through which AD or RADIUS servers can be reached. If you’re using the VNet peering connectivity type, then you can skip this step.

    Admins can choose the connectors through which back-end AD and RADIUS servers must be reached. To enable this feature, customers can set up a mapping between their back-end AD/RADIUS server subnets such that if the authentication traffic falls under a specific subnet, then that traffic is directed to the specific resource location. However, If a resource location isn’t mapped to a subnet, then admins can specify to use the wildcard resource location for those subnets.

    Previously, Adaptive Authentication traffic for on-premises AD/RADIUS was directed to any available resource location using the round robin method. This caused issues for customers with multiple resource locations.

    1. On the Adaptive Authentication UI, click Manage Connectivity.
    2. Enter the subnet details and select the respective resource location.

      Note:

      If you clear the Use any available resource location for remaining subnets checkbox, only the traffic directed towards the configured subnets is tunneled.

    3. Click Add, and then click Save Changes.

    Note:

    • Only RFC1918 IP address subnets are allowed.
    • The number of subnet-resource location mappings per customer is limited to 10.
    • Multiple subnets can be mapped to a single resource location.
    • Duplicate entries aren’t allowed for the same subnet.
    • To update the subnet entry, delete the existing entry and then update.
    • If you rename or remove the resource location, make sure to remove the entry from the Manage Connectivity screen in the Adaptive Authentication user interface.
    • Any changes made to the resource location mapping by using the following CLI commands are overwritten by the changes pushed from the user interface (Adaptive Authentication Provisioning > Manage Connectivity).
      • set cloudtunnel parameter -subnetResourceLocationMappings
      • set policy expression aauth_allow_rfc1918_subnets <>
      • set policy expression aauth_listen_policy_exp <>

    Specify connectors

Provisioning Adaptive Authentication is now complete.

Step 2: Configure Adaptive Authentication policies

How to connect to your Adaptive Authentication instance:

After the provisioning, you can access the Adaptive Authentication management IP address directly. You can access the Adaptive Authentication management console using the FQDN or your primary IP address.

Important:

  • In a high availability setup, as part of the synchronization process, the certificates are also synchronized. So ensure that you use the wildcard certificate.
  • If you need a unique certificate for each node, upload the certificate files and keys in any folder that doesn’t get synchronized (for example, create a separate folder (nosync_cert) in the nsconfig/SSL directory) and then upload the certificate uniquely on each node.

Access the Adaptive Authentication management console:

  • To access the Adaptive Authentication management console using the FQDN, see Configure SSL for ADC Admin UI access.
  • To access the Adaptive Authentication using your primary address, do the following:
    1. Copy the primary IP address from the Configure Authentication policies section in the GUI and access the IP address in your browser.
    2. Log in using the credentials that you’ve entered while provisioning.
    3. Click Continue.

      Configure policies

    4. Navigate to Configuration > Security > AAA - Application Traffic > Virtual Servers.
    5. Add the authentication policies. For various use cases, see Sample authentication configurations.

Note:

Accessing the Adaptive Authentication instance using the IP address isn’t trusted and many browsers block the access with warnings. We recommend that you access the Adaptive Authentication management console with FQDN to avoid any security barriers. You must reserve the FQDN for the Adaptive Authentication management console and map it with the primary and secondary management IP address.

For example, if your Adaptive Authentication instance IP is 192.0.2.0 and Secondary: 192.2.2.2, then;

  • primary.domain.com can be mapped to 192.0.2.0
  • secondary.domain.com can be mapped to 192.2.2.2

Step 3: Enable Adaptive Authentication for Workspace

After provisioning is complete, you can enable authentication for Workspace by clicking Enable in the Enable Adaptive Authentication for Workspace section.

Enable Adaptive Authentication for Workspace

Note:

With this, the Adaptive Authentication configuration is completed. When you access your workspace URL, you must be redirected to the Adaptive Authentication FQDN.

Configure Adaptive Authentication service