为 Web Studio 设置智能卡身份验证
本文概述了为 Web Studio 设置和启用智能卡身份验证所需的步骤:
步骤 5(可选):为 Web Studio 配置身份验证委派
-
注意:
智能卡身份验证仅支持与 Web Studio 服务器位于同一 Active Directory 域中的用户。
步骤 1:安装智能卡驱动程序
在以下计算机上安装智能卡驱动程序:
- 安装了证书服务的域控制器。
- Web Studio 服务器
- 最终用户用于访问 Web Studio 的计算机
- 用于为智能卡用户注册证书的计算机
智能卡驱动程序因供应商而异。例如,如果使用 ITS 提供的智能卡硬件,请从 https://support.globalsign.com/ssl/ssl-certificates-installation/safenet-drivers 下载 SaftNet 驱动程序。
步骤 2:为智能卡用户颁发证书
注意:
以下步骤仅作为示例,指导您完成此过程。
在域控制器上,按照以下步骤完成任务:
-
访问域控制器并打开“证书颁发机构”。
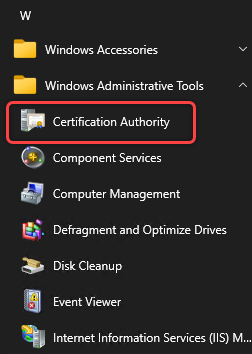
- 复制“注册代理”模板。详细步骤如下:
-
右键单击“证书模板”,然后选择“管理”。

-
右键单击“注册代理”,然后选择“复制模板”。
-
在“使用者名称”选项卡上,确保未选中“在使用者名称中包含电子邮件”。

-
在“加密”选项卡上,选择“Microsoft 基本智能卡加密服务提供程序”,然后单击“确定”。“证书模板”列表中将显示一个名为“注册代理副本”的模板。
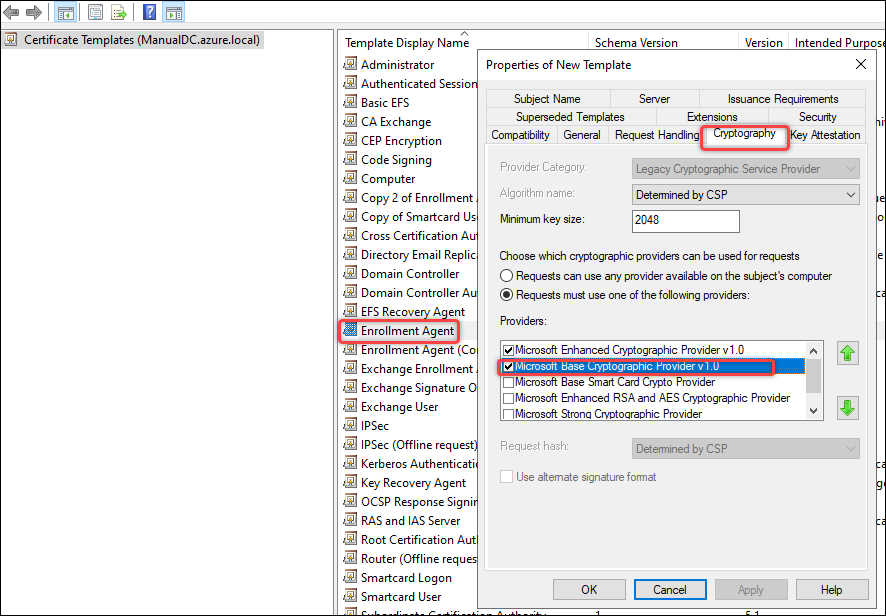
-
- 为智能卡颁发证书。详细步骤如下:
- 右键单击“证书模板”,然后选择“新建 > 要颁发的模板”。
- 选择“注册代理副本”和“智能卡用户”。
- 单击“确定”。
步骤 3:为智能卡用户注册证书
注意:
以下步骤仅作为示例,指导您完成此过程。
在已加入域的物理 Windows 计算机上,按照以下步骤为每张智能卡注册证书:
- 准备一台用于注册的已加入域的物理 Windows 计算机:
- 确保已安装智能卡驱动程序。
- 将智能卡插入计算机。
- 使用要分配给智能卡的用户帐户登录计算机。
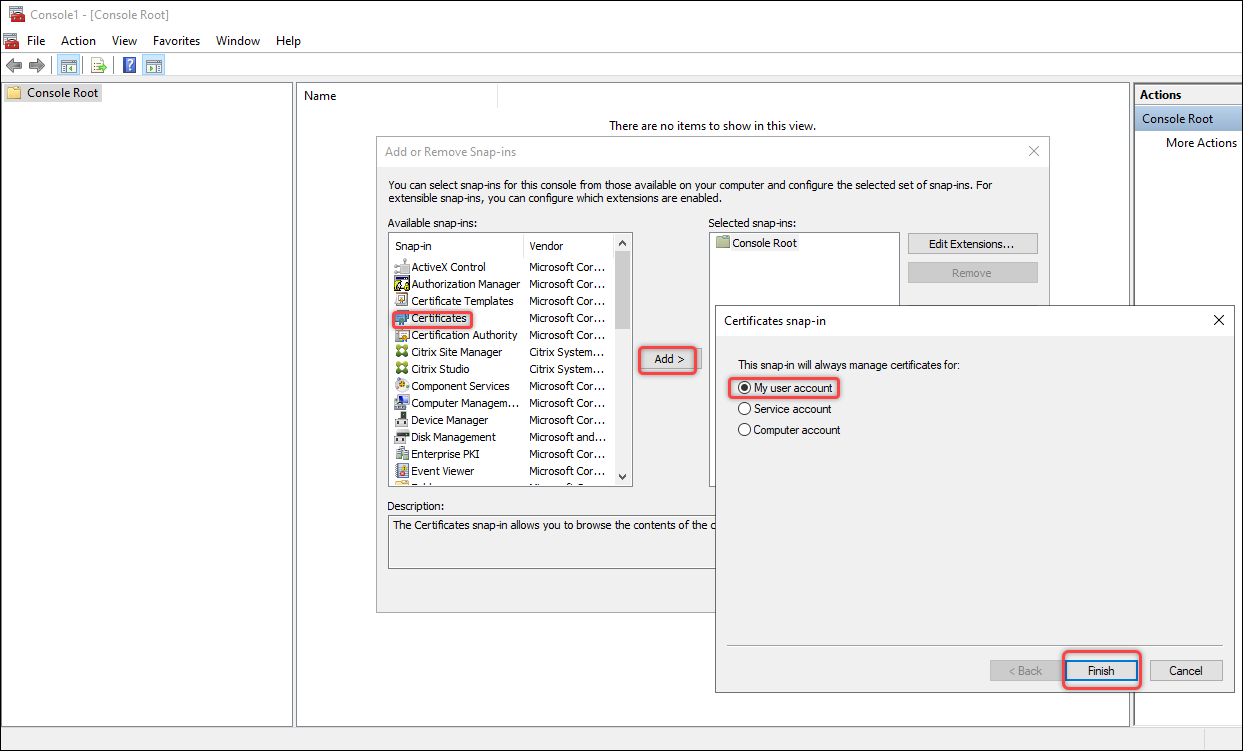
- 将“证书”管理单元添加到在步骤 1 中准备的计算机上。详细步骤如下:
- 打开 mmc。
- 单击“文件”,然后单击“添加/删除管理单元”。
- 在出现的“添加或删除管理单元”窗口中,选择“证书”,然后单击“添加 >”。
- 在出现的对话框中,选择“我的用户帐户”,然后单击“完成”。
-
单击“确定”。
- 为“证书”管理单元请求新证书。详细步骤如下:
-
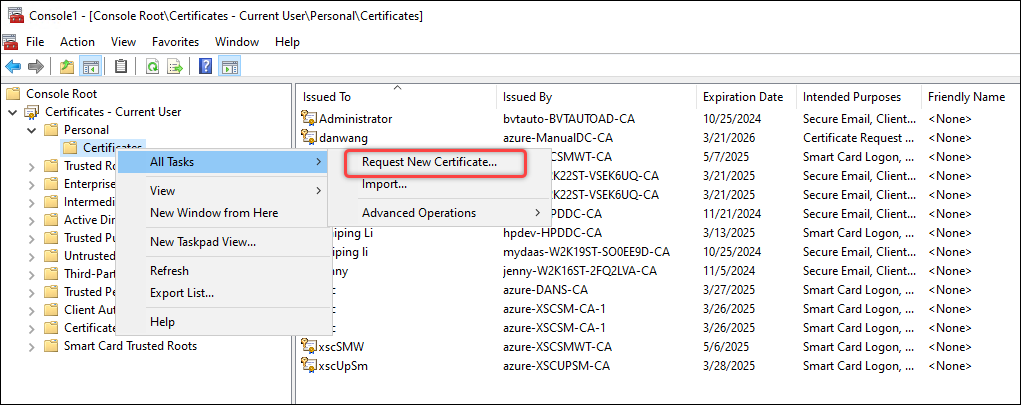
转至“证书 - 当前用户 > 个人”,右键单击“证书”,然后选择“所有任务 > 请求新证书”。
-
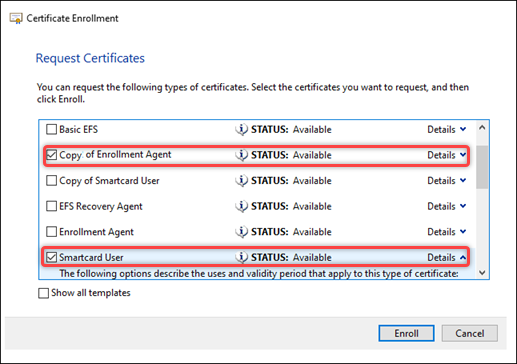
在出现的“请求证书”对话框中,选择“注册代理副本”和“智能卡用户”。
-
在上述对话框中,单击“智能卡用户”的“详细信息”,然后单击“属性”。将出现“证书属性”对话框。
-
-
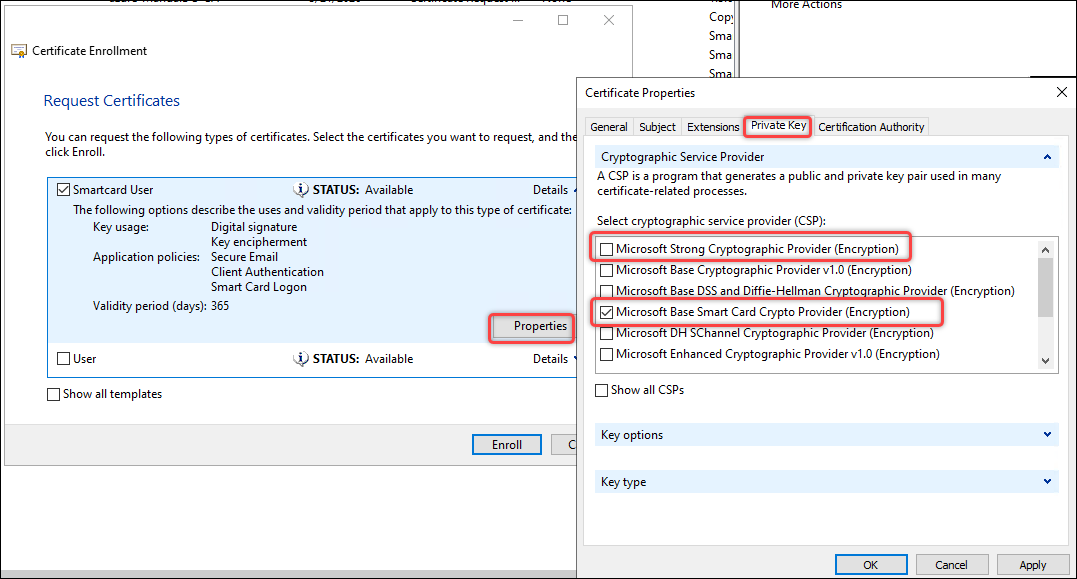
- 在“私钥”选项卡上,展开“加密服务提供程序”,清除“Microsoft 强加密服务提供程序(加密)”,仅选择“Microsoft 基本智能卡加密服务提供程序(加密)”,然后单击“确定”。
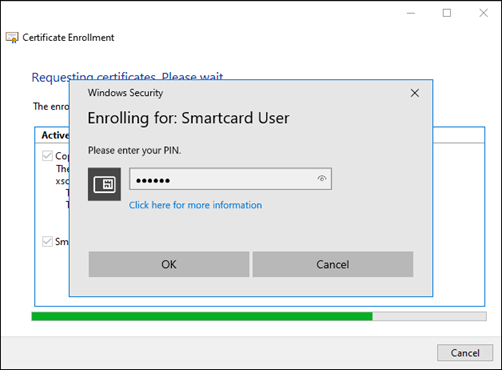
- 单击“注册”。
-
在出现的“Windows 安全”对话框中,输入智能卡 PIN 码,然后单击“确定”。注册完成后,单击“完成”。
成功注册后,在“证书 - 当前用户 -> 个人 -> 证书”下将显示两个证书,如以下屏幕截图所示。

步骤 4:配置 Web Studio IIS 服务器
在每台 Web Studio 服务器上,按照以下步骤配置 IIS 以进行智能卡身份验证:
-
为 Web Studio 计算机启用 客户端证书映射身份验证。
在 IIS 7 及更高版本的默认安装中,
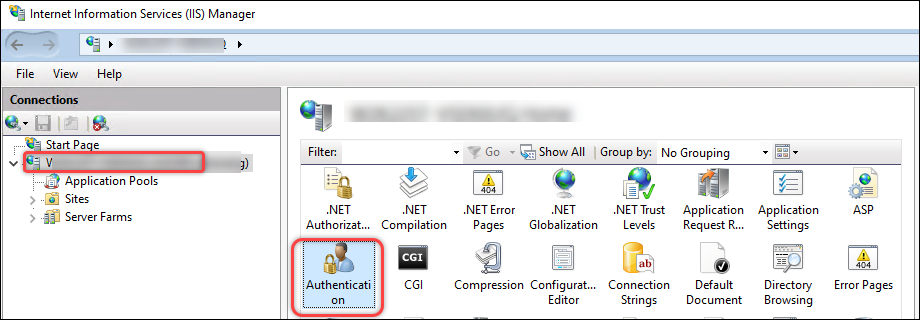
<clientCertificateMappingAuthentication>元素不可用。有关安装和启用的更多信息,请参阅此 Microsoft 文章。 - 在 Web Studio 计算机上启动“IIS 管理器”。
-
为计算机启用“Active Directory 客户端证书身份验证”。详细步骤如下:
-
在左侧窗格中选择计算机,然后双击“身份验证”。
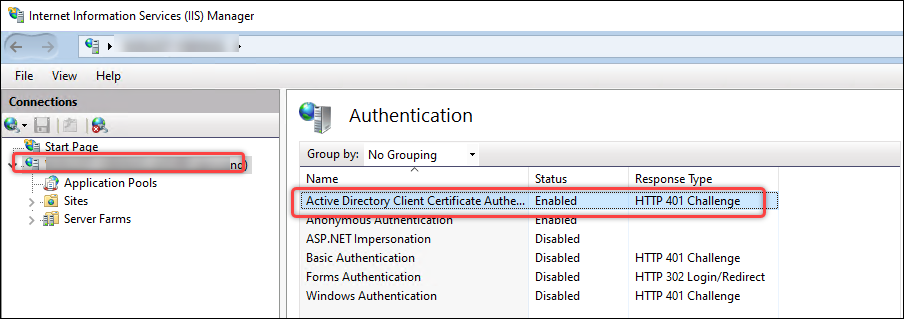
-
启用Active Directory 客户端证书身份验证。
-
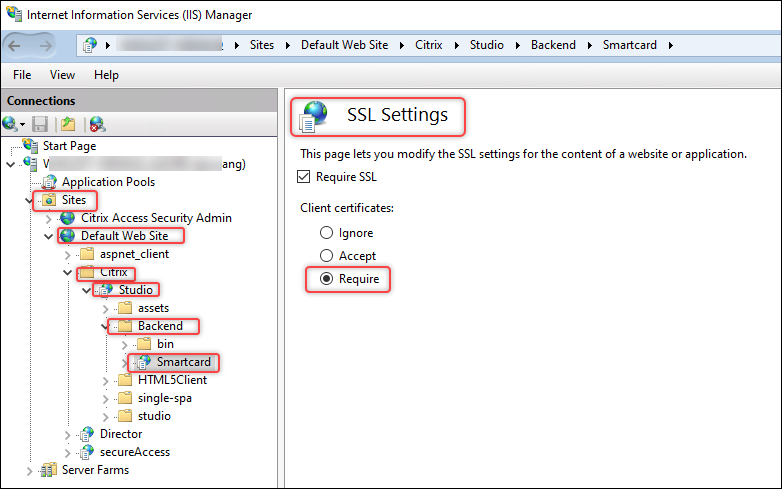
- 为 Web Studio Backend 模块配置更安全的 HTTPS 协议以及客户端证书身份验证:
-
转至站点 >
安装 Web Studio 的 IIS 站点名称(站点 ID = 1,默认情况下为 Default Web Site)> Studio > Backend > Smartcard,然后在 IIS 部分中双击SSL 设置。
-
为客户端证书选择要求。
-
返回站点 >
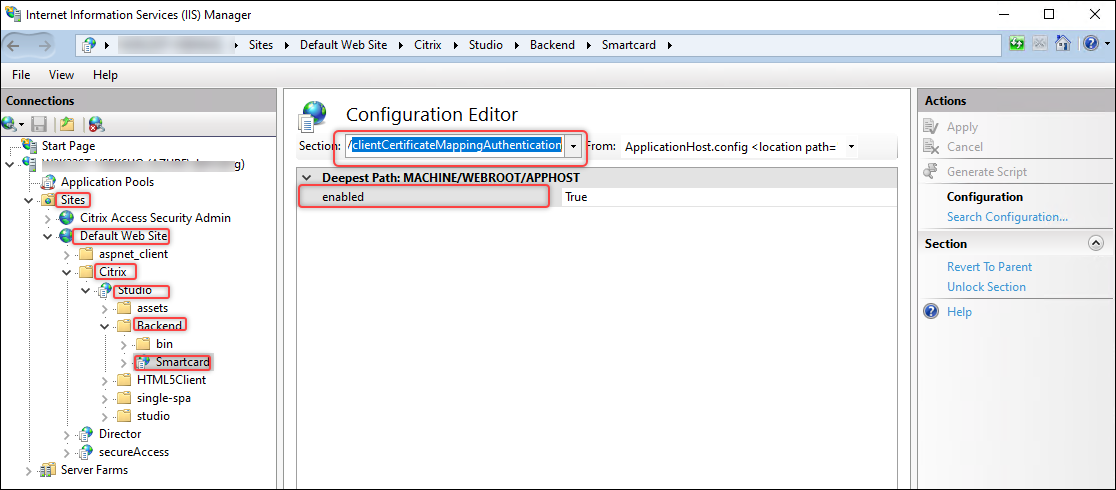
安装 Web Studio 的 IIS 站点名称(站点 ID = 1,默认情况下为 Default Web Site)> Studio > Backend > Smartcard,然后在 IIS 部分中双击配置编辑器。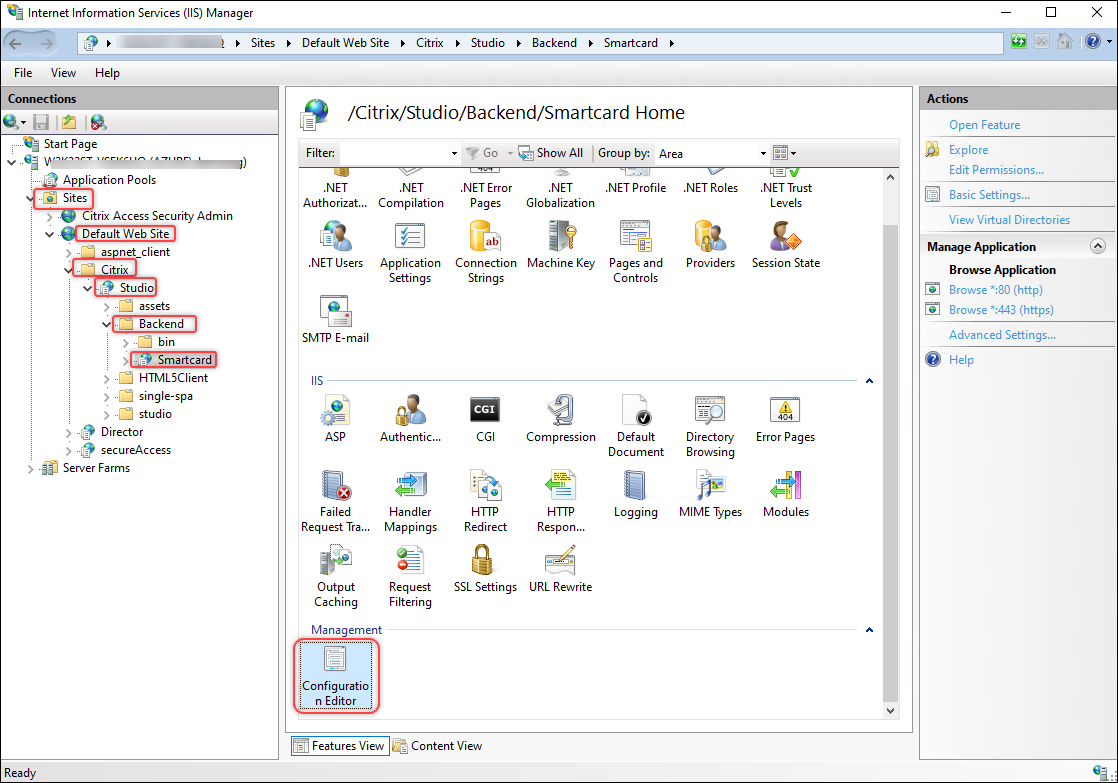
-
确保 /clientCertificateMappingAuthentication 已启用。
-
-
(仅限 Windows 2022)禁用通过 TCP 的 TLS 3.1。详细步骤如下:
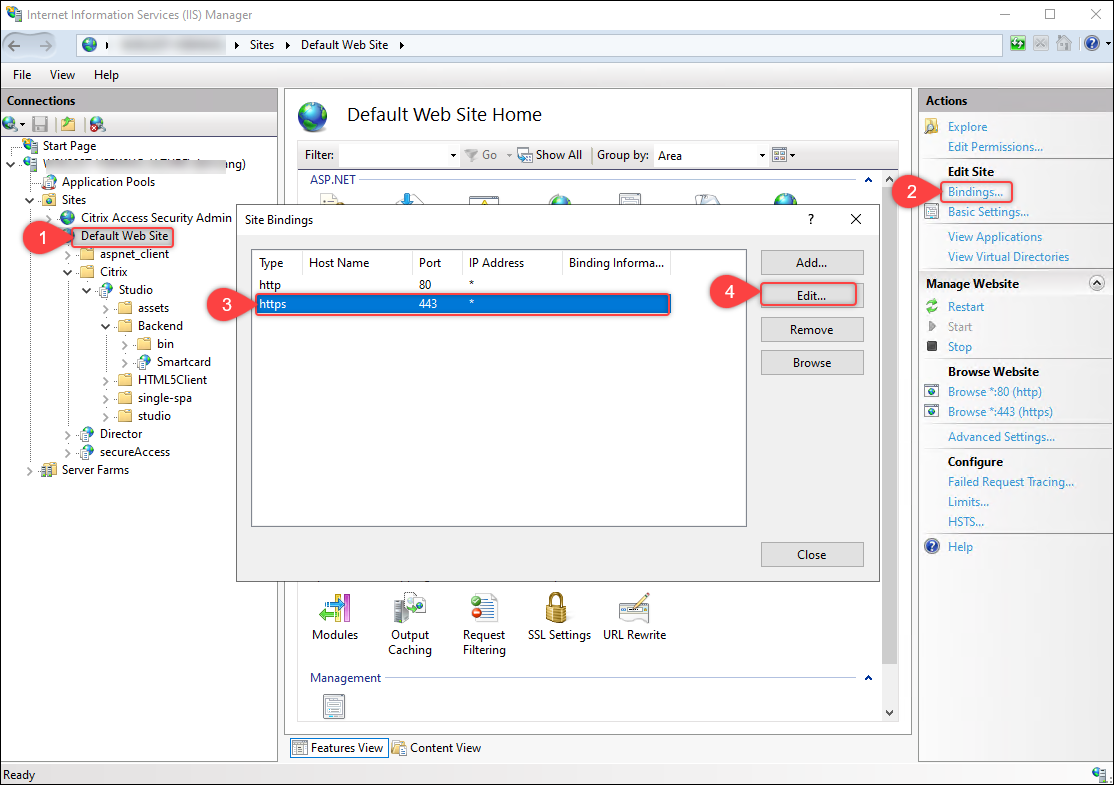
- 转至站点 >
安装 Web Studio 的 IIS 站点名称(站点 ID = 1,默认情况下为 Default Web Site)。 - 单击编辑站点 > 绑定。
-
在出现的站点绑定对话框中,选择 https 记录,然后单击编辑。
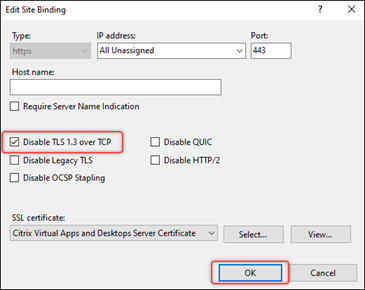
-
在出现的编辑站点绑定对话框中,选择禁用通过 TCP 的 TLS 1.3,然后单击确定。
- 转至站点 >
须知:
Web Studio Backend 是 Web Studio 中的一个模块,提供以下功能:
- 智能卡身份验证。
- 使用集成 Windows 身份验证从 Orchestration 服务检索 FMA 持有者令牌。
步骤 5(可选)配置 Web Studio 的身份验证委派
当 Web Studio 和 Delivery Controller 安装在不同的服务器上时,您必须为每个 Web Studio 服务器配置到 Delivery Controller 的 HOST 和 HTTPS 服务委派。
请按照以下步骤为每个 Web Studio 服务器完成此任务:
- 导入 Delivery Controller™ Orchestration HTTPS 证书
- 配置 Web Studio 服务器的委派
- (可选)配置 Web Studio IIS 服务器服务帐户的委派
导入 Delivery Controller Orchestration HTTPS 证书
在 Web Studio 服务器上,将 Delivery Controller Orchestration HTTPS 证书导入到受信任的根证书颁发机构。详细步骤如下:
- 启动设置 > 管理计算机证书。
-
右键单击受信任的根证书颁发机构 > 证书,然后选择所有任务 > 导入。
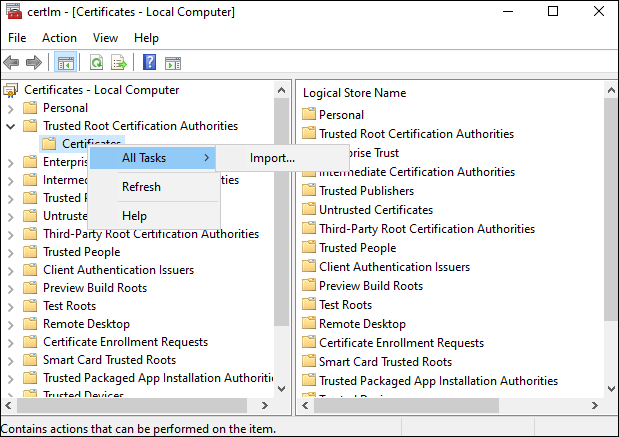
- 按照屏幕上的说明导入 Delivery Controller Orchestration HTTPS 证书。
配置 Web Studio 服务器的委派
在域控制器上,为 Web Studio 服务器配置到 Delivery Controller 的 HOST 和 HTTP 服务委派。请按照以下步骤完成此任务:
- 在域控制器上,启动Active Directory 管理中心。
- 找到要为其配置委派的 Web Studio 服务器的计算机帐户(例如,Dan002)。
-
右键单击该帐户,选择属性,然后完成以下步骤:
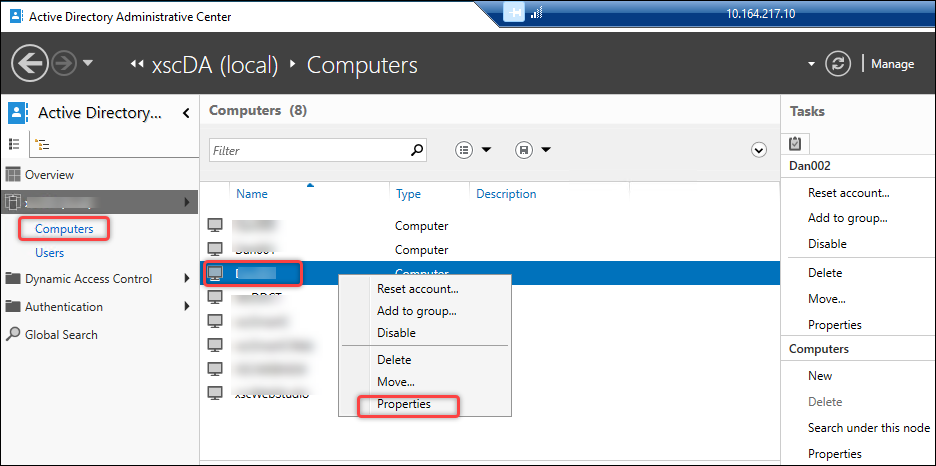
-
转至委派选项卡。
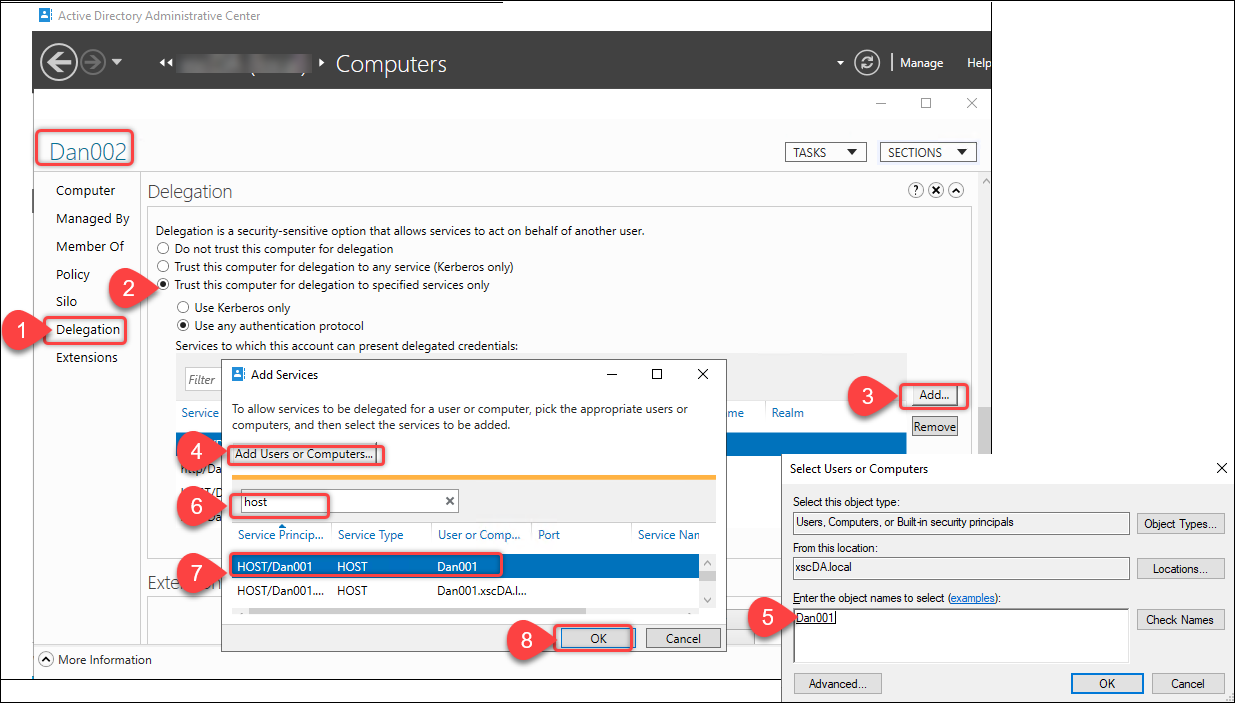
- 选择仅信任此用户进行指定服务委派 > 使用任何身份验证协议。
- 单击添加以指定此计算机帐户可以委派给哪些服务。
- 在出现的添加服务对话框中,单击添加用户或计算机以找到 Delivery Controller 的计算机名称(例如,Dan001)。
- 选择 HOST 和 HTTP 服务,然后单击确定。
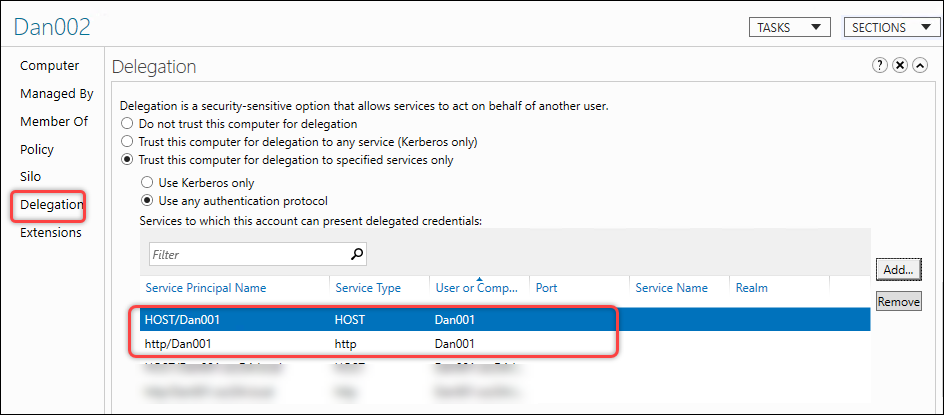
-
配置结果显示在以下屏幕截图中。
(可选)配置 Web Studio IIS 服务器服务帐户的委派
如果您已为 Web Studio IIS 服务器配置了服务帐户,则还需要为该服务帐户配置到 Delivery Controller 的 HOST 和 HTTP 服务委派。建立此委派后,Web Studio 服务器可以使用其服务帐户模拟当前智能卡用户,以访问 Delivery Controller 的 HOST 和 HTTP 服务。请按照以下步骤完成配置:
- 在域控制器上,启动Active Directory 管理中心。
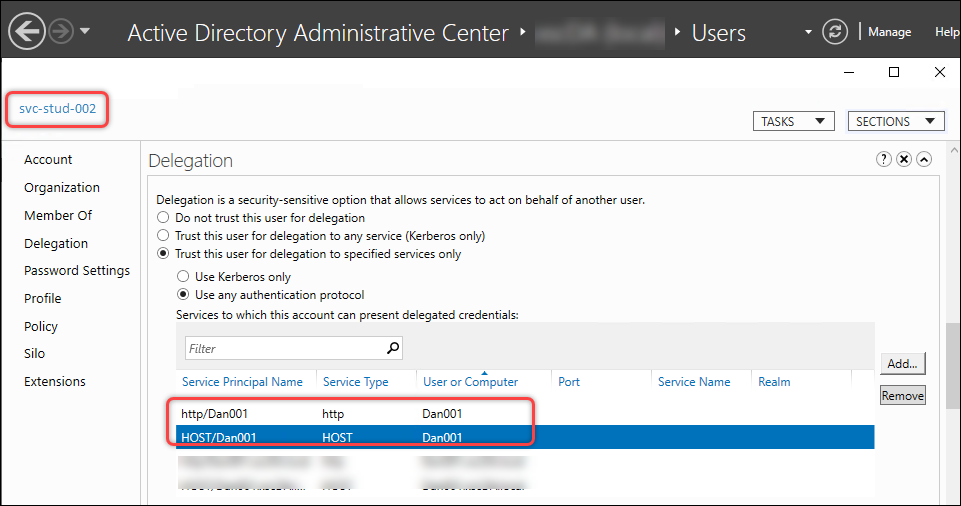
- 找到要为其配置委派的 Web Studio IIS 服务器的用户帐户(服务帐户)(例如,svr-stud-002)。
- 右键单击该帐户并选择属性。
- 按照配置 Web Studio 服务器的委派中的步骤 3 所述过程,将 Web Studio IIS 服务器的服务帐户委派给 Delivery Controller 的 HOST 和 HTTP 服务。
配置结果显示在以下屏幕截图中。
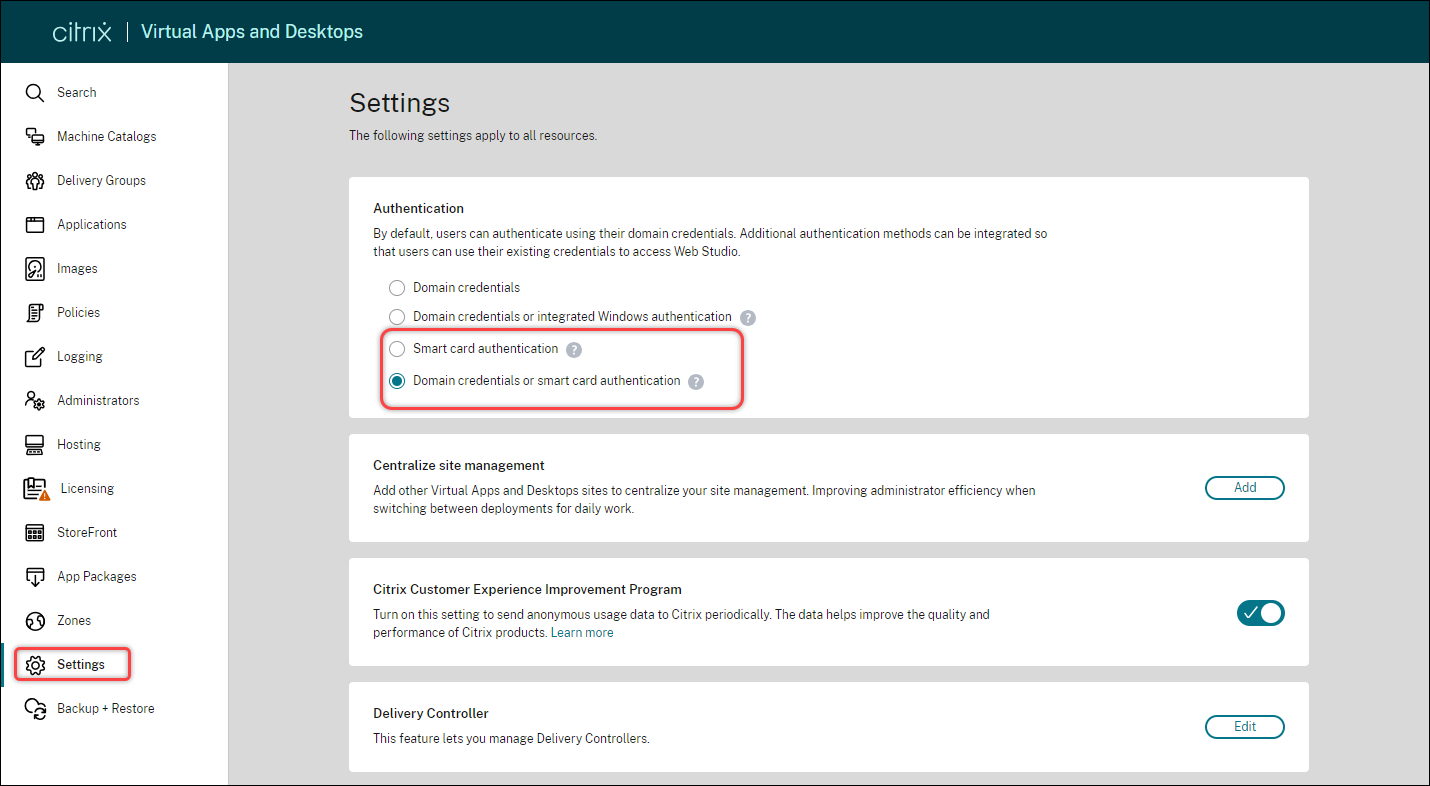
步骤 6:为 Web Studio 启用智能卡身份验证
请按照以下步骤为 Web Studio 启用智能卡身份验证:
- 登录 Web Studio 并在左侧窗格中选择设置。
- 根据需要选择智能卡身份验证或域凭据或智能卡身份验证。
-
单击应用。