Acceso a PC remoto
- Schritt
- Step
- Step
Información general
El Acceso a PC remoto es una extensión de Citrix Virtual Apps and Desktops. Permite a las organizaciones permitir fácilmente a los empleados acceder a sus PC físicos de oficina de forma remota y segura. Si los usuarios pueden acceder a sus PC de oficina, pueden acceder a todas las aplicaciones, datos y recursos que necesitan para realizar su trabajo.
El Acceso a PC remoto utiliza los mismos componentes de Citrix Virtual Apps™ y Desktops que entregan escritorios y aplicaciones virtuales. Los requisitos y el proceso de implementación y configuración del Acceso a PC remoto son los mismos que los requisitos y el proceso necesarios para implementar Citrix Virtual Apps and Desktops. Esta uniformidad proporciona una experiencia administrativa coherente y unificada. Los usuarios obtienen la mejor experiencia de usuario al usar Citrix HDX para entregar sus sesiones de PC de oficina remotas.
-
Para obtener más información, consulta Acceso a PC remoto en la documentación de Citrix Virtual Apps and Desktops.
-
Consideraciones
Estas consideraciones son específicas del VDA de Linux:
CustomProperties
-
En máquinas físicas, usa el VDA de Linux solo en modo no 3D. Debido a las limitaciones del controlador de NVIDIA, la pantalla local del PC no se puede apagar cuando el modo HDX 3D está habilitado. Mostrar esta pantalla es un riesgo de seguridad potencial.
-
Utiliza catálogos de máquinas de tipo SO de sesión única para máquinas Linux físicas.
-
La asignación automática de usuarios no está disponible para las máquinas Linux. Con la asignación automática de usuarios, los usuarios se asignan a sus máquinas automáticamente cuando inician sesión localmente en los PC. Este inicio de sesión se produce sin intervención del administrador. La aplicación Citrix Workspace™ en el cliente ayuda a los usuarios a acceder a las aplicaciones y los datos del PC de oficina dentro de la sesión de escritorio de Acceso a PC remoto.
-
Si los usuarios ya han iniciado sesión en sus PC localmente, los intentos de iniciar los PC desde StoreFront fallan.
- Las opciones de ahorro de energía no están disponibles para las máquinas Linux.
Configuración
Para entregar sesiones de PC Linux, instala el VDA de Linux en los PC de destino, crea un catálogo de máquinas de tipo Acceso a PC remoto y crea un Grupo de entrega para que los PC del catálogo de máquinas estén disponibles para los usuarios que soliciten acceso. La siguiente sección detalla el procedimiento:
Paso 1 - Instala el VDA de Linux en los PC de destino
Te recomendamos que uses la instalación sencilla para instalar el VDA de Linux. Durante la instalación, establece el valor de la variable CTX_XDL_VDI_MODE en Y.
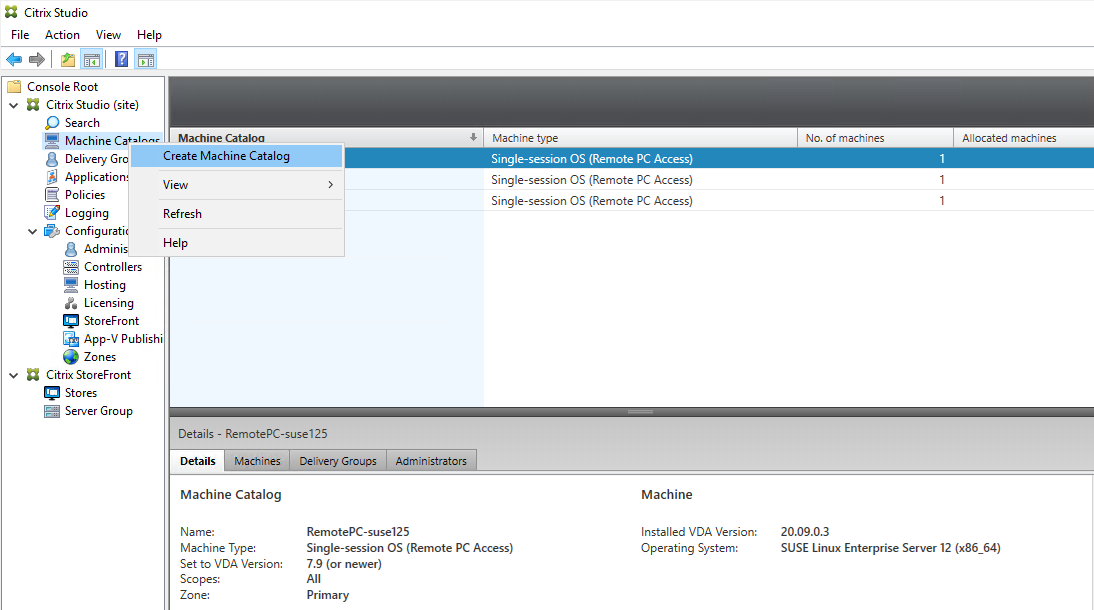
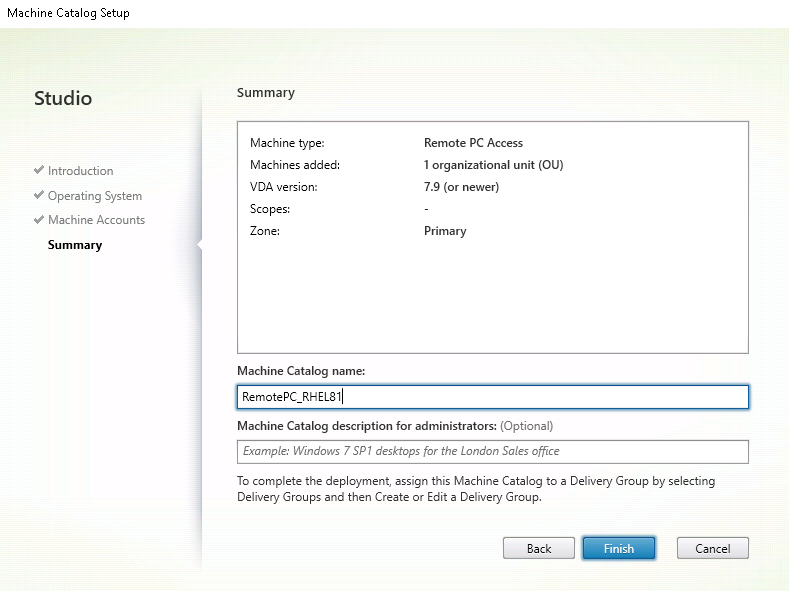
Paso 2 - Crea un catálogo de máquinas de tipo Acceso a PC remoto
- En Citrix Studio, haz clic con el botón derecho en Catálogos de máquinas y selecciona Crear catálogo de máquinas en el menú contextual.
-
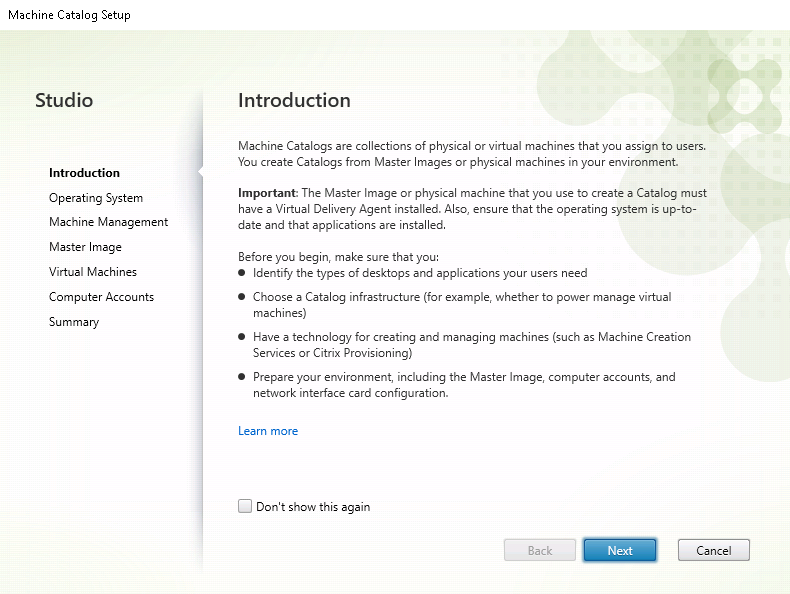
Haz clic en Siguiente en la página Introducción.
-
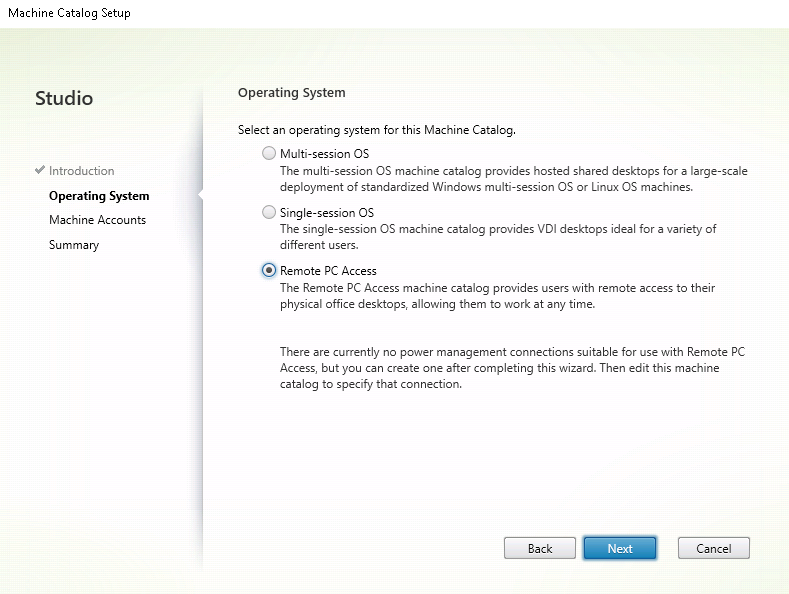
Selecciona Acceso a PC remoto en la página Sistema operativo.
-
-
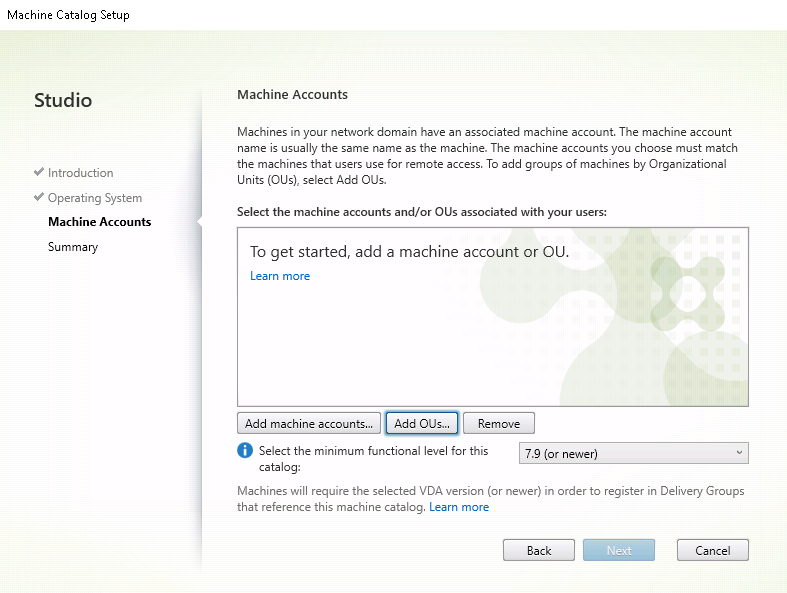
- Haz clic en Agregar UO para seleccionar las UO que contienen los PC de destino, o haz clic en Agregar cuentas de máquina para agregar máquinas individuales al catálogo de máquinas.
-
-
Asigna un nombre al catálogo de máquinas.
-
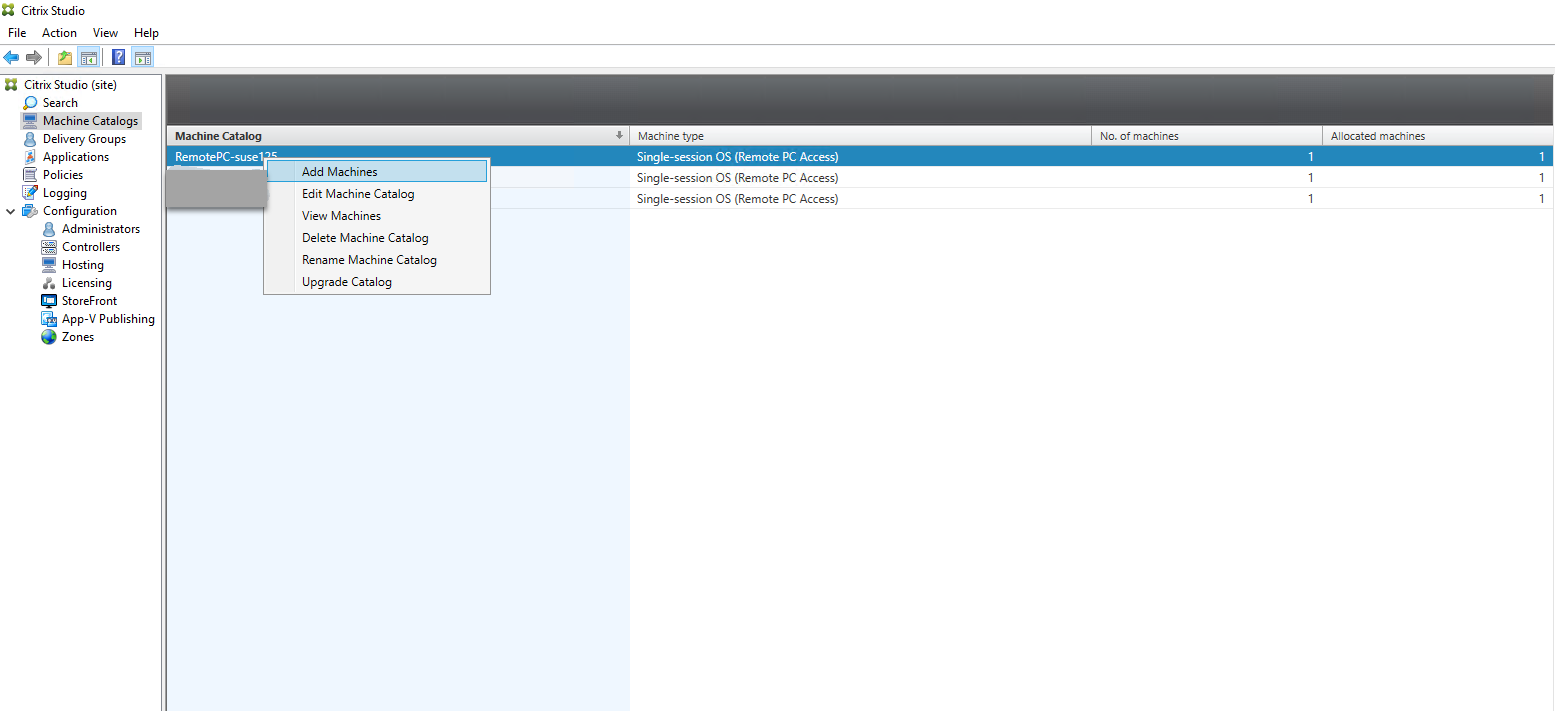
(Opcional) Haz clic con el botón derecho en el catálogo de máquinas para realizar las operaciones pertinentes.
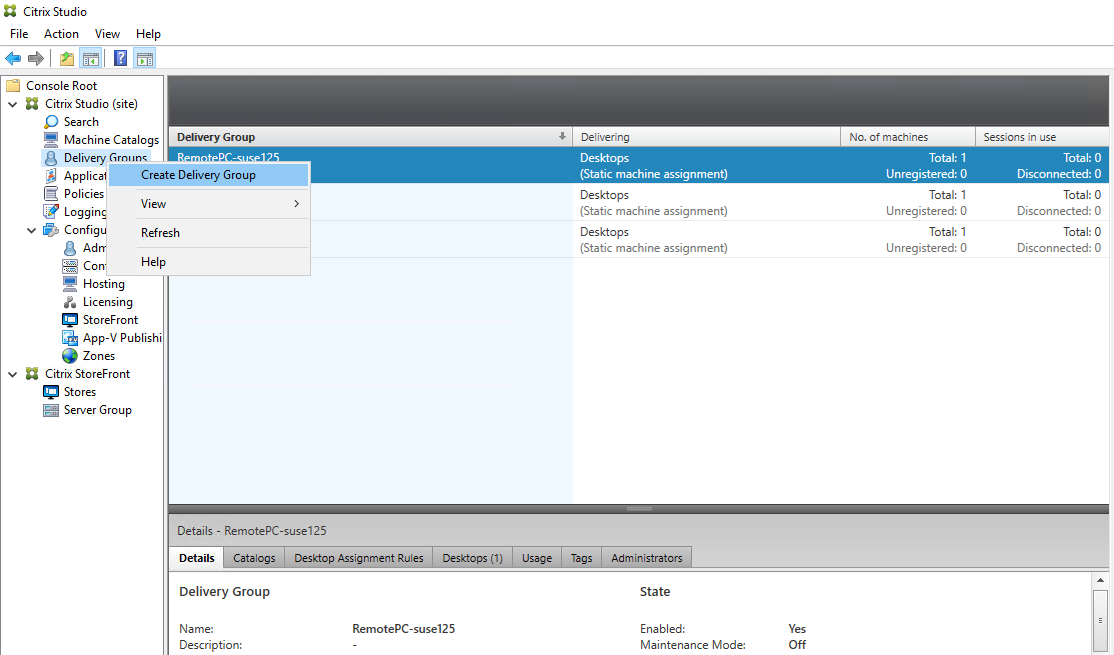
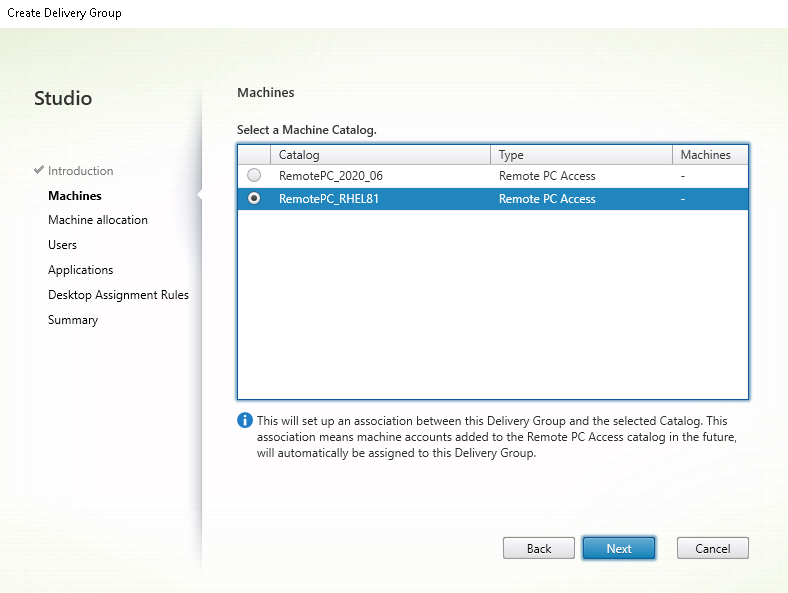
Paso 3 - Crea un Grupo de entrega para que los PC del catálogo de máquinas estén disponibles para los usuarios que soliciten acceso
-
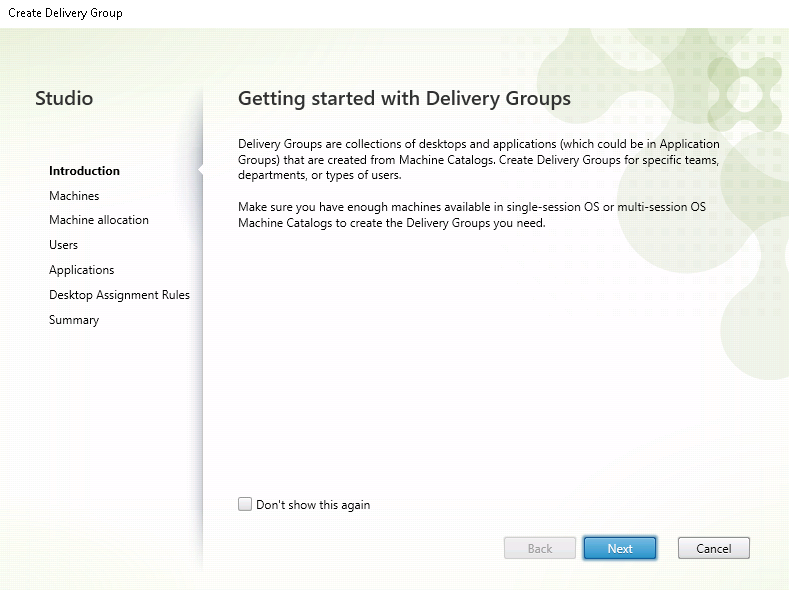
En Citrix Studio, haz clic con el botón derecho en Grupos de entrega y selecciona Crear grupo de entrega en el menú contextual.
-
Haz clic en Siguiente en la página Introducción a los grupos de entrega.
-
Selecciona el catálogo de máquinas creado en el Paso 2 para asociarlo con el Grupo de entrega.
-
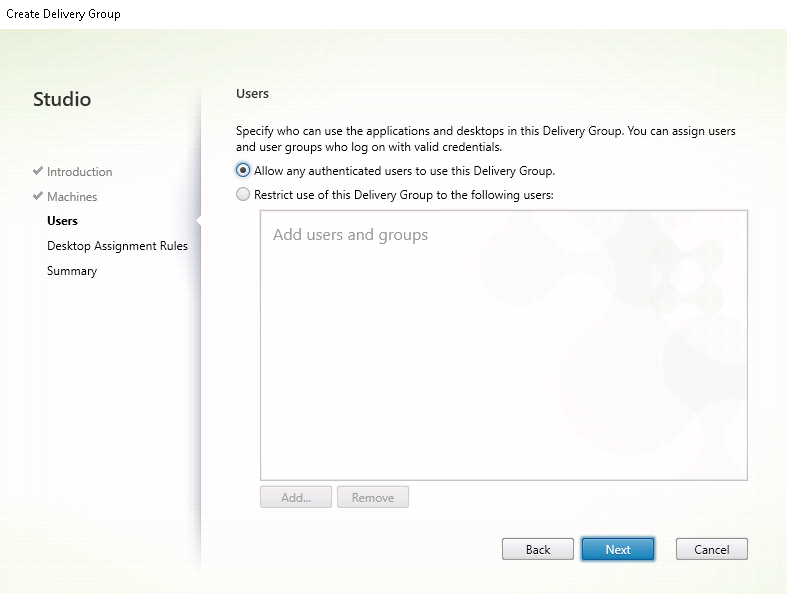
Agrega usuarios que puedan acceder a los PC del catálogo de máquinas. Los usuarios que agregues pueden usar la aplicación Citrix Workspace en un dispositivo cliente para acceder a los PC de forma remota.
Wake on LAN
Remote PC Access supports Wake on LAN, which gives users the ability to turn on physical PCs remotely. This feature enables users to keep their office PCs turned off when not in use to save energy costs. It also enables remote access when a machine has been turned off inadvertently.
With the Wake on LAN feature, the magic packets are sent directly from the VDA running on the PC to the subnet in which the PC resides when instructed by the delivery controller. This allows the feature to work without dependencies on extra infrastructure components or third-party solutions for delivery of magic packets.
The Wake on LAN feature differs from the legacy SCCM-based Wake on LAN feature. For information on the SCCM-based Wake on LAN, see Wake on LAN – SCCM-integrated.
System requirements
The following are the system requirements for using the Wake on LAN feature:
-  Control plane:
-  Citrix DaaS™ (anteriormente Citrix Virtual Apps and Desktops service)
-  Citrix Virtual Apps and Desktops 2012 or later
        -  Physical PCs:
        -  VDA version 2012 or later
-  Wake on LAN enabled in the BIOS and on the NIC

-  ### Configure Wake on LAN
Currently, the configuration of integrated Wake on LAN is only supported using PowerShell.
- To configure Wake on LAN:
- Create the Remote PC Access machine catalog if you do not have one already.
- 1. Create the Wake on LAN host connection if you do not have one already.
- > Note:
To use the Wake on LAN feature, if you have a host connection of the “Microsoft Configuration Manager Wake on LAN” type, create a host connection.
- Retrieve the Wake on LAN host connection’s unique identifier.
-
Associate the Wake on LAN host connection with a machine catalog.
To create the Wake on LAN host connection:
# Load Citrix SnapIns
Add-PSSnapIn -Name "*citrix*"

# Provide the name of the Wake on LAN host connection
[string]$connectionName = "Remote PC Access Wake on LAN"

# Create the hypervisor connection
$hypHc = New-Item -Path xdhyp:\Connections `
            -Name $connectionName `
            -HypervisorAddress "N/A" `
            -UserName "woluser" `
            -Password "wolpwd" `
            -ConnectionType Custom `
            -PluginId VdaWOLMachineManagerFactory `

-  -CustomProperties "<CustomProperties></CustomProperties>" `
>                  >
-  -Persist

-  $bhc = New-BrokerHypervisorConnection -HypHypervisorConnectionUid $hypHc.HypervisorConnectionUid

## Wait for the connection to be ready before trying to use it

while (-not $bhc.IsReady)

-  {
-  Start-Sleep -s 5
-  $bhc = Get-BrokerHypervisorConnection -HypHypervisorConnectionUid $hypHc.HypervisorConnectionUid
-  }

<!--NeedCopy-->
-
When the host connection is ready, run the following commands to retrieve the host connection’s unique identifier:
 $bhc = Get-BrokerHypervisorConnection -Name "<WoL Connection Name>"

 -  $hypUid = $bhc.Uid

 <!--NeedCopy-->
After you retrieve the connection’s unique identifier, run the following commands to associate the connection with the Remote PC Access machine catalog:
 Get-BrokerCatalog -Name "<Catalog Name>" | Set-BrokerCatalog -RemotePCHypervisorConnectionUid $hypUid

 <!--NeedCopy-->
-
Enable Wake on LAN in the BIOS and on the NIC on each VM in the machine catalog.
Note: The method for enabling Wake on LAN varies with different machine configurations.
- To enable Wake on LAN in the BIOS:
-
Enter the BIOS and enable the Wake on LAN feature.
The method for accessing the BIOS depends on the manufacturer of your motherboard and the BIOS vendor the manufacturer has selected.
-
Save your settings and restart the machine.
-
- To enable Wake on LAN on the NIC:
-
Run the
sudo ethtool <NIC>command to check whether your NIC supports magic packets.<NIC>is the device name of your NIC, for example,eth0. Thesudo ethtool <NIC>command provides an output about the capabilities of your NIC:- If the output contains a line similar to
Supports Wake-on: <letters>where<letters>contains the letterg, your NIC supports the Wake on LAN magic packet method. - If the output contains a line similar to
Wake-on: <letters>where<letters>contains the lettergand does not contain the letterd, the Wake on LAN magic packet method is enabled. However, if<letters>contains the letterd, it indicates that the Wake on LAN feature is disabled. In this case, enable Wake on LAN by running thesudo ethtool -s <NIC> wol gcommand.
- If the output contains a line similar to
-
On most distributions, the
sudo ethtool -s <NIC> wol gcommand is required after each startup. To persistently set this option, complete the following steps based on your distributions:Ubuntu: Add the
up ethtool -s <NIC> wol gline to the interface configuration file/etc/network/interfaces. For example:# ifupdown has been replaced by netplan(5) on this system. See # /etc/netplan for current configuration. # To re-enable ifupdown on this system, you can run: # sudo apt install ifupdown auto eth0 iface eth0 inet static address 10.0.0.1 netmask 255.255.240.0 gateway 10.0.0.1 up ethtool -s eth0 wol g <!--NeedCopy-->RHEL/SUSE: Add the following
ETHTOOL_OPTSparameter to the interface configuration file/etc/sysconfig/network-scripts/ifcfg-<NIC>:ETHTOOL_OPTS="-s ${DEVICE} wol g" <!--NeedCopy-->
-
- To enable Wake on LAN in the BIOS:
Design considerations
When you are planning to use Wake on LAN with Remote PC Access, consider the following:
- Multiple machine catalogs can use the same Wake on LAN host connection.
- For a PC to wake up another PC, both PCs must be in the same subnet and use the same Wake on LAN host connection. It does not matter if the PCs are in the same or different machine catalogs.
- Host connections are assigned to specific zones. If your deployment contains more than one zone, you need a Wake on LAN host connection in each zone. The same applies to machine catalogs.
- Magic packets are broadcasted using the global broadcast address 255.255.255.255. Ensure that the address is not blocked.
- There must be at least one PC turned on in the subnet - for every Wake on LAN connection - to be able to wake up machines in that subnet.
Operational considerations
The following are considerations for using the Wake on LAN feature:
- The VDA must register at least once before the PC can be woken up using the integrated Wake on LAN feature.
- Wake on LAN can only be used to wake up PCs. It does not support other power actions, such as restart or shut down.
- After the Wake on LAN connection is created, it is visible in Studio. However, editing its properties within Studio is not supported.
- Magic packets are sent in one of the two ways:
- When a user tries to launch a session to their PC and the VDA is unregistered
- When an administrator sends a power on command manually from Studio or PowerShell
- Because the delivery controller is unaware of a PC’s power state, Studio displays Not Supported under power state. The delivery controller uses the VDA registration state to determine whether a PC is on or off.
More resources
The following are other resources for Remote PC Access:
-
Solution design guidance: Remote PC Access Design Decisions.
-
Examples of Remote PC Access architectures: Reference Architecture for Citrix Remote PC Access Solution.