Virtual disks
Upgrading virtual disks involves installing the new version of the Citrix Provisioning™ target device software on the virtual disk image.
Important:
Back up all virtual disks before upgrading to a newer product version.
In-place upgrade
It involves two steps:
- Start the client in private or maintenance mode.
- Run the target device installer as described in Preparing a master target device for imaging.
Note:
Upgrading Citrix Provisioning requires local administrator privileges.
Upgrade a virtual disk using reverse imaging
Upgrade by reverse reimaging only if you cannot upgrade using in-place upgrade method.
The reimaging upgrade method that you choose depends on your existing Citrix Provisioning implementation and network requirements.
Versioned virtual disk upgrade
This method reimages to a maintenance version of the virtual disk, allowing production devices to continue running and booting from the production version of the virtual disk. After the upgraded version of the virtual disk is promoted to production, target devices will boot or reboot from the upgraded virtual disk version.
Upgrade prerequisites include:
- Upgrading all Citrix Provisioning servers
- Upgrading Citrix Provisioning consoles
- Creating a backup copy of the virtual disk
To upgrade, complete the following procedure:
- Boot the Maintenance device from the managed virtual disk while in Maintenance mode.
- From the product installation directory, run
P2PVS.exeto reverse image using volume-to-volume imaging. Select the virtual disk as the source and the hard disk drive (HDD) as the destination. If your destination partition is on any partition other than partition 1, you must edit theboot.iniorbceditpartition settings before rebooting from the HDD. - Reboot the Maintenance device from the HDD. Do not PXE boot.
- On the maintenance device, uninstall 6.x target device software, and then install the latest version of the target device software.
- Run the Citrix Provisioning Imaging Wizard to create a virtual disk image. Create the target device if it does not exist, and assign the virtual disk to the target device.
- Test streaming the new virtual disk image by booting a maintenance or test device from the upgraded virtual disk.
Manual reverse imaging using P2PVS
When manually performing reverse imaging using P2PVS, consider the following:
- Boot the provisioning target device into the virtual disk using private\maintenance mode.
- Install
PVS\_UpgradeWizard.exeorPVS\_UpgradeWizard\_x64.exefrom the Upgrade folder of the ISO image to get the latestP2PVS.exe. The upgrade wizard can also be installed with the Citrix Provisioning meta-installer using the Target Device Installation > Install Upgrade Wizard option. - Run P2PVS.exe from the Citrix Provisioning Upgrade Wizard directory. By default, this directory is C:\Program Files\Citrix\Citrix Provisioning Upgrade Wizard.
- Click the From menu and choose Provisioning Services vDisk and click Next.
- In the partition screen, select the partitions. All system partitions, regardless of whether they have a drive letter or not, are used in reverse imaging. Click Next.
- Click Convert on the last page to begin reverse imaging.
Note:
Reverse imaging for BIOS systems is non-destructive. The partition table of the system is not altered. Because Citrix Provisioning imaging is blocked base, the partition table of the local hard disk must be the same as the partition table of the virtual disk. Important:
Reverse imaging for UEFI systems is destructive. All partitions on the local hard disk are destroyed and re-created to match the partitions of the virtual disk.
Upgrading vDisks manually
Use the manual upgrade as a universal approach to upgrading vDisks, or if any of the following are true:
- The virtual disk has gone through several modifications in private image mode.
- The original hard drive is no longer available.
The manual upgrade method includes completing the following tasks:
- Image the virtual disk back to the master target device’s hard drive.
- Install the latest product software on the master target device.
- Image the target device’s hard drive onto the virtual disk file.
- Boot from the virtual disk.
Image back to a master target device’s hard drive
There are two procedures that allow you to image a virtual disk back to a hard drive. The procedure you select depends on the state of the disk drive you are imaging to. You can image back to the original hard drive from which the virtual disk was created. Returning the image to the original hard drive is the recommended method. Alternatively, you can image back using an unformatted, uninitialized hard disk drive.
Image back to the original hard drive from which the virtual disk was created
- Boot from the virtual disk in private or shared image Mode.
- From Windows Administrative Tools, select the Computer Management menu option. The Computer Management window appears.
- In the tree, under Storage, select Disk Management.
- Note the partition letter of the active partition of the original hard disk. If new, format the disk before continuing.
- Run the Image Builder utility on the target device. This utility is at \Program Files\Citrix\Citrix Provisioning\P2PVS.exe.
- Specify the drive letter of the newly created partition, or the original boot HDD partition, as the Destination Drive. The destination drive points to the virtual disk first partition by default.
- Proceed cloning the hard drive image to the virtual disk destination drive.
- To connect the virtual disk to the provisioning server, from the console, set the target device to boot from the hard drive, then PXE boot the target device. If this step is not completed properly, the provisioning server is unable to connect with the virtual disk.
- Uninstall the product software. For details, see the section about removing Citrix Provisioning.
Image back using an unformatted, uninitialized hard disk drive
- Boot from the virtual disk in Private Image Mode.
- From Windows Administrative Tools, select the Computer Management menu option. The Computer Management window appears.
- In the tree, under Storage, select Disk Management.
- Create a new primary partition, as the first partition, assign a drive letter to it, and then format the partition.
- Right-click on the newly created partition, then choose Mark Partition as Active.
- Delete the boot.ini.hdisk file from the root of the virtual disk.
- Run the Image Builder utility on the target device. This utility is at
\Program Files\Citrix\Citrix Provisioning\P2PVS.exe. - Specify the destination drive letter of the newly created partition, or the original boot HDD partition, as the virtual disk. The virtual disk first points to the destination drive partition by default.
- Clone the hard drive image to the virtual disk destination drive.
- To connect the virtual disk to the provisioning server, from the console, set the target device to boot from the hard drive, then PXE boot the target device. If this step is not completed correctly, the provisioning server is unable to connect with the virtual disk.
- Uninstall the product software. For details, see the section about removing Citrix Provisioning.
Install the master target device software
Complete the following steps to install the latest product software on the master target Device.
- Run the new Citrix Provisioning Server Target Device installer on the target device.
- PXE boot the target device.
Image the hard drive
Complete the following steps to image the target device’s hard drive onto the virtual disk file:
- Run the Image Builder utility on the target device. This utility is at \Program Files\Citrix\Citrix Provisioning\P2PVS.exe.
- Specify the drive letter of the newly created partition, or the original boot HDD partition, as the destination drive. The destination drive points to the virtual disk first partition by default.
- Clone the hard drive image to the virtual disk destination drive.
Boot from the virtual disk
Using the Citrix Provisioning console, set the target device on the provisioning server to boot from virtual disk, then reboot the target device. The new target device is now running the new virtual disk image.
Upgrade a target virtual disk using in-place upgrade
Use the information contained in this article to upgrade a target device virtual disk using the in-place upgrade method.
Important:
This upgrade procedure can only be used for Citrix Provisioning target devices using version 7.6.1 and newer. For Provisioning Services 7.6.1 and newer, the upgraded target is installed using the target install method, and is not upgraded using binary replacement. Citrix recommends that you uninstall if you are using version 7.6.0 or earlier.
Boot a target device into private image mode or a maintenance version
Use the information in this section to boot a target device in either private image mode, or to boot in maintenance mode.
Tip:
Back up the virtual disk before upgrading before booting from private image mode.
Boot in private image mode
-
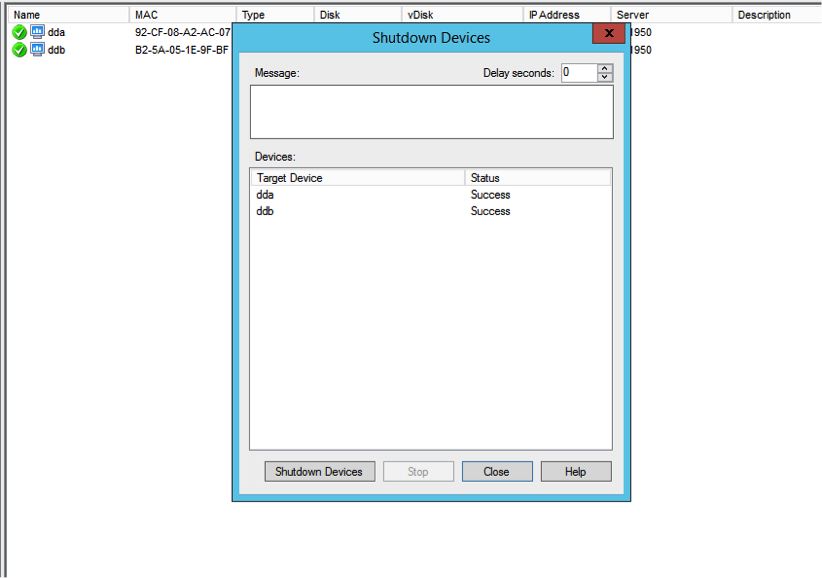
Shut down all other devices.
-
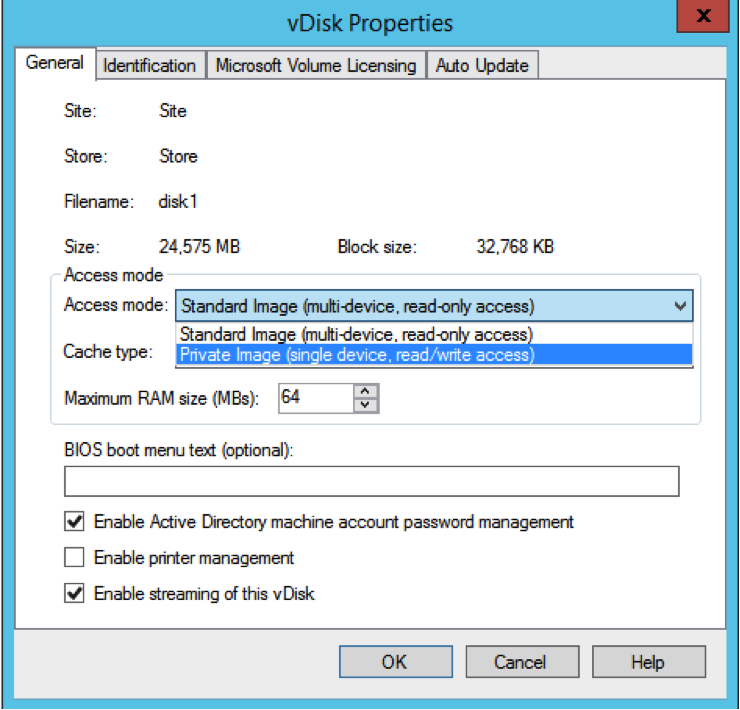
Set the virtual disk that you want to upgrade to private image mode:
-
Open the virtual disk’s properties dialog by right-clicking the virtual disk, and choose Properties.
-
From the Access mode group, select Private Image (single device, read/write access):
-
-
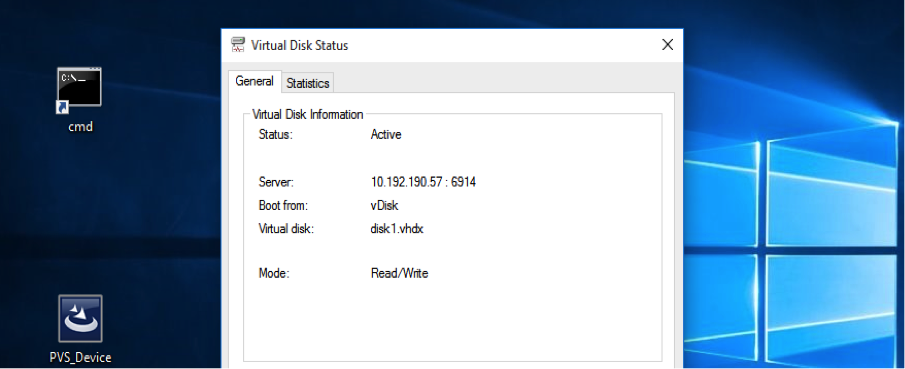
Boot a target device using that virtual disk:
Boot in maintenance mode
-
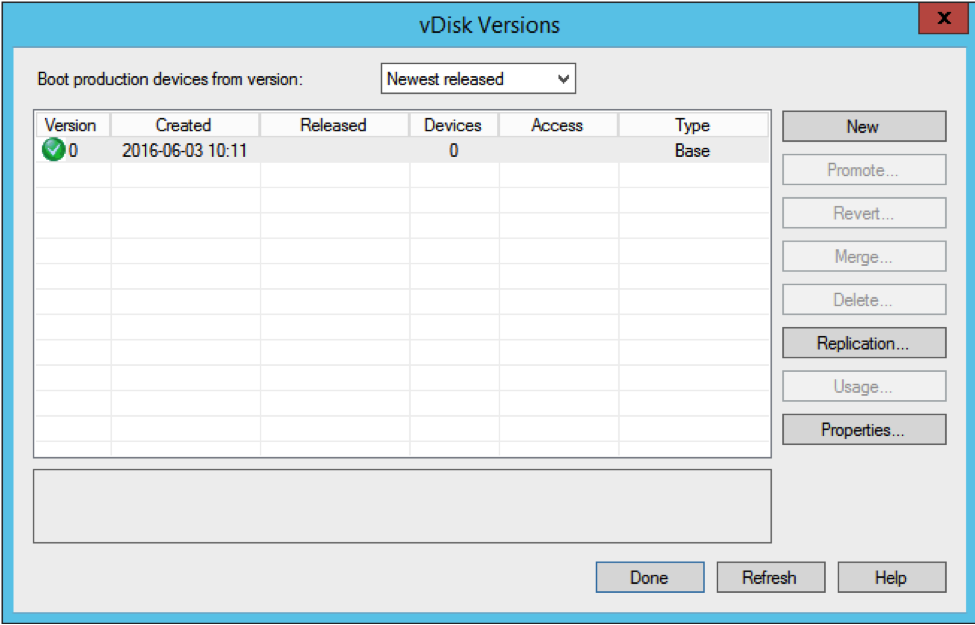
Right-click the standard mode virtual disk and choose the option Versions… to open the virtual disk Versions screen.
-
Click the New button (in the upper right portion of the interface) to create a maintenance virtual disk version:
-
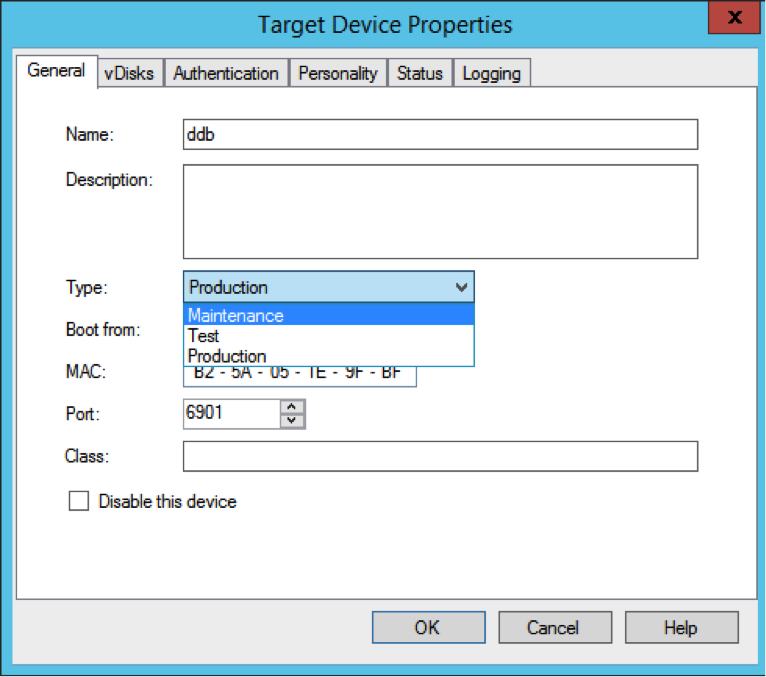
Set a target device that is using that virtual disk to maintenance mode by right-clicking on the target, then choose the Properties option.
-
Choose Maintenance from the menu for the property type:
-
Boot a target device using the specified virtual disk version.
-
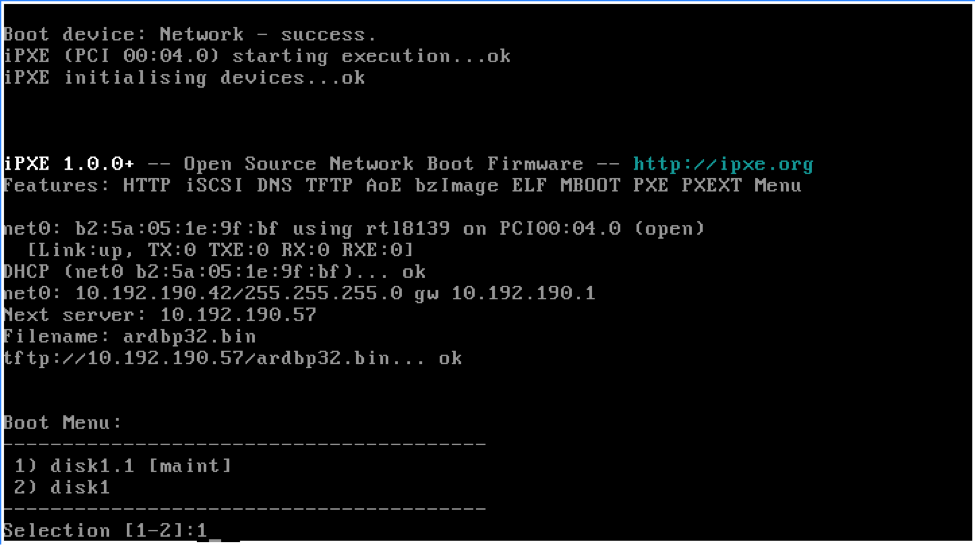
Choose option 1 from the boot menu that appears when booting the target device:
-
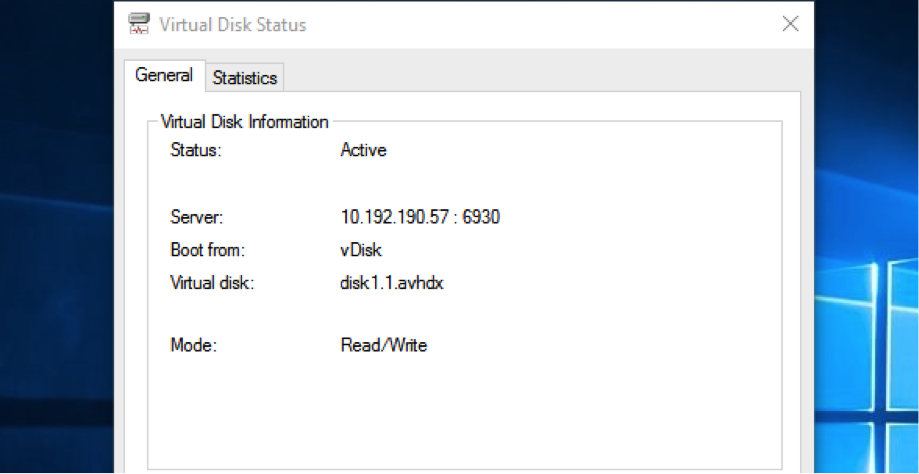
The provisioning status tray of the device resembles:
Tip:
The virtual disk’s name is followed by a
.xwhere x is greater than or equal to 1 and the extension is.avhdxor.avhd.
Upgrade the Citrix Provisioning target device software
After booting a device into private image mode or a maintenance version, use the information in this section to upgrade the Citrix Provisioning target device software.
To upgrade the Citrix Provisioning target device software:
- Log into the target device using local administrator login credentials.
- Copy the PVS_Device.exe or PVS_Device_x64.exe to the target device.
- Right-click the installer and choose Run as administrator.
- Run the installer and choose all the options as you would install a fresh version.
- Click Finish to begin the upgrade.
- Shut down the target device.
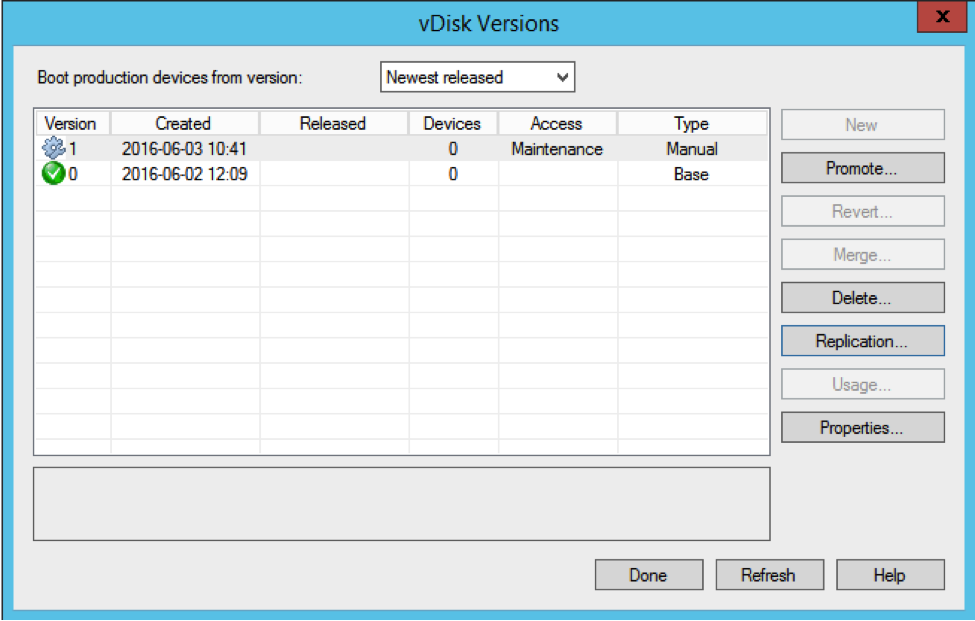
- Open the virtual disk version interface.
-
Click Promote to promote the virtual disk to either a test or production version:
Tip
The New button is grayed out and inaccessible.
-
Test version - Use this version to verify the virtual disk is fully operational before promoting it to the production version.
-
Production version - Represents the version used by all users in a full roll out of the virtual disk to the production environment.
-
In this article
- In-place upgrade
- Upgrade a virtual disk using reverse imaging
- Versioned virtual disk upgrade
- Upgrading vDisks manually
- Install the master target device software
- Image the hard drive
- Boot from the virtual disk
- Upgrade a target virtual disk using in-place upgrade
- Boot a target device into private image mode or a maintenance version