-
-
Integrate Citrix Virtual Apps and Desktops with Citrix Gateway
-
Enable TLS on Delivery Controllers
-
WebSocket communication between VDA and Delivery Controller™
-
-
-
This content has been machine translated dynamically.
Dieser Inhalt ist eine maschinelle Übersetzung, die dynamisch erstellt wurde. (Haftungsausschluss)
Cet article a été traduit automatiquement de manière dynamique. (Clause de non responsabilité)
Este artículo lo ha traducido una máquina de forma dinámica. (Aviso legal)
此内容已经过机器动态翻译。 放弃
このコンテンツは動的に機械翻訳されています。免責事項
이 콘텐츠는 동적으로 기계 번역되었습니다. 책임 부인
Este texto foi traduzido automaticamente. (Aviso legal)
Questo contenuto è stato tradotto dinamicamente con traduzione automatica.(Esclusione di responsabilità))
This article has been machine translated.
Dieser Artikel wurde maschinell übersetzt. (Haftungsausschluss)
Ce article a été traduit automatiquement. (Clause de non responsabilité)
Este artículo ha sido traducido automáticamente. (Aviso legal)
この記事は機械翻訳されています.免責事項
이 기사는 기계 번역되었습니다.책임 부인
Este artigo foi traduzido automaticamente.(Aviso legal)
这篇文章已经过机器翻译.放弃
Questo articolo è stato tradotto automaticamente.(Esclusione di responsabilità))
Translation failed!
Enable TLS on Delivery Controllers
To enable TLS on a delivery controller™, you must:
-
Obtain, install, and register a server certificate on all Delivery Controllers. For details, see Requesting and installing a certificate.
-
Configure a port with the TLS certificate. For details, see Requesting and installing a certificate.
-
Enforce HTTPS traffic by disabling HTTP. For more details, see Enforce HTTPS traffic only.
-
Optionally, you can change the ports the Controller uses to listen for HTTP and HTTPS traffic. For more details, see Change HTTP or HTTPS ports.
Requesting and installing a certificate
To use TLS, you must install a certificate whose Alternative Name includes the DDC’s FQDN. You must create a suitable certificate. This can be done using a Microsoft Certificate Authority or other internal or external certificate authorities.
Create certificate using Microsoft Certificate Authority
If the Microsoft Certificate Authority is integrated into an Active Directory domain or into the trusted forest the Delivery Controllers are joined to, you can acquire a certificate from the Certificates MMC snap-in Certificate Enrollment wizard. The Microsoft Certificate Authority needs to have a certificate template published suitable for use by web servers. If you are using a Citrix Gateway or a StoreFront™ server on a different domain then you need to export the Root Certification Authority Certificate and import it into the Citrix Gateway and StoreFront.
-
On the Delivery Controller, open the MMC console and add the Certificates snap-in. When prompted select Computer account.
-
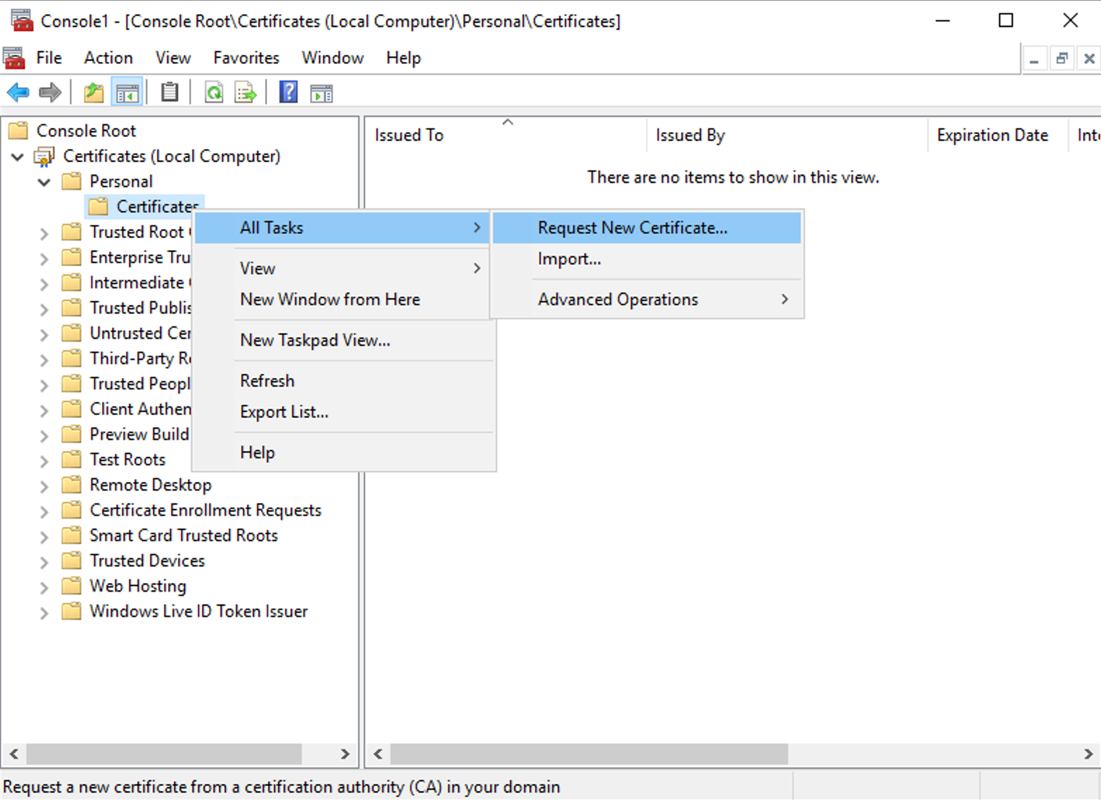
Expand Personal > Certificates, then use the All Tasks > Request New Certificate context menu command.
-
Click Next to begin, and Next to confirm that you are acquiring the certificate from Active Directory enrollment.
-
Select a suitable template such as Web Server Exportable. If the template has been set up to automatically provide the values for Subject you can click Enroll without providing more details.

-
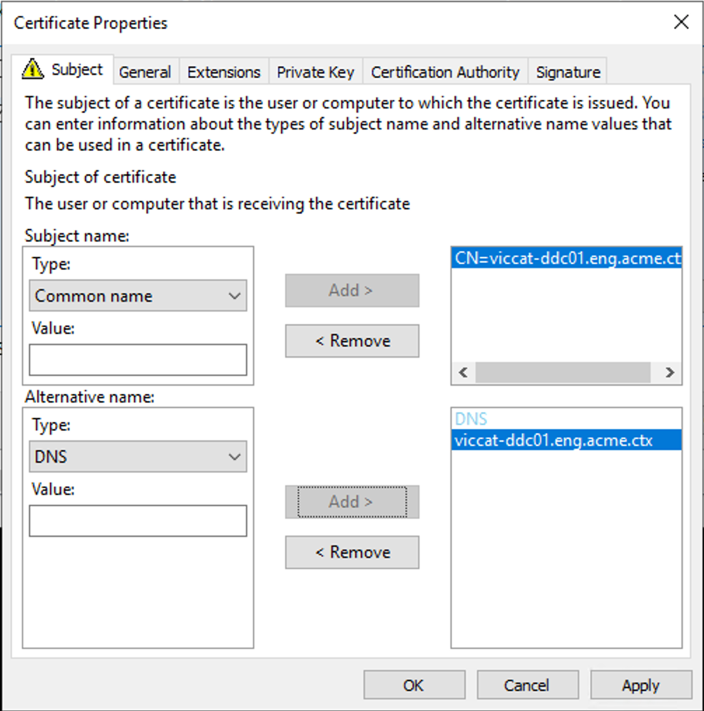
To provide more details for the certificate template, click the Details arrow button and configure the following:
Subject name: select Common Name and add the FQDN of the Delivery Controller.
Alternative name: select DNS and add the FQDN of the Delivery Controller.
-
Press OK.
-
Press Enroll to create an install the certificate
Install existing certificate file
If you have an existing certificate as a file then you can install it:
-
On the Delivery Controller, open the MMC console and add the Certificates snap-in. When prompted select Computer account.
-
Expand Personal > Certificates, then use the All Tasks > Import context menu command.
-
Browse for the certificate file.
Configuring SSL/TLS listener port
If the IIS Windows component is installed on the same server, which is installed as part of Web Studio and Director, you can configure TLS using IIS. For more information, see Enable TLS on Web Studio and Director. Otherwise, to configure the certificate using PowerShell:
-
To check if there is an existing certificate bound, open an command prompt and run
netsh http show sslcert:netsh http show sslcert <!--NeedCopy--> -
If there is an existing binding then delete it.
netsh http delete sslcert ipport=0.0.0.0:443
<!--NeedCopy-->
Replacing
0.0.0.0:443with a specific IP address and port if there was one specified in the existing binding. -
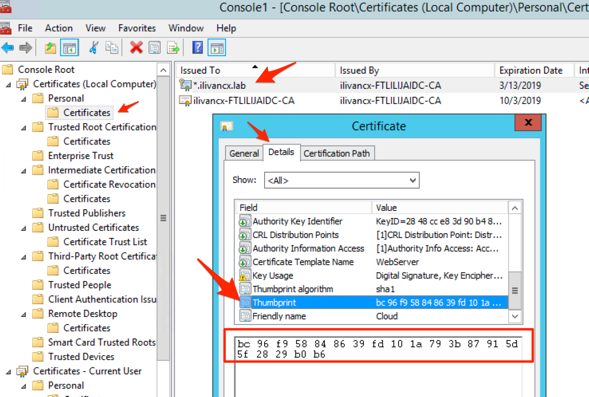
Find the thumbprint of the certificate you installed previously. To view the thumbprint, open Manage computer certificates, browse to the certificate and open it and go to the Details tab.
Alternatively you can use PowerShell. For example the following script looks for a certificate whose common name matches the server’s host name and prints the thumbnail:
$HostName = ([System.Net.Dns]::GetHostByName(($env:computerName))).Hostname
$Thumbprint = (Get-ChildItem -Path Cert:\LocalMachine\My | Where-Object {$_.Subject -match ("CN=" + $HostName)}).Thumbprint -join ';'
Write-Host -Object "Certificate Thumbprint for $($HostName): $($Thumbprint)" -Foreground Yellow
<!--NeedCopy-->
If the certificate common name does not match the host names then this will fail. If there are multiple certificates for the host name then this returns multiple thumbprints concatenated together and you must choose the appropriate thumbprint.
The following example looks for a certificate by friendly name:
$friendlyName = "My certificate name"
$Thumbprint = (Get-ChildItem -Path Cert:\LocalMachine\My | Where-Object {$_.FriendlyName -eq $friendlyNam}).Thumbprint -join ';'
Write-Host -Object "Certificate Thumbprint for $friendlyName: $($Thumbprint)" -Foreground Yellow
<!--NeedCopy-->
If there are multiple certificates with the specified friendly name then this returns multiple thumbprints concatenated together and you must choose the appropriate thumbprint.
-
To bind the certificate to the port, use the
netsh http add sslcertcommand:netsh http add sslcert ipport=[IP address]:443 certhash=[certificate hash] appid=[application GUID] disablelegacytls=enable <!--NeedCopy-->-
ipport: The IP address and port. Using 0.0.0.0:443 applies this to all IP addresses. You can instead specify a specific IP address. -
certhash: The thumbprint of the certificate you identified in the previous step. -
appid: The GUID of the Citrix Broker Service.Note:
When renewing a certificate or rebinding, use the specific
appidassociated with the Broker Service rather than an arbitrary GUID.To find the correct
appidfor the Citrix Broker Service:-
Open a PowerShell command window as an administrator and run the following command:
Get-WmiObject -Class Win32_Product | Select-String -Pattern "broker" <!--NeedCopy--> -
Locate the IdentifyingNumber (GUID) for the Citrix Broker Service in the output (for example,
{D333C884-187F-447C-8C67-463F33989C8F}). Use this GUID for theappidparameter.
-
-
disablelegacytls=enable: Disables legacy versions of TLS. This parameter is available on Windows 2022 and higher. Windows 2022 it disables TLS 1.0 and 1.1. On Windows 2025 this is unnecessary as TLS 1.0 and 1.1 are disabled by default.
For example, run the following command to bind the certificate with thumbprint
bc96f958848639fd101a793b87915d5f2829b0b6to port443on all IP addresses:netsh http add sslcert ipport=0.0.0.0:443 certhash=bc96f958848639fd101a793b87915d5f2829b0b6 appid={91fe7386-e0c2-471b-a252-1e0a805febac} disablelegacytls=enable <!--NeedCopy--> -
Once HTTPS is enabled, you should configure any StoreFront deployments and Netscaler Gateways to use HTTPS instead of HTTP to connect to the delivery controller.
Configure cipher suites
The cipher suite order list must include the TLS_ECDHE_RSA_WITH_AES_256_CBC_SHA384, or TLS_ECDHE_RSA_WITH_AES_128_CBC_SHA256 cipher suites (or both); and these cipher suites must precede any TLS_DHE_ cipher suites.
- Using the Microsoft Group Policy Editor, browse to Computer Configuration > Administrative Templates > Network > SSL Configuration Settings.
- Edit the policy “SSL Cipher Suite Order”. By default, this policy is set to “Not Configured”. Set this policy to Enabled.
- Arrange suites in the correct order; remove any cipher suites suites you do not want to use.
Ensure that either TLS_ECDHE_RSA_WITH_AES_256_CBC_SHA384, or TLS_ECDHE_RSA_WITH_AES_128_CBC_SHA256 precedes any TLS_DHE_ cipher suites.
On Microsoft Learn, see also Configuring TLS Cipher Suite Order.
Enforce HTTPS traffic only
It is recommended that you configure the XML Service to ignore HTTP traffic.
- Run
regedit - Open HKLM\Software\Citrix\DesktopServer\
- Create a new DWORD value with name
XmlServicesEnableNonSsland set it to 0. - Restart the Broker Service.
There is a corresponding registry DWORD value XmlServicesEnableSsl you can create to ignore HTTPS traffic. Ensure that it is not set to 0.
Change HTTP or HTTPS ports
By default, the XML Service on the Controller listens on port 80 for HTTP traffic and port 443 for HTTPS traffic. Although you can use non-default ports, be aware of the security risks of exposing a Controller to untrusted networks. Deploying a standalone StoreFront server is preferable to changing the defaults.
To change the default HTTP or HTTPS ports used by the Controller, run the following command from Studio:
BrokerService.exe -StoreFrontPort <http-port> -StoreFrontTlsPort <https-port>
where <http-port> is the port number for HTTP traffic and <https-port> is the port number for HTTPS traffic.
Note:
After changing a port, Studio might display a message about license compatibility and upgrading. To resolve the issue, re-register service instances using the following PowerShell cmdlet sequence:
Get-ConfigRegisteredServiceInstance -ServiceType Broker -Binding XML_HTTPS |
Unregister-ConfigRegisteredServiceInstance
Get-BrokerServiceInstance | where Binding -eq "XML_HTTPS" |
Register-ConfigServiceInstance
<!--NeedCopy-->
Share
Share
This Preview product documentation is Citrix Confidential.
You agree to hold this documentation confidential pursuant to the terms of your Citrix Beta/Tech Preview Agreement.
The development, release and timing of any features or functionality described in the Preview documentation remains at our sole discretion and are subject to change without notice or consultation.
The documentation is for informational purposes only and is not a commitment, promise or legal obligation to deliver any material, code or functionality and should not be relied upon in making Citrix product purchase decisions.
If you do not agree, select I DO NOT AGREE to exit.